---
title: VPC Peering with AWS
description: To secure network traffic, you can configure a private network
connection between a Capella Analytics cluster and an Amazon Web Services
(AWS) account through virtual private cloud (VPC) peering.
pubDate: 2026-08-17T09:53:44.266Z
antora:
editUrl: https://github.com/couchbaselabs/docs-columnar/edit/main/modules/admin/pages/vpc-peering.adoc
xref: xref:analytics:admin:vpc-peering.adoc[]
---
[Consult the llms.txt file for a full list of contents](/llms.txt)
[View original HTML](/analytics/admin/vpc-peering.html)
# VPC Peering with AWS
> To secure network traffic, you can configure a private network connection between a Capella Analytics cluster and an Amazon Web Services (AWS) account through virtual private cloud (VPC) peering.
## [](#columnar-vpc-peer-preq)Prerequisites
To configure VPC peering between your Capella Analytics cluster and Amazon Web Services (AWS), you need:
* One of the following Capella roles:
* Organization Owner
* Project Owner
* Access to the [Amazon VPC console](https://console.aws.amazon.com/vpc/) and information about your AWS network, including:
* AWS Account ID
* AWS VPC ID
* CIDR Block
* Regions
* The [AWS Command Line Interface (CLI)](https://docs.aws.amazon.com/cli/latest/userguide/cli-chap-welcome.html) installed and configured.
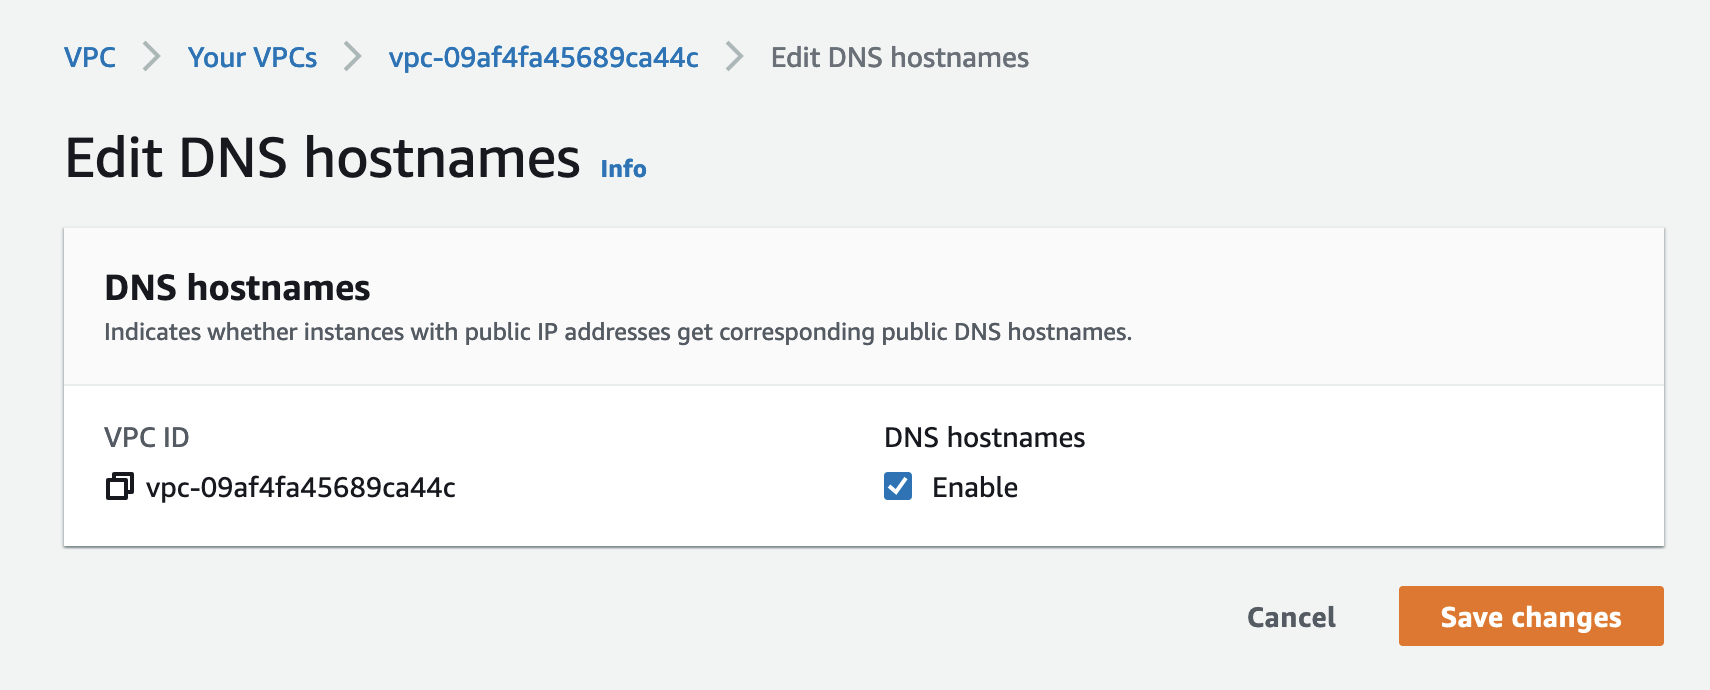
* In AWS, enable **DNS hostnames** for your AWS VPC.
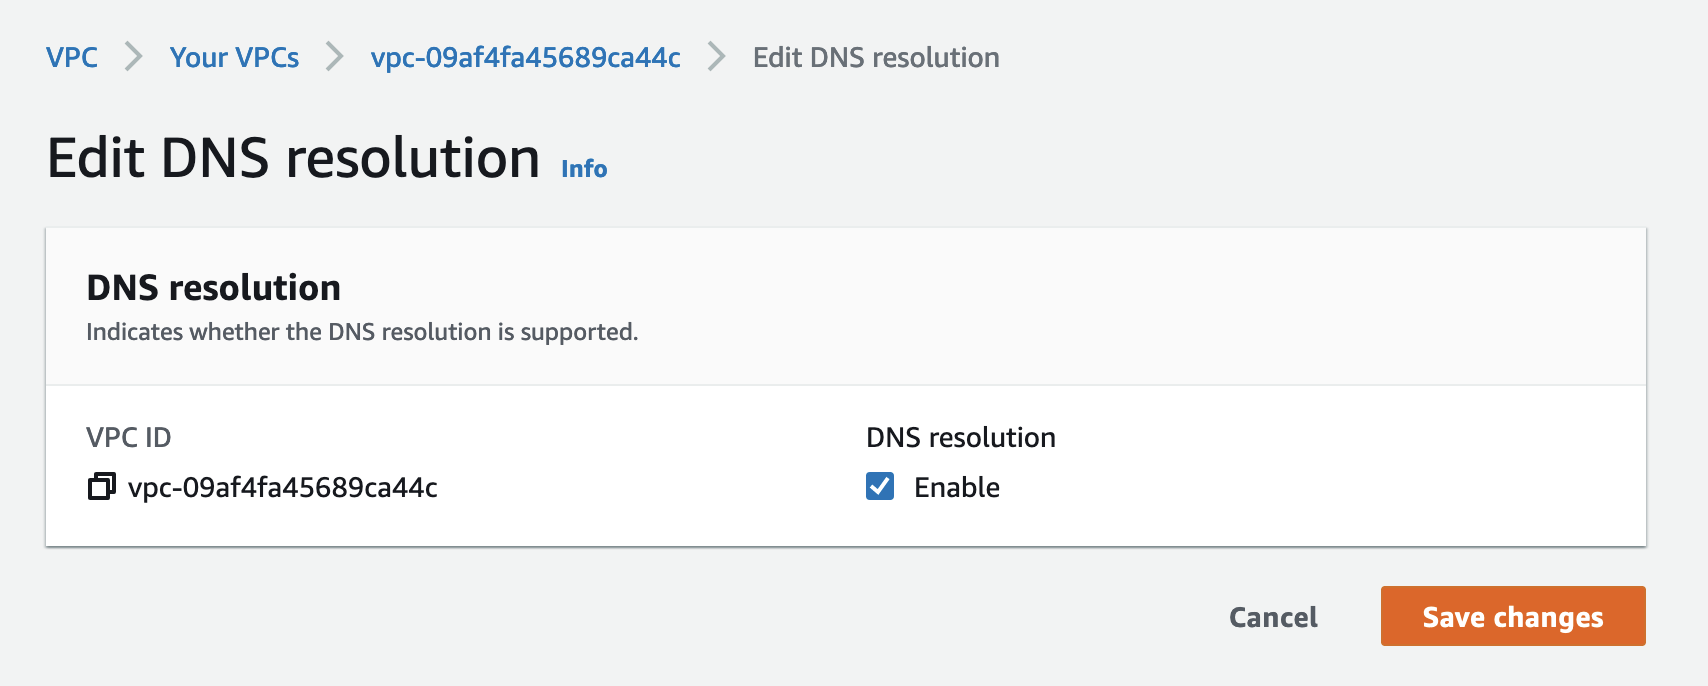
* In AWS, enable **DNS resolution** for your AWS VPC.
* Make sure the CIDR block specified when creating your Capella Analytics cluster does not overlap with the application VPC CIDR block.
## [](#set-up-vpc-peering)Set Up VPC Peering
1. In the Capella UI, select the **Capella Analytics** tab and select a cluster where you want to create the new private network.
2. Click **Settings** **VPC Peering**.
3. Click **Set Up VPC**.
4. Confirm that the prerequisite AWS services are set up: **Virtual Network Peering** and **Route 53**. Click **Next**.
5. Enter the following network details:
> [!TIP]
> You can use the [Amazon VPC console](https://console.aws.amazon.com/vpc/) to locate most of this information.
Name
Enter an identifying name for display in Capella.
AWS Account ID
The numeric AWS Account ID.
Virtual Network ID
The alphanumeric VPC ID which starts with `vpc-`.
Available Regions
The AWS region where your VPC is deployed.
CIDR Block
The AWS VPC CIDR block of network in which your application runs. This CIDR block cannot overlap with the CIDR block of your Capella Analytics cluster.
6. Click **Set Up VPC**.
Capella sets up the private network. It typically takes up to a minute.
On success, the private network appears on the list of private networks. You may briefly see the cluster enter a "Deploying" state while Capella sets up the new connection.
> [!CAUTION]
> While the network status is "Complete," there are some final steps you must carry out before you can access your Capella Analytics cluster from your VPC using VPC peering.
7. Click the name of the new private network.
8. A page opens with commands that you must run in the AWS CLI. These commands:
* Accept the peering request.
* Link your VPC to the appropriate DNS server for hostname resolution.
You must run the two AWS CLI commands to accept the peering request and link your VPC to the appropriate DNS server for hostname resolution. Once you run these commands, their output should be similar to the following example:
```console
$ aws ec2 accept-vpc-peering-connection --region=us-west-2 --vpc-peering-connection-id=pcx-004adebd9bf32a24f
```
```console
{
"VpcPeeringConnection": {
"AccepterVpcInfo": {
"CidrBlock": "10.0.0.0/20",
"CidrBlockSet": [
{
"CidrBlock": "10.0.0.0/20"
}
],
"OwnerId": "264138468394",
"PeeringOptions": {
"AllowDnsResolutionFromRemoteVpc": false,
"AllowEgressFromLocalClassicLinkToRemoteVpc": false,
"AllowEgressFromLocalVpcToRemoteClassicLink": false
},
"VpcId": "vpc-09af4fa45689ca44c",
"Region": "us-west-2"
},
"RequesterVpcInfo": {
"CidrBlock": "10.0.16.0/20",
"CidrBlockSet": [
{
"CidrBlock": "10.0.16.0/20"
}
],
"OwnerId": "689827245340",
"VpcId": "vpc-091c6caeba936ac48",
"Region": "us-east-1"
},
"Status": {
"Code": "provisioning",
"Message": "Provisioning"
},
"Tags": [],
"VpcPeeringConnectionId": "pcx-004adebd9bf32a24f"
}
}
```
```console
$ aws route53 associate-vpc-with-hosted-zone --hosted-zone-id=Z04089311NGVVH0FO3QGG --vpc=VPCId=vpc-09af4fa45689ca44c,VPCRegion=us-west-2 --region=us-east-1
```
```console
{
"ChangeInfo": {
"Id": "/change/C0508746QOHOO1XX5BH5",
"Status": "PENDING",
"SubmittedAt": "2021-12-03T16:58:38.401Z",
"Comment": ""
}
}
```
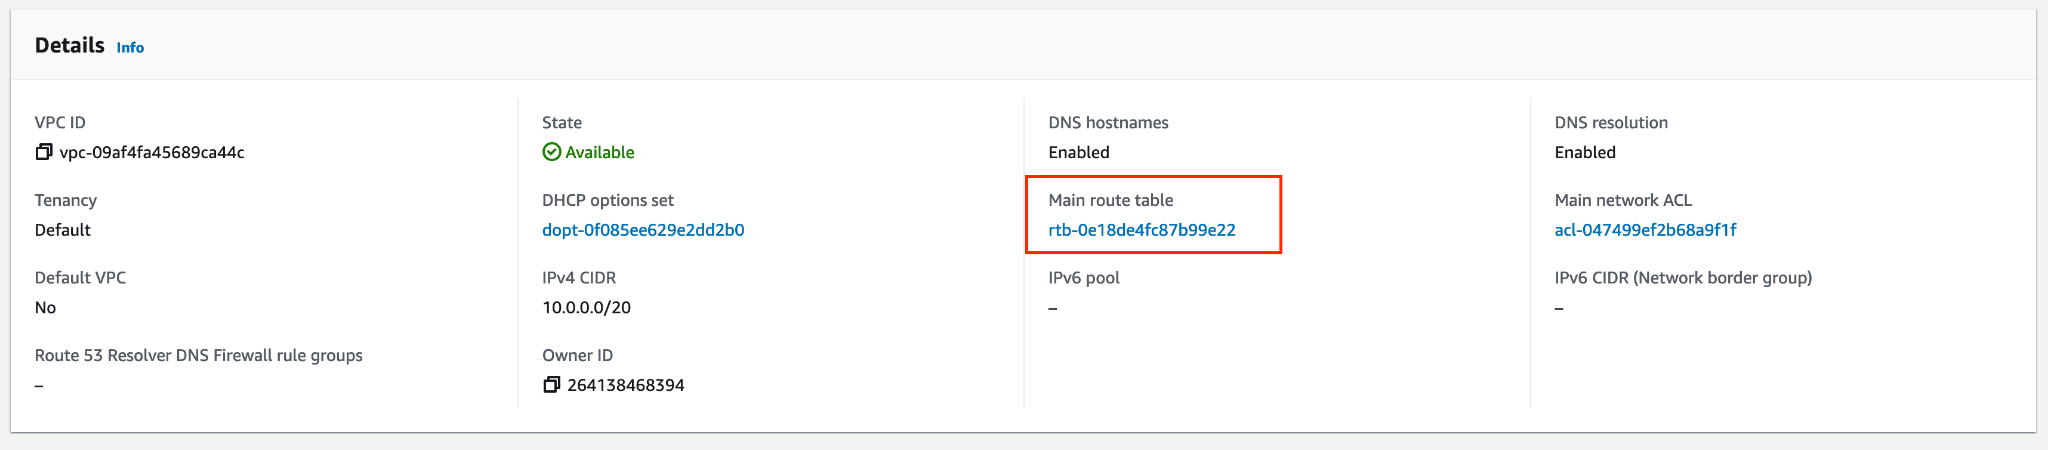
9. Update the route table for your application's VPC to make sure all traffic destined for your Capella Analytics cluster is appropriately routed:
1. Identify the route table for your application VPC:
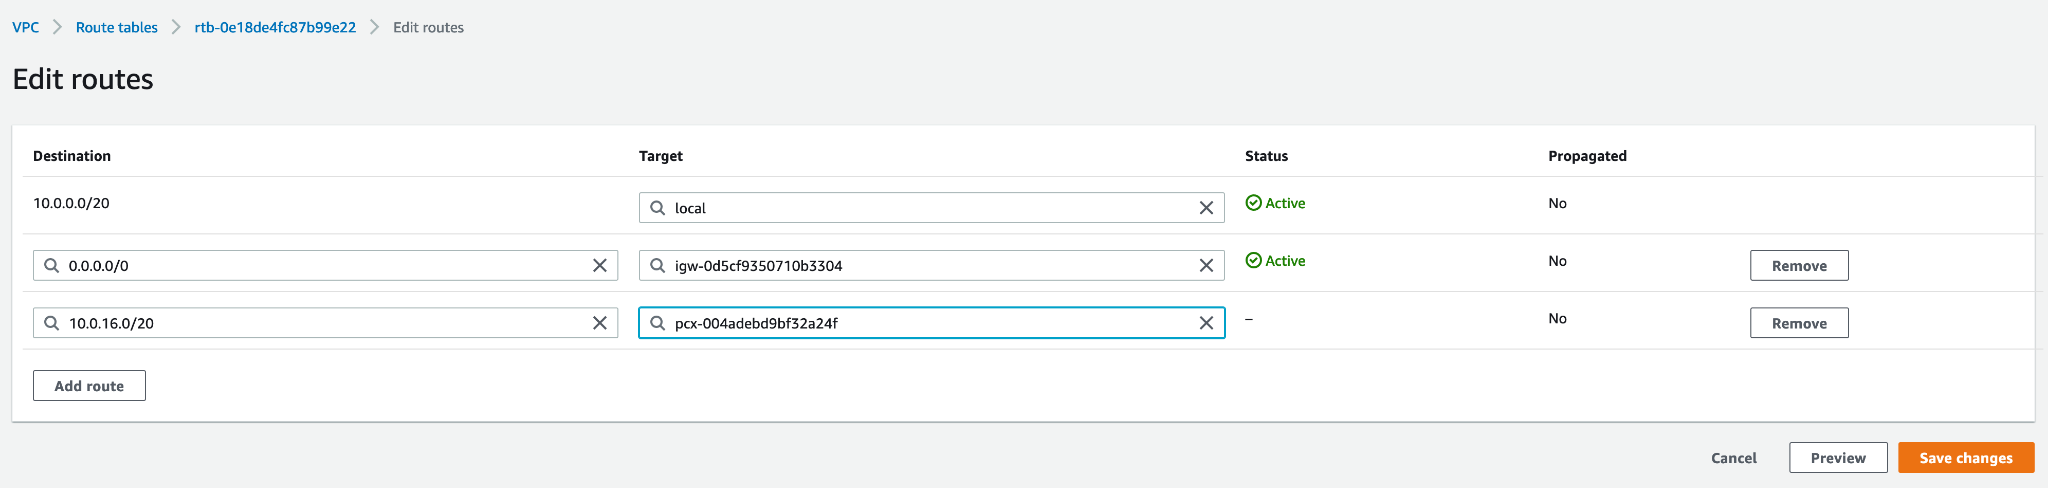
2. Edit the routes of this route table to add the Capella Analytics cluster as a new route.
Find the CIDR block of the Capella Analytics cluster, either from the Capella UI or from `RequesterVpcInfo` in the VPC peering request output. In this example, enter `10.0.16.0/20` as the destination. The target `VpcPeeringConnectionId` is `pcx-004adebd9bf32a24f` in this example.
10. If your VPC has any outbound security groups that limit outbound traffic to specific IPs, you must add the CIDR block for your Capella Analytics cluster to the outbound security group.
## [](#verify-vpc-peering-connectivity)Verify VPC Peering Connectivity
With a new VPC Peering connection, check that applications connecting from the application VPC are using the private network correctly.
### [](#hostname-resolution)Check Hostname Resolution
When an application connects to a Capella Analytics cluster, its first step is to resolve the hostnames of all nodes in the cluster. Use the following procedure to check that hostname resolution is working correctly:
1. In the Capella UI, retrieve the DNS SRV record for your cluster by clicking **Settings** **Connection String**.
2. With the DNS SRV record, use `nslookup` to resolve the hostname. For example:
```console
nslookup -type=SRV _couchbases._tcp.cb.a-lxzt-gdkzoqfuu.cloud.couchbase.com
```
```console
Server: 127.0.0.53
Address: 127.0.0.53#53
Non-authoritative answer:
_couchbases._tcp.cb.a-lxzt-gdkzoqfuu.cloud.couchbase.com service = 0 0 11207 9qvj8x-f2oxhahtz.a-lxzt-gdkzoqfuu.cloud.couchbase.com.
_couchbases._tcp.cb.a-lxzt-gdkzoqfuu.cloud.couchbase.com service = 0 0 11207 jkzlapnfpklgjhtl.a-lxzt-gdkzoqfuu.cloud.couchbase.com.
_couchbases._tcp.cb.a-lxzt-gdkzoqfuu.cloud.couchbase.com service = 0 0 11207 4ncgebm6lmtbxmkr.a-lxzt-gdkzoqfuu.cloud.couchbase.com.
```
3. Use `nslookup` to resolve one of the hostnames returned from the SRV record. For example:
```console
nslookup 9qvj8x-f2oxhahtz.a-lxzt-gdkzoqfuu.cloud.couchbase.com
```
```console
Server: 127.0.0.53
Address: 127.0.0.53#53
Non-authoritative answer:
Name: 9qvj8x-f2oxhahtz.a-lxzt-gdkzoqfuu.cloud.couchbase.com
Address: 10.0.18.110
```
4. When the DNS resolution is working correctly, `nslookup` returns the private IP of the Capella node—an IP from the cluster's CIDR block. If the `nslookup` returns the public IP for this node and you're using AWS, check that you have:
* Enabled DNS resolution
* Enabled DNS hostnames
* Associated the hosted zone with your VPC
### [](#check-network-connectivity)Check Network Connectivity
If DNS resolution is working correctly, use the following procedure to check the network connectivity between your application instances and your Capella Analytics cluster:
1. To check that the routing works for your VPC, use `traceroute` with one of the nodes in your cluster that you resolved when [checking DNS resolution](#hostname-resolution). For example:
```console
traceroute -T 9qvj8x-f2oxhahtz.a-lxzt-gdkzoqfuu.cloud.couchbase.com -p 18091
```
```console
traceroute to 9qvj8x-f2oxhahtz.a-lxzt-gdkzoqfuu.cloud.couchbase.com (10.0.18.110), 30 hops max, 60 byte packets
1 ip-10-0-18-110.us-west-2.compute.internal (10.0.18.110) 0.303 ms 0.288 ms 0.302 ms
```
2. The result from this `traceroute` should return quickly. If it's slow, this can indicate issues with your routing. Validate the route table associated with the VPC to check that you have associated the correct CIDR block with the VPC peering connection.
3. Use `curl` to validate that the node responding correctly over the private network:
```console
$ curl -k https://9qvj8x-f2oxhahtz.a-lxzt-gdkzoqfuu.cloud.couchbase.com:18091
```
```console
301 Moved PermanentlyMoved Permanently
The document has moved