---
title: "Developer Tutorial: Student Record System"
description: Learn how to create and deploy a student records database on
Capella Operational and connect it to your application, using the Java SDK.
pubDate: 2026-08-17T09:53:44.266Z
antora:
editUrl: https://github.com/couchbase/docs-sdk-java/edit/release/3.8/modules/hello-world/pages/student-record-developer-tutorial.adoc
xref: xref:3.8@java-sdk:hello-world:student-record-developer-tutorial.adoc[]
---
[Consult the llms.txt file for a full list of contents](/llms.txt)
[View original HTML](/java-sdk/3.8/hello-world/student-record-developer-tutorial.html)
# Developer Tutorial: Student Record System
> Learn how to create and deploy a student records database on Capella Operational and connect it to your application, using the Java SDK.
Couchbase is a schema-less JSON document database designed for high performance, scalability, and fast development. This tutorial teaches you about the key concepts behind Couchbase and how they differ from traditional SQL database systems like MySQL and Oracle.
> [!IMPORTANT]
> This tutorial is designed for use with Capella Operational cloud services. If you wish to use a standalone or Docker installation of Couchbase, see the [Server Developer Tutorial](../../../server/current/tutorials/couchbase-tutorial-student-records.md).
## [](#prerequisites)Prerequisites
* Before starting this tutorial, you must have a Couchbase Capella account. If you do not have one already, [Create an Account](../../../cloud/get-started/create-account.md).
* Install the Java Software Development Kit (JDK) — Couchbase JVM SDKs are compatible with version 8, 11, 17, or 21.
* The recommended version is the latest Java LTS release, which is currently [JDK 21](https://adoptium.net/en-GB/). Ensure you install the highest available patch for the LTS version.
* Install Apache Maven (version 3+)
> [!TIP]
> The easiest way to install and manage Java JDKs and Maven on your machine is through [SDKMan](https://sdkman.io/install).
>
> After following the instructions to install SDKMan, open a terminal window and run the commands `sdk install java` and `sdk install maven` to install the latest versions of Java and Maven.
## [](#database-design)Data Model
The model consists of three record types:
| **student** | Information about individual students, like name and date of birth. |
| -------------- | --------------------------------------------------------------------------------------------------------------------------------------------------------------------------- |
| **course** | Courses the students can take. Includes course name, faculty, and the number of credit points associated with the course. Students can take more than one course at a time. |
| **enrollment** | Information related to courses the students are taking. In a relational database, this is usually a link record that creates a relationship between a student and a course. |
### [](#relational-model)Relational Model
In a relational model, the database contains a list of students and a list of courses. Each student can enroll in multiple courses.
A student's enrollment record is stored in a separate table called `enrollment`, which links that record to the courses they are enrolling in.
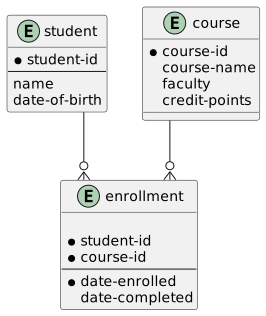
The `enrollment` table highlights a challenge with the relational model, each table is based on a fixed schema that only supports a single data object type, which means you cannot store a student in the same table as their enrollment record.
### [](#document-model)Document Model
Couchbase uses a document model that stores each record as a JSON document. The document model:
* Contains simple scalar types and complex types, like nested records and arrays
* Lets you store complex types without decomposing them to a second table
In this tutorial, the document model stores the list of enrollment records with the student records. Each enrollment record contains a reference to the course that it relates to.
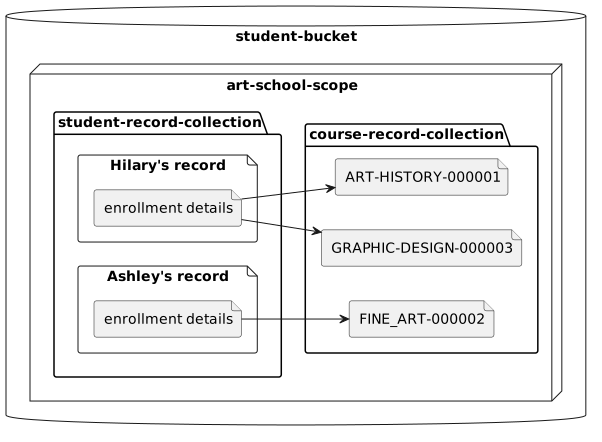
With JSON, you can change the structure of the document without having to rebuild schemas. For example, you can add a new field to store students' email addresses without migrating existing data to a new schema.
In a document database, a student's record and their course records can look similar to this:
Student record
```json
{
"student-id": "000001",
"name": "Hilary Smith",
"date-of-birth": "21-12-1980",
"enrollments": [
{
"course-id": "ART-HISTORY-00003",
"date-enrolled": "07-9-2021"
},
{
"course-id": "GRAPHIC-DESIGN-00001",
"date-enrolled": "15-9-2021"
}
]
}
```
Art history course record
```json
{
"course-id": "ART-HISTORY-00003",
"course-name": "art history",
"faculty": "fine art",
"credit-points" : 100
}
```
Graphic design course record
```json
{
"course-id": "GRAPHIC-DESIGN-00001",
"course-name": "graphic design",
"faculty": "media and communication",
"credit-points" : 200
}
```
Hilary's enrollment is stored in the same document as her student details, which means child information is stored with its parent. This structure lets you access and retrieve all of Hilary's details with one search and without the need for complex table joins.
> [!NOTE]
> You should not store a student with their course record as it can lead to data duplication and make it difficult to maintain your data. For example, you would need to access every single student record in your cluster to change the `credit-points`.
## [](#create-and-deploy-a-cluster)Create and Deploy a Cluster
Every Capella account includes one free tier operational cluster. In this tutorial, you will use the free tier cluster to create and manage student records.
To create and deploy a cluster:
1. Sign in to [Couchbase Capella](https://cloud.couchbase.com/).
2. On the **Operational Clusters** page, click **Create Cluster**.
3. Select **My First Project** as the project for your cluster. (If you've already created a project, you can select that instead.)
4. Under **Cluster Option**, select **Free**.
5. In the **Cluster Name** field, enter **student-cluster**.
6. (Optional) Provide a description of your cluster.
7. Select one of the available cloud service providers.
8. Select an available geographic region for your cluster.
> [!TIP]
> If you are unsure which cloud provider and region to choose, select the default options, for example **AWS** and **US East**.
9. Accept the default **CIDR Block** for your cluster.
10. Click **Create Cluster** to deploy the cluster.
The cluster may take a few minutes to deploy. When the cluster is deployed, you can implement a data model.
## [](#buckets-scopes-and-collections)Buckets, Scopes, and Collections
To organize and manage your data in Couchbase, you can create buckets, scopes, and collections inside your cluster.
A bucket is equivalent to a database in a relational database management system, while scopes and collections are used to provide separation between documents of different types.
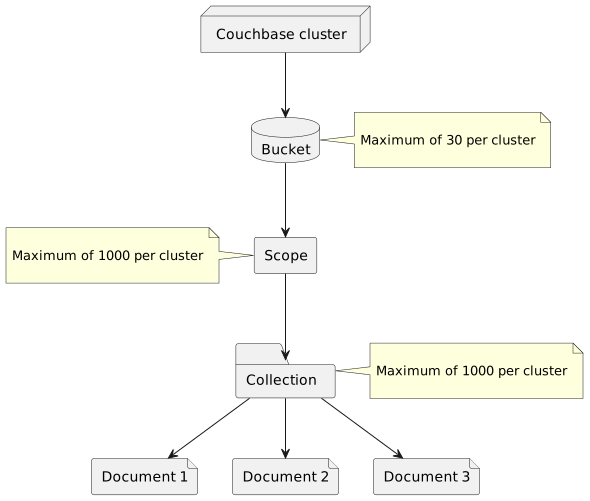
| bucket | Stores and retrieves data in the server. |
| ---------- | --------------------------------------------------------------------------------------------------------------- |
| scope | Stores collections. When you create a new bucket, Couchbase provides you with a default scope called \_default. |
| collection | Contains a set of documents. Couchbase provides you with a default collection called \_default. |
For more information, see [Buckets, Scopes, and Collections](../../../cloud/clusters/data-service/about-buckets-scopes-collections.md).
### [](#create-a-bucket-scope-and-collection)Create a Bucket, Scope, and Collection
To continue this tutorial, you must create a bucket to hold all student data, a scope to narrow down the data into only data related to an art school, and two collections to narrow it down further into art school students and art school courses.
To create the data model from the Capella UI:
1. On the **Operational** tab, select **student-cluster**.
2. Click the **Data Tools** tab.
3. In the left pane, click **\+ Create**.
4. Under **Bucket**, select **New** and enter the name `student-bucket`. Keep the default 100 MiB memory quota.
5. Under **Scope**, enter the name `art-school-scope`.
6. Under **Collection**, enter the name `student-record-collection` for your first collection.
7. Click **Create**.
To create the second collection, follow the above steps but use the existing `student-bucket` and `art-school-scope`, and then create a collection with the name `course-record-collection`.
The two collections allow you to use the relational model and the document model at the same time to achieve the best design and performance possible.
The `student-record-collection` contains student records, and each student record contains a list of that student's enrollments. Unlike the standard relational model decomposition where a link table is created between students and courses, a document model stores the enrollments as part of the student records.
The `course-record-collection`, on the other hand, uses the relational model to link the enrollment records to the course records they apply to. This allows you to retrieve other details like the full title of the course or the number of credits students receive upon completing the course.
> [!TIP]
> Scopes and Schools
>
> For this tutorial we have a single scope, `art-school-scope`. In a larger application, you may have other faculties, such as `engineering-school-scope` — or possibly have a scope for each art school across a district, repeating the course collections within each one, as appropriate.
## [](#connecting-the-java-sdk)Connecting the Java SDK
After implementing the data model, you can set up a Couchbase SDK and connect it to your cluster to write your first application. We will be using Maven here — for more information about the Java SDK installation, see the [full installation page](../project-docs/sdk-full-installation.md), or review the [Getting Started page](start-using-sdk.md).
### [](#configure-the-cluster-connection)Configure the Cluster Connection
Before you can establish a connection to your cluster, you must obtain the connection string, add an allowed IP address, and configure the cluster access credentials.
To configure the connection:
1. On the **Operational Clusters** page, select **student-cluster**.
2. Go to **Connect** **SDKs**.
3. Make a note of the **Public Connection String**. You will need this to connect to the cluster.
4. Add an allowed IP address.
1. From **Connect** **SDKs**, click the **Allowed IP Addresses** link to go to the **Allowed IP Addresses** page.
2. Click **Add Allowed IP**.
3. On the **Add Allowed IP** page, select **Add Current IP Address** to automatically populate your public IP address.
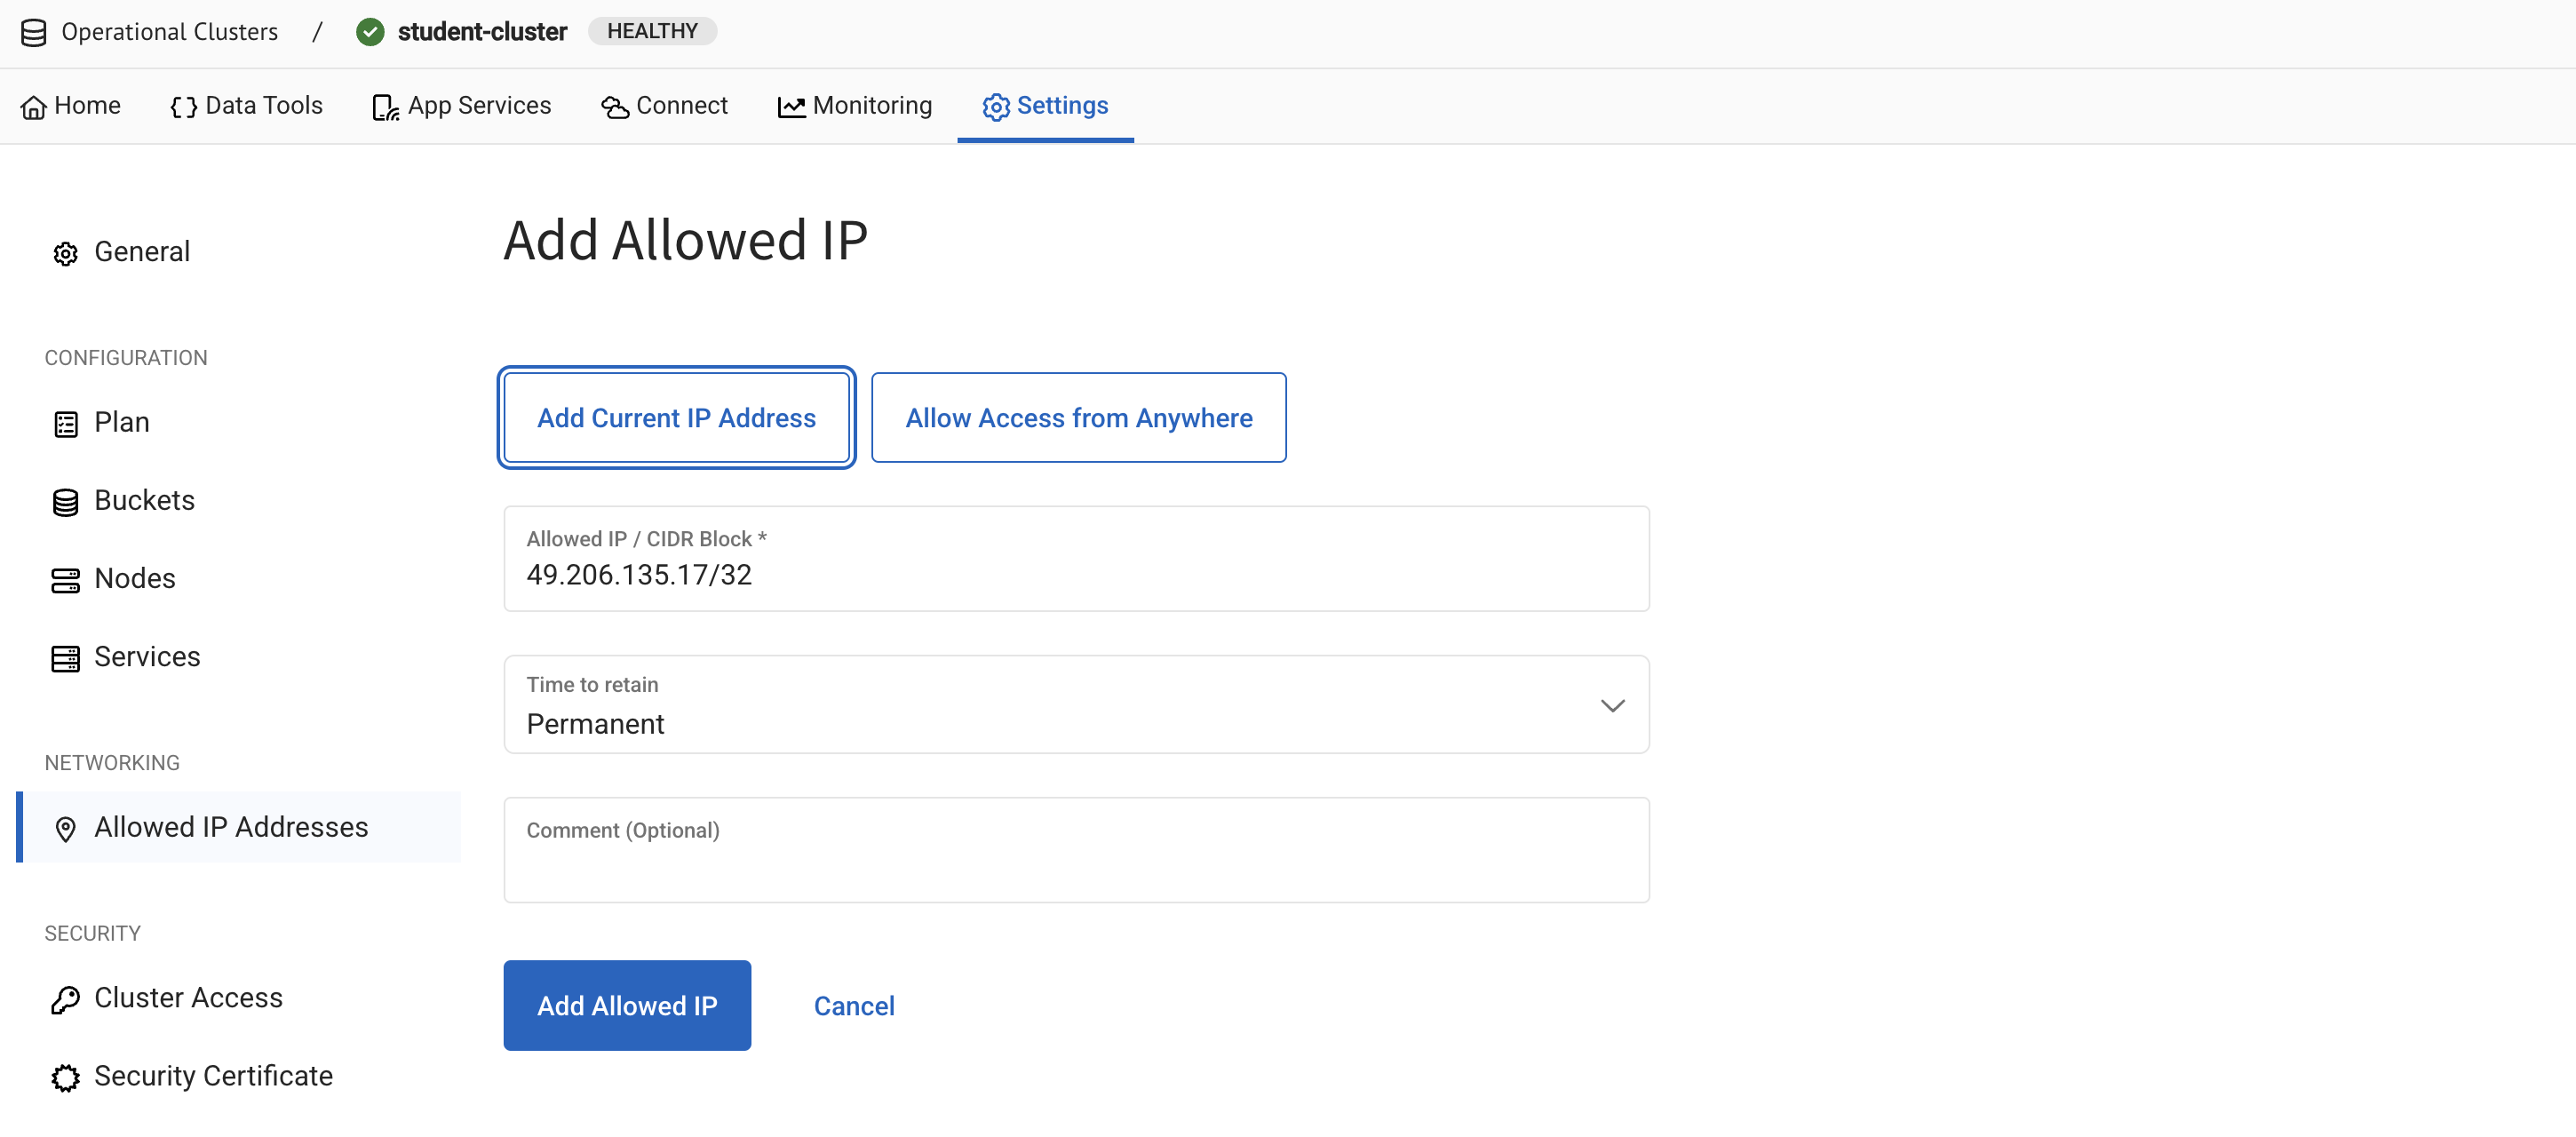
4. Click **Add Allowed IP**.
5. Create new cluster access credentials.
1. From **Connect** **SDKs**, click the **Cluster Access** link to go to the **Cluster Access** page.
2. Click **Create Cluster Access**.
3. Enter an access name, for example `administrator`, and make a note of it for later.
4. Enter a password, for example `Admin@123`, and again make a note of it for later.
5. Under **Bucket-Level Access**, select **student-bucket** and **art-school-scope**, and set the access to **Read/Write**.
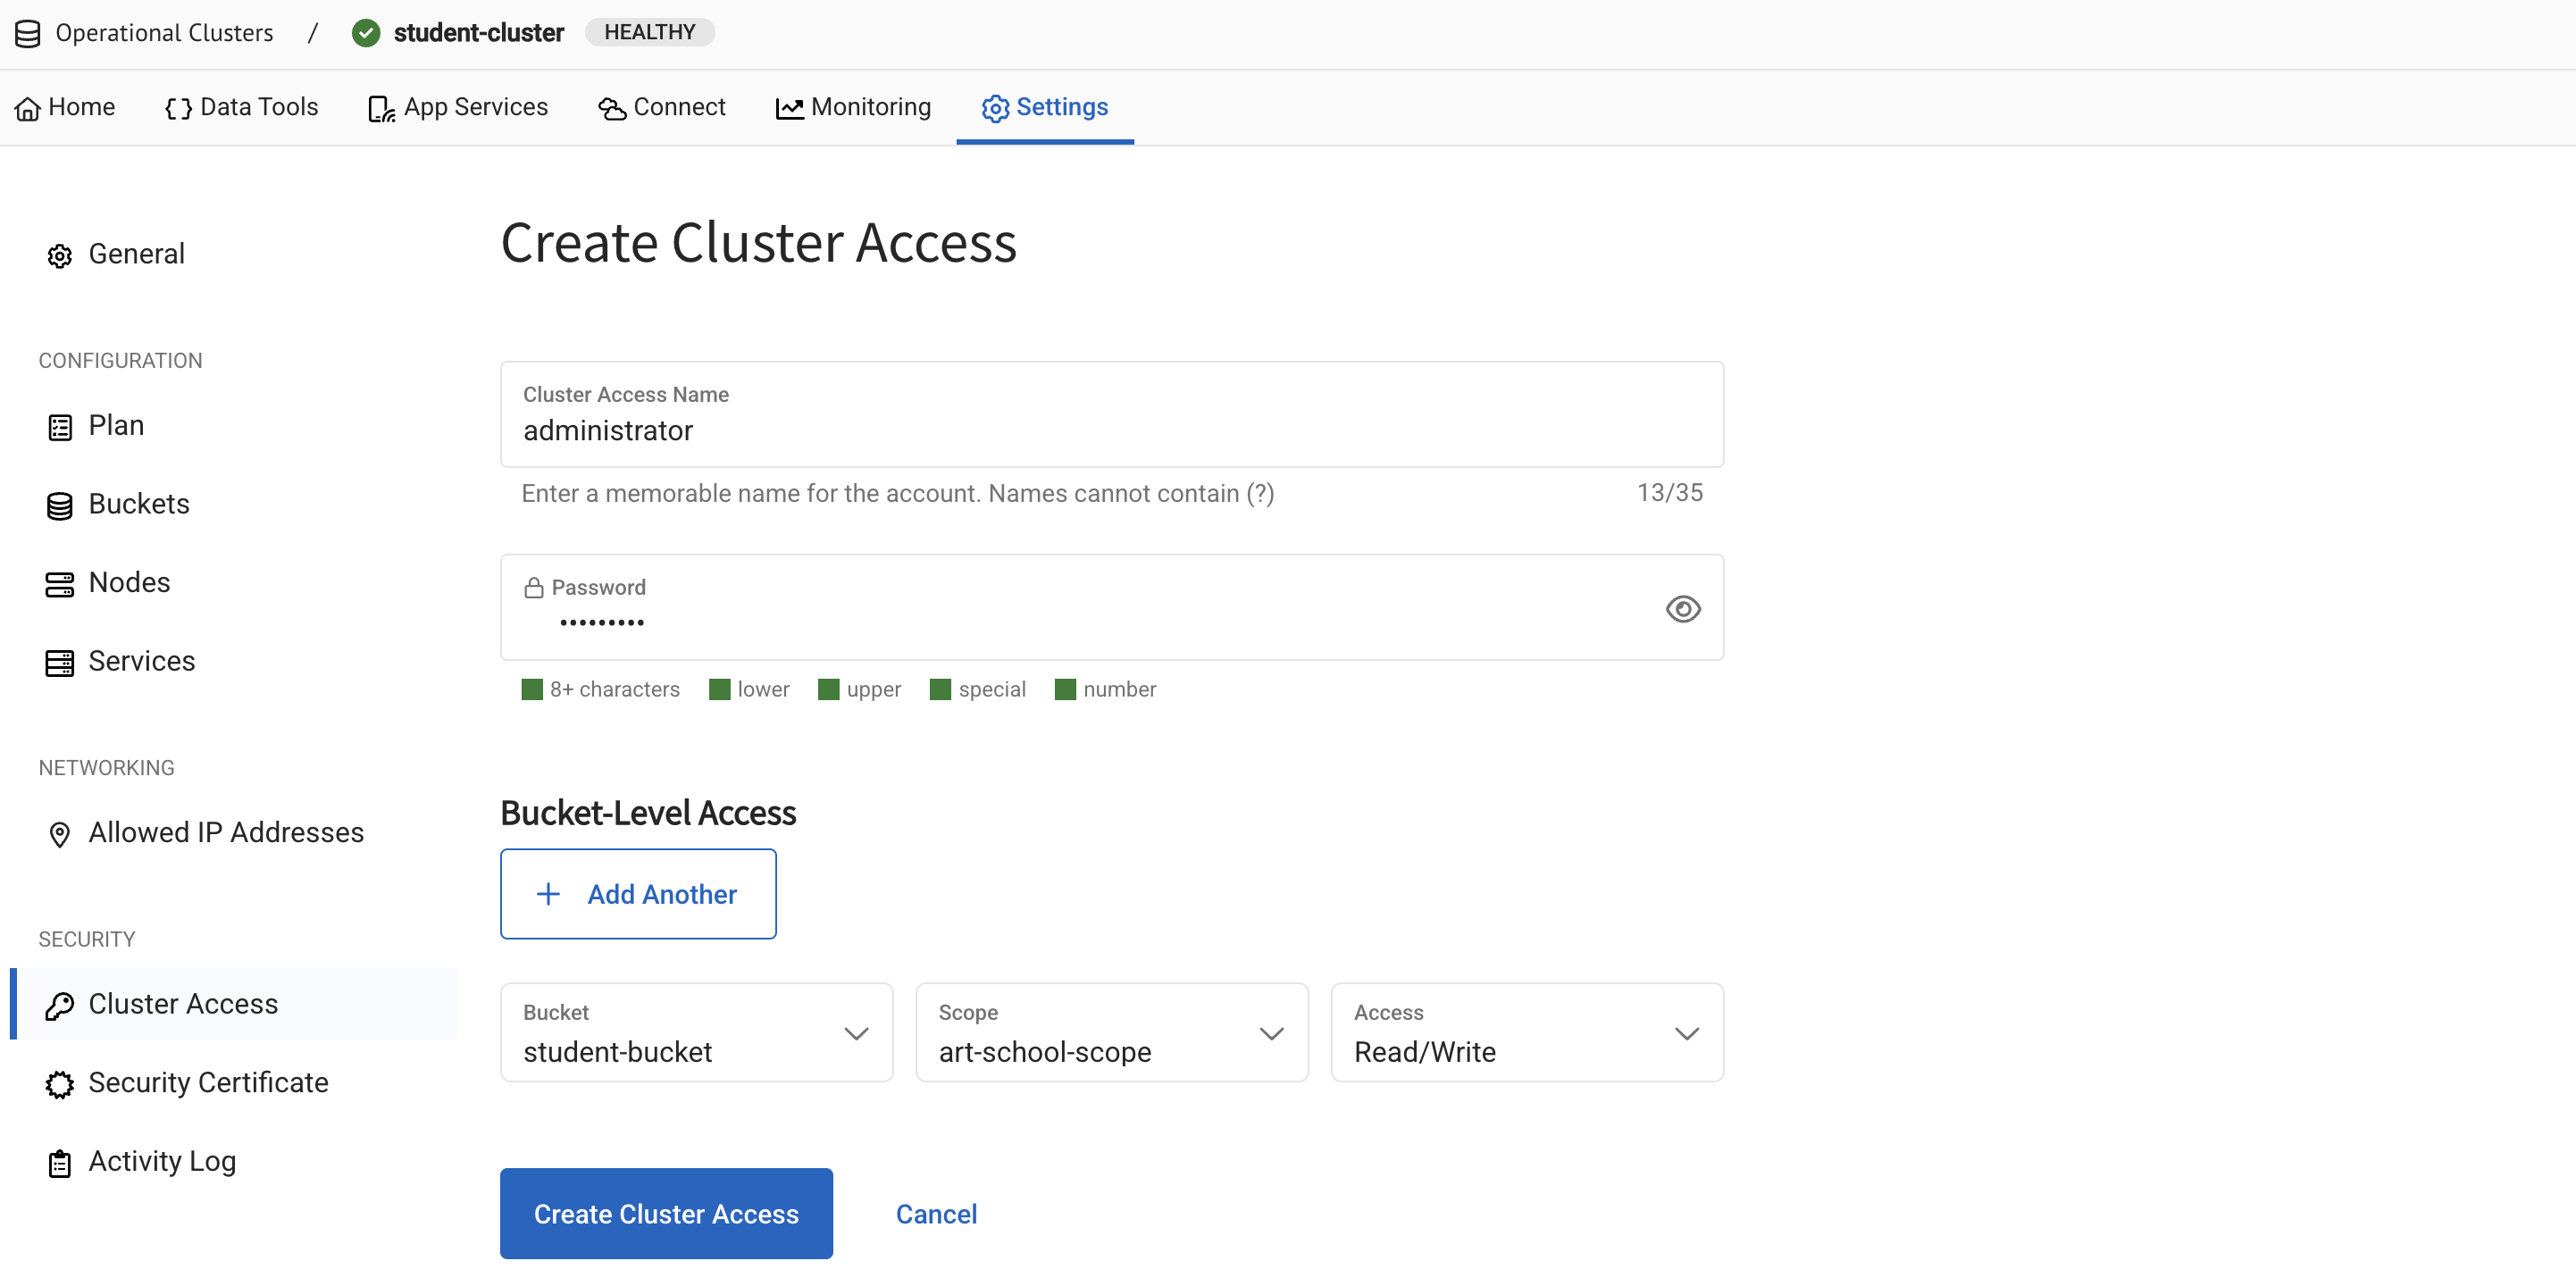
6. Click **Create Cluster Access**.
You can now set up a Couchbase Java SDK and connect it to your cluster.
### [](#set-up-the-java-sdk)Set Up the Java SDK
To set up the Java SDK:
1. Create the following directory structure on your computer:
📂 ~ (your home directory)
📂 student
📂 src
📂 main
📂 java
2. In the `student` directory, create a new file called `pom.xml`.
📂 ~ (your home directory)
📂 student
📃 pom.xml ⬅ here!
📂 src
📂 main
📂 java
3. Paste the following code block into your `pom.xml` file:
```xml
4.0.0
org.example
couchbase-java
1.0-SNAPSHOT
16
16
UTF-8
${encoding}
${encoding}
${encoding}
${encoding}
com.couchbase.client
java-client
3.8.3
org.slf4j
slf4j-api
2.0.9
org.slf4j
slf4j-simple
2.0.9
```
4. Open a terminal window and navigate to your `student` directory.
5. Run the command `mvn install` to pull in all the dependencies and finish your SDK setup.
Next, connect your Java SDK to your cluster.
### [](#connect-to-the-cluster)Connect the SDK to Your Cluster
To connect to the cluster:
1. In your `java` directory, create a new file called `ConnectStudent.java`.
📂 ~ (your home directory)
📂 student
📃 pom.xml
📂 src
📂 main
📂 java
📃 ConnectStudent.java ⬅ here!
2. Paste the following code block into your `ConnectStudent.java` file:
```java
import com.couchbase.client.java.Bucket;
import com.couchbase.client.java.Cluster;
import com.couchbase.client.java.Collection;
import com.couchbase.client.java.Scope;
import com.couchbase.client.java.ClusterOptions;
import java.time.Duration;
public class ConnectStudent {
public static void main(String[] args) {
String connectionString = "<>"; // Replace this with Connection String
String username = "<>"; // Replace this with username from cluster access credentials
String password = "<>"; // Replace this with password from cluster access credentials
//Connecting to the cluster
Cluster cluster = Cluster.connect(connectionString, ClusterOptions.clusterOptions(username, password)
// Use the pre-configured profile below to avoid latency issues with your connection.
.environment(env -> env.applyProfile("wan-development"))
);
// The `cluster.bucket` retrieves the bucket you set up for the student cluster.
Bucket bucket = cluster.bucket("student-bucket");
// Most of the Couchbase APIs are non-blocking.
// When you call one of them, your application carries on and continues to perform other actions while the function you called executes.
// When the function has finished executing, it sends a notification to the caller and the output of the call is processed.
// While this usually works, in this code sample the application carries on without waiting for the bucket retrieval to complete after you make the call to `cluster.bucket`.
// This means that you now have to try to retrieve the scope from a bucket object that has not been fully initialized yet.
// To fix this, you can use the `waitUntilReady` call.
// This call forces the application to wait until the bucket object is ready.
bucket.waitUntilReady(Duration.ofSeconds(10));
// The `bucket.scope` retrieves the `art-school-scope` from the bucket.
Scope scope = bucket.scope("art-school-scope");
// The `scope.collection` retrieves the student collection from the scope.
Collection student_records = scope.collection("student-record-collection");
// A check to make sure the collection is connected and retrieved when you run the application.
// You can see the output using maven.
System.out.println("The name of this collection is " + student_records.name());
// Like with all database systems, it's good practice to disconnect from the Couchbase cluster after you have finished working with it.
cluster.disconnect();
}
}
```
3. In the `ConnectStudent.java` file, replace the `<>`, `<>`, and `<>` placeholders with the connection string, username, and password that you noted when configuring the cluster connection.
> [!IMPORTANT]
> You must re-run `mvn install` in your `student` directory whenever you make a change to a java file to rebuild your application.
4. Open a terminal window and navigate to your `student` directory.
5. Run the command `mvn install` to pull in all the dependencies and rebuild your application.
6. Run the following command to check that the connection works:
```console
mvn exec:java -Dexec.mainClass="ConnectStudent" -Dexec.cleanupDaemonThreads=false
```
If the connection is successful, the collection name outputs in the console log.
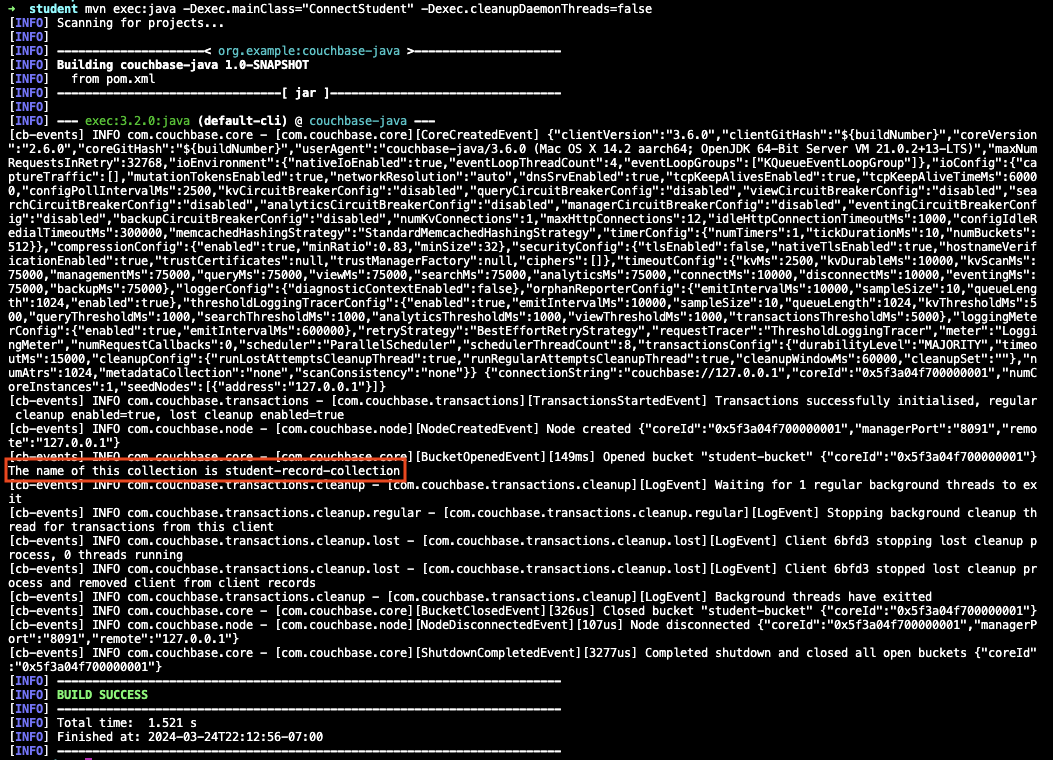
If you come across errors in your console, see the [troubleshooting section](#roubleshooting).
## [](#create-a-student-record)Create a Student Record
After connecting to the cluster, you can create a student record in the form of a JSON document inserted into the `student-record-collection`.
To create a student record:
1. In your `java` directory, create a new file called `InsertStudent.java`.
2. Paste the following code block into your `InsertStudent.java` file:
```java
import com.couchbase.client.java.Bucket;
import com.couchbase.client.java.Cluster;
import com.couchbase.client.java.Collection;
import com.couchbase.client.java.Scope;
import com.couchbase.client.java.json.JsonObject;
import com.couchbase.client.java.ClusterOptions;
import java.time.Duration;
import java.time.LocalDate;
import java.time.format.DateTimeFormatter;
public class InsertStudent {
public static void main(String[] args) {
String connectionString = "<>"; // Replace this with Connection String
String username = "<>"; // Replace this with username from cluster access credentials
String password = "<>"; // Replace this with password from cluster access credentials
Cluster cluster = Cluster.connect(connectionString, ClusterOptions.clusterOptions(username, password)
.environment(env -> env.applyProfile("wan-development"))
);
Bucket bucket = cluster.bucket("student-bucket");
bucket.waitUntilReady(Duration.ofSeconds(10));
Scope scope = bucket.scope("art-school-scope");
Collection student_records = scope.collection("student-record-collection");
// This `JsonObject` class creates and populates the student record.
JsonObject hilary = JsonObject.create()
.put("name", "Hilary Smith")
.put("date-of-birth",
LocalDate.of(1980, 12, 21)
.format(DateTimeFormatter.ISO_DATE));
// The `upsert` function inserts or updates documents in a collection.
// The first parameter is a unique ID for the document, similar to a primary key used in a relational database system.
// If the `upsert` call finds a document with a matching ID in the collection, it updates the document.
// If there is no matching ID, it creates a new document.
student_records.upsert("000001", hilary);
cluster.disconnect();
}
}
```
3. In the `InsertStudent.java` file, replace the `<>`, `<>`, and `<>` placeholders with the connection string, username, and password that you noted when configuring the cluster connection.
4. Open a terminal window and navigate to your `student` directory.
5. Run the command `mvn install` to pull in all the dependencies and rebuild your application.
6. Run the following command to insert the student record into the collection:
```sh
mvn exec:java -Dexec.mainClass="InsertStudent" -Dexec.cleanupDaemonThreads=false
```
7. From the Capella UI, go to your student cluster and check the `student-record-collection` for the new student record you just added:
1. Go to **Data Tools** **Documents**.
2. Under **Get documents from**, select `student-bucket`, `art-school-scope`, and `student-record-collection`.
3. Click **Get Documents**.
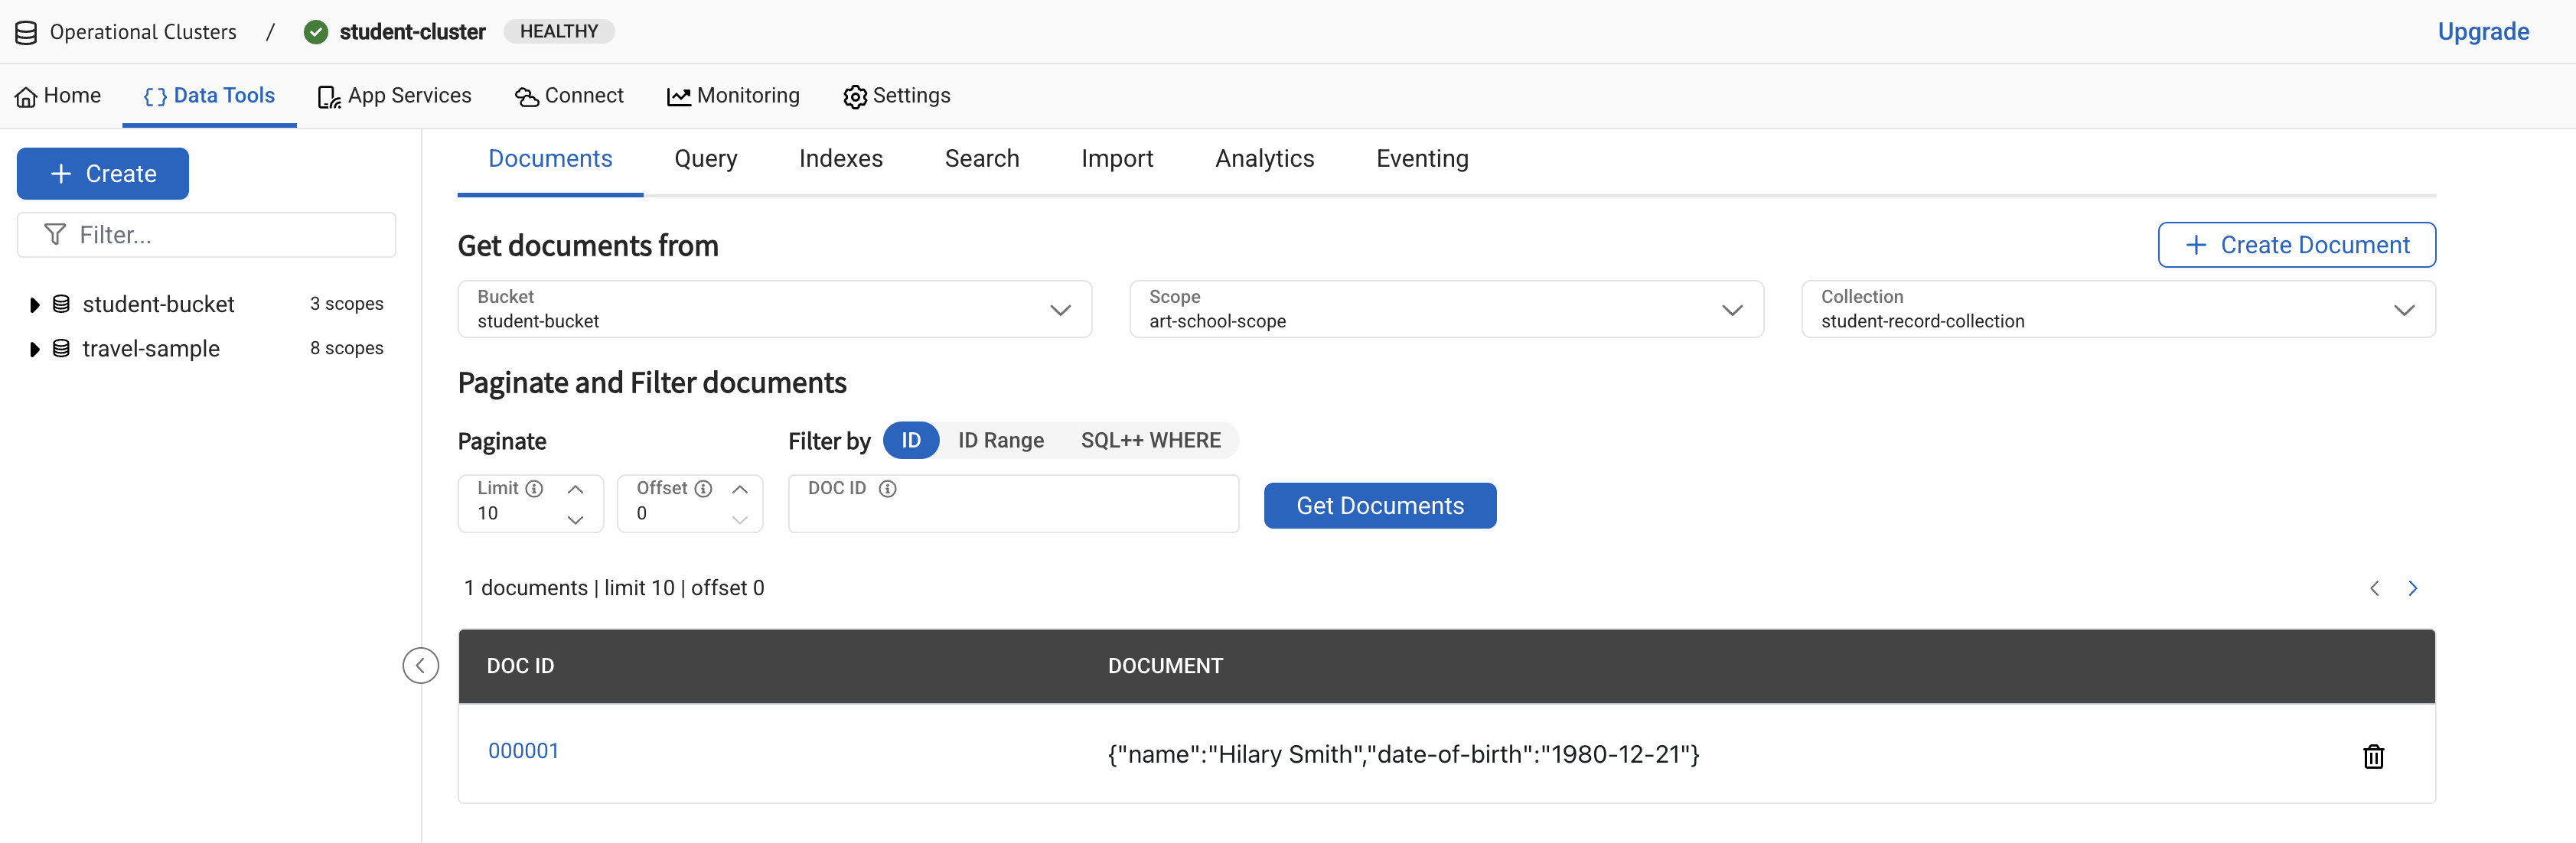
### [](#create-course-records)Create Course Records
Creating course records is similar to creating student records. To create course records:
1. In your `java` directory, create a new file called `InsertCourses.java`.
2. Paste the following code block into your `InsertCourses.java` file:
```java
import com.couchbase.client.java.Bucket;
import com.couchbase.client.java.Cluster;
import com.couchbase.client.java.Collection;
import com.couchbase.client.java.Scope;
import com.couchbase.client.java.json.JsonObject;
import com.couchbase.client.java.ClusterOptions;
import java.time.Duration;
public class InsertCourses {
public static void main(String[] args) {
String connectionString = "<>"; // Replace this with Connection String
String username = "<>"; // Replace this with username from cluster access credentials
String password = "<>"; // Replace this with password from cluster access credentials
Cluster cluster = Cluster.connect(connectionString, ClusterOptions.clusterOptions(username, password)
.environment(env -> env.applyProfile("wan-development"))
);
Bucket bucket = cluster.bucket("student-bucket");
bucket.waitUntilReady(Duration.ofSeconds(10));
Scope scope = bucket.scope("art-school-scope");
// The code here is similar to creating a student record, but it writes to a different collection.
Collection course_records = scope.collection("course-record-collection");
addCourse(course_records, "ART-HISTORY-000001", "art history", "fine art", 100);
addCourse(course_records, "FINE-ART-000002", "fine art", "fine art", 50);
addCourse(course_records, "GRAPHIC-DESIGN-000003", "graphic design", "media and communication", 200);
cluster.disconnect();
}
private static void addCourse(Collection collection, String id, String name,
String faculty, int creditPoints) {
JsonObject course = JsonObject.create()
.put("course-name", name)
.put("faculty", faculty)
.put("credit-points", creditPoints);
collection.upsert(id, course);
}
}
```
3. In the `InsertCourses.java` file, replace the `<>`, `<>`, and `<>` placeholders with the connection string, username, and password that you noted when configuring the cluster connection.
4. Open a terminal window and navigate to your `student` directory.
5. Run the command `mvn install` to pull in all the dependencies and rebuild your application.
6. Run the following command to insert the student record into the collection:
```sh
mvn exec:java -Dexec.mainClass="InsertCourses" -Dexec.cleanupDaemonThreads=false
```
7. From the Capella UI, go to your student cluster and check the `course-record-collection` for the new course records you just added.
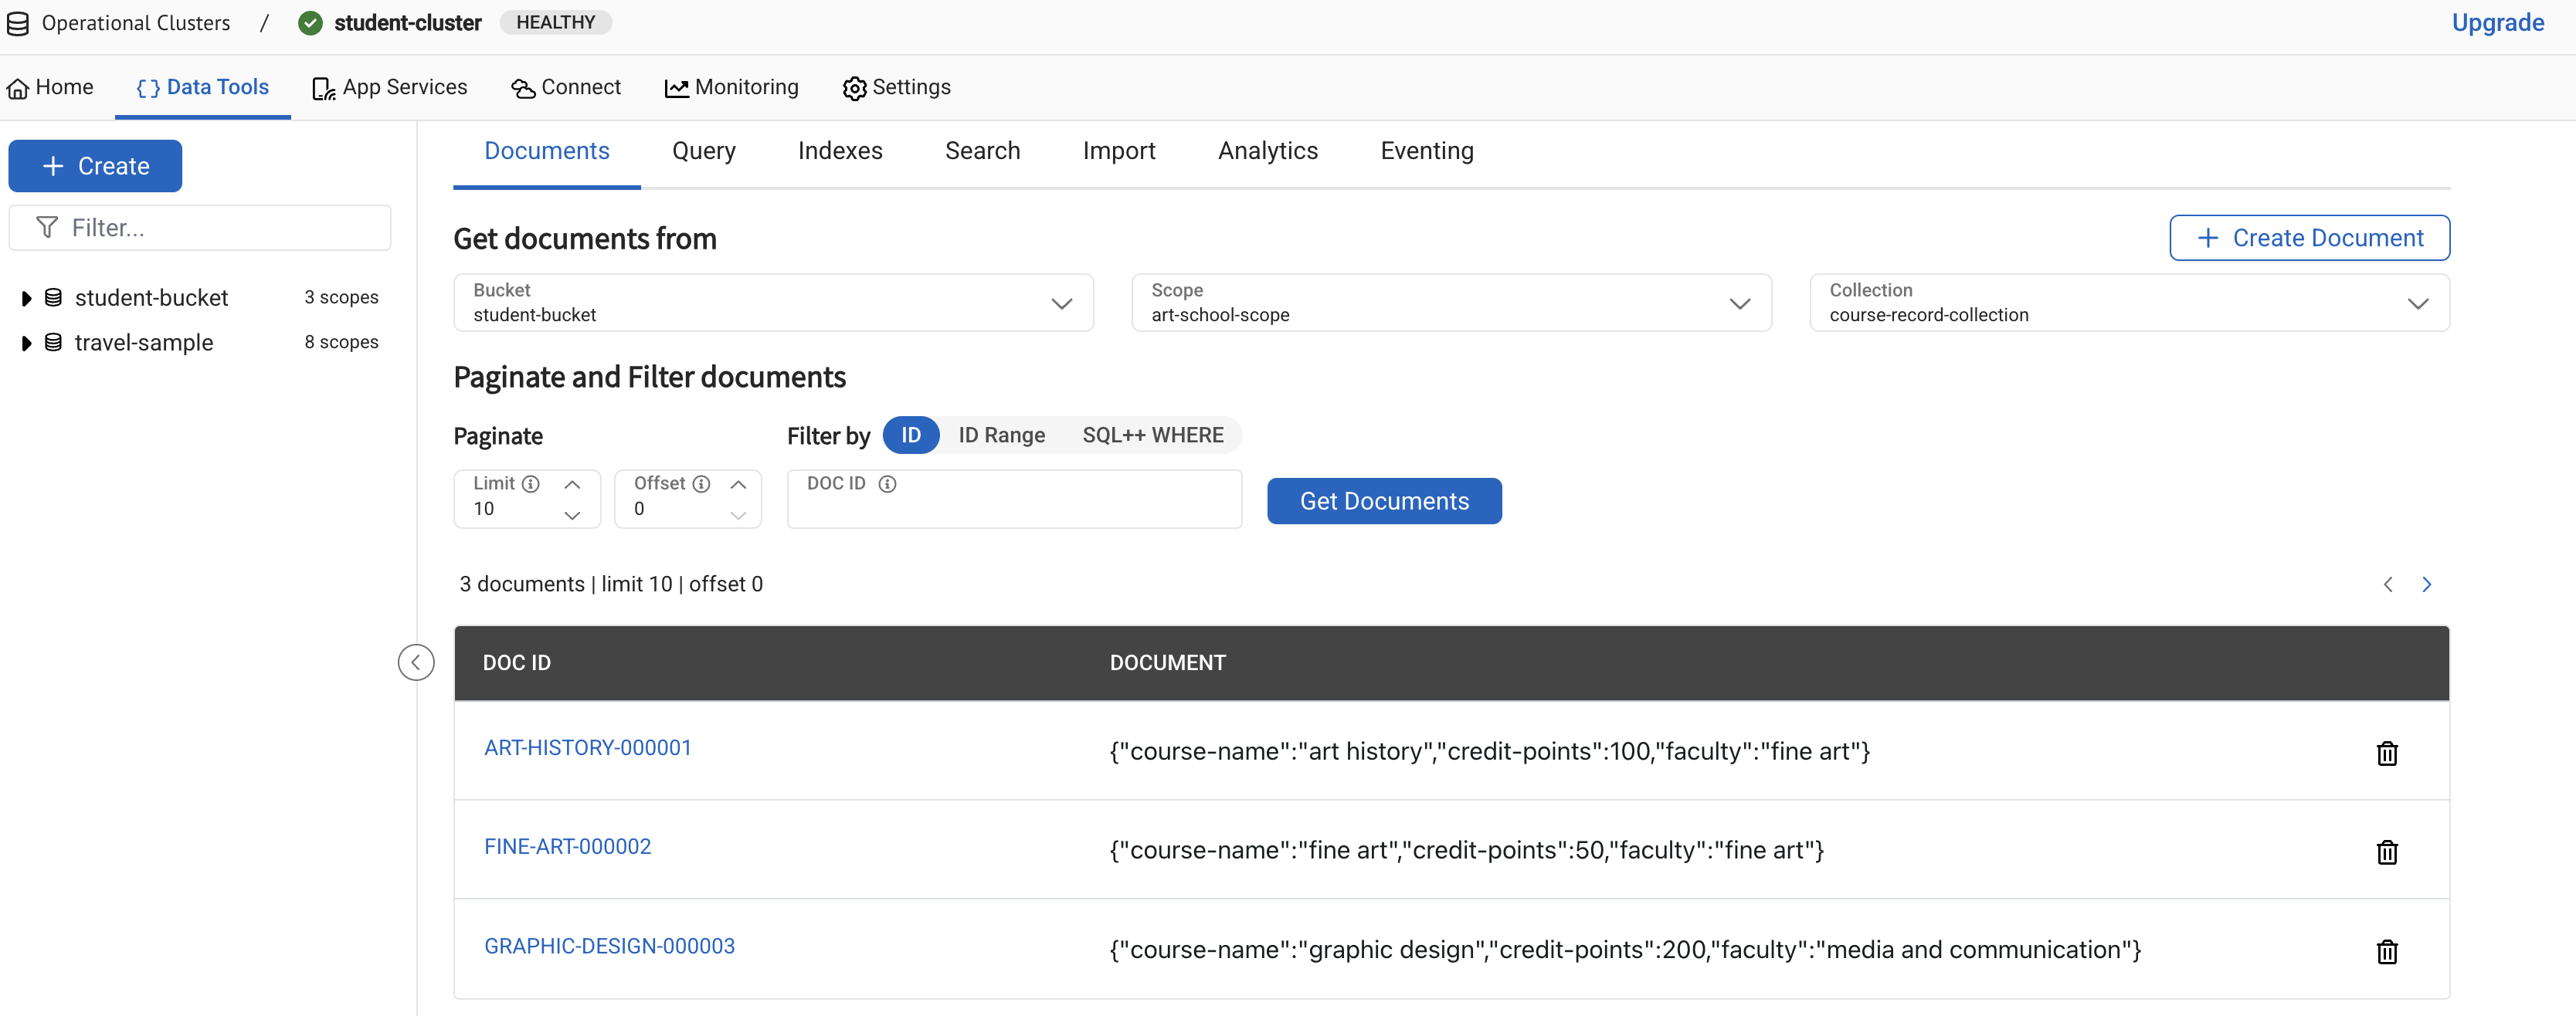
If you come across errors in your console, see the [troubleshooting section](#roubleshooting).
## [](#retrieve-records)Retrieve Records
You can retrieve your records using the [query editor](#retrieve-with-query-editor) or the [SDK](#retrieve-with-sdk).
### [](#retrieve-with-query-editor)Retrieving Records with the Query Editor
To retrieve the records with the Query Editor, you must first define an index.
#### [](#define-an-index)Define an Index
Before you can retrieve your records with the query editor, you must first define an index in your bucket. The index helps your cluster find specific data when you run a query.
To define an index:
1. On the **Operational Clusters** page, select **student-cluster**.
2. Go to **Data Tools** **Query**.
3. Select **student-bucket** and **art-school-scope** in the **Context** drop-down.
Using these filters, you can narrow down the scope of your queries. You do not need to add the names of your bucket and scope to your queries.
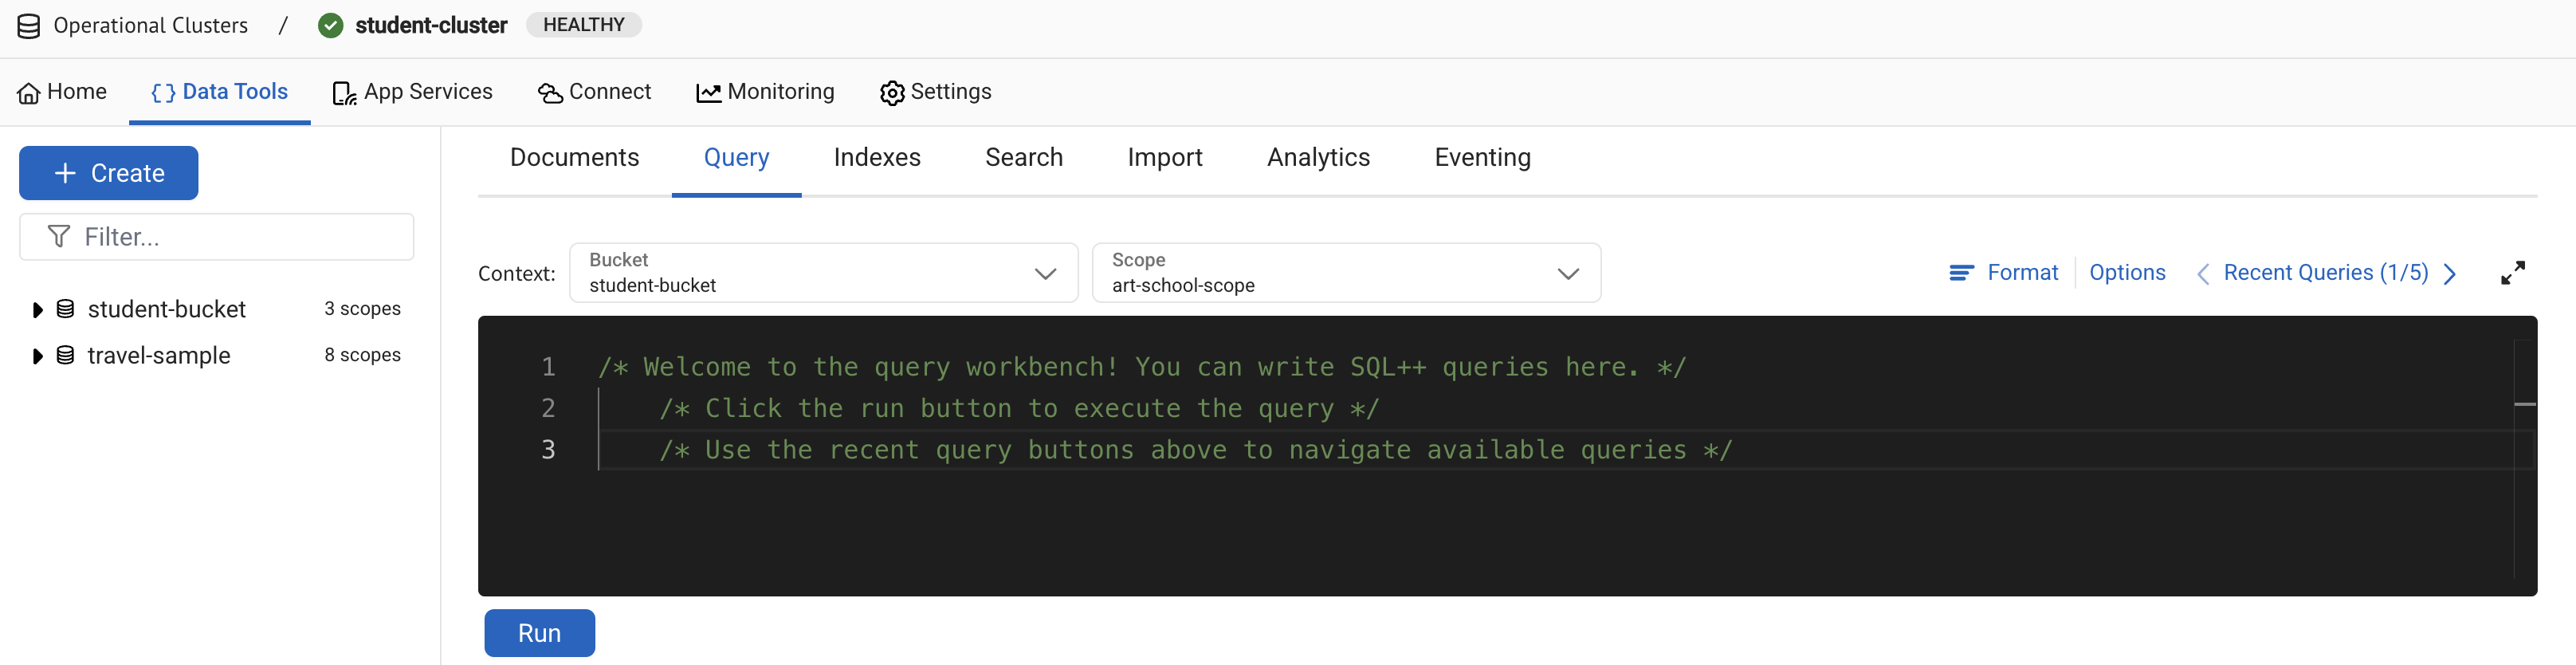
4. Enter the following query into your query editor:
```sqlpp
CREATE PRIMARY INDEX course_idx ON `course-record-collection`
```
5. Click **Run** to create a single index called `course_idx` in your `course-record-collection`.
#### [](#retrieve-your-records)Retrieve Your Records
You can use the Query Editor to retrieve all course records at once, or narrow your search down to retrieve records based on specific criteria.
##### [](#retrieve-all-course-records)Retrieve All Course Records
To retrieve all of your course records using the query editor:
1. Enter the following query into your query editor:
```sqlpp
SELECT crc.* FROM `course-record-collection` crc
```
2. Click **Run** to retrieve all course records.
```json
[
{
"course-name": "art history",
"credit-points": 100,
"faculty": "fine art"
},
{
"course-name": "fine art",
"credit-points": 50,
"faculty": "fine art"
},
{
"course-name": "graphic design",
"credit-points": 200,
"faculty": "media and communication"
}
]
```
##### [](#retrieve-course-records-with-less-than-200-credits)Retrieve Course Records with Less than 200 Credits
You can expand your query to narrow your search down further. To retrieve only courses with less than 200 `credit-points` using the query editor:
1. Enter the following query into your query editor:
```sqlpp
SELECT crc.* FROM `course-record-collection` crc WHERE crc.`credit-points` < 200
```
2. Click **Run** to retrieve all courses with less than 200 credits.
```json
[
{
"course-name": "art history",
"credit-points": 100,
"faculty": "fine art"
},
{
"course-name": "fine art",
"credit-points": 50,
"faculty": "fine art"
}
]
```
#### [](#retrieve-record-ids)Retrieve Record IDs
The `id` field is not automatically returned when you retrieve all of your course information.
The `id` is part of a document's meta structure, and to retrieve it you must adjust your SQL++ query and run it again:
1. Enter the following query into your query editor:
```sqlpp
SELECT META().id, crc.* FROM `course-record-collection` crc WHERE crc.`credit-points` < 200
```
The `META()` function call returns any property contained inside the document's metadata, including the ID.
2. Click **Run** to retrieve course records and their IDs.
```json
[
{
"course-name": "art history",
"credit-points": 100,
"faculty": "fine art",
"id": "ART-HISTORY-000001"
},
{
"course-name": "fine art",
"credit-points": 50,
"faculty": "fine art",
"id": "FINE-ART-000002"
}
]
```
### [](#retrieve-with-sdk)Retrieving Records with the SDK
You can also use SQL++ queries to retrieve your records with the SDK. Unlike the query editor, you must include the name of the bucket and the scope to fully qualify the name of the collection in the SQL++ statement in your application. For example:
```sqlpp
SELECT crc.* FROM `student-bucket`.`art-school-scope`.`course-record-collection` crc
```
#### [](#retrieve-your-records-2)Retrieve Your Records
You can use the SDK to retrieve all course records at once, or narrow your search down to retrieve records based on specific criteria.
##### [](#retrieve-all-course-records-2)Retrieve All Course Records
To retrieve all of your course records using the Java SDK:
1. In your `java` directory, create a new file called `ArtSchoolRetriever.java`.
2. Paste the following code block into your `ArtSchoolRetriever.java` file:
```java
import com.couchbase.client.core.error.CouchbaseException;
import com.couchbase.client.java.Cluster;
import com.couchbase.client.java.json.JsonObject;
import com.couchbase.client.java.query.QueryResult;
import com.couchbase.client.java.ClusterOptions;
public class ArtSchoolRetriever {
public static void main(String[] args) {
String connectionString = "<>"; // Replace this with Connection String
String username = "<>"; // Replace this with username from cluster access credentials
String password = "<>"; // Replace this with password from cluster access credentials
Cluster cluster = Cluster.connect(connectionString, ClusterOptions.clusterOptions(username, password)
.environment(env -> env.applyProfile("wan-development"))
);
retrieveCourses(cluster);
cluster.disconnect();
}
private static void retrieveCourses(Cluster cluster) {
try {
final QueryResult result = cluster.query("select crc.* from `student-bucket`.`art-school-scope`.`course-record-collection` crc");
for (JsonObject row : result.rowsAsObject()) {
System.out.println("Found row: " + row);
}
} catch (CouchbaseException ex) {
ex.printStackTrace();
}
}
}
```
3. In the `ArtSchoolRetriever.java` file, replace the `<>`, `<>`, and `<>` placeholders with the connection string, username, and password that you noted when configuring the cluster connection.
4. Open a terminal window and navigate to your `student` directory.
5. Run the command `mvn install` to pull in all the dependencies and rebuild your application.
6. Run the following command to retrieve all course records:
```sh
mvn exec:java -Dexec.mainClass="ArtSchoolRetriever" -Dexec.cleanupDaemonThreads=false
```
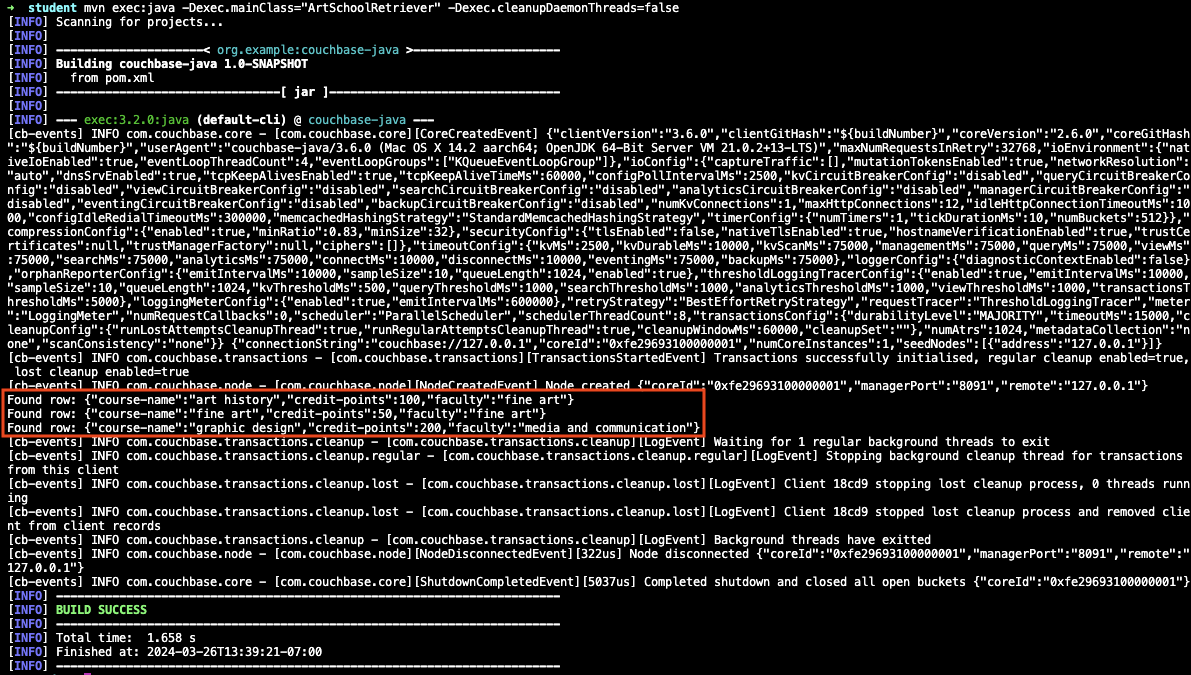
If the retrieval is successful, the course information outputs in the console log.
##### [](#retrieve-course-records-with-less-than-200-credits-2)Retrieve Course Records with Less than 200 Credits
You can set parameters in your code to narrow your search down further. To retrieve only courses with less than 200 `credit-points` using the Java SDK:
1. In your `java` directory, create a new file called `ArtSchoolRetrieverParameters.java`.
2. Paste the following code block into your `ArtSchoolRetrieverParameters.java` file:
```java
import com.couchbase.client.core.error.CouchbaseException;
import com.couchbase.client.java.Cluster;
import com.couchbase.client.java.json.JsonObject;
import com.couchbase.client.java.query.QueryOptions;
import com.couchbase.client.java.query.QueryResult;
import com.couchbase.client.java.ClusterOptions;
public class ArtSchoolRetrieverParameters {
public static void main(String[] args) {
String connectionString = "<>"; // Replace this with Connection String
String username = "<>"; // Replace this with username from cluster access credentials
String password = "<>"; // Replace this with password from cluster access credentials
Cluster cluster = Cluster.connect(connectionString, ClusterOptions.clusterOptions(username, password)
.environment(env -> env.applyProfile("wan-development"))
);
retrieveCourses(cluster);
cluster.disconnect();
}
private static void retrieveCourses(Cluster cluster) {
try {
// This SQL++ statement takes the parameter `$creditPopints`,
// which is then substituted by the value in the second parameter when the statement is called.
final QueryResult result = cluster.query("select crc.* " +
"from `student-bucket`.`art-school-scope`.`course-record-collection` crc " +
"where crc.`credit-points` < $creditPoints",
// The second parameter in the function call, with a value that replaces `$creditPoints`.
QueryOptions.queryOptions()
.parameters(JsonObject.create().put("creditPoints", 200)));
for (JsonObject row : result.rowsAsObject()) {
System.out.println("Found row: " + row);
}
} catch (CouchbaseException ex) {
ex.printStackTrace();
}
}
}
```
3. In the `ArtSchoolRetrieverParameters.java` file, replace the `<>`, `<>`, and `<>` placeholders with the connection string, username, and password that you noted when configuring the cluster connection.
4. Open a terminal window and navigate to your `student` directory.
5. Run the command `mvn install` to pull in all the dependencies and rebuild your application.
6. Run the following command to retrieve all course records:
```sh
mvn exec:java -Dexec.mainClass="ArtSchoolRetrieverParameters" -Dexec.cleanupDaemonThreads=false
```
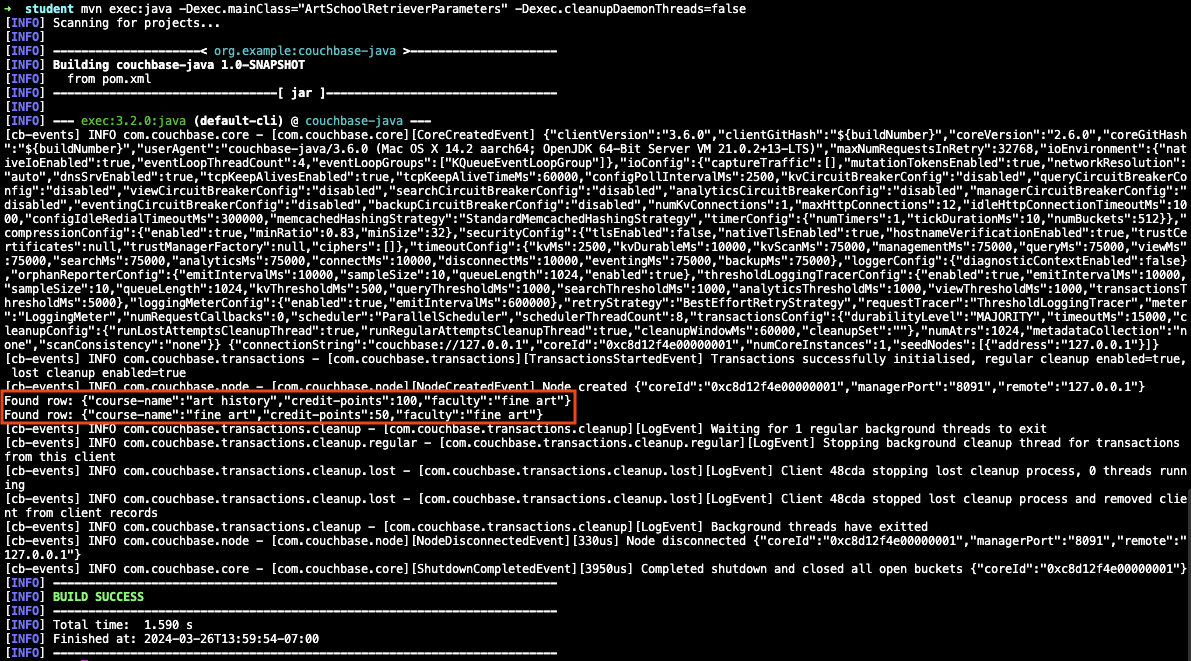
If the retrieval is successful, the course information with your parameters outputs in the console log.
If you come across errors in your console, see the [troubleshooting section](#roubleshooting).
## [](#add-course-enrollments)Add Course Enrollments
After retrieving student and course records, you can add enrollment details to the student records using the SDK.
### [](#add-enrollment-details)Add Enrollment Details
To add enrollment details to a student record:
1. In your `java` directory, create a new file called `AddEnrollments.java`.
2. Paste the following code block into your `AddEnrollments.java` file:
```java
import com.couchbase.client.core.error.CouchbaseException;
import com.couchbase.client.java.Bucket;
import com.couchbase.client.java.Cluster;
import com.couchbase.client.java.Collection;
import com.couchbase.client.java.Scope;
import com.couchbase.client.java.json.JsonArray;
import com.couchbase.client.java.json.JsonObject;
import com.couchbase.client.java.query.QueryOptions;
import com.couchbase.client.java.query.QueryResult;
import com.couchbase.client.java.query.QueryScanConsistency;
import com.couchbase.client.java.ClusterOptions;
import java.time.Duration;
import java.time.LocalDate;
import java.time.format.DateTimeFormatter;
public class AddEnrollments {
public static void main(String[] args) {
String connectionString = "<>"; // Replace this with Connection String
String username = "<>"; // Replace this with username from cluster access credentials
String password = "<>"; // Replace this with password from cluster access credentials
Cluster cluster = Cluster.connect(connectionString, ClusterOptions.clusterOptions(username, password)
.environment(env -> env.applyProfile("wan-development"))
);
// Retrieves the student bucket you set up.
Bucket bucket = cluster.bucket("student-bucket");
// Forces the application to wait until the bucket is ready.
bucket.waitUntilReady(Duration.ofSeconds(10));
// Retrieves the `art-school-scope` collection from the scope.
Scope scope = bucket.scope("art-school-scope");
Collection student_records = scope.collection("student-record-collection");
// Retrieves Hilary's student record, the `graphic design` course record, and the `art history` course record.
// Each method uses a SQL++ call to retrieve a single record from each collection.
JsonObject hilary = retrieveStudent(cluster,"Hilary Smith");
JsonObject graphic_design = retrieveCourse(cluster, "graphic design");
JsonObject art_history = retrieveCourse(cluster, "art history");
// Couchbase does not have a native date type, so the common practice is to store dates as strings.
String currentDate = LocalDate.now().format(DateTimeFormatter.ISO_DATE);
// Stores the `enrollments` inside the student record as an array.
// `JsonArray.create()` creates an empty list structure.
JsonArray enrollments = JsonArray.create();
// Adds two JSON elements to the `enrollments` array: the course that the enrollment relates to, and the date that the student enrolled in the course.
// To avoid repeating data all over the cluster, you store a reference to the course instead of the entire course record itself in this field.
// This means that you do not have to search through every single record if the course details change.
enrollments.add(JsonObject.create()
.put("course-id", graphic_design.getString("id"))
.put("date-enrolled", currentDate));
enrollments.add(JsonObject.create()
.put("course-id", art_history.getString("id"))
.put("date-enrolled", currentDate));
// Adds the `enrollments` array to Hilary's student record.
hilary.put("enrollments", enrollments);
// Commits the changes to the collection.
// The `upsert` function call takes the key of the record you want to insert or update and the record itself as parameters.
// If the `upsert` call finds a document with a matching ID in the collection, it updates the document.
// If there is no matching ID, it creates a new document.
student_records.upsert(hilary.getString("id"), hilary);
cluster.disconnect();
}
private static JsonObject retrieveStudent(Cluster cluster, String name) throws CouchbaseException {
QueryOptions studentQueryOptions = QueryOptions.queryOptions();
studentQueryOptions.parameters(JsonObject.create().put("name", name));
studentQueryOptions.scanConsistency(QueryScanConsistency.REQUEST_PLUS);
final QueryResult result = cluster.query("select META().id, src.* " +
"from `student-bucket`.`art-school-scope`.`student-record-collection` src " +
"where src.`name` = $name", studentQueryOptions);
return result.rowsAsObject().get(0);
}
private static JsonObject retrieveCourse(Cluster cluster, String course) throws CouchbaseException {
QueryOptions courseQueryOptions = QueryOptions.queryOptions();
courseQueryOptions.parameters(JsonObject.create().put("courseName", course));
courseQueryOptions.scanConsistency(QueryScanConsistency.REQUEST_PLUS);
final QueryResult result = cluster.query("select META().id, crc.* " +
"from `student-bucket`.`art-school-scope`.`course-record-collection` crc " +
"where crc.`course-name` = $courseName", courseQueryOptions);
return result.rowsAsObject().get(0);
}
}
```
> [!NOTE]
> Because this is a tutorial, you do not need to add an error check to make sure that your collection has returned an item. In a live application, error checks must be made to prevent errors and keep the application running.
3. In the `AddEnrollments.java` file, replace the `<>`, `<>`, and `<>` placeholders with the connection string, username, and password that you noted when configuring the cluster connection.
4. Open a terminal window and navigate to your `student` directory.
5. Run the command `mvn install` to pull in all the dependencies and rebuild your application.
6. Run the following command to insert the student record into the collection:
```sh
mvn exec:java -Dexec.mainClass="AddEnrollments" -Dexec.cleanupDaemonThreads=false
```
7. From the Capella UI, go to your student cluster.
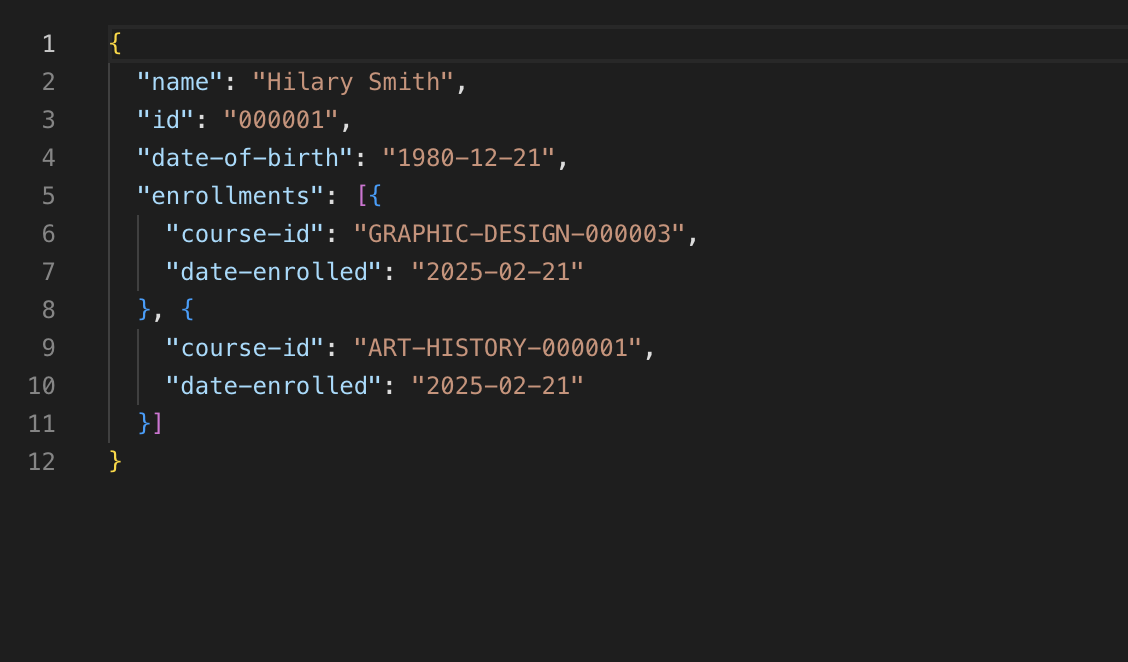
8. Go to the `student-record-collection` and click the document ID to see the new information you just added to Hilary's student record.
If you come across errors in your console, see the [troubleshooting section](#roubleshooting).
### [](#next-steps)Next Steps
Now that you have finished following the Student Record System tutorial, you can explore more of Capella Operational by checking out the rest of the [developer documentation](../../../cloud/develop/intro.md), or look at working with the [Data Service](../concept-docs/data-durability-acid-transactions.md)or [SQL++ Queries](../concept-docs/querying-your-data.md) from the SDK.
## [](#troubleshooting)Troubleshooting
Below are some tutorial-specific tips for troubleshooting — you can find more detailed troubleshooting for connecting to Capella in our [Troubleshooting Cloud Connections](../howtos/troubleshooting-cloud-connections.md) page.
### [](#authentication-error)Authentication Error
If you get an authentication error when running Maven commands in your console, confirm that the username and password in your Java file matches the username and password you used when setting up the Capella Operational cluster in your browser.
If they do not match, you can edit the Java file to add the correct username or password and try compiling and running the Maven command again.
### [](#unknown-host-exception)Unknown Host Exception
If you get an `UnknownHostException` error in your console, go to your Java file and confirm that the connection string matches the one provided by the Capella Operational cluster.
### [](#other-build-errors)Other Build Errors
For any other build errors in your console, run `mvn install` and try the original command again.