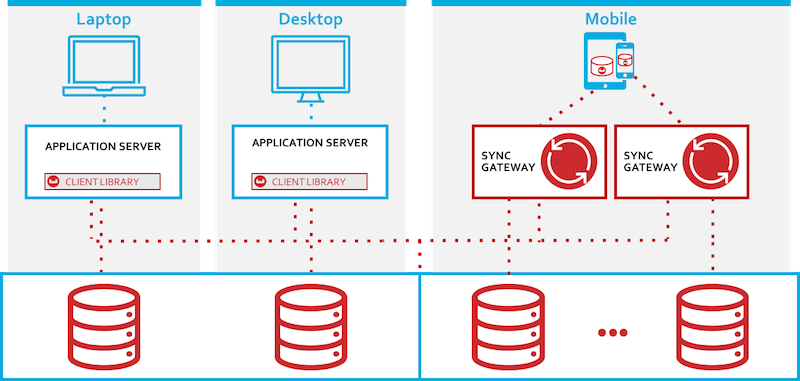
Sync
Data Routing
In the Access Control lesson we discussed how Sync Gateway supports Authorization and Access Control functions. In this lesson we discuss how it can be used for Data Synchronization and Routing.
A Sync Gateway configuration file determines the runtime behavior of Sync Gateway, including server configuration and the database or set of databases with which a Sync Gateway instance can interact.
Sync Gateway uses channels to make it easy to share a database between a large number of users and control access to the database. Conceptually, a channel could be viewed as a tag. Every document in the database belongs to a set of channels, and a user is granted appropriate access a set of channels. A channel is used to:
-
Partition the data set.
-
Authorize users to access documents.
-
Minimize the amount of data synced down to devices.
In the backend installation section, we walked you through the steps to launch Sync Gateway with a specific config file.
Open the sync-gateway-config-travelsample.json file located at
https://github.com/couchbaselabs/mobile-travel-sample/blob/master/sync-gateway-config-travelsample.json.
It includes the sync function which is a JavaScript function whose source code is stored in the Sync Gateway’s database configuration file.
/* Routing */
// Add doc to the user's channel.
channel("channel." + username);
Shared Bucket Access
Before you begin this lesson, confirm that you have Sync Gateway up and running by following the instructions in the Sync Gateway installation section.
Sync Gateway and Couchbase Server [1] mobile and server/web applications now have the ability to read and write to the same bucket. It is an opt-in feature that can be enabled in the Sync Gateway configuration file.
The sync metadata used by the Sync Gateway for replication with mobile clients is included in the Extended Attributes or XAttrs associated with the document.
The capability can be enabled through a configuration setting in the sync gateway config file. It is to be noted that if you are using Enterprise Edition of Sync Gateway [2], then the "import_docs" flag is optional. Every node with "enable_shared_bucket_access" set to "true" will automatically import document mutations from the server bucket.
Open the sync-gateway-config-travelsample.json file located at https://github.com/couchbaselabs/mobile-travel-sample/blob/master/sync-gateway-config-travelsample.json
"import_docs": "continuous",
"enable_shared_bucket_access": true
You can specify the Couchbase Server documents that need to be imported and processed by the Sync Gateway by defining an import filter function. In our demo, we will only be synchronizing the "user" document. So every other document type is ignored.
function(doc) {
  /* Just ignore all the static travel-sample files */
  if (doc._deleted == true ) {
    return true;
   }
  if (doc.type == "landmark" || doc.type == "hotel" || doc.type == "airport" || doc.type =="airline" || doc.type == "route") {
    return false;
  }

  return true;
}
Replication
Replication is the process by which clients running Couchbase Lite synchronize database changes with the remote (server) database.
-
Pull Replication is the process by which clients running Couchbase Lite download database changes from the remote (server) source database to the local target database
-
Push Replication is the process by which clients running Couchbase Lite upload database changes from the local source database to the remote (server) target database
Couchbase Mobile’s replication protocol is implemented as a messaging protocol layered over WebSocket.

The replication process can be “continuous” or "`one shot"`.
-
In “Continuous” replication mode, the changes are continually synchronized between the client and Sync Gateway.
-
In “One shot” mode, the changes are synchronized once and the connection between the client and server disconnects. When any future changes need to be pushed up or pulled down, the client must start a new replication.
Open the fileDatabaseManager.swift.
We will review the method func startPushAndPullReplicationForCurrentUser()
func startPushAndPullReplicationForCurrentUser() {
  ...
}
First, you fetch the URL of the Sync Gateway
guard let remoteUrl = URL.init(string: kRemoteSyncUrl) else {
  lastError = TravelSampleError.RemoteDatabaseNotReachable

  return
}
Do some checks to confirm the validity of the database and user credentials
guard let user = self.currentUserCredentials?.user,let password =   self.currentUserCredentials?.password  else {
  lastError = TravelSampleError.UserCredentialsNotProvided
  return
}

guard let db = db else {
  lastError = TravelSampleError.RemoteDatabaseNotReachable
  return
}
Verify that the replicator is not already in progress
if _pushPullRepl != nil {
  // Replication is already started
  return
}
The ReplicatorConfiguration is initialized with the local database and URL of the target DB on Sync Gateway.
The replicatorType in the Replicator Config specifies the type of replication.
In the code snippet in the Travel app, it is pushAndPull indicating that both push and pull replication is enabled.
The continuous mode is set to true in the Travel app.
fileprivate let kRemoteSyncUrl = "ws://localhost:4984"
let dbUrl = remoteUrl.appendingPathComponent(kDBName)

let config = ReplicatorConfiguration.init(database: db, target: URLEndpoint.init(url:dbUrl))

config.replicatorType = .pushAndPull
config.continuous =  true
The Replicator is configured with relevant authentication credentials. In the Travel app, the list of users that are permitted access is configured in the Sync Gateway configuration file as discussed in the Access Control section.
config.authenticator = BasicAuthenticator(username: user, password: password)The Replicator is configured to only pull from current user’s channels. The list of channels that the user has access to is defined in the Sync Gateway configuration file as discussed in the Data Routing section.
// This should match what is specified in the sync gateway config
// Only pull documents from this user's channel
let userChannel = "channel.\(user)"
config.channels = [userChannel]
The Replicator is initialized with the specified configuration
_pushPullRepl = Replicator.init(config: config)A change listener callback block is registered to listen for replication changes. Every time, there is a push or pull change, the callback is invoked.
_pushPullReplListener = _pushPullRepl?.addChangeListener({ [weak self] (change) in
    let s = change.status
    print("PushPull Replicator: \(s.progress.completed)/\(s.progress.total), error: \(String(describing: s.error)), activity = \(s.activity)")

    if s.progress.completed == s.progress.total {
        self?.postNotificationOnReplicationState(.idle)
    }
    else {
        self?.postNotificationOnReplicationState(s.activity)
    }
})
Start the Replication
_pushPullRepl?.start()