User Profile Sample: Couchbase Lite Query
Introduction
Couchbase Lite brings powerful querying and Full-Text-Search(FTS) capabilities to the edge. The new query interface is based on N1QL, Couchbase’s declarative query language that extends SQL for JSON. If you are familiar with SQL, you will feel right at home with the semantics of the new API. The query API is designed using the Fluent API Design Pattern, and it uses method cascading to read to like a Domain Specific Language (DSL). This makes the interface very intuitive and easy to understand.
Couchbase Lite can be used as a standalone embedded database within your mobile app.
Prerequisites
This tutorial assumes familiarity with building Swift apps with Xcode and with Couchbase Lite.
-
If you are unfamiliar with the basics of Couchbase Lite, it is recommended that you walk through the tutorial Fundamentals of using Couchbase Lite as a Standalone database
-
iOS (Xcode)
Download the latest version from the Mac App StoreIf you are on an older version of Xcode, which you need to retain for other development needs, make a copy of your existing version of Xcode and install the latest Xcode version. That way you can have multiple versions of Xcode on your Mac. -
git (Optional)
This is required if you would prefer to pull the source code from GitHub repo.-
Create a free github account if you don’t already have one
-
git can be downloaded from git-scm.org
-
App Overview
We will be working with a very simple User Profile app. If you have walked through the Standalone tutorial, you will recognize that this version extends the functionality introduced in the app introduced in that tutorial.
This app does the following
-
Allows users to log in and create or update his/her user profile information. Just as you could in the Standalone tutorial.
-
Includes a second record type. As part of profile information, users can now select a "university" from a list of possible options.
The list of matching universities is found by quering (using the new Query API) a local prebuilt "University" Database, which is bundled in the app.
-
The user profile information is persisted as a Document in the local Couchbase Lite Database. So subsquently, when the user logs out and logs back in again, the profile information is loaded from the Database.
Installation
Fetching App Source Code
Clone the query branch of the User Profile Demo project from GitHub.
Type the following command in your terminal
git clone -b query https://github.com/couchbaselabs/userprofile-couchbase-mobile.gitInstalling Couchbase Lite XCFramework
Next, we will download the Couchbase Lite 3.0 XCFramework.
The Couchbase Lite iOS XCFramework is distributed via SPM, CocoaPods, Carthage or you can download the pre-built framework — see the Get Started - Install documentation for more information.
In our example, we will download the pre-built version of the XCFramework, using a script. To do this, type the following in a command terminal:
cd /path/to/UserProfileDemo/content/modules/userprofile/examples

sh install_tutorial.sh 3.0.0 (1)| 1 | Where 3.0.0 is the required Couchbase Lite release number. |
Next, let’s verify the installation.
Data Model
Couchbase Lite is a JSON Document Store. A Document is a logical collection of named fields and values. The values are any valid JSON types.
In addition to the standard JSON types, Couchbase Lite supports some special types like Date and Blob.
While it is not required or enforced, it is a recommended practice to include a "type" property that can serve as a namespace for related documents.
The app deals with two Document types: User Profile and University.
The User Profile Document
The User Profile Document has a type property of user as shown in Example 1.
Its document ID is of the form "user::demo@example.com".
{
    "type":"user",
    "name":"Jane Doe",
    "email":"jame.doe@earth.org",
    "address":"101 Main Street",
    "image":CBLBlob (image/jpg),
    "university":"Rensselaer Polytechnic"
}
The User Record
The "user" Document is encoded to a native struct named UserRecord as shown in Example 2
let kUserRecordDocumentType = "user"
typealias ExtendedData = [[String:Any]]
struct UserRecord : CustomStringConvertible{
    let type = kUserRecordDocumentType
    var name:String?
    var email:String?
    var address:String?
    var imageData:Data?
    var university:String?
    var extended:ExtendedData? // future

    var description: String {
        return "name = \(String(describing: name)), email = \(String(describing: email)), address = \(String(describing: address)), imageData = \(imageData)"
    }


}
The University Document
The app comes bundled with a collection of Documents of type "university". Each Document represents a university — see Example 3
{
    "type":"university","web_pages": [
      "http://www.rpi.edu/"
    ],
    "name": "Rensselaer Polytechnic Institute",
    "alpha_two_code": "US",
    "state-province": null,
    "domains": [
      "rpi.edu"
    ],
    "country": "United States"
}
UniversityRecord
The "university" Document is encoded to a native struct named UniversityRecord — as shown in Example 4
typealias Universities = [UniversityRecord]
// Native object
struct UniversityRecord : CustomStringConvertible{

    var alphaTwoCode:String?
    var country:String?
    var domains:[String]?
    var name:String?
    var webPages:[String]?

    var description: String {
        return "name = \(String(describing: name)), country = \(String(describing: country)), domains = \(String(describing: domains)), webPages = \(webPages), alphaTwoCode = \(String(describing: alphaTwoCode)) "
    }

}
Using a Prebuilt Database
There are several reasons why you may want to bundle your app with a prebuilt database. This would be suited for data that does not change or change that often, so you can avoid the bandwidth and latency involved in fetching/syncing this data from a remote server. This also improves the overall user experience by reducing the start-up time.
In our app, the instance of Couchbase Lite that holds the pre-loaded "university" data is separate from the Couchbase Lite instance that holds "user" data hold the pre-loaded data. A separate Couchbase Lite instance is not required. However, in our case, since there can be many users potentially using the app on a given device, it makes more sense to keep it separate. This is to avoid duplication of pre-loaded data for every user.
Location of the cblite file
The pre-built database will be in the form of a cblite file.
It should be be in your app project bundle.
-
In the
UserProfileDemo.xcodeprojproject explorer, locate theuniversities.cblite2file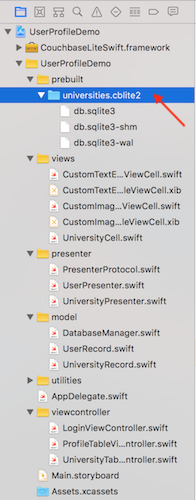
Loading the Prebuilt Database
-
Open the DatabaseManager.swift file and locate the
openPrebuiltDatabase()function. The prebuilt database is common to all users of the app (on the device). So it will be loaded once and shared by all users on the device.func openPrebuiltDatabase(handler:(_ error:Error?)->Void) { -
First, we create an instance of
DatabaseConfigurationobject and specify the path where the database would be locatedvar options = DatabaseConfiguration() guard let universityFolderUrl = _applicationSupportDirectory else { fatalError("Could not open Application Support Directory for app!") return } let universityFolderPath = universityFolderUrl.path let fileManager = FileManager.default if !fileManager.fileExists(atPath: universityFolderPath) { try fileManager.createDirectory(atPath: universityFolderPath, withIntermediateDirectories: true, attributes: nil) } // Set the folder path for the CBLite DB options.directory = universityFolderPath -
Then we determine if the "universities" database already exists at the specified location. It would not be present if this is the first time we are using the app, in which case, we locate the "universities.cblite" resource in the App’s main bundle and we copy it over to the Database folder.
If the database is already present at the specified Database location, we simply open the database.
// Load the prebuilt "universities" database if it does not exist as the specified folder
if Database.exists(withName: kUniversityDBName, inDirectory: universityFolderPath) == false {
    // Load prebuilt database from App Bundle and copy over to Applications support path
    if let prebuiltPath = Bundle.main.path(forResource: kUniversityDBName, ofType: "cblite2") {
        try Database.copy(fromPath: prebuiltPath, toDatabase: "\(kUniversityDBName)", withConfig: options)

    }
    // Get handle to DB  specified path
    _universitydb = try Database(name: kUniversityDBName, config: options)

    // Create indexes to facilitate queries
    try createUniversityDatabaseIndexes()

}
else
{
    // Gets handle to existing DB at specified path
    _universitydb = try Database(name: kUniversityDBName, config: options)

}
Indexing the Prebuilt Database
-
Creating indexes for non-FTS based queries is optional. However, in order to speed up queries, you can create indexes on the properties that you would query against. Indexing is handled eagerly.
-
In the DatabaseManager.swift file, locate the
createUniversityDatabaseIndexes()function. We create an index on thenameandlocationproperties of the documents in the university database.fileprivate func createUniversityDatabaseIndexes()throws { // For searches on type property try _universitydb?.createIndex(IndexBuilder.valueIndex(items: ValueIndexItem.expression(Expression.property("name")),ValueIndexItem.expression(Expression.property("location"))), withName: "NameLocationIndex") }
Closing the Database
When a user logs out, we close the Prebuilt Database along with other user-specific databases
-
In the DatabaseManager.swift file, locate the
closePrebuiltDatabase()function.func closePrebuiltDatabase() -> Bool { -
Closing the database is pretty straightforward
try db.close()
try universitydb.close()
Will open Prebuilt DB  at path /Users/priya.rajagopal/Library/Developer/CoreSimulator/Devices/E4E62394-9940-4AF8-92FC-41E3C794B216/data/Containers/Data/Application/A9425551-7F52-461D-B4F5-CC04315154D6/Library/Application Support

2018-05-04 17:04:16.319360-0400 UserProfileDemo[54115:13479070] CouchbaseLite/2.0.0 (Swift; iOS 11.3; iPhone) Build/806 Commit/2f2a2097+CHANGES LiteCore/2.0.0 (806)

2018-05-04 17:04:16.319721-0400 UserProfileDemo[54115:13479070] CouchbaseLite minimum log level is Verbose
Will open/create DB  at path /Users/priya.rajagopal/Library/Developer/CoreSimulator/Devices/E4E62394-9940-4AF8-92FC-41E3C794B216/data/Containers/Data/Application/A9425551-7F52-461D-B4F5-CC04315154D6/Library/Application Support/demo@example.com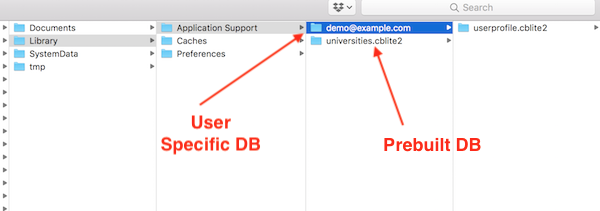
Exploring the Query API
The Query API in Couchbase Lite is extensive.
In our app, we will be using the QueryBuilder API to make a simple pattern matching query using the like operator.
Fetching University Document
From the "Your Profile" screen, when the user taps on the "University" cell, a search screen is displayed where the user can enter the search criteria (name and optionally, the location) for the university.
When the search criteria is entered, the local "universities" Database is queried for [The "University" Document] documents that match the specified search criteria.
-
Open the UniversityPresenter.swift file and locate the
fetchUniversityRecords()function.func fetchUniversitiesMatchingName( _ name:String,country countryStr:String?, handler:@escaping(_ universities:Universities?, _ error:Error?)->Void) { do { -
We build the Query using the
QueryBuilderAPI that will look for Documents that match the specified criteria.var whereQueryExpr = Function.lower(Expression.property(UniversityDocumentKeys.name.rawValue)) .like(Expression.string("%\(name.lowercased())%")) (1) if let countryExpr = countryStr { let countryQueryExpr = Function.lower(Expression.property(UniversityDocumentKeys.country.rawValue)) .like(Expression.string("%\(countryExpr.lowercased())%")) whereQueryExpr = whereQueryExpr.and(countryQueryExpr) (2) } let universityQuery = QueryBuilder.select(SelectResult.all()) (3) .from(DataSource.database(db)) (4) .where(whereQueryExpr) (5) print(try? universityQuery.explain())1 Build a QueryExpressionthat uses thelikeoperator to look for the specified "name" string in the "name" property. Notice couple of things here:
(a) The use of wildcard "%" operator to denote that we are looking for the presence of the string anywhere in the "name" property and
(b) The use ofFunction.lowercase()to convert the search string into lowercase equivalent. Sincelikeoperator does case-senstive matching, we convert the search string and the property value to lowercase equivalents and compare the two.2 If the location criteria was specified in the search, then Build a QueryExpressionthat uses thelikeoperator to look for the specified "location" string in the "location" property.3 The SelectResult.all()specifiees that we are interested in all properties in Documents that match the specified criteria4 The DataSource.database(db)specified the Data Source5 We include the whereclause that is the logical ANDing of the QueryExpression in <1> and <2> -
We run the Query by calling the
execute()method on the Query that was constructed in the previous stepvar universities = Universities() for result in try universityQuery.execute() { if let university = result.dictionary(forKey: "universities"){ var universityRecord = UniversityRecord() (1) universityRecord.name = university.string(forKey: UniversityDocumentKeys.name.rawValue) (2) universityRecord.country = university.string(forKey: UniversityDocumentKeys.country.rawValue) universityRecord.webPages = university.array(forKey: UniversityDocumentKeys.webPages.rawValue)?.toArray() as? [String] (3) universities.append(universityRecord) } }1 Create an instance of UniversityRecord type 2 Use specific type getters to fetch property values. The UniversityRecord instance is populated with these property values. 3 Getters also available for arraytypes. This returns a Couchbase LiteArrayObjecttype. So you would have to usetoArray()to convert the Couchbase Lite native array equivalent.
-
List
-
Selection
-
Log Off/On


Learn More
Congratulations on completing this tutorial!
This tutorial walked you through an example of how to use a pre-built Couchbase Lite database. We looked at a simple Query example. Check out the following links for further details on the Query API including a Xcode playground for testing the APIs.