Public Networking with External DNS
How to configure a Couchbase cluster so that is available via the public internet.
|
Tutorials are accurate at the time of writing but rely heavily on third party software. Tutorials are provided to demonstrate how a particular problem may be solved. Use of third party software is not supported by Couchbase. For further help in the event of a problem, contact the relevant software maintainer. |
There are numerous reasons why you would want to expose a Couchbase database on the public internet. Some examples could be:
-
Cross data center replication (XDCR)
-
Client access for a 3rd-party function-as-a-service (FaaS) platform
-
Database-as-a-service (DBaaS) platforms
All of these use cases share a common goal; they allow clients to access the database instance without having to establish a VPN to a Kubernetes instance. They also all require secure — TLS protected — communication that are sometimes difficult to achieve with typical Kubernetes architectures.
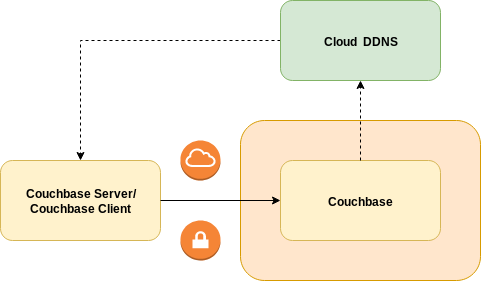
A publicly addressable cluster uses the public networking with External DNS strategy for its network architecture. Couchbase cluster nodes are exposed using load-balancer services that have public IP addresses allocated to them. The External DNS controller is responsible for managing dynamic DNS (DDNS) in a cloud based provider to provide stable addressing and a basis for TLS.
This tutorial will guide you through fully configuring your Couchbase cluster to use this feature and also configure the External DNS controller.
DDNS
Before continuing you will need a public DNS domain.
These can be purchased from a registrar such as Gandi, GoDaddy, Namecheap, etc.
For this tutorial we will use rockstar-wizard.com.
The next step is to delegate the service of that domain to a DDNS provider. During the life cycle of a Couchbase cluster, nodes may be added and removed for cluster scaling, upgrades or fault recovery. In each instance, new DNS names need to be created for any new Couchbase pods that are created, or DNS names removed from pods that are deleted. The DDNS provider exposes a REST API that allows the External DNS controller in Kubernetes to synchronize what the Couchbase cluster looks like with public DNS. For this tutorial we will use Cloudflare. You will need to create an API key in order for External DNS to authenticate against the Cloudflare API.
All supported DDNS providers are documented on the External DNS home page.
TLS
The Operator ensures you configure your Couchbase clusters securely. If the Operator detects a cluster is being exposed on the public internet, it will enforce TLS encryption. This ensures eavesdroppers cannot intercept any passwords or sensitive data while in transit.
Before we generate TLS certificates we need to determine what DNS domain the cluster will be in.
We could use our rockstar-wizard.com domain directly, but then it could only ever be used by a single Couchbase cluster.
Therefore we shall use a subdomain called gandalf.rockstar-wizard.com as a unique namespace for our Cluster.
For example, the UI will be allocated the DNS name console.gandalf.rockstar-wizard.com within this subdomain.
In general, a wildcard DNS name (*.gandalf.rockstar-wizard.com) will handle all public DNS names generated by the Operator.
This needs to be added to the Couchbase cluster certificate.
To create TLS certificates for the Couchbase cluster follow the TLS tutorial.
External DNS
Assuming you have already configured the Operator in the couchbase namespace, the next thing you need to install is the External DNS controller.
This must be installed before the Couchbase cluster as the Operator will wait for DNS propagation before balancing in Couchbase Server pods.
This is because clients must be able to reach the Couchbase server pods in order to serve traffic and prevent application errors.
Create a service account for the External DNS controller to run as:
$ kubectl --namespace gandalf create serviceaccount external-dnsThe External DNS controller requires a role in order for it to be able to poll for resources and look for DNS records to replicate into the DDNS provider:
$ kubectl --namespace couchbase create -f - <<EOF
apiVersion: rbac.authorization.k8s.io/v1
kind: ClusterRole
metadata:
  name: external-dns
rules:
- apiGroups:
  - ""
  resources:
  - services
  - pods
  - nodes
  verbs:
  - get
  - watch
  - list
EOF
I used a cluster role so it can be shared between service accounts in different namespaces. This does require administrative permissions to install, however when bound to the service account it will not grant cluster-wide privileges.
To link the role to the service account:
$ kubectl --namespace couchbase create rolebinding --clusterrole external-dns --serviceaccount couchbase:external-dns external-dnsFinally install the External DNS deployment:
$ kubectl --namespace couchbase create -f - <<EOF
apiVersion: extensions/v1beta1
kind: Deployment
metadata:
  name: external-dns
spec:
  selector:
    matchLabels:
      app: external-dns
  template:
    metadata:
      labels:
        app: external-dns
    spec:
      serviceAccountName: external-dns (1)
      containers:
       - name: external-dns
         image: registry.opensource.zalan.do/teapot/external-dns:latest
         args:
         - --source=service (2)
         - --domain-filter=rockstar-wizard.com (3)
         - --provider=cloudflare (4)
         - --txt-owner-id=couchbase.my-kubernetes-cluster (5)
         env:
         - name: CF_API_KEY (6)
           value: REDACTED
         - name: CF_API_EMAIL (7)
           value: REDACTED
EOF
Let’s look at this deployment in a little more detail:
| 1 | The spec.template.spec.serviceAccountName attribute ensures External DNS pods are running as the service account we set up.
This grants the controller permission to poll resources and look for DDNS requests. |
| 2 | The --source argument tells External DNS to only look at services within the namespace.
The Operator generates hostnames for services that need to be exposed on the internet using the Couchbase cluster DNS configuration.
These services are annotated with the hostnames.
The External DNS controller creates DNS records for these hostnames when public IP addresses are allocated for the service. |
| 3 | The --domain-filter argument tells External DNS to only consider DDNS entries that are associated with DNS entries related to our rockstar-wizard.com domain.
With this configuration you can define multiple clusters in the couchbase namespace.
For example a second cluster with the DNS configuration merlin.rockstar-wizard.com within the same namespace would also be matched by this controller. |
| 4 | The --provider argument tells External DNS to replicate DDNS entries into Cloudflare. |
| 5 | The --txt-owner-id argument tells External DNS to label TXT management records with a string unique to the External DNS instance.
External DNS uses TXT records to record metadata — especially ownership information — associated with the DNS records it is managing.
If the rockstar-wizard.com domain is used by multiple instances of External DNS without specifying any ownership, then they would conflict with one another. |
| 6 | The CF_API_KEY environment variable is used by the Cloudflare provider to authenticate against the Cloudflare API. |
| 7 | The CF_API_EMAIL environment variable is used by the Cloudflare provider to identify what account to use against the Cloudflare API. |
Couchbase Cluster
The final Couchbase cluster definition will look similar to the following:
apiVersion: couchbase.com/v2
kind: CouchbaseCluster
metadata:
  name: couchbase
spec:
  image: couchbase/server:7.6.6
  security:
    adminSecret: my-admin-secret
  networking:
    exposeAdminConsole: true
    adminConsoleServiceTemplate:
      spec:
        type: LoadBalancer
    exposedFeatures:
    - xdcr
    - client
    exposedFeatureServiceTemplate:
      spec:
        type: LoadBalancer
    dns:
      domain: gandalf.rockstar-wizard.com
    tls:
      secretSource:
        serverSecretName: couchbase-cert
  servers:
  - name: default
    services:
    - data
    - index
    - query
    size: 3
Configuration options are fully documented in the public networking how-to.