Manage Auditing
You can audit actions performed on Couchbase Server. Auditing helps administrators verify that system management tasks are performed correctly.
Audit Records and Their Content
The records created by the Couchbase auditing facility capture information about who performed an action, what action was taken, when it occurred, and whether it was successful. Couchbase Server processes create the records asynchronously. Each record is stored as a JSON document that can be retrieved and inspected.
Users with the Full Admin or Security Admin roles can configure Auditing. Users with the Full Admin, Security Admin, or Read-Only Security Admin roles can view the audit configuration.
For information about event auditing, see Auditing.
For a complete list of events audited by Couchbase Server, see Audit Event Reference.
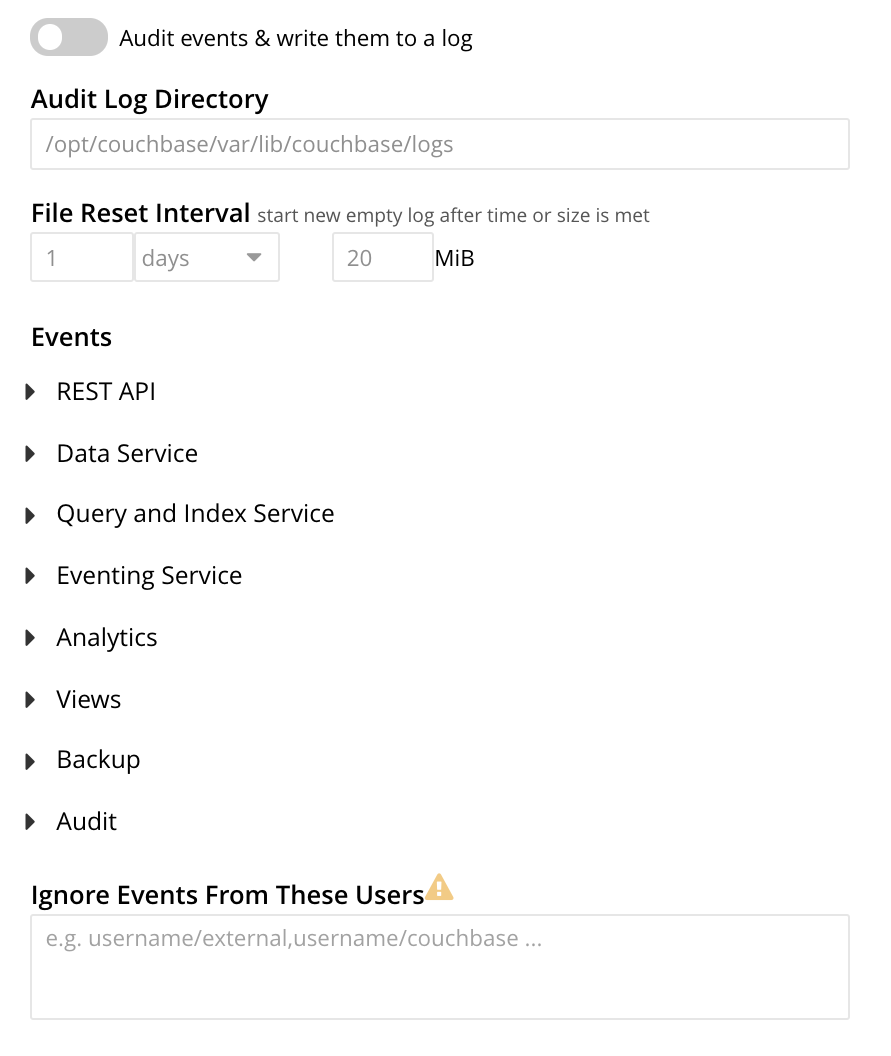
The Audit screen is as follows and has the following panels:
-
Audit events & write them to a log.
For more information, see Manage Audit Logs and Events.
-
User activity.
For more information, see Audit User Activity.
Manage Audit Logs and Events
The details of managing audit logs and events are as follows:
-
Manage Audit Logs: The audit logs contain records of all actions that have been audited. Each record includes information about the user who performed the action, the action that was taken, and the time at which it occurred.
-
Manage Events: Couchbase Server supports both filterable and non-filterable events. For more information, see Filterable and Non-Filterable Events.
Couchbase Web Console allows the user to do the following:
-
Enable event-auditing for the node.
-
Enable filterable events per module.
-
Disable filterable events individually, within each module.
-
Ignore all filterable events for specified local, external, and internal or system users.
The event types are as follows:
-
Enabled by default and can be disabled: These events are enabled and logged by default. To disable an event, clear the associated checkbox.
-
Enabled by default and cannot be disabled: These events, also known as non-filterable, are enabled and logged by default but associated with greyed-out, non-interactive checkboxes. You cannot disable these events.
-
Disabled by default and can be enabled: These events are disabled by default and associated with cleared checkboxes. To enable an event, check the associated checkbox.
-
-
Ignoring Filterable Events By User: To avoid logging filterable events for specific users, such as authentication by the Full Administrator, you can specify these users in the Ignore Events From These Users field.
Specify the users according to their registered domain in the format,
<username>/externalorusername/couchbase. Separate multiple names with commas.For more information, see Authentication Domains.
You can also mention the following Couchbase internal users in the Ignore Events From These Users field:
@eventing
@cbq-engine
@ns_server
@index
@projector
@goxdcr
@fts
@cbas
Specify each internal user in the format
@<internalusername>/couchbase.For each user specified in the field, all filterable events are ignored. Non-filterable events are audited.
Manage Audit Logs and Events from the UI
To manage audit logs and events from the UI, follow these steps:
-
Open the Couchbase Web Console.
-
Select .
-
To enable auditing, turn on the Audit events & write them to a log toggle.
-
You can edit the following fields that control the audit logs:
- Audit Log Directory
-
Set the path for saving the audit logs. The operating system, on which Couchbase Server is installed, determines the default path:
-
Linux:
/opt/couchbase/var/lib/couchbase/logs -
Windows:
C:\Program Files\Couchbase\Server\var\lib\couchbase\logs -
MacOS:
/Users/couchbase/Library/Application Support/Couchbase/var/lib/couchbase/logs
-
- File Reset Interval
-
Use this setting to specify when Couchbase Server rotates the audit log, based on the log’s age or file size. When rotation occurs, Couchbase Server renames the current
audit.logfile to a new filename with a timestamp, for example,<node-name>.local-2024-07-30T15-42-18-audit.log.For more information about log rotation, see Saving and Pruning Audit Records.
By default, Couchbase Server does not delete old log files automatically. Over time, these files can consume significant disk space on your nodes. You can set the pruneAgeparameter in thesettings/auditREST API to make Couchbase Server delete log files based on their age. For more information, see Audit API. -
Edit necessary events in the Events section.
For example, select Data Service to view all of its filterable and non-filterable events.
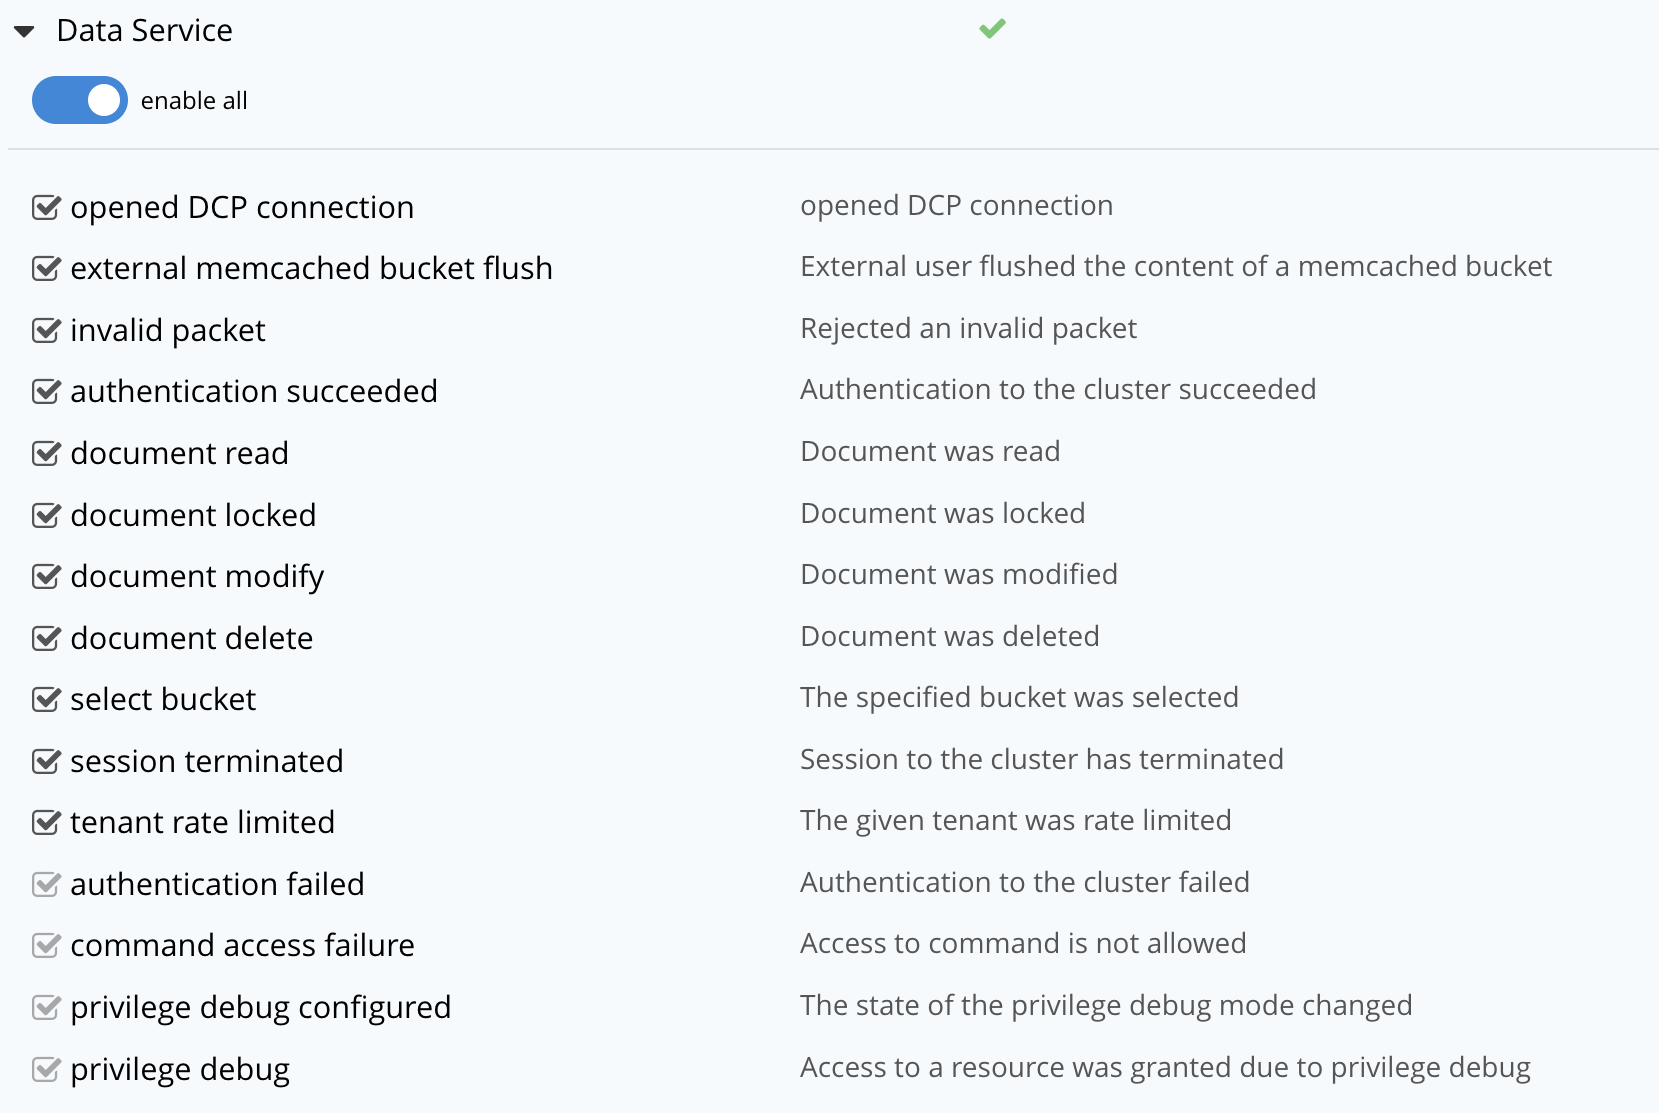
Select or clear the events for the Data Service as required, or select enable all to enable all the events for the Data Service.
Selected events are logged and unselected events are not logged. The greyed-out events are logged, by default.
-
(Optional) To avoid logging filterable events for specific users, mention those filterable events in the Ignore Events From These Users field. For more information, see Ignoring Filterable Events By User.
-
Select Save to save the audit log configuration.
Managing Auditing with the CLI
To manage auditing with the Couchbase CLI, use the setting-audit command, as follows:
/opt/couchbase/bin/couchbase-cli setting-audit \
--cluster 10.143.192.101 \
--username Administrator \
--password password \
--set \
--audit-enabled 1 \
--audit-log-path '/opt/couchbase/var/lib/couchbase/logs' \
--audit-log-rotate-interval 86400 \
--audit-log-rotate-size 104857600
The command explanation is as follows:
-
Enable auditing for the current node, by specifying a value of
1for theaudit-enabledparameter. Specifying0disables auditing for the current node. -
Specify a pathname as the value for
audit-log-path, which is the location for theaudit.logfile. -
Specify an
audit-log-rotate-intervalof86400seconds or 24 hours. -
Specify an
audit-log-rotate-sizeof104857600bytes or 100 MB.
If the call is successful, the following message is displayed:
SUCCESS: Audit settings modified
For more information about configuring audit using the Couchbase CLI, see setting-audit.
Managing Auditing with the REST API
You can manage auditing using the following REST API method and URI:
GET /settings/audit/descriptors

POST /settings/audit
For more information about all the REST API endpoints to manage auditing, see Configure Auditing.
Getting Filterable Audit Events Information
The REST API example, to retrieve information about filterable audit events, is as follows:
In the following example, output is piped to the jq program, to simplify readability.
curl -v -X GET -u Administrator:password http://10.143.192.101:8091/settings/audit/descriptors | jq
If the call is successful, it returns an array of objects, each of which contains identifying information for a filterable event. An output example is as follows:
[
  {
    "id": 8243,
    "name": "mutate document",
    "module": "ns_server",
    "description": "Document was mutated via the REST API"
  },
  {
    "id": 8255,
    "name": "read document",
    "module": "ns_server",
    "description": "Document was read via the REST API"
  },
  {
    "id": 8257,
    "name": "alert email sent",
    "module": "ns_server",
    "description": "An alert email was successfully sent"
  },
          .
          .
          ,
Based on the output, each filterable event has individual id, name, module, and description.
Modifying the Audit Configuration
The REST API example, to modify the current audit configuration, is as follows:
curl -v -X POST -u Administrator:password \
http://10.143.192.101:8091/settings/audit \
-d auditdEnabled=true \
-d disabled=8243,8255,8257,32770,32771,32772,32780,32783,32784,32785,32786,40963 \
-d disabledUsers=testuser/local,@eventing/local,@cbq-engine/local \
-d rotateSize=524288000 \
-d rotateInterval=7200 \
-d logPath='/opt/couchbase/var/lib/couchbase/logs'
-d pruneAge=10800
The example explanation is as follows:
-
Enable node auditing by setting the
auditEnabledparameter totrue. -
Supply a comma-separated list of audit event ids as the value for the
disabledparameter. This indicates that each corresponding filterable event will be disabled. -
Mention a list of
disabledUsers. For more information, see Ignoring Filterable Events By User.When you list the users using the REST API, the local and internal usernames take the /localin the place of the/couchbasesuffix. -
Specify
rotateSizein bytes androtateIntervalin seconds. -
Use the
pruneAgeparameter to instruct Couchbase Server to automatically delete rotated audit logs after 10800 seconds (3 hours).
Auditing User Activity
You can track the last time a user made a request to Cluster Manager. This feature records the most recent activity for each account, allowing administrators to identify active and inactive users.
Administrators can configure roles or groups to include in activity tracking. For more information, see Audit User Activity.
| Couchbase Server only tracks the activity of local users. The feature does not record activity for users who authenticate through external systems, such as LDAP or SAML. |
By default, Couchbase Server tracks activity for certain administrative roles, but you can customize the configuration to meet organizational policies. You can view the last recorded activity in the UI, or through CLI, and the REST API.
Enable User Activity Auditing
You can enable or disable user activity auditing from the UI or using the REST API.
Enable User Activity Auditing from the UI
To enable auditing of user activity, do the following:
-
Open the Couchbase Web Console.
-
Select .
-
To enable user activity auditing, turn on the User activity toggle.
-
Select the roles and groups for which you want to log user activity.
By default, Couchbase Server records the login activities of all users who have an Administrator role. -
To enable or disable user activity logging for roles, go to the Roles section. Then enable or disable each role by selecting or clearing the associated checkboxes respectively.
-
To enable or disable user activity logging for members of a group, go to the Groups section. Then enable or disable each group by selecting or clearing the associated checkboxes respectively.
-
-
Select Save to save the user activity logging configuration.
User Activity Auditing using the REST API
To get the status details or change the status of user activity auditing, use the following methods and URI:
GET /settings/security/userActivity

POST /settings/security/userActivity
Change User Activity Auditing Status using the REST API
To change the status of user activity auditing, use the POST /settings/security/userActivity REST API endpoint, as follows:
curl -X POST http://localhost:8091/settings/security/userActivity -u Administrator:password \
-d enabled=[true | false] \
-d trackedRoles=admin,ro_admin,security_admin,user_admin_local,user_admin_external,cluster_admin,eventing_admin,backup_admin,replication_admin,fts_admin,analytics_admin \
-d trackedGroups=[group_name1,group_name2,...]
The command explanation is as follows:
-
Use
-d enabled=[true | false]to enable or disable user activity auditing. -
Use
trackedRolesto list the roles for which the user activity must be tracked. List the role names separated by commas. -
Use
trackedGroupsto list the groups for which the member user activity must be tracked. List the group names separated by commas.
The following is an example:
curl -X POST http://localhost:8091/settings/security/userActivity -u Administrator:password \
-d enabled=true \
-d trackedRoles=admin,ro_admin,security_admin,user_admin_local,user_admin_external,cluster_admin,eventing_admin,backup_admin,replication_admin,fts_admin,analytics_admin \
-d trackedGroups=DataReaderGroup
Get User Activity Auditing Status using the REST API
To get the current status of user activity auditing, use the GET /settings/security/userActivity REST API endpoint, as follows:
curl -X GET http://localhost:8091/settings/security/userActivity -u Administrator:password | jq '.'
An output example is as follows:
{
  "enabled": true,
  "trackedGroups": [
    "DataReaderGroup"
  ],
  "trackedRoles": [
    "admin",
    "ro_admin",
    "security_admin",
    "user_admin_local",
    "user_admin_external",
    "cluster_admin",
    "eventing_admin",
    "backup_admin",
    "replication_admin",
    "fts_admin",
    "analytics_admin"
  ]
}
View User Activity
User activity tracking records the last time a local user made a request to the Cluster Manager, helping administrators identify active and inactive accounts. You can view the last recorded activity in the UI, or through the REST API.
| User activity is not saved in real time. User activity updates are batched and saved periodically. |
View User Activity from the UI
To view the user activity, do the following:
-
Open the Couchbase Web Console.
-
Select . You can see the last activity time for each user in the last activity column.
-
(Optional) To sort users based on their last activity time, click the column header, last activity.
View User Activity Using the REST API
To view users' last activity, use the GET /settings/rbac/users method and URI as follows:
curl -X GET http://localhost:8091/settings/rbac/users -u Administrator:password | jq '[.[] | select(.id and .last_activity_time) | {id, last_activity_time}]'
In the command, the result is piped through the jq program to find only those users with the last activity time.
An output example is as follows:
[
  {
    "id": "testLocalUser",
    "last_activity_time": "2025-09-17T17:19:05+05:30"
  },
  {
    "id": "testBucketAdmin",
    "last_activity_time": "2025-09-17T19:29:52+05:30"
  },
  {
    "id": "localuser",
    "last_activity_time": "2025-09-16T23:46:19+05:30"
  }
]