Couchbase Server’s native encryption at rest protects sensitive data by encrypting it when writing it to disk. This feature is transparent to the database’s users. Couchbase Server automatically decrypts data when read from disk and encrypts it when writing it to disk.
You can encrypt:
-
All data in a non-ephemeral bucket
-
Logs
-
Configuration data
-
Audit data
For an overview of native encryption at rest, see Native Encryption at Rest.
Enabling Encryption
Enabling encryption at rest is a two step process:
-
Create at least one encryption key. You must use an encryption-at-rest key to encrypt bucket data. You can choose to use the master password instead of an encryption-at-rest key to encrypt audit, configuration, and log data. However, for the best security, you should use an encryption-at-rest key.
-
Enable encryption for one or more types of data.
The following sections explain these steps in greater detail.
Creating Encryption Keys
Couchbase Server only supports encrypting bucket data using an encryption at rest key. Therefore, you must create at least one encryption-at-rest key to encrypt bucket data. You should also consider creating encryption-at-rest keys when encrypting audit, configuration, and log data.
Requirements
For each key you create, you must choose a Key Management Service (KMS) that maintains the key for you. You have three options to choose from:
-
Amazon’s AWS KMS
-
Any KMS that implements the Key Management Interoperability Protocol (KMIP)
-
Couchbase Server
See Encryption Key Management Services for more information.
You must decide what data your encryption key can encrypt. You can create an encryption key that can encrypt any type of data and other encryption keys. You can also choose to limit what types of data the key can encrypt, or configure it to only encrypt other encryption keys. See Encryption-at-Rest Keys for more information.
|
When configuring external KMS integration, make sure that all required key and certificate files are present at the exact file paths specified during key creation. These files must exist on every node in the cluster, including any nodes added during a rebalance operation. Couchbase Server does not create these files automatically. If any of these files are missing or located at a different path, encryption initialization or rebalance operations can fail. For example, the Client Private Key Path (PEM format) must exist at the same specified location on all nodes before you create or edit a KMIP key. |
You must have the proper privileges to create encryption keys. The role you need depends on what the key you’re creating can encrypt:
For keys that can encrypt audit, configuration, or log data or can encrypt other encryption-at-rest keys (KEKs), you must have one or more of the following roles:
For keys that can encrypt any bucket in the cluster, you must have one or more of the following roles:
For keys that can encrypt one or more specific buckets, you must have one or more of the following roles:
-
Bucket Admin that has privileges on the bucket to be encrypted.
Create an Encryption Key Using the Couchbase Server Web Console
To create an encryption key using the Couchbase Server Web Console:
-
Click Security on the main menu.
-
Click Encryption at Rest. The Encryption at Rest tab opens.
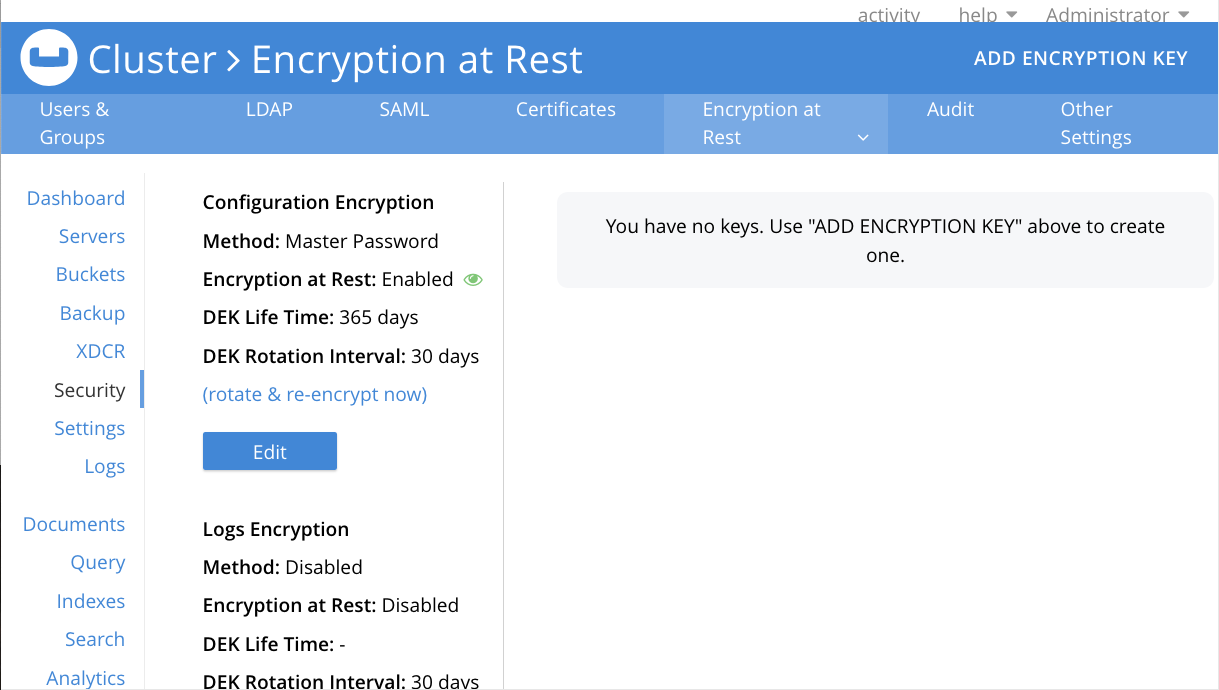
-
Click Add Encryption Key to open the Add Encryption Key dialog.
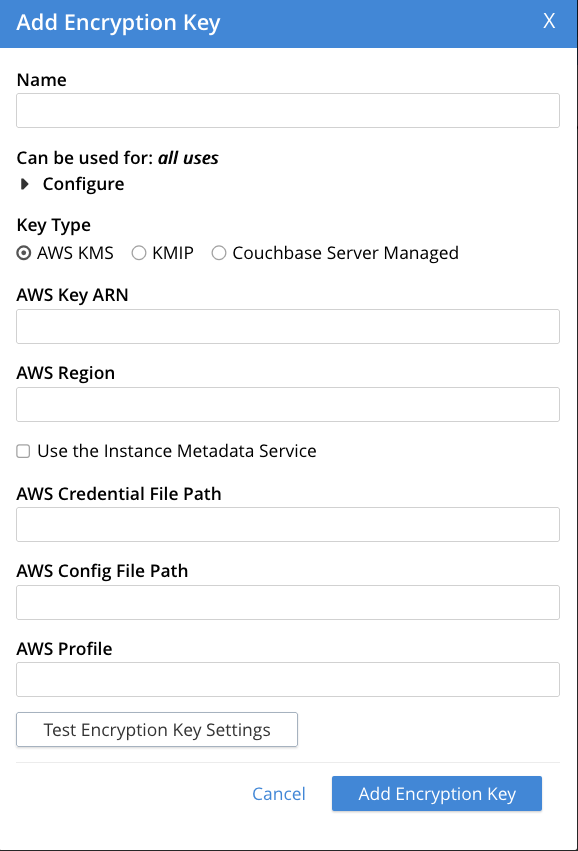
-
Enter a name for your key in the Name box.
-
If you want to limit what your key can encrypt, click Configure to expand the list of uses. Then choose what you want to your key to be able to encrypt.
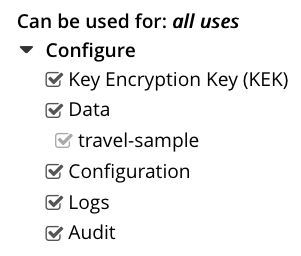
If you want your key to only be able encrypt specific buckets, deselect Data and then select the buckets.
If you’re creating an encryption key managed by a KMIP KMS or AWS KMS, only leave Key Encryption Key (KEK) selected. Then use the key to encrypt an encryption key managed by Couchbase Server. Do not assign an encryption key managed by a remote KMS to directly encrypt data. See this caution for more information. -
Under Key Type, choose the KMS you want to manage your key. The option you choose changes the fields in the rest of the dialog.
-
Depending on the KMS you chose, enter the details to complete creating the encryption key:
-
AWS
-
KMIP
-
Auto-Generated
-
Enter the Amazon Resource Name (ARN) for the encryption key and the AWS Region in which the KMS is located.
-
Choose whether to use the AWS Instance Metadata Service. Enable this option if your Couchbase Server cluster runs on AWS EC2 instances to allow it to connect to other AWS services.
-
Enter the paths on your cluster where you have stored the AWS credential and configuration files.
-
Enter the name of the profile defined in your AWS configuration file that Couchbase Server should use.
-
Verify that your settings work by clicking the Test Encryption Key Settings button.
To use a KMIP-compatible KMS:
-
Enter the host and port number for the KMS server and choose a timeout for network connections.
-
Choose which certificates to use when verifying the identity of the KMS. You can choose to not verify the KMS’s identity, however this is insecure.
-
Enter the details for the client certificate Couchbase Server uses to authenticate with the KMS. This information includes how to encrypt the certificate passphrase.
-
In the KMIP Encryption/Decryption Approach field, choose how Couchbase Server interacts with the KMS:
-
Select Use KMIP Get & encrypt locally, if you want Couchbase Server to retrieve the encryption key from the KMS and use it locally to decrypt keys and data.
-
Select Use KMIP native Encrypt/Decrypt operation to have Couchbase Server send the encrypted DEKs to the KMS so it can decrypt them. This method is more secure, because the encryption key does not leave the KMS.
-
This option has Couchbase Server manage the key. To complete creating the key:
-
Choose whether you want to use the cluster’s master password or another encryption key to encrypt your new key. If you want to use another encryption key, it must be configured as a Key Encryption Key (KEK).
-
Decide whether you want Couchbase Server to cache the key. This setting lets Couchbase Server keep the key unencrypted in memory so it does not have to read and decrypt it for each encryption or decryption. Disabling this option increases processor resource use because Couchbase Server has to decrypt the key for each use. Disabling it does slightly improve security by reducing the chance of in-memory key exposure attacks.
-
Decide whether you want to have the encryption-at-rest key auto rotate. If you choose to rotate it, enter how often to rotate, a date and time for the first rotation. See Encryption Key Rotation and Expiration for more information about key rotation.
-
Create an Encryption Key Using the REST API
The REST API’s /settings/encryptionKeys endpoint lets you create and manage encryption keys.
To create an encryption key, send a POST containing details of the key to this endpoint.
The following example shows how to create an encryption key managed by Couchbase Server using the REST API:
curl -u Administrator:password \
  -X POST \
  http://127.0.0.1:8091/settings/encryptionKeys \
  --data-binary @- <<EOF | jq
{
  "name": "Example Auto-Generated Key",
  "type": "cb-server-managed-aes-key-256",
  "usage": [
    "bucket-encryption-travel-sample", "config-encryption", "log-encryption"
  ],
  "data": {
    "rotationIntervalInDays": 90,
    "nextRotationTime": "2025-07-31T19:27:19Z"
  }
}
EOF
Some of the parameters set in the example are:
-
name: the name you want to give the key. -
type: the KMS you want to use to manage the key and the key’s encryption algprithm. -
usage: the type of data the key can encrypt.
The data object content depends on the KMS you chose.
For keys managed by Couchbase Server, the data object’s content mainly set key rotation options.
The example sets the rotationIntervalInDays to 90 and the date of the next rotation to July 1st 2025.
The output of running the previous example looks like this:
{
  "data": {
    "keys": [
      {
        "id": "fad3d3ae-9195-4779-994e-69266c9360c9",
        "active": true,
        "creationDateTime": "2025-05-02T19:34:07Z",
        "keyMaterial": "******"
      }
    ],
    "encryptionApproach": "nodeSecretManager",
    "canBeCached": true,
    "nextRotationTime": "2025-07-31T19:27:19Z",
    "autoRotation": true,
    "rotationIntervalInDays": 90
  },
  "id": 13,
  "name": "Example Auto-Generated Key",
  "type": "cb-server-managed-aes-key-256",
  "usage": [
    "bucket-encryption-travel-sample",
    "config-encryption",
    "log-encryption"
  ],
  "creationDateTime": "2025-05-02T19:34:07Z"
}
See Create or Update an Encryption-at-Rest Key for details on how to create keys using the REST API.
Encrypt Data at Rest
Once you have created an encrytion-at-rest key, you can use it to encrypt bucket data. For audit, configuration, and log data, you can choose to use the master password instead of an encryption-at-rest key. You must set the master password on each node before using it for encryption at rest. By default, the nodes do not have a master password. See Setting the Master Password for more information.
| Once you enable encryption for a bucket or system data, Couchbase Server begins to encrypt data as it writes it. It does not encrypt the data that existed before you enabled encryption. See When Couchbase Server Encrypts Data for more information when Couchbase Server encrypts and decrypts data. |
The following sections explain how to enable encryption for each type of data.
Encrypt Bucket Data
To encrypt a bucket, you must have at least one encrytion-at-rest key configured to encrypt all buckets or the specific bucket you want to encrypt. See Creating Encryption Keys for more information about creating encryption-at-rest keys.
Users with Bucket Admin or Cluster Admin roles can enable encryption for rest for buckets as long as an encryption key exists that’s allowed to encrypt the bucket.
| Once you enable encryption for a bucket, Couchbase Server begins to encrypt data as it writes it. It does not encrypt the data that existed in the bucket before you enabled encryption. See When Couchbase Server Encrypts Data for more information when Couchbase Server encrypts and decrypts data. |
Encrypt a Bucket Using the Couchbase Server Web Console
-
On the main menu, select Buckets.
-
You can encrypt a bucket when you create it or you can edit an existing bucket to encrypt it.
For an existing bucket:
-
Click the name of the bucket you want to encrypt.
-
Click Edit.
For a new bucket:
-
Click Add Bucket to open the Create Bucket dialog.
-
-
In the Edit Bucket Settings or Add Data Bucket dialog, expand the Advanced bucket settings section.
-
Select Enable Encryption at Rest.
-
In the Available Encryption Keys list, select the encryption key you want to use to encrypt the bucket.
-
Edit the DEK Rotation Interval and DEK Life Time settings to configure the data encryption key rotation. See Encryption Key Rotation and Expiration for more information about these settings.
-
If you are adding a bucket, configure the rest of the settings for your bucket. See Create a Bucket with the UI for more information about creating buckets.
-
Click Add Bucket or Save Changes to save your changes.
Encrypt a Bucket Using the REST API
When creating a bucket, you can set the encryptionAtRestKeyId parameter to the ID of the encryption key you want to use to encrypt the bucket:
curl -v -X POST http://127.0.0.1:8091/pools/default/buckets \
-u Administrator:password \
-d name=testBucket \
-d ramQuota=100 \
-d encryptionAtRestKeyId=0
When updating an existing bucket, you can set the encryptionAtRestKeyId parameter to the ID of the encryption key you want to use to encrypt the bucket:
curl -v -X POST http://127.0.0.1:8091/pools/default/buckets/testBucket \
-u Administrator:password \
-d encryptionAtRestKeyId=18
If the bucket is already encrypted, Couchbase Server re-encrypts the bucket’s data encryption keys (DEKs) using the newly-assigned encryption key. If the bucket is not encrypted, Couchbase Server begins encrypting its data.
See Creating and Editing Buckets for more information about creating and updating buckets using the REST API.
Encrypt Audit, Configuration, and Log Data
You can encrypt audit, configuration, and log data using the master password or an encryption-at-rest key. By default, Couchbase Server encrypts the configuration data using the master password.
To make changes to the encryption settings for audit, configuration, and log data, you must have the Full Admin or Security Admin roles.
Change Audit, Configuration, or Log Encryption Settings via the Web Console
To change the settings for audit, configuration, and log data via the Couchbase Server Web Console:
-
Click Security on the main menu.
-
Click Encryption at Rest.
-
Click Edit under Configuration Encryption, Logs Encryption, or Audit Encryption depending on the type of data whose encryption settings you want to change.
-
In the Encryption at Rest dialog, change the encryption-at-rest settings:
- To Disable Encryption
-
Select Disabled
- To Use the Master Password
-
Select Master Password
- To Use an Encryption-at-Rest Key
-
-
Select Encryption Key.
-
Under Available Encryption Keys, select the encryption key you want to use. You must have a key that you configured to encrypt the type of data you selected.
-
Optionally change the DEK Rotation Interval and DEK Life Time settings to configure the data encryption key rotation. See Encryption Key Rotation and Expiration for more information about these settings.
-
-
Click Save Changes to save your changes.
Change Audit, Configuration, or Log Encryption Settings via the REST API
The REST API’s /settings/security/encryptionAtRest endpoint lets you change the settings for audit, configuration, and log data encryption.
To change the settings, send a POST request to this endpoint with settings for each type of data you whose encryption you want to change.
The following example shows how to enabled encryption at rest for audit data using an encryption-at-rest key whose id is 0:
 curl -v -u Administrator:password \
      -X POST 'http://127.0.0.1:8091/settings/security/encryptionAtRest' \
      -d "audit.encryptionMethod=encryptionKey" \
      -d "audit.encryptionKeyId=0" | jq
You can find the id attribute of the encryption-at-rest key you want to use by sending a GET request to the /settings/encryptionKeys endpoint.
See List Encryption-at-Rest Keys for more information about this endpoint.
|
For more information about managing encryption at rest settings for audit, configuration, and log data, see Manage Audit, Config, and Log Encryption at Rest.
Viewing Encryption Status
You can view the status of encryption at rest for a bucket, audit, configuration, and log data using the Couchbase Server Web Console or the REST API.
Viewing Encryption Status Using the Couchbase Server Web Console
To view the status of encryption at rest for a bucket using the Couchbase Server Web Console:
-
Click Buckets on the main menu.
-
Click the name of the bucket whose encryption status you want to view.
-
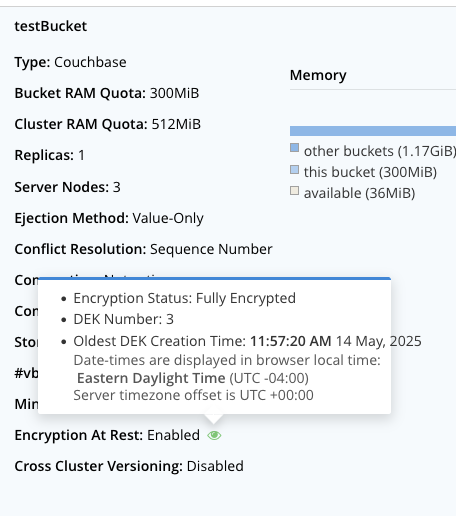
The encryption status appears next to the Encryption At Rest label under the bucket’s name.
-
For more details, hover over the eye icon next to the Encryption At Rest label.
To view the status of encryption at rest for audit, configuration, and log data using the Couchbase Server Web Console:
-
Click Security on the main menu.
-
Click the Encryption at Rest tab.
-
The encryption status appears next to the Configuration Encryption, Logs Encryption, and Audit Encryption labels.
-
To view details about the encryption status, hover over the eye icon next to the label.
Viewing Encryption Status Using the REST API
To view the encryption status of buckets using the REST API, send a GET request to the /pools/default/buckets endpoint.
View the encryptionAtRestKeyId field in the response to see the encryption status of each bucket.
If it’s set to -1, the bucket is not encrypted.
If it’s set to any other value, the bucket is encrypted and the value is the ID of the encryption key Couchbase Server uses to encrypt it.
Additional details, such as the encrypted status of the data, are in the encryptionAtRestInfo object.
See rest-api:rest-bucket-summary.adoc for more information about the /pools/default/buckets endpoint.
The following example shows how to view the encryption status of the bucket bucket named testBucket.
It pipes the REST API result through the jq command to format and filter the output to show just the encryptionAtRestKeyId and encryptionAtRestInfo fields:
curl -X GET -u Administrator:password \
      http://localhost:8091/pools/default/buckets/testBucket \
      | jq '{encryptionAtRestInfo, encryptionAtRestKeyId}'
The result of running this command looks like this:
{
  "encryptionAtRestInfo": {
    "dataStatus": "encrypted",
    "dekNumber": 3,
    "issues": [],
    "oldestDekCreationDatetime": "2025-05-14T15:57:20Z"
  },
  "encryptionAtRestKeyId": 18
}
To view the encryption status of audit, configuration, and log data using the REST API, send a GET request to the /settings/security/encryptionAtRest endpoint.
See Get Audit, Config, and Log Encryption-at-Rest Settings for more information.
Manually Rotate Encryption-at-rest Keys
You can have Couchbase Server automatically rotate the encryption-at-rest keys it manages based on a schedule you set when creating the key. You can also manually have Couchbase Server rotate a key that it manages. To rotate an encryption-at-rest key managed by an external KMS, you must use the KMS’s tools to rotate the key, then have Couchbase Server re-encrypt DEKs with the new key.
The following sections explain the manual processes.
Manually Rotate a Couchbase Server-Managed Encryption-At-Rest Key
You can manually rotate encryption-at-rest keys that Couchbase Server manages. You may choose to manually rotate a key if you believe it has been compromised or if you your security requirements have changed.
When you rotate an encryption-at-rest key, Couchbase Server creates a new key and uses it to re-encrypt all DEKs that were encrypted with the previous version of the key. This process does not re-encrypt data, as the DEKs do not change.
To manually rotate a Couchbase-Managed encryption-at-rest key using the Couchbase Server Web Console:
-
Click Security on the main menu.
-
Click the Encryption at Rest tab.
-
Click the encryption key you want to rotate.
-
Click the Rotate button next to the key you want to rotate.
To manually rotate an encryption-at-rest key, send a POST request to the /controller/rotateEncryptionKey/{KEY_ID} endpoint, where {KEY_ID} is the ID of the key you want to rotate.
See Rotate Data Encryption Keys for more information about manually rotating encryption-at-rest keys using the REST API.
Manually Rotate a Encryption-at-rest Key Managed by AWS KMS
To rotate an encryption-at-rest key managed by AWS KMS, you must use AWS’s tools to rotate the key. See Rotate AWS KMS keys to learn how to rotate keys in AWS KMS. Once you have rotated the key in AWS KMS, have Couchbase Server re-encrypt any DEKs encrypted with the previous version of the key.
To re-encrypt the DEKs with the rotated key using the Couchbase Server Web Console:
-
Click Security on the main menu.
-
Click the Encryption at Rest tab.
-
Click the encryption key that you rotated in AWS KMS.
-
Click Rotate next to the key you want to rotate.
To re-encrypt the DEKs using the REST API, send a POST request to the /controller/rotateEncryptionKey/{KEY_ID} endpoint, where {KEY_ID} is the ID of the key that you rotated in AWS KMS.
See Rotate Data Encryption Keys for more information about manually rotating encryption-at-rest keys using the REST API.
Manually Rotate an Encryption-at-rest Key Managed by a KMIP KMS
You must use the KMS’s tools to rotate the keys it manages. Couchbase Server cannot trigger the rotation of a key managed by an external KMS. Consult your KMS’s documentation to learn how to rotate its keys.
|
When configuring external KMS integration, make sure that all required key and certificate files are present at the exact file paths specified during key creation. These files must exist on every node in the cluster, including any nodes added during a rebalance operation. Couchbase Server does not create these files automatically. If any of these files are missing or located at a different path, encryption initialization or rebalance operations can fail. For example, the Client Private Key Path (PEM format) must exist at the same specified location on all nodes before you create or edit a KMIP key. |
Some KMIP KMSs require you to create a new key with a new ID when rotating a key. In this case, when you rotate a key in the KMS, you must update the key ID in Couchbase Server.
To update the key ID in Couchbase Server using the Couchbase Server Web Console:
-
Click Security.
-
Click Encryption at Rest.
-
Click the KMIP KMS encryption key that you rotated.
-
Click the Edit.
-
In the Edit Encryption Key dialog, change the KMIP Key ID to the new key ID and click Save Encryption Key.
To update the key ID in Couchbase Server using the REST API, use the /settings/encryptionKeys/{KEY_ID} endpoint to modify the key.
The KEY_ID path parameter is the Couchbase Server ID of the key you want to update.
Update the activeKey.kmipId attribute in the data object to the new key ID.
The following example updates the KMIP key ID of the encryption-at-rest key with the Couchbase Server id of 3 to the a KMIP key ID:
curl -sS -u Administrator:password  \
     -X PUT   http://127.0.0.1:8091/settings/encryptionKeys/3   \
       --data-binary @- <<EOF | jq
{
  "name": "Example KMIP Key",
  "type": "kmip-aes-key-256",
  "usage": [
    "KEK-encryption"
  ],
"data": {
      "port": 5696,
      "host": "kms.example.com",
      "certPath": "/scripts/certs/cb_cert.pem",
      "keyPath": "/scripts/certs/cb_key.pem",
      "activeKey": {
        "kmipId": "5b7e1ee1-33e5-4468-b168-50f391e8baa4"
    }
  }
}
EOF
The result of running this command looks like this:
{
  "data": {
    "port": 5696,
    "host": "kms.example.com",
    "reqTimeoutMs": 30000,
    "keyPath": "/scripts/certs/cb_key.pem",
    "keyPassphrase": "******",
    "encryptionApproach": "useGet",
    "certPath": "/scripts/certs/cb_cert.pem",
    "caSelection": "useCbCa",
    "encryptWith": "nodeSecretManager",
    "historicalKeys": [
      {
        "id": "afba44fb-4ae5-4d40-b1e1-3a661b0948e1",
        "kmipId": "0788edb1-1418-4225-903b-bc1f9f59aa4d",
        "creationDateTime": "2025-08-07T18:46:15Z"
      }
    ],
    "activeKey": {
      "id": "78130a6c-2a5f-4941-92ee-52223f473e01",
      "kmipId": "5b7e1ee1-33e5-4468-b168-50f391e8baa4",
      "creationDateTime": "2025-08-07T18:49:38Z"
    }
  },
  "id": 3,
  "name": "Example KMIP Key",
  "type": "kmip-aes-key-256",
  "usage": [
    "KEK-encryption"
  ],
  "creationDateTime": "2025-08-07T18:46:15Z"
}
See Create or Update an Encryption-at-Rest Key for more information about updating encryption-at-rest keys using the REST API.
| When you change the KMIP key ID, Couchbase Server starts re-encryption the DEKs that used the old key with the new key. However, this process may take some time. Be sure that the KMS does not delete the old key until Couchbase Server has finished re-encrypting the DEKs with the new key. |
Manually Drop DEKs and Re-encrypt Data
You can have Couchbase Server drop the data encryption keys (DEKs) for a bucket or type of data and re-encrypt the data with new DEKs. You may choose to do this if you believe the DEKs have been compromised. When you drop the DEKs for a bucket or type of data, Couchbase Server creates a new replacement DEK and uses it to re-encrypt all of the data in the bucket or of that type. Then it removes the old DEKs.
| Dropping DEKs is not the same as rotating DEKs. When Couchbase Server automatically rotates a DEK, it makes it inactive, creates a new active DEK, and then uses that for newly written data. It does not re-encrypt data, nor does it immediately remove the old DEKs. |
Drop DEKs for a Bucket
To drop DEKs for a bucket using the Couchbase Server Web Console:
-
Click Buckets on the main menu.
-
Click the name of the bucket whose DEKs you want to rotate.
-
Click Re-encrypt.
-
In the Confirm Rotate DEKs & Re-encrypt Data dialog, click Rotate DEKs & Re-encrypt to confirm you want to rotate the DEKs and re-encrypt the data.
| This process re-encrypts all data in the bucket. Depending on the amount of data the bucket stores, this process can take a long time and could affect the performance of the cluster. |
To learn how to drop DEKs for a bucket using the REST API, see Drop DEKs and Re-encrypt Data for a Bucket.
Drop DEKs for Audit, Configuration, or Log Data
To drop DEKs for audit, configuration, or log data using the Couchbase Server Web Console:
-
Click Security on the main menu.
-
Click the Encryption at Rest tab.
-
Click rotate DEKs and re-encrypt now under Configuration Encryption, Logs Encryption, or Audit Encryption depending on the type of data whose DEKs you want to drop.
To learn how to drop DEKs for audit, configuration, or log data using the REST API, see Drop DEKs and Re-encrypt Data for a Bucket.
Deleting Encryption Keys
You can delete an encryption key using the Couchbase Server Web Console or the REST API. You can only delete an encryption key if it’s not used to encrypt data. If you want to delete a that’s in use, you must first assign any data or key that’s encrypted by it to a different key.
Delete an Encryption-At-Rest Key Using the Couchbase Server Web Console
To delete an encryption key using the Couchbase Server Web Console:
-
Click Security on the main menu.
-
Click the Encryption at Rest tab.
-
Click the encryption key you want to delete.
-
Click the Delete button next to the key you want to delete.
-
In the Confirm Delete dialog, click Delete Encryption Key to confirm you want to delete the key.
Delete an Encryption-At-Rest Key Using the REST API
To delete an encryption key using the REST API, send a DELETE request to the /settings/encryptionKey/{KEY_ID} endpoint.
The following example shows how to delete the encryption key with the id 13 using the REST API:
 curl -v -u Administrator:password -X DELETE \
      http://127.0.0.1:8091/settings/encryptionKeys/13 | jq