Migrating Application Data to a Collections-Based Model
With the introduction of scopes and collections, you can plan for a simpler mapping from RDBMS and consolidate hundreds of microservices and/or tenants in a single Couchbase cluster, resulting in much lower operational cost.
This topic provides guidelines to help migrate your data from a bucket-based model (pre-7.0) to the collections-based model using scopes and collections in Couchbase Server 7.0 and later.
To learn more about scopes and collections, refer to the Learn section in the documentation.
While the exact steps to migrate will depend on your use case and requirements, following are the high level steps that will be explained in subsequent sections.
-
Plan your collections strategy
-
What buckets, scopes, collections and indexes you will have
-
Determine mapping from old bucket(s) to new bucket(s)/scope(s)/collections
-
Scripts to create scopes, collections and indexes
-
-
Migrate your application code
-
SDK code including SQL++ queries
-
-
Data migration
-
Determine if offline strategy works or online migration is necessary
-
Follow steps for offline or online migration
-
-
Plan and implement your security strategy
-
What Users and Role assignments will you need?
-
Create scripts to manage these assignments
-
-
Go live with your new collections-aware application
-
Setup XDCR and setup backup
Pre-requisite: Upgrade to Couchbase Server version 7.x
Ensure that you upgrade your cluster to Couchbase Server 7.0 or later. For information about the upgrade process and procedures, see Upgrading Couchbase Server.
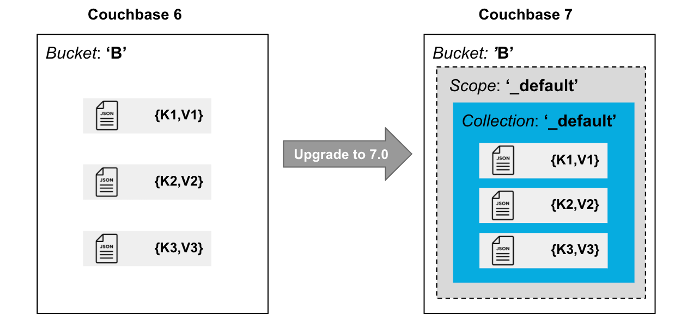
Every bucket in Couchbase Server 7.0 or later has a _default scope with a _default collection in it.
When you upgrade to version 7.0 or later, all data in the bucket is moved to the _default collection of the bucket.
There will be no impact to existing applications, for example, any references to bucket B will automatically resolve to B._default._default.
If you do not wish to use named scopes and collections, you can stop right here. But if you would like to use this new feature, read on.
Plan your Scopes and Collections Strategy
Common Migration Scenarios
There are two common migration scenarios:
-
Consolidating data in multiple buckets to collections in a single bucket
-
Splitting data in a single bucket into multiple collections in a bucket.
Consolidating multiple buckets to collections in a single bucket
Consolidating multiple buckets into a single bucket enables you to lower your costs (TCO) by allowing for much higher density. For example, a cluster can only have up to 30 buckets, whereas you can have 1000 collections per cluster.
This migration scenario will be useful for microservice consolidation.
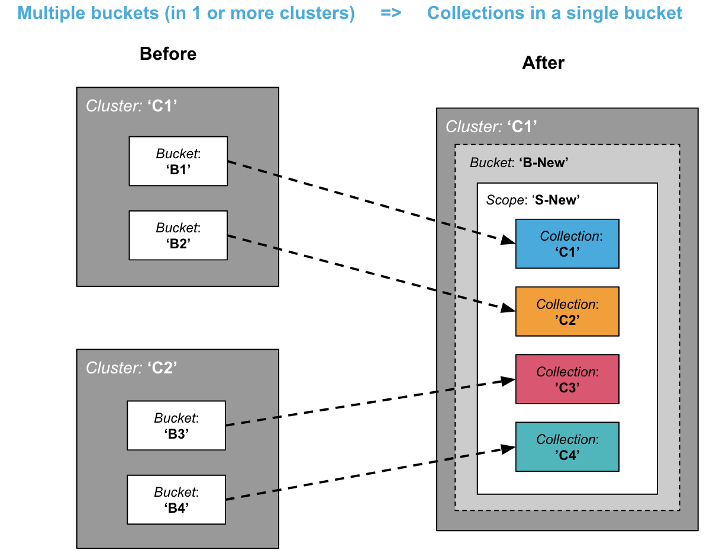
While the diagram shows one variation where all target collections belong to the same scope, the target collections can belong to different scopes as well.
Splitting data in a single bucket to multiple collections in a bucket
Splitting data from a single bucket into multiple collections in a bucket enables you to take advantage of logical isolation, security isolation, replication and access control. For example, data previously qualified with a “type = xxx” field or with a key prefix “xxx_key” can now live in their own collection.
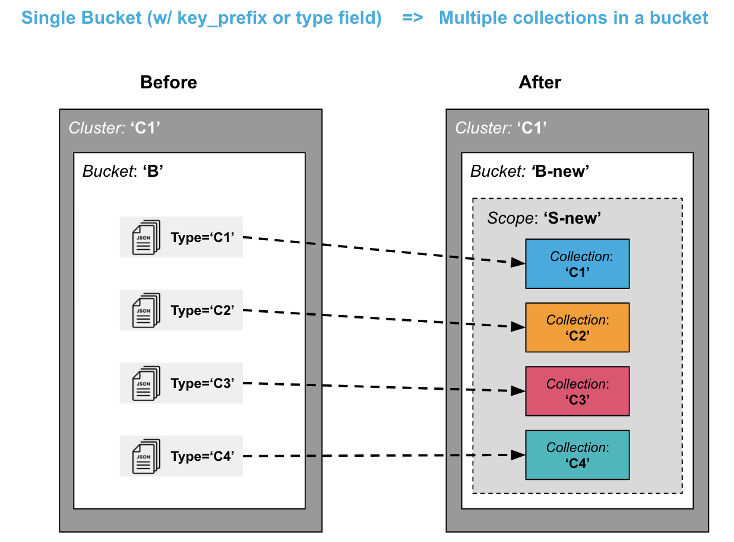
Note that this scenario may be slightly more complex than the previous scenario especially if you want to get rid of the key prefix or type field. For a simpler migration, you may want to leave the key prefixes and type data fields as is, even though they may be somewhat redundant with collections.
Scripts to Create Scopes, Collections, and Indexes
Once you have planned what scopes, collections, and indexes you want to have, you will need to create scripts to create these entities. To do so, you can choose to use one of the following options:
-
An SDK of your choice
-
Couchbase CLI,
couchbase-cli -
REST APIs
-
SQL++ scripts
Here is an example of using the CLI (couchbase-cli and cbq) to create a scope, collection, and an index:
// create a scope called 'myscope' using couchbase-cli
./couchbase-cli  collection-manage -c localhost -u Administrator -p password --bucket testBucket --create-scope myscope

// create a collection called mycollection in myscope
./couchbase-cli  collection-manage -c localhost -u Administrator -p password --bucket testBucket --create-collection myscope.mycollection

// create and index on mycollection using cbq (1)
./cbq --engine=localhost:8093 -u Administrator -p password --script="create index myidx1 on testBucket.myscope.mycollection(field1,field2);"| 1 | Note that the index creation statement does not require you to qualify the data with a type = xxx or key-prefix qualification clause anymore. |
| Ensure that you are conforming to the naming conventions for scopes and collections. |
Migrate your Application Code
In order to use named scopes and collections, your application code (including SQL++ queries) will need to be migrated.
If you were using type fields or key prefixes previously, you will not need them anymore.
SDK Example
In your SDK code you have to connect to a cluster, open a bucket and obtain a reference to a collection object to store and retrieve documents. Prior to collections, all key-value operations were performed directly on the bucket.
Note: If you have already migrated to SDK 3.0, you have already done some of the work of starting to use collections (though up until 7.0, you could only use the default collection).
The following is a simple Java SDK code snippet for storing and retrieving a document to a collection:
Cluster cluster = Cluster.connect("127.0.0.1", "Administrator", "password");

Bucket bucket = cluster.bucket("bucket-name");
Scope scope = bucket.scope("scope-name");
Collection collection = scope.collection("collection-name");

JsonObject content = JsonObject.create().put("author", "mike");
MutationResult result = collection.upsert("document-key", content);

GetResult getResult = collection.get("document-key");
SQL++ Queries
To run a SQL++ query on the collection created in the previous section, use the following code snippet:
//run a SQL++ using the context of the scope
scope.query("SELECT * FROM collection-name");
Notice that you can query directly on a scope. The above query on the scope object automatically maps to SELECT * FROM bucket-name.scope-name.collection-name.
A scope may have multiple collections and you can join those directly by referencing the collection name within the scope.
If you need to query across scopes (or across buckets), then it is better to use the cluster object to query.
Another way to provide path context to SQL++ is to set it on QueryOptions.
QueryOptions qo = QueryOptions.queryOptions().raw(“query_context”, "bucket-name.scope-name");
cluster.query("SELECT * FROM collection-name", qo);
Note that queries no longer need to qualify with type = xxx field or key_prefix qualifier.
| Query using bucket-based model(pre-7.0) | Query using collection-based model (7.x) |
|---|---|
|
|
Data Migration
Before migrating your existing data to your new named scopes and collections, you must first determine whether you can afford an offline migration (where your application is offline for a few hours), or if you need a mostly online migration with minimal application downtime.
Offline migration could be faster overall, and requires fewer extra resources such as extra disk space or nodes.
Offline Migration
If you can afford an offline migration, you can choose to migrate using SQL++ scripts, or use the backup and restore feature.
Using SQL++ Scripts
- Prerequisite
-
Ensure that your cluster has sufficient disk space and that Query service is running.
The following high-level tasks provide guidance to perform an offline migration using SQL++ scripts:
-
Create new scopes, collections, and indexes.
-
Take the old application offline.
-
For each named collection, perform the following:
-
Insert data using filters. Select data from the
_defaultcollection and insert into the named collection. -
For data that was migrated in the previous step, delete data from the
_defaultcollection to save space. If space is not an issue, you can perform this task at the very end.
-
-
Verify your migrated data.
-
Drop old buckets.
-
Bring your new application online.
Using Backup and Restore
- Prerequisite
-
Ensure that you have sufficient disk space to store your backup.
The following high-level tasks provide guidance to perform an offline migration using the backup and restore feature:
-
Create new scopes, collections, indexes.
-
Take the old application offline.
-
Take a backup (cbbackupmgr) of the 7.x cluster.
-
Restore using explicit mapping to named collections.
-
Use
--filter-keysand--map-data. Refer to the examples below.
-
-
Bring your new application online.
Example 1 No filtering
Consider the following example that moves the entire _default collection to a named collection, which is (this is the likely case for scenario 1 of consolidation).
// Backup the default scope of a bucket upgraded to 7.x

cbbackupmgr config -a  backup -r test-01 --include-data beer-sample._default
cbbackupmgr backup -a  backup -r test-01 -c localhost -u Administrator -p password

// Restore above backup to a named collection

cbbackupmgr restore -a  backup -r test-01 -c localhost -u Administrator -p password  --map-data beer-sample._default._default=beer-sample.beer-service.service_01
Example 2 With filtering
Consider the following example moves portions of _default collection to different named collections (this is the likely case for scenario 2 of splitting).
// Backup the travel-sample bucket from a cluster upgraded to 7.x

cbbackupmgr config -a  backup -r test-02 --include-data travel-sample
cbbackupmgr backup -a  backup -r test-02 -c localhost -u Administrator -p password

// Restore type=’airport’ documents to a collection travel.booking.airport
cbbackupmgr restore -a  backup -r test-02 -c localhost -u Administrator -p password  --map-data travel-sample._default._default=travel.booking.airport --auto-create-buckets --filter-values '"type":"airport"'

// Restore key_prefix =’airport’ documents to a collection travel.booking.airport
cbbackupmgr restore -a  backup -r test-02 -c localhost -u Administrator -p password  --map-data travel-sample._default._default=travel.booking.airport --auto-create-buckets --filter-keys airport_*
Online Migration
Online Migration Using XDCR
A mostly online migration will require you to use replication (XDCR).
-
Setup XDCR from source cluster to target cluster. Depending on the spare disk space and compute resources in your source cluster, you can choose to perform self-XDCR, where the source and destination bucket are on the same cluster), or you can set up a separate cluster to replicate to.
-
Create new buckets, scopes, collections, and indexes.
-
Set up replications either directly from a bucket to a bucket.scope.collection or using Migration Mode (details shown below) if a single bucket’s default collection has to be split to multiple collections.
-
Explicit mapping rules are specifiable for each destination to specify subset of the data.
-
Once replication destination are caught up, you can take the old application offline.
-
Bring the new application online and direct it to the new cluster (or new bucket if using self-XDCR).
-
Delete the old cluster, or old bucket if using self-XDCR.
Using replication (XDCR) to consolidate from multiple buckets to a single bucket
This is the consolidation scenario.
For each source bucket, set up a replication to the named collection in the destination bucket and scope. The following screenshot shows the XDCR set up for 1 source bucket.

Using replication (XDCR) to split from a single bucket to multiple collections
The following XDCR screens show the replication setup.
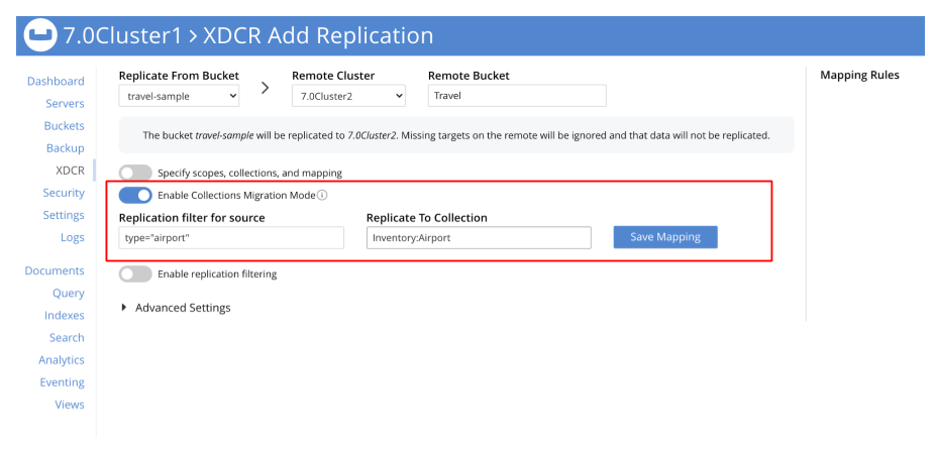
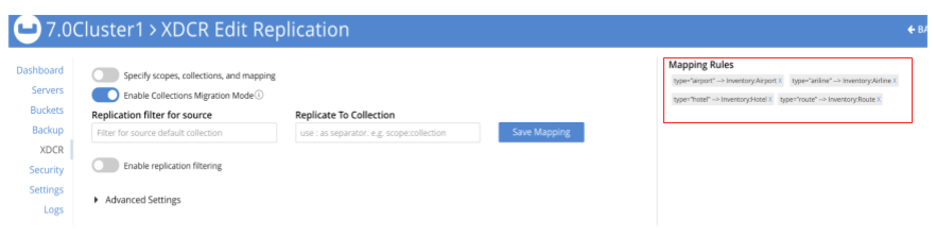
In this example, the sample dataset travel-sample._default._default is the source and a new bucket travel is the target. There are 4 filters set up:
-
filter type="airport", replicate to Inventory:Airport
-
filter type="airline", replicate to Inventory:Airline
-
filter type="hotel", replicate to Inventory:Hotel
-
filter type="route", replicate to Inventory:Route
Online Migration Using Eventing
The Eventing Service, like XCDR, can also be used to convert (or more aptly, reorganize) upgraded buckets in a 7.x deployment into targeted collections.
A detailed example of reorganizing data from any keyspace is given in the scriptlet ConvertBucketToCollections.
Plan and Implement your Security Strategy
Now that your data has been migrated to named scopes and collections, you have finer control over what data you can assign privileges to.
The following roles are available at scope and collection levels. Refer to the RBAC documentation for details.
- Admin Roles
-
The Scope Admin role is available at scope level. A Scope Admin can administer collections in their scope.
- Data Reader Roles
-
Data Reader Data Writer Data DCP Reader Data Monitoring
- Query Roles
-
FTS Searcher Query Select Query Update Query Insert Query Delete Query Manage Index Query Manage Functions Query Execute Functions