Manage Users, Groups, and Roles
Couchbase Server lets you assign roles to individual users, which grant access to resources. You can also create groups of users and assign roles to each group. Each user automatically inherits the roles of the groups they belong to.
Creating and Managing Users and Groups
The administrator, who installs and configures Couchbase Server, is granted the Full Administrator role, with complete access to the system, including read and write privileges. After the initial configuration is complete, the Full Administrator can add other users and assign roles to define their privileges.
|
As a Full Administrator, you can add users and groups to Couchbase Server by using the Couchbase Web Console UI, the CLI, or the REST API, as described in the following sections.
| All explanations and examples on this page are for the Couchbase Server cluster user with the Full Administrator role, unless otherwise noted. |
For more information about the Couchbase Server authorization, see Authorization.
For more information about roles and corresponding privileges, see Roles.
Manage Users and Groups from the UI
Manage users and groups in Couchbase Server through the Couchbase Web Console.
To see the Security screen, do the following:
-
Open the Couchbase Web Console.
-
On the Dashboard, go to the Security tab, and select Users & Groups.
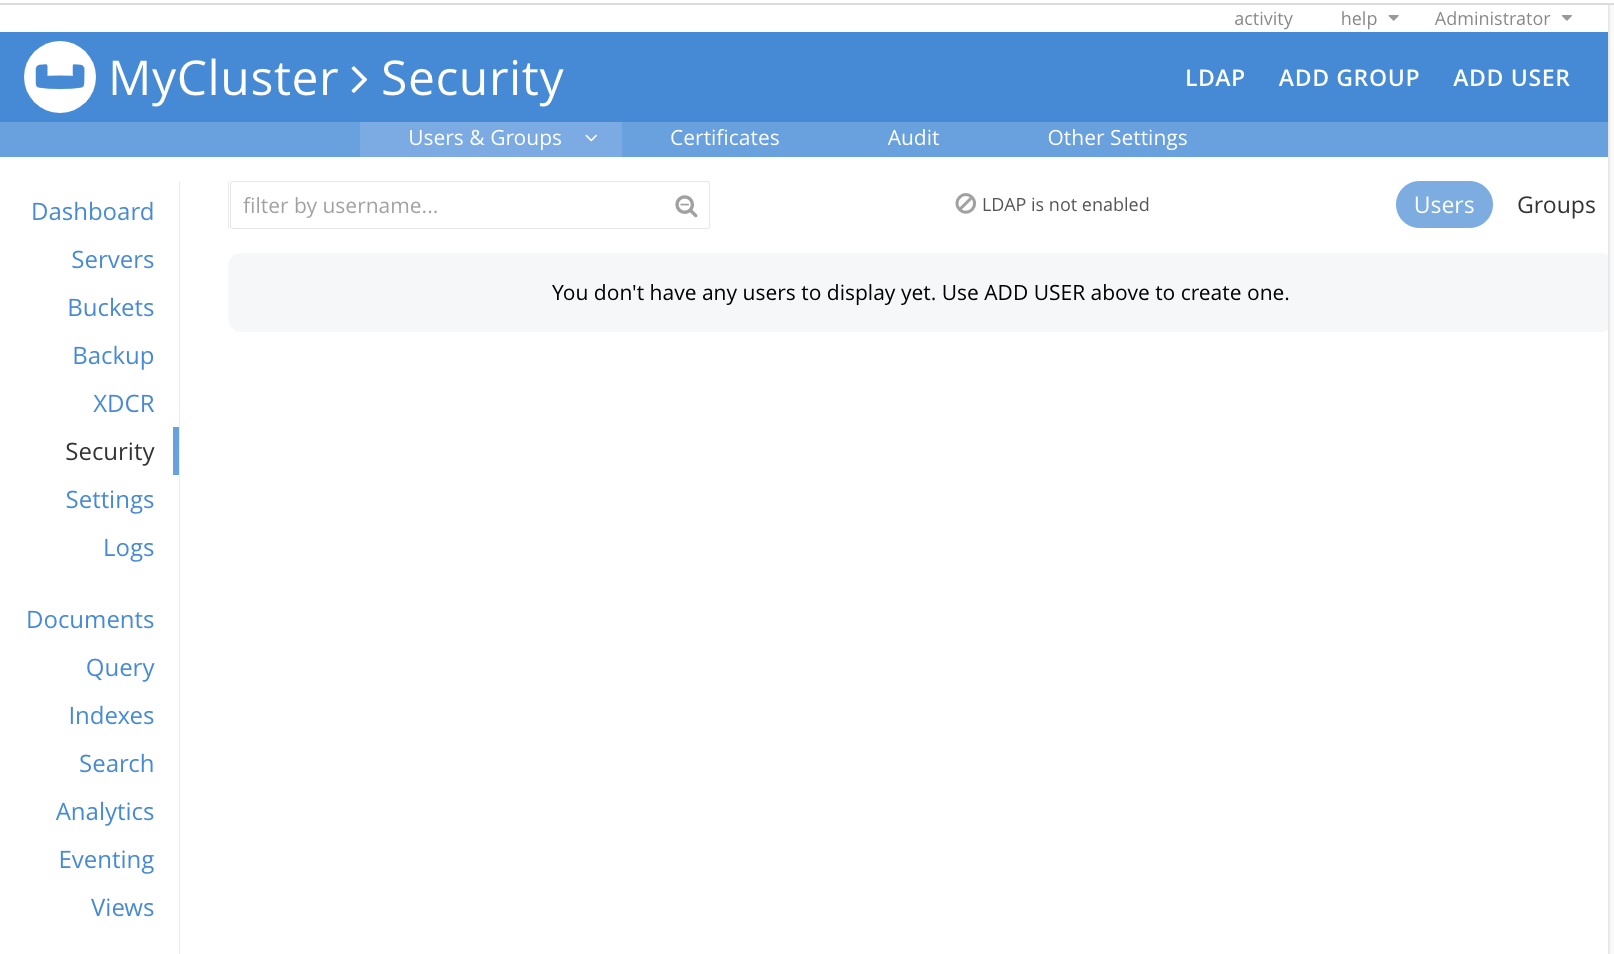
From the Users & Groups tab, you can do the following:
-
Assign roles to users and groups.
The Full Administrator, who created the cluster, is not listed in the Users & Groups tab.
The following notification is displayed on the screen when LDAP or SAML are not enabled: LDAP/SAML is not enabled.
This indicates that the external authentication, using either saslauthd or LDAP, has not been enabled.
To enable LDAP, see the 1st step in the procedure Getting Started with saslauthd and LDAP.
For more information about the external authentication, see Authentication Domains.
Manage Groups from the UI
Add, edit, or delete groups in Couchbase Server through the Couchbase Web Console.
Add a Group
Create user groups and assign roles to them. Add users to the group, which automatically grants users the group’s roles. Groups provide an efficient way to manage role assignments when the number of users is large.
To create a group from the UI, do the following:
-
On the Security screen, select the Add Group tab.
The Add New Group dialog is displayed.

-
Select or enter the necessary values in the following fields:
-
Group Name: The name for the user group in the current cluster.
-
Description: An optional description for the user group.
-
Map to LDAP Group: The name of an existing LDAP group to which this group must be mapped. For more information, see Map LDAP Groups to Couchbase Server Roles.
-
Roles: The list of role (categories) to associate with the group. To see the roles, expand each role category.
The first category is Administrative roles, which grants access to cluster-wide features.
The Administrative role category is followed by the Bucket, Data, Views, Query & Index, Search, Analytics, Eventing, XDCR, Backup, and Mobile role categories.
You can apply the roles to some or all buckets of the cluster. Within any given bucket, the assigned role can apply to all or to a subset of scopes and collections defined for that bucket.
-
-
Select Save to save the details.
Create a Group with an Administrative Role
For example, to create a ClusterAdmin group where all members are granted the Cluster Admin role, do the following:
-
In the Add New Group dialog, enter a Group Name.
-
Select Cluster Admin from the Roles section.

In this example, LDAP group mapping is not required. The group is intended only for users defined on Couchbase Server as local or external. For an explanation of LDAP group mappings, see Map LDAP Groups to Couchbase Server Roles.
-
Select Save to save the details. The group is created and listed in the Groups section of the Users & Groups tab.
Create a Group with a Data-Access Role
Within each bucket, Couchbase Server organizes data into scopes and collections. For more information, see Scopes and Collections. You must assign appropriate roles because Role-Based Access Control (RBAC) protects access to each bucket, scope, and collection.
To create a group with a data-access role, for example, Data Reader, do the following:
-
In the Add New Group dialog, enter a Group Name.
-
Expand the Data category in the Roles section, which lists the Data roles.
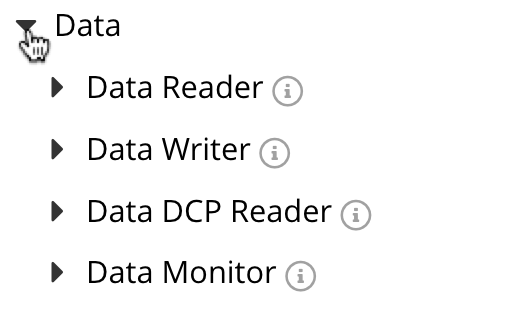
-
Select Data Reader to list the role-assignment options.
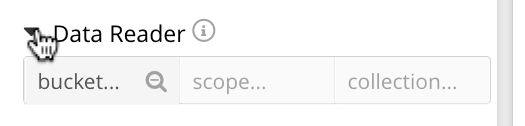
You can select a bucket, its associated scope, and its associated collection. In each case, the default selection is a wild-card symbol (*) indicating that all values are selected by default.
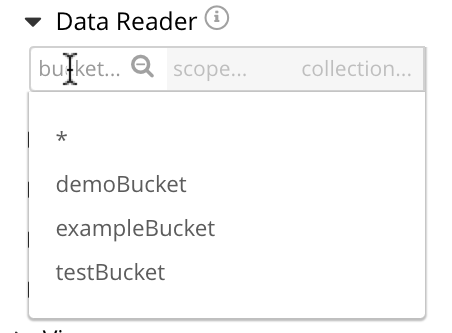
Select the bucket field that lists the available 3 buckets demoBucket, exampleBucket, and testBucket. Select testBucket.
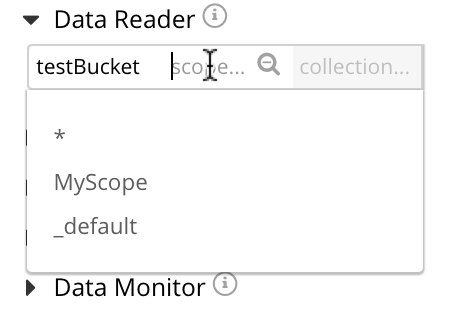
-
Select the scope field that lists the available MyScope and _default. Select MyScope.
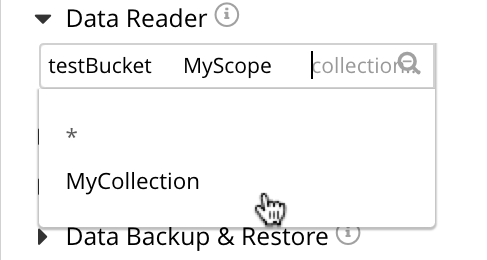
-
Select the collection field that lists the available MyCollection. Select MyCollection.
-
Select Save to save the role assignment. The role is assigned and listed in the Groups section of the Users & Groups tab.
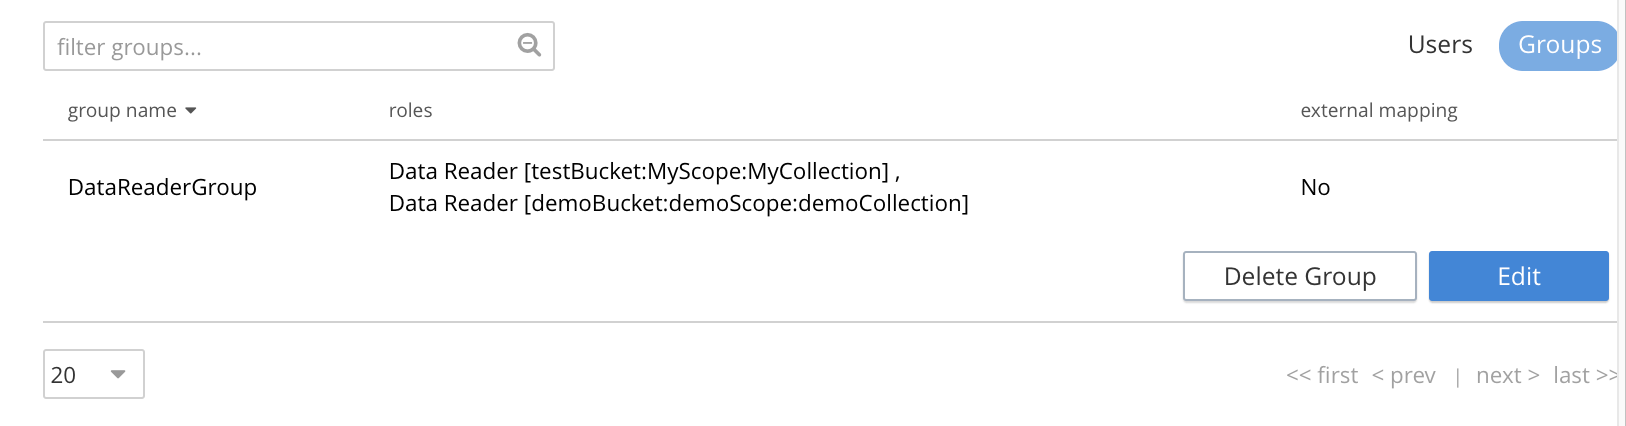
Repeat the procedure for any additional roles you want to assign to the same or a different group. You can assign multiple roles in one go and save the changes.
| Some roles apply to all data in the bucket, some to all collections in a specified scope within a specified bucket, and some to all documents in a specified collection within a specified scope and bucket. |
Edit a Group
To make additional changes to an existing group’s role assignments, do the following:
-
In the Users & Groups tab, select Groups.
-
Select Edit associated with the group you want to edit. The Edit Group dialog is displayed.
-
Make the necessary changes to the group’s role assignments.
-
Select Save to save the changes.
Manage Users from the UI
You can add, edit, or delete users in Couchbase Server through the Couchbase Web Console. As an administrator, you can also reset the password for users, force them to change password, and lock/unlock user accounts.
Add a User
You can add a user to the local domain or an external domain, from the UI.
Add a Locally Authenticated User
To add a locally authenticated user from the UI, do the following:
-
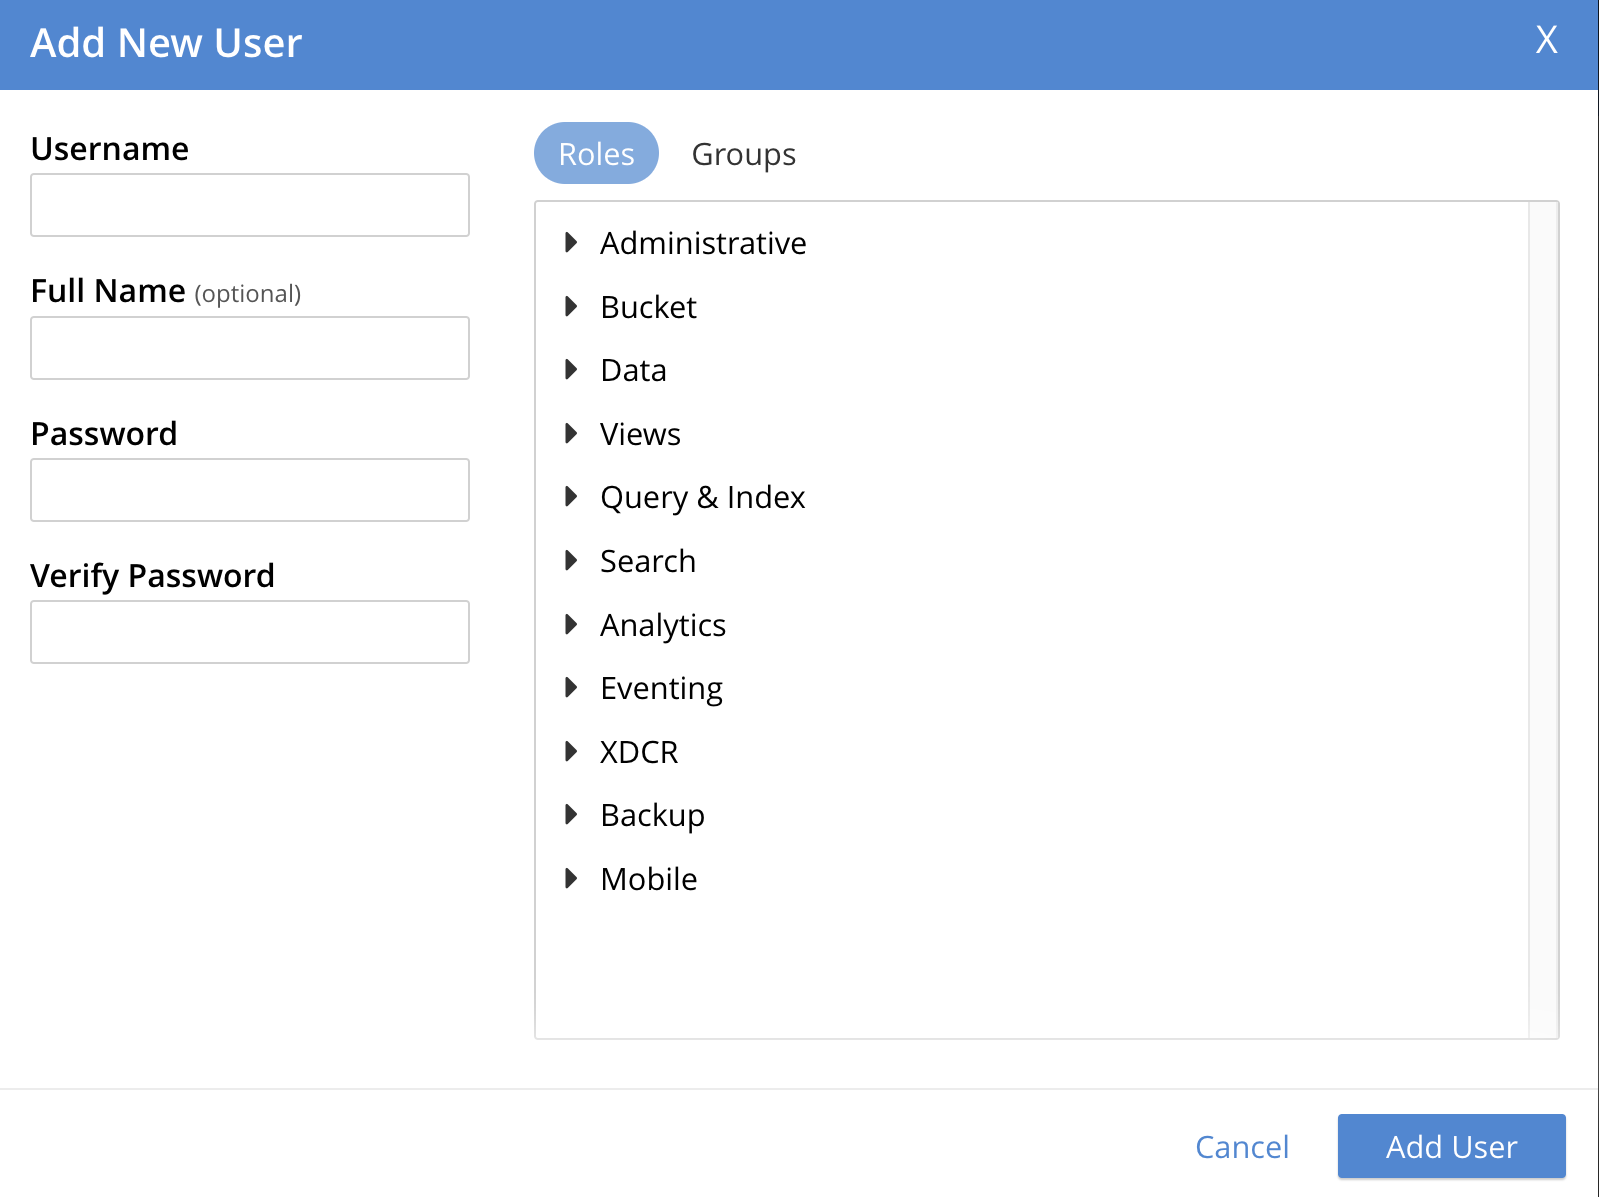
On the Security screen, select the Add User tab. The Add New User dialog is displayed.
-
Select or enter the necessary values in the following fields:
-
Username: The name for the user in the current cluster, based preferably on the role type.
-
Full Name: An optional full name for the user.
-
Password: The temporary password for the user.
For more information about username and password authentication, see Usernames and Passwords.
-
Verify Password: To verify the temporary password for the user.
-
Force Password Update: To force the user to change their assigned temporary password on next login, enable this option. For more information about forcing password changes, see Force Password Update.
-
Roles: The list of role (categories) to associate with the user. You can assign the user to one or more specific roles, or to one or more groups so that the user inherits the group’s assigned roles, or both.
To see the roles, expand each role category. The first category is Administrative roles, which grants access to cluster-wide features. The Administrative role category is followed by the Bucket, Data, Views, Query & Index, Search, Analytics, Eventing, XDCR, Backup, and Mobile role categories.
For more information about assigning roles, see Assign Roles to a User.
You can apply the roles to some or all buckets of the cluster. Within any given bucket, the assigned role can apply to all or to a subset of scopes and collections defined for that bucket.
-
Groups: The list of groups to associate with the user. You can assign the user to one or more groups so that the user inherits the group’s assigned roles.
-
-
Select Save to save the details.
If Native LDAP or saslauthd is enabled, the Add New User dialog displays the Authentication Domain section.
Authentication Domain has the following options:
-
Couchbase: By default, this option is enabled. The user is defined locally. The password for the user must be created.
-
External: The user is defined externally, and no password is created. For more information about adding an external user, see Add an Externally Authenticated User.
Assign Roles to a User
You can assign roles to users from the UI by using one of the following methods:
-
When adding a user, as explained in the Add a Locally Authenticated User.
-
For an existing user, by editing their role details.
To assign a role, for example, Query Curl Access, to an existing user, do the following:
-
On the Security screen, select Users & Groups, and then select Users.
-
Select the user from the list you want to assign a role and select Edit associated with that user. The Edit User dialog is displayed.
-
In the Edit User dialog, in the Roles section, expand the Query & Index category that lists the Query roles.
-
Select or assign the Query CURL Access role.
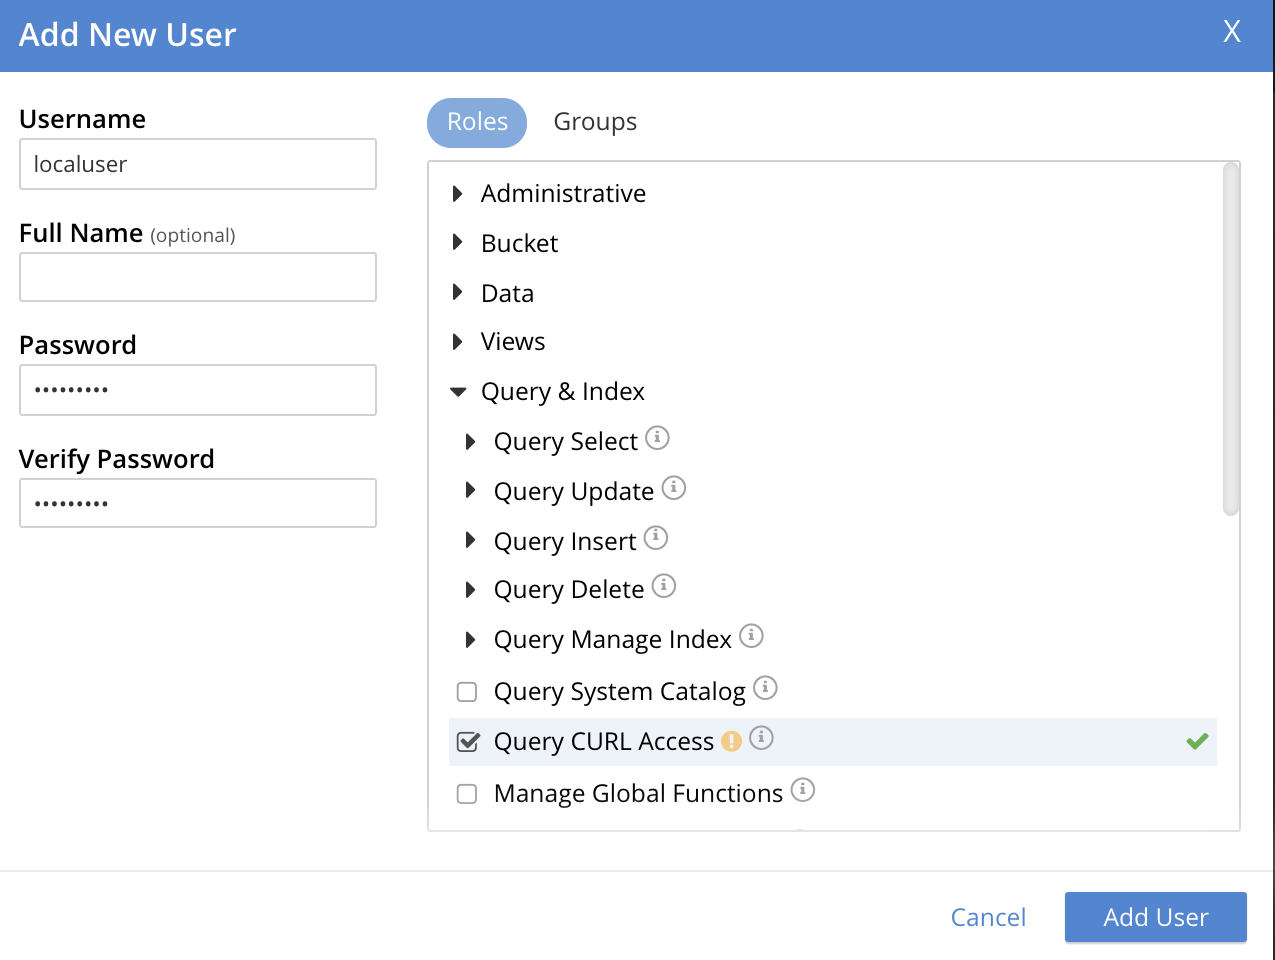
-
Select Save Changes to save the details.
You can see the newly assigned role in the Users list.
Now, you can continue the user-definition process by assigning the user to a group.
Assign a User to a Group
You can assign a user to one or more groups. You can either continue the user-definition process by assigning the user to a group while adding the user, or you can edit the user’s details later to assign them to a group.
To assign a user to a group, when adding the user, do the following:
-
In the Add New User dialog, select the Groups tab. The available groups are listed.
-
Select the group(s) to which you want to assign the user.
-
Select Add User to save the changes.
Change User’s Group
To change a user’s group or assign a user to a group, by editing the user’s details, do the following:
-
On the Security screen, select Users & Groups, and then select Users.
-
Select the user from the list you want to assign a group and select Edit associated with that user. The Edit User dialog is displayed.
-
In the Edit User dialog, select the Groups tab. The available groups are listed.
For example, add user to the
ClusterAdminuser group by selecting the associated checkbox.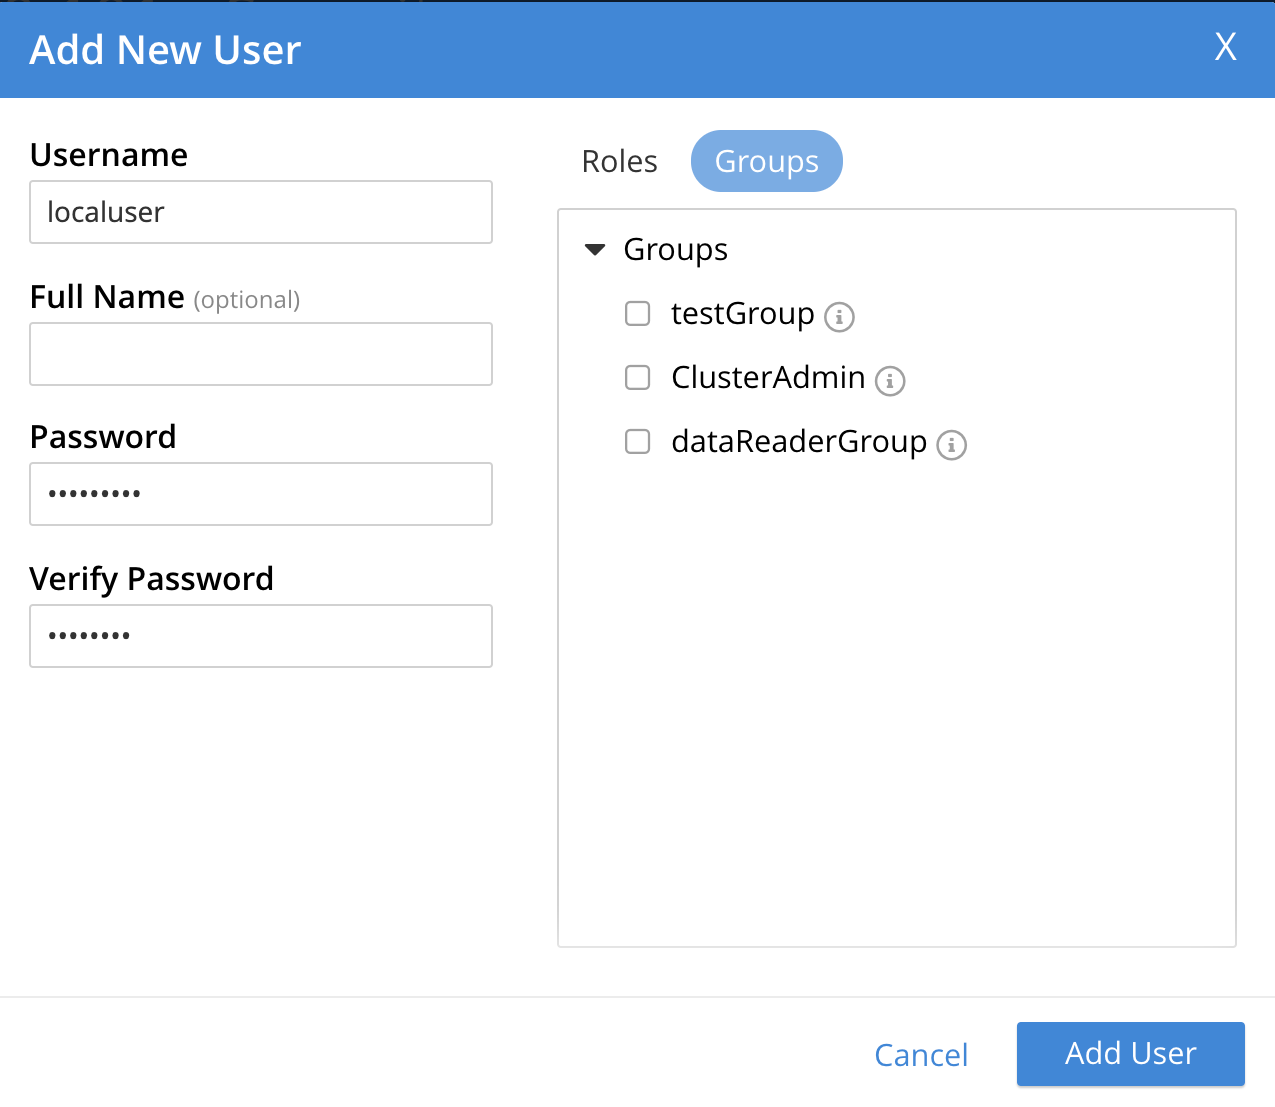
-
Select Save Changes to save the details.
You can see the result in the Users list:

The user localuser is defined and granted the following roles:
-
The
Query CURL Accessrole was assigned directly. -
The
Cluster Adminrole is inherited from theClusterAdmingroup.
The auth domain for the user is Couchbase, indicating that this is a locally defined user.
Add an Externally Authenticated User
An externally authenticated user is not authenticated on Couchbase Server. Instead, the user is authenticated on a server outside the cluster. The user’s password is defined and maintained by the external system.
External authentication must be supported by Native LDAP, saslauthd, or PAM.
- Prerequisite
-
To add externally authenticated users, you must complete the required setup. For detailed steps to configure external authentication using Native LDAP, which is the recommended method, see Configure LDAP.
- Procedure
-
To add an externally authenticated user, do the following:
-
On the Security screen, select the Add User tab. The Add New User dialog is displayed.
-
In the Add New User dialog, select the External authentication domain type. Password fields are not displayed as they’re not necessary to add an externally authenticated user.
-
The steps to set up Username, Roles, and Groups are same as in the sections Add a Locally Authenticated User, Assign Roles to a User, and Assign a User to a Group respectively.
For example, assign the Query System Catalog role to the external user. Then add the external user to the
ClusterAdmingroup, where it inherits the Cluster Admin role.
-
After the definition process is complete, the external user and its associated roles are listed in the Users tab.
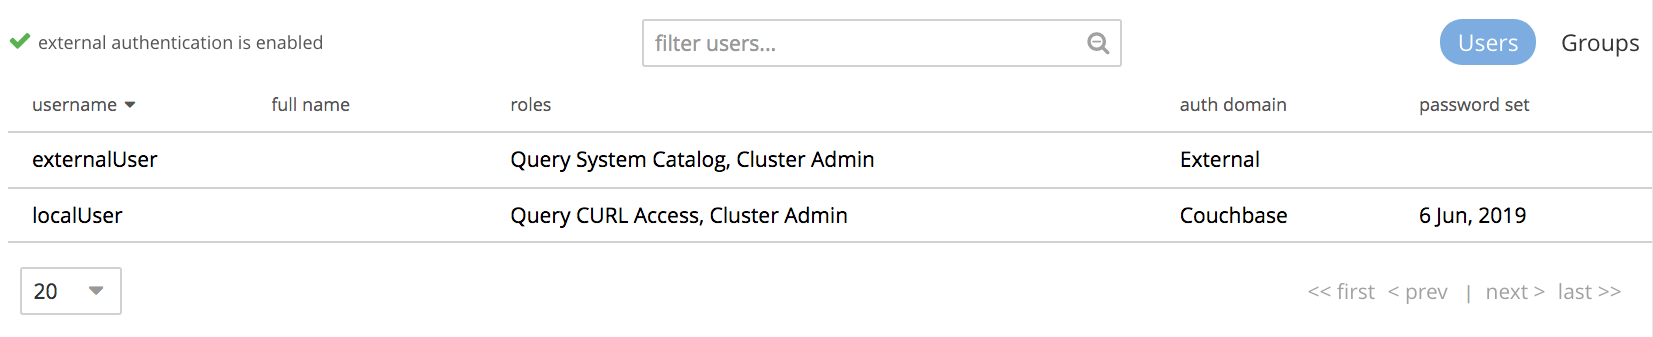
From the example, the externally authenticated user externalUser has the roles Query System Catalog and Cluster Admin.
The auth domain is External, indicating that the user is authenticated on an external server.
You can authenticate the external users only using the PLAIN method.
By default, the Couchbase SDK uses PLAIN only when connecting over TLS ports.
Therefore, external users must connect through TLS ports.
For more information about the authentication methods, see Understanding Authentication.
|
Delete a User
To delete a user, do the following:
-
In the Users & Groups tab, select Users.
-
Select the user you want to remove, and then select Delete. The Confirm Delete User dialog is displayed.
-
To confirm the deletion, select Delete User.
Lock and Unlock User Accounts
You can lock user accounts to prevent access to the Couchbase Server, and unlock them to restore access. Locking a user account does not delete the user; it only prevents authentication. After an account is marked as locked, it prevents the user from logging in or from continuing the existing sessions. Locking an account terminates all active UI sessions and long-running connections such as Memcached or streaming connections.
|
For more information about user account locking, see Blocking User Authentication.
To lock or unlock a user account, do the following:
-
On the Security screen, select the Users & Groups tab, and then select Users.
-
In the Users list, select the user account you want to lock or unlock.
-
Do the following:
-
For locking a user account:
-
Select Lock. The Confirm Lock User dialog is displayed.
-
Select Lock User to confirm and save the changes.
-
-
For unlocking a user account:
-
Select Unlock. The Confirm Unlock User dialog is displayed.
-
Select Unlock User to confirm and save the changes.
-
-
When a user attempts to log in to their account after it’s locked, they see the following error message:
Login failed. Please try again.
Manage Users and User Groups with the CLI
Use the user-manage command to manage the users. Using this command, you can create or delete users and groups, assign roles, and list current status.
Manage Users with the CLI
You can manage users by creating or deleting users, assigning roles, and listing current status using the CLI.
Get User Information with the CLI
To get a list of users in the current cluster, use the following command:
The command is piped to the jq program, to optimize output readability.
/opt/couchbase/bin/couchbase-cli user-manage --cluster http://10.144.210.101 \
--username Administrator \
--password password \
--list | jq
An example of the output is as follows:
[
  {
    "id": "externalUser",
    "domain": "local",
    "roles": [
      {
        "role": "scope_admin",
        "bucket_name": "demoBucket",
        "scope_name": "demoScope",
        "origins": [
          {
            "type": "user"
          }
        ]
      },
      {
        "role": "ro_admin",
        "origins": [
          {
            "type": "user"
          }
        ]
      }
    ],
    "groups": [],
    "external_groups": [],
    "name": "",
    "password_change_date": "2021-02-01T09:46:04.000Z"
  },
  {
    "id": "testUser",
    "domain": "local",
    "roles": [
      {
        "role": "data_reader",
        "bucket_name": "testBucket",
        "scope_name": "MyScope",
        "collection_name": "MyCollection",
        "origins": [
          {
            "type": "user"
          }
        ]
      }
    ],
    "groups": [],
    "external_groups": [],
    "name": "",
    "password_change_date": "2021-02-01T09:40:23.000Z"
  }
]
The output has information about the following entries:
-
id: The unique identifier for the user. -
domain: The authentication domain for the user. -
roles: The roles assigned to the user, including any restrictions on buckets, scopes, and collections for non-global roles. -
name: The name of the user, if specified. -
groups: The local groups to which the user belongs. -
external_groups: Any external groups to which the user belongs. -
password_change_date: The date the user’s password was last changed.
Manage Local Users with the CLI
Couchbase Server stores and maintains the username and password of a local user. You can assign roles to the user either directly or through group membership.
Create a Local User with the CLI Using Direct Role-Assignment
To create a locally authenticated user and directly assign a role to it, use the following command:
/opt/couchbase/bin/couchbase-cli user-manage \
--cluster http://10.144.210.101 \
--username Administrator \
--password password \
--set \
--rbac-username dgreen \
--rbac-password dGr3En239 \
--roles query_external_access,analytics_reader \
--auth-domain local
The command explanation is as follows:
-
The
--setflag updates the RBAC profile for the cluster. -
You define the
usernameandpasswordfor the user. -
The
--auth-domainflag specifies that this is alocaluser. -
You assign the
query_external_accessandanalytics_readerroles using the--rolesflag. To change direct role assignments, recreate the user and specify all desired roles as arguments to the--rolesflag.
If the command is successful, the following message, with standard command-line warning about the significance of the query_external_access role, is displayed:
WARNING: Granting the query_external_access role permits execution of the N1QL function CURL() and may allow access to other network endpoints in the local network and the Internet.
SUCCESS: User dgreen set
Create a Local User with the CLI by Directly Assigning a Per-Collection Role
You can assign roles that permit data access to a bucket, a scope within a bucket, or a collection within a scope.
Specify the assignment in square brackets after the role name. In the square brackets, first mention the bucket name, then the scope name and the collection name. Separate the names of bucket, scope, and collection with colons.
The following example shows how to create a local user and assign a role that grants access to data within a specific collection:
/opt/couchbase/bin/couchbase-cli user-manage \
--cluster http://10.144.210.101 \
--username Administrator \
--password password \
--set \
--rbac-username dhiggins \
--rbac-password d8&3hdli2 \
--roles data_reader[testBucket:my_new_scope:my_new_collection] \
--auth-domain local
This command assigns the data_reader role for the collection my_new_collection in the scope my_new_scope of the bucket testBucket to the user dhiggins.
If the command is successful, the following message is displayed:
SUCCESS: User dhiggins set
Create a Local User with the CLI, Using Group-Based Role-Assignment
To create a locally authenticated user and assign a role through group membership, use the following command:
/opt/couchbase/bin/couchbase-cli user-manage --cluster http://10.143.192.101 \
--username Administrator \
--password password \
--rbac-username cbrown \
--rbac-password cBr403n438 \
--auth-domain local \
--set \
--user-groups Admins
The command explanation is as follows:
-
The
--setflag indicates that the command edits group membership. -
The
--user-groupsflag indicates that theAdminsgroup gets edited. -
Flags indicate the username and password for the new user, who inherits the roles assigned to the specified group.
If the command is successful, the following message is displayed:
SUCCESS: User 'cbrown' group memberships were updated
Delete a Local User with the CLI
To delete a local user, specify the --delete flag, with the username and authentication domain as follows:
/opt/couchbase/bin/couchbase-cli user-manage --cluster http://10.143.192.101 \
--username Administrator \
--password password \
--rbac-username dgreen \
--auth-domain local \
--delete
The output is as follows:
SUCCESS: User 'dgreen' was removed
Manage User Account Locking with the CLI
You can lock or unlock user accounts, and get a list of locked or unlocked user accounts, using the CLI.
|
Lock or Unlock a User Account with the CLI
Use the couchbase-cli user-manage command to lock or unlock a user account as follows:
-
To lock a user account, pass the
--lockargument. -
To unlock a user account, pass the
--unlockargument.
To lock a user account, use the following command:
/opt/couchbase/bin/couchbase-cli user-manage --cluster http://10.143.192.101 \
--username Administrator \
--password password \
--rbac-username <username> \
--auth-domain local \
--lock
To unlock a user account, use the following command:
/opt/couchbase/bin/couchbase-cli user-manage --cluster http://10.143.192.101 \
--username Administrator \
--password password \
--rbac-username <username> \
--auth-domain local \
--unlock
Manage Groups with the CLI
You can manage groups by creating or deleting groups, assigning roles, and listing current status using the CLI.
Get Group Information with the CLI
To get a list of groups in the current cluster, use the following command:
/opt/couchbase/bin/couchbase-cli user-manage --cluster http://10.143.192.101 \
--username Administrator \
--password password \
--list-groups
An example of the output is as follows:
[
  {
    "id": "DataReaderGroup",
    "roles": [
      {
        "role": "data_reader",
        "bucket_name": "testBucket",
        "scope_name": "MyScope",
        "collection_name": "MyCollection"
      },
      {
        "role": "data_reader",
        "bucket_name": "demoBucket",
        "scope_name": "demoScope",
        "collection_name": "demoCollection"
      }
    ],
    "ldap_group_ref": "",
    "description": "Administrators with limited Data Reader permission."
  }
]
The output has the following information:
A single group DataReaderGroup is defined on the cluster and the data_reader role is assigned to it, for the specified collections.
Create a Group with the CLI
To create a group using the CLI, use the following command:
/opt/couchbase/bin/couchbase-cli user-manage \
--cluster http://10.143.192.101 \
--username Administrator \
--password password \
--set-group \
--group-name xdcrAdmin \
--roles replication_admin
The command explanation is as follows:
-
Use the
--set-groupflag to create or edit a group. -
Specify the group name with the
--group-nameflag. -
Assign the
replication_adminrole to the new group using the--rolesflag.
To change the group’s role assignments, recreate the group and specify all new role assignments as arguments to the --roles flag.
User memberships remain unchanged.
|
If the command is successful, the following message is displayed.
SUCCESS: Group 'xdcrAdmin' was created
For more information about how to use the CLI to create a mapping between a Couchbase Server user group and an LDAP group, see Map Groups with the CLI.
Delete a Group with the CLI
To delete a group using the CLI, use the user-manage command as follows:
/opt/couchbase/bin/couchbase-cli user-manage \
--cluster http://10.143.192.101 \
--username Administrator \
--password password \
--delete-group \
--group-name xdcrAdmin
The command deletes the group xdcrAdmin.
If the command is successful, the following message is displayed:
SUCCESS: Group 'xdcrAdmin' was deleted
Manage External Users with the CLI
You can define and manage externally authenticated users in Couchbase Server using the CLI.
To create an external user, as a prerequisite, you must configure external authentication. For recommended procedures, see Configure LDAP.
Create an External User with the CLI Using Direct Role-Assignment
To create an externally authenticated user and directly assign a role to it, use the user-manage command as follows:
/opt/couchbase/bin/couchbase-cli user-manage --cluster http://10.143.192.101 \
--username Administrator \
--password password \
--set \
--rbac-username wgrey \
--roles cluster_admin \
--auth-domain external
The command explanation is as follows:
-
Specify
--auth-domainasexternal. -
Use the
--setflag to update the cluster’s RBAC profile. -
Do not specify a password. Couchbase Server does not save the password because the authentication occurs on the LDAP server. Assign the role to the user with the
--rolesflag ascluster_admin.
If the command is successful, the following message is displayed:
SUCCESS: User wgrey was created
Create an External User by Directly Assigning a Per-Collection Role
You can assign roles that permit data access to a bucket, a scope within a bucket, or a collection within a scope.
Specify the assignment in square brackets after the role name. In the square brackets, first mention the bucket name, then the scope name and the collection name. Separate the names of bucket, scope, and collection with colons.
The following example shows how to create an external user and assign a role that grants access to data within a specific collection:
/opt/couchbase/bin/couchbase-cli user-manage --cluster http://10.144.210.101 \
--username Administrator \
--password password \
--set \
--rbac-username tcrawford \
--roles data_writer[testBucket:my_new_scope:my_new_collection] \
--auth-domain external
If the command is successful, the following message is displayed:
SUCCESS: User tcrawford set
This command assigns the data_reader role for the collection my_new_collection in the scope my_new_scope of the bucket testBucket to the external user tcrawford.
Create an External User with the CLI Using Group-Based Role Assignment
To create an external user with a group-based role assignment, use the user-manage command as follows:
/opt/couchbase/bin/couchbase-cli user-manage --cluster http://10.143.192.101 \
--username Administrator \
--password password \
--set \
--rbac-username rjones \
--rbac-name 'Richard Jones' \
--auth-domain external \
--user-groups Admins
The command explanation is as follows:
-
The
--setflag updates a group. -
By passing the existing Couchbase Server user group
Adminsas the value of--user-groups, you assignrjonesas a member of theAdminsgroup. -
rjonesnow inherits all roles assigned toAdmins.
If the command is successful, the following message is displayed:
SUCCESS: User 'rjones' group memberships were updated
For more information about how to use the CLI to create a mapping between a Couchbase Server user group and an LDAP group, see Map Groups with the CLI.
Delete an External User with the CLI
To delete an external user using the CLI, use the --delete-user flag and specify external as the value of the --auth-domain flag.
The command is as follows:
/opt/couchbase/bin/couchbase-cli user-manage --cluster http://10.143.192.101 \
--username Administrator \
--password password \
--rbac-username wgrey \
--auth-domain external \
--delete
If the command is successful, the following message is displayed:
SUCCESS: User 'wgrey' was removed
Manage Users and User Groups Using the REST API
You can create or delete users and groups, assign roles, and list current status using the REST API.
Manage Users Using the REST API
You can manage users using the following REST API methods and URI:
GET /settings/rbac/users

PUT /settings/rbac/users/local/<username>

DELETE /settings/rbac/users/local/<username>
You can create and delete users and groups, assign roles, and list the current status.
For more information about managing users, groups, and roles with the REST API, see Role Based Admin Control (RBAC).
You can define each user as either local or external. Before you create external users, configure external authentication. For recommended procedures, see Configure LDAP.
Get User Information Using the REST API
To list the cluster’s current users, use the GET /settings/rbac/users method and URI as follows:
curl -v -X GET -u Administrator:password \
http://10.143.192.101:8091/settings/rbac/users
If successful, the command returns a document containing an entry for each of the current users. This output is identical to the output in the section Get User Information with the CLI.
Manage Local Users Using the REST API
Couchbase Server stores and maintains the username and password for each local user. You can assign roles to a user directly or through group membership.
Create a Local User Using the REST API with Direct Role-Assignment
To create a local user, use the PUT /settings/rbac/users/local/<username> method and URI.
See the following example:
curl -v -X  PUT -u Administrator:password \
http://10.143.192.101:8091/settings/rbac/users/local/dgreen \
-d password=dGr3En238 \
-d roles=ro_admin
The API specifies that you must create the user dgreen as a local user, with the given password and the ro_admin role.
Get a Local User Information Using the REST API
To list the current users, use the GET /settings/rbac/users method and URI as follows:
curl -v -X GET -u Administrator:password http://10.143.192.101:8091/settings/rbac/users | jq '.'
If successful, the call returns the following information:
[
  {
    "id": "dgreen",
    "domain": "local",
    "roles": [
      {
        "role": "ro_admin",
        "origins": [
          {
            "type": "user"
          }
        ]
      }
    ],
    "groups": [],
    "external_groups": [],
    "uuid": "aad6c6df-bf03-428b-8850-2e4171ec88f2",
    "password_change_date": "2023-07-24T07:39:09.000Z",
    "locked": true
  }
]
Create a Local User Using the REST API by Directly Assigning a Per-Collection Role
You can assign roles that permit data access to a bucket, a scope within a bucket, or a collection within a scope.
Specify the assignment in square brackets after the role name. In the square brackets, first mention the bucket name, then the scope name and the collection name. Separate the names of bucket, scope, and collection with colons.
The following example shows how to create a local user and assign a role that grants access to data within a specific collection.
Use the PUT /settings/rbac/users/local/<username> method and URI:
curl -v -X  PUT -u Administrator:password \
http://10.144.210.101:8091/settings/rbac/users/local/dwilliams \
-d password=dGr3En238 \
-d roles=data_reader[testBucket:my_new_scope:my_new_collection]
This command assigns the data_reader role for the collection my_new_collection in the scope my_new_scope of the bucket testBucket to the user dwilliams.
Create a Local User Using the REST API with Group-Based Role-Assignment
To assign a group-based role to a local user, use the PUT /settings/rbac/users/local/<username> method and URI with -d groups as follows:
curl -v -X  PUT -u Administrator:password \
http://10.143.192.101:8091/settings/rbac/users/local/sdavis \
-d groups=Admins,xdcrAdmin \
-d password=Sd4v1s938
The --groups flag adds the user specified in the endpoint (sdavis) to the Admins and xdcrAdmin groups.
To modify group membership later, run the command again and specify all required groups as arguments to the groups parameter.
Manage User Account Locking Using the REST API
You can lock or unlock user accounts, and get a list of locked or unlocked user accounts, using the following REST API methods and URIs:
GET /settings/rbac/users

PATCH /settings/rbac/users/local/<username>
|
Lock or Unlock a User Account Using the REST API
Use the PATCH /settings/rbac/users/local/<username> method and URI as follows:
-
To lock a user account, set the
-d lockedflag totrue. -
To unlock a user account, set the
-d lockedflag tofalse.
See the following example:
curl -X PATCH -u Administrator:password \
http://localhost:8091/settings/rbac/users/local/testAdmin \
-d locked=[true | false]
If the -d locked flag is set to true and the call is successful, the user account testAdmin is locked and returns no value.
If the call fails, 401 for Unauthorized error is returned.
For information about viewing locked or unlocked user accounts, see the section View Locked or Unlocked User Accounts Using the REST API.
View Locked or Unlocked User Accounts Using the REST API
Use the REST API method and URI GET /settings/rbac/users as follows:
-
To view the list of locked user accounts, set
'map(select(.locked == true))'. -
To view the list of unlocked user accounts, set
'map(select(.locked == false))'.
See the following example:
curl -X GET http://localhost:8091/settings/rbac/users -u Administrator:password | jq 'map(select(.locked == [true | false]))'
If 'map(select(.locked == true))' and the call is successful, the output lists the details of all locked user accounts in the cluster.
See the output example:
{
  "id": "testAdmin",
  "domain": "local",
  "roles": [
    {
      "role": "data_reader",
      "bucket_name": "testBucket",
      "scope_name": "MyScope",
      "collection_name": "MyCollection",
      "origins": [
        {
          "type": "group",
          "name": "DataReaderGroup"
        }
      ]
    },
    {
      "role": "cluster_admin",
      "origins": [
        {
          "type": "group",
          "name": "DataReaderGroup"
        },
        {
          "type": "user"
        }
      ]
    }
  ],
  "groups": [
    "DataReaderGroup"
  ],
  "external_groups": [],
  "name": "",
  "uuid": "0a7c82e7-7cb5-4acd-81a3-ddd38c9d2267",
  "password_change_date": "2025-08-16T18:31:36+05:30",
  "locked": true,
  "temporary_password": false
}
In the output example, you can see the details of the locked user account testAdmin.
Manage Groups Using the REST API
You can create and delete groups, assign roles, and list current status using the following REST API methods and URI:
PUT /settings/rbac/groups/<group-name>

GET /settings/rbac/groups

DELETE /settings/rbac/groups/<group-name>
Create a Group Using the REST API
To create a group, use the PUT /settings/rbac/groups/<group-name> method and URI.
See the following example:
curl -v -X PUT -u Administrator:password \
http://10.143.192.101:8091/settings/rbac/groups/roAdminGroup \
-d roles=ro_admin
The command explanation is as follows:
-
Create a group with the name
roAdminGroup. -
Assign the
ro_adminrole to the grouproAdminGroupusing therolesparameter. -
All the future members of the group
roAdminGroupinherit thero_adminrole.
Get Group Information Using the REST API
To list the cluster’s current groups, use the GET /settings/rbac/groups method and URI as follows:
curl -v -X GET -u Administrator:password \
http://10.143.192.101:8091/settings/rbac/groups
If successful, the command returns a document containing an entry for each of the current groups. This output is identical to the output in the section Get Group Information with the CLI.
Delete a Group Using the REST API
To delete a group with the REST API, use the DELETE /settings/rbac/groups/<group-name> method and URI.
See the following example:
curl -v -X DELETE -u Administrator:password \
http://10.143.192.101:8091/settings/rbac/groups/roAdminGroup
This command deletes the group roAdminGroup.
Manage External Users Using the REST API
You can define and manage externally authenticated users in Couchbase Server using the following REST API methods and URIs:
PUT /settings/rbac/users/external/<username>

DELETE /settings/rbac/users/external/<username>
To create an external user, as a prerequisite, you must configure external authentication. For recommended procedures, see Configure LDAP.
Create an External User Using the REST API with Direct Role-Assignment
To create an externally authenticated user and directly assign a role to it, use the PUT /settings/rbac/users/external/<username> method and URI.
See the following example:
curl -v -X PUT -u Administrator:password \
http://10.143.192.101:8091/settings/rbac/users/external/wgrey \
-d roles=cluster_admin
This command creates the externally authenticated user wgrey, and assigns them the cluster_admin role.
Create an External User by Directly Assigning a Per-Collection Role
You can assign roles that permit data access to a bucket, a scope within a bucket, or a collection within a scope.
Specify the assignment in square brackets after the role name. In the square brackets, first mention the bucket name, then the scope name and the collection name. Separate the names of bucket, scope, and collection with colons.
The following example shows how to create an external user and assign a role that grants access to data within a specific collection.
Use the PUT /settings/rbac/users/external/<username> method and URI:
curl -v -X  PUT -u Administrator:password \
http://10.144.210.101:8091/settings/rbac/users/external/dwilliams \
-d password=dGr3En238 \
-d roles=data_reader[testBucket:my_new_scope:my_new_collection]
This command assigns the data_reader role for the collection my_new_collection in the scope my_new_scope of the bucket testBucket to the externally authenticated user dwilliams.
Create an External User Using the REST API with Group-Based Role-Assignment
To assign a group-based role to an external user, use the PUT /settings/rbac/users/external/<username> method and URI with -d groups as follows:
curl -v -X  PUT -u Administrator:password \
http://10.143.192.101:8091/settings/rbac/users/external/sdavis \
-d groups=Admins,xdcrAdmin \
-d password=Sd4v1s938
The --groups flag adds the externally authenticated user specified in the endpoint (sdavis) to the Admins and xdcrAdmin groups.
The user sdavis inherits the roles assigned to each of the groups.
Delete an External User Using the REST API
To delete an external user, use the DELETE /settings/rbac/users/external/<username> method and URI as follows:
curl -v -X DELETE -u Administrator:password \
http://10.143.192.101:8091/settings/rbac/users/external/wgrey
This command deletes the external user wgrey from the cluster.
For more information about managing users, groups, and roles with the REST API, see Role Based Admin Control (RBAC).