Quick Start
Get the Couchbase MCP Server running in under 5 minutes by configuring an MCP client, connection string, and authentication.
Get the Couchbase MCP Server running in under 5 minutes.
Prerequisites
Make sure you complete the prerequisites before proceeding.
Step 1: Configure Your MCP Client
Select your MCP client and add the Couchbase MCP Server configuration.
-
Claude Desktop
-
Cursor
-
Windsurf
-
VS Code
-
JetBrains
-
Factory
You can integrate the Couchbase MCP Server into Claude Desktop by following these steps:
-
Open the Claude Desktop configuration file:
-
macOS:
~/Library/Application Support/Claude/claude_desktop_config.json -
Windows:
%APPDATA%\Claude\claude_desktop_config.json
-
-
Add the Couchbase MCP Server configuration. For detailed instructions, see the MCP quickstart guide.
-
uvx
-
Docker
{
  "mcpServers": {
    "couchbase": {
      "command": "uvx",
      "args": ["couchbase-mcp-server"],
      "env": {
        "CB_CONNECTION_STRING": "couchbases://your-connection-string",
        "CB_USERNAME": "your-username",
        "CB_PASSWORD": "your-password"
      }
    }
  }
}
{ "mcpServers": { "couchbase": { "command": "docker", "args": [ "run", "--rm", "-i", "-e", "CB_CONNECTION_STRING=couchbases://your-connection-string", "-e", "CB_USERNAME=your-username", "-e", "CB_PASSWORD=your-password", "couchbase/mcp-server" ] } } } -
Logs: ~/Library/Logs/Claude (macOS), %APPDATA%\Claude\Logs (Windows)
You can integrate the Couchbase MCP Server into Cursor using either of the following methods.
Option 1: Add via the Cursor MCP Links

| The install link uses placeholder values from the configuration examples. Update the connection string and credentials after installation. |
Option 2: Manual Addition
-
Go to Cursor > Cursor Settings > Tools & Integrations > MCP Tools. See the Cursor MCP documentation for details.
-
Add the Couchbase MCP Server configuration.
You may need to add the server configuration under a parent key of
mcpServers.-
uvx
-
Docker
{
  "mcpServers": {
    "couchbase": {
      "command": "uvx",
      "args": ["couchbase-mcp-server"],
      "env": {
        "CB_CONNECTION_STRING": "couchbases://your-connection-string",
        "CB_USERNAME": "your-username",
        "CB_PASSWORD": "your-password"
      }
    }
  }
}
{ "mcpServers": { "couchbase": { "command": "docker", "args": [ "run", "--rm", "-i", "-e", "CB_CONNECTION_STRING=couchbases://your-connection-string", "-e", "CB_USERNAME=your-username", "-e", "CB_PASSWORD=your-password", "couchbase/mcp-server" ] } } } -
Logs: Bottom panel > Output list > Cursor MCP
You can integrate the Couchbase MCP Server into Windsurf by following these steps:
-
Navigate to Command Palette > Windsurf MCP Configuration Panel or Windsurf - Settings > Advanced > Cascade > Model Context Protocol (MCP) Servers. See the official documentation for details.
-
Click Add Server > Add custom server.
-
Add the Couchbase MCP Server configuration.
-
uvx
-
Docker
{
  "mcpServers": {
    "couchbase": {
      "command": "uvx",
      "args": ["couchbase-mcp-server"],
      "env": {
        "CB_CONNECTION_STRING": "couchbases://your-connection-string",
        "CB_USERNAME": "your-username",
        "CB_PASSWORD": "your-password"
      }
    }
  }
}
{ "mcpServers": { "couchbase": { "command": "docker", "args": [ "run", "--rm", "-i", "-e", "CB_CONNECTION_STRING=couchbases://your-connection-string", "-e", "CB_USERNAME=your-username", "-e", "CB_PASSWORD=your-password", "couchbase/mcp-server" ] } } } -
Logs: Check Windsurf output panel
You can integrate the Couchbase MCP Server into VS Code using either of the following methods.
Option 1: MCP Server bundled with Couchbase VS Code Extension (Preferred)
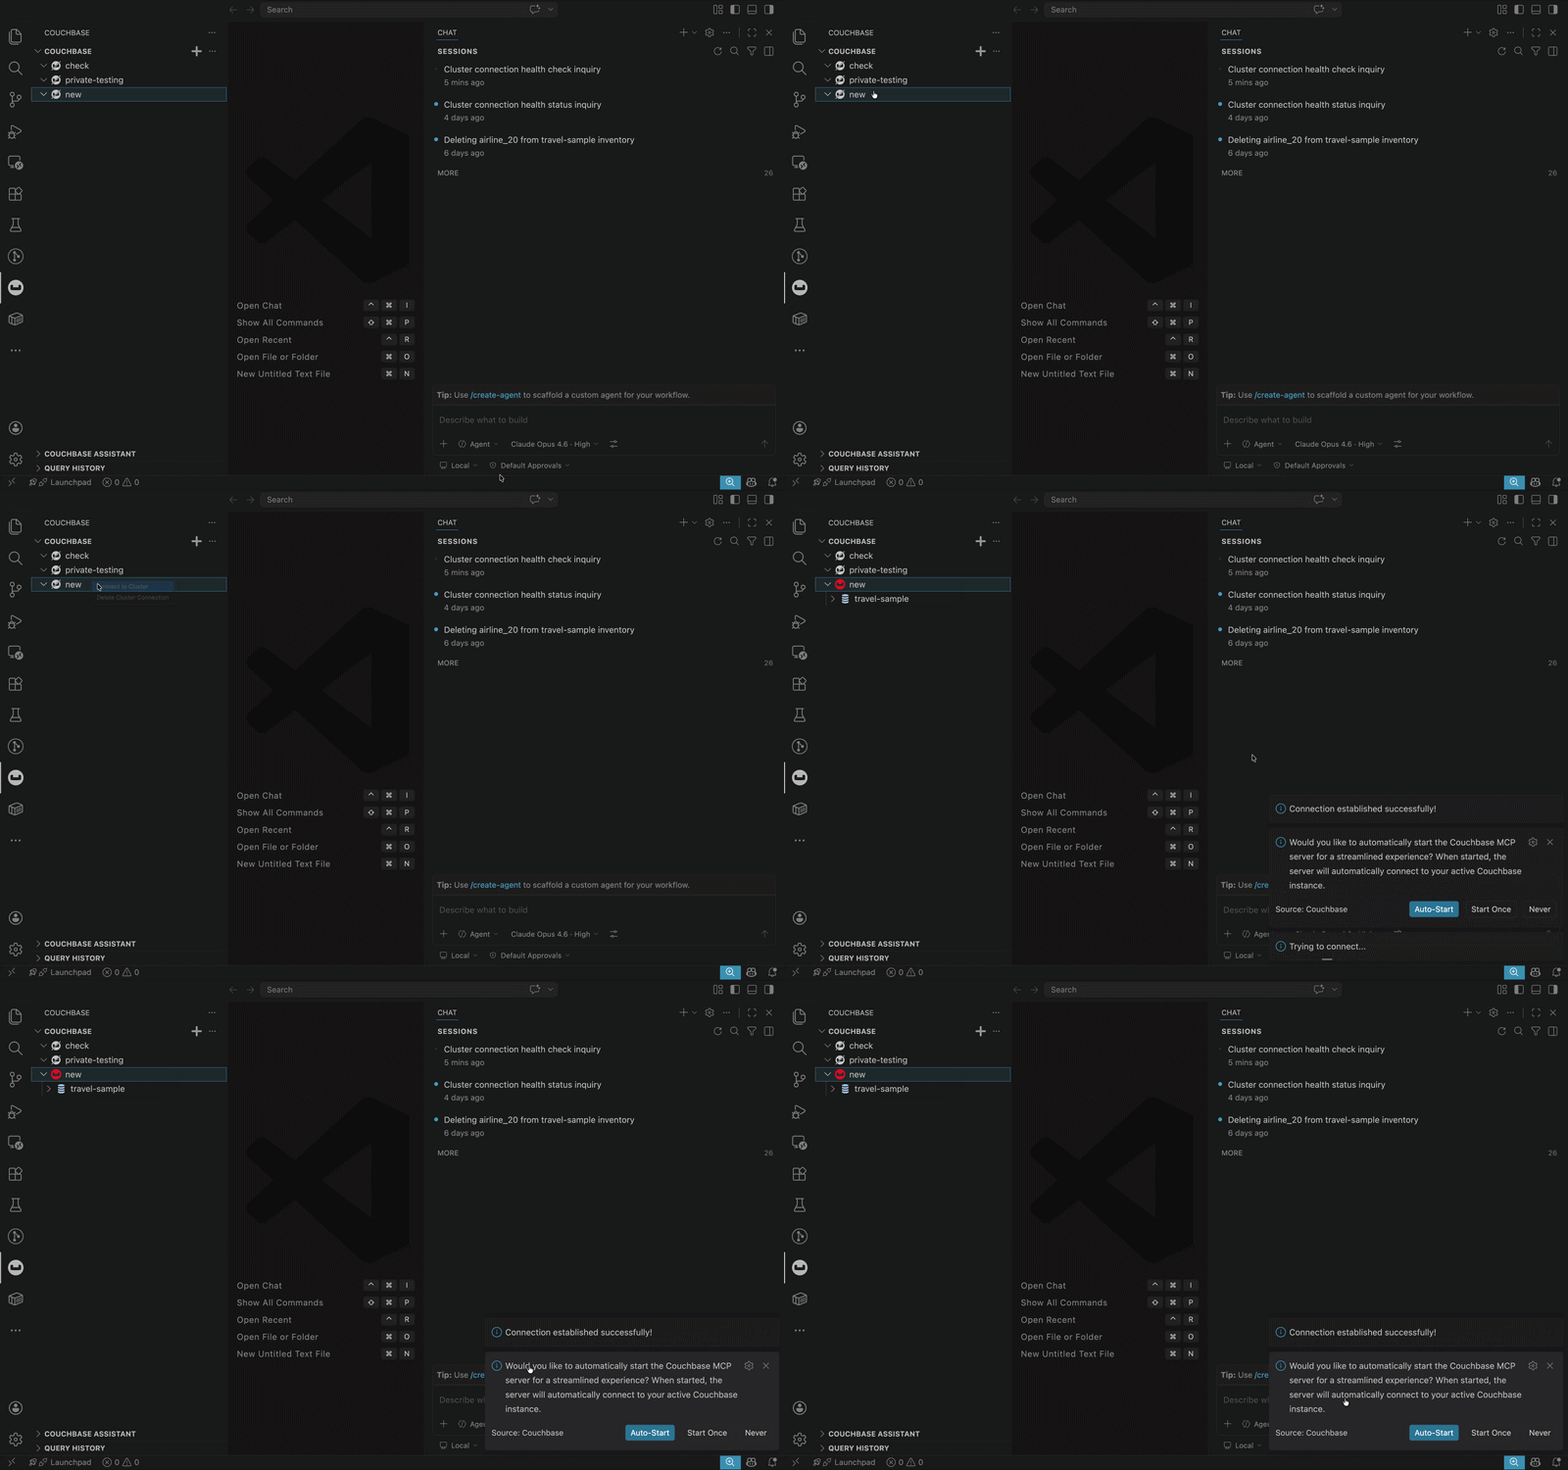
The Couchbase VS Code Extension (v3.0.0+) bundles the MCP server out-of-the-box. It auto-prompts to start MCP server on cluster connect in stdio transport mode.
From Command Palette (Ctrl+Shift+P / Cmd+Shift+P):
-
Couchbase: Start MCP Server- Start the server -
Couchbase: Get MCP Server Config- Inspect config JSON -
Couchbase: MCP Server Settings- Customize disabled tools, elicitation for tools, read-only mode, export paths, etc.
Quick Start: Install extension → Connect cluster → Accept prompt to start MCP Server.
Option 2: Manual Configuration
See the VS Code MCP documentation for details.
-
Create a configuration file using one of two scopes:
-
Workspace: Create
.vscode/mcp.jsonin your project root. Settings apply only to that project. -
Global (User): Run MCP: Open User Configuration from the Command Palette (
Ctrl+Shift+P/Cmd+Shift+P). Settings apply to all projects. On macOS, this file is located at~/Library/Application Support/Code/User/mcp.json.
-
-
Add the Couchbase MCP Server configuration.
VS Code uses servers as the top-level JSON property, not mcpServers.
|
-
uvx
-
Docker
{
  "servers": {
    "couchbase": {
      "command": "uvx",
      "args": ["couchbase-mcp-server"],
      "env": {
        "CB_CONNECTION_STRING": "couchbases://your-connection-string",
        "CB_USERNAME": "your-username",
        "CB_PASSWORD": "your-password"
      }
    }
  }
}
{
"servers": {
"couchbase": {
"command": "docker",
"args": [
"run", "--rm", "-i",
"-e", "CB_CONNECTION_STRING=couchbases://your-connection-string",
"-e", "CB_USERNAME=your-username",
"-e", "CB_PASSWORD=your-password",
"couchbase/mcp-server"
]
}
}
}Logs: Command Palette > MCP: List Servers > Show Output
You can integrate the Couchbase MCP Server into JetBrains IDEs using either of the following methods.
-
Install the AI Assistant or Junie plugin.
-
Navigate to Settings > Tools > AI Assistant (or Junie) > MCP Server.
-
Click "+" to add the Couchbase MCP Server configuration and click Save.
-
uvx
-
Docker
{
  "mcpServers": {
    "couchbase": {
      "command": "uvx",
      "args": ["couchbase-mcp-server"],
      "env": {
        "CB_CONNECTION_STRING": "couchbases://your-connection-string",
        "CB_USERNAME": "your-username",
        "CB_PASSWORD": "your-password"
      }
    }
  }
}
{ "mcpServers": { "couchbase": { "command": "docker", "args": [ "run", "--rm", "-i", "-e", "CB_CONNECTION_STRING=couchbases://your-connection-string", "-e", "CB_USERNAME=your-username", "-e", "CB_PASSWORD=your-password", "couchbase/mcp-server" ] } } } -
Logs: Help > Show Log in Finder/Explorer > mcp > couchbase
You can integrate the Couchbase MCP Server into Factory using any of the following methods.
See the Factory AI MCP documentation for details.
Option 1: Droid CLI
Run the following command in the Droid CLI:
droid mcp add couchbase-mcp 'uvx couchbase-mcp-server --connection-string=couchbases://your-connection-string --username=your-username --password=your-password' --type stdioOption 2: Configuration File
Navigate to the MCP configuration file at ~/.factory/mcp.json and add the Couchbase MCP Server configuration.
-
uvx
-
Docker
{
  "mcpServers": {
    "couchbase": {
      "command": "uvx",
      "args": ["couchbase-mcp-server"],
      "env": {
        "CB_CONNECTION_STRING": "couchbases://your-connection-string",
        "CB_USERNAME": "your-username",
        "CB_PASSWORD": "your-password"
      }
    }
  }
}
{
"mcpServers": {
"couchbase": {
"command": "docker",
"args": [
"run", "--rm", "-i",
"-e", "CB_CONNECTION_STRING=couchbases://your-connection-string",
"-e", "CB_USERNAME=your-username",
"-e", "CB_PASSWORD=your-password",
"couchbase/mcp-server"
]
}
}
}Option 3: Factory MCP Registry
To configure the Couchbase MCP server using the Factory MCP registry, type /mcp in the chat interface to launch the interactive UI, or type /mcp in the Droid CLI to access the MCP management menu.
Browse the registry for "Couchbase" MCP server, and add it.
Once added, the Couchbase MCP configuration template will be appended to ~/.factory/mcp.json.
Update the placeholder values with your specific settings.
Logs: ~/.factory/logs/
| Replace the placeholder values with your actual Couchbase cluster credentials. See Environment Variables for all available options. |
Step 2: Set Your Connection String
The connection string format depends on your deployment type.
-
Capella
-
Self-Managed
Use couchbases:// (with s for TLS):
couchbases://cb.your-endpoint.cloud.couchbase.comFind your connection string in the Capella UI under Cluster > Connect.
| Ensure the machine running the MCP server has its IP allowed in your Capella cluster settings. This is only required when the MCP server reaches Capella over the public Internet — not if it’s hosted on a VPC or a private network connected to Capella. |
Use couchbase:// for local or unencrypted connections:
couchbase://localhost
couchbase://127.0.0.1
Use couchbases:// if TLS is enabled on your cluster.
To find your connection string and credentials, see the Couchbase Server Web Console: connection strings are under Servers (Connect to Couchbase Server), and database users are under Security (Manage Users and Roles).
If your Couchbase Server is running on the host machine and you’re using Docker, the connection string would typically be couchbase://host.docker.internal. See the Docker networking documentation for more details.
Step 3: Set Up Authentication
Configure authentication for your MCP server. Choose one of the following methods.
Basic Authentication (Username and Password)
For Basic Authentication setup, see Manage Database Credentials (Capella) or Manage Users and Roles (self-managed).
Set CB_USERNAME and CB_PASSWORD in your MCP client configuration:
{
  "env": {
    "CB_CONNECTION_STRING": "couchbases://your-connection-string",
    "CB_USERNAME": "your-username",
    "CB_PASSWORD": "your-password"
  }
}
mTLS (Mutual TLS)
Set CB_CLIENT_CERT_PATH and CB_CLIENT_KEY_PATH:
{
  "env": {
    "CB_CONNECTION_STRING": "couchbases://your-connection-string",
    "CB_CLIENT_CERT_PATH": "/path/to/client-certificate.pem",
    "CB_CLIENT_KEY_PATH": "/path/to/client.key"
  }
}
See Configuring Authentication for full details.
Step 4: Validate the Setup
Save your configuration and restart your MCP client.
Check server status
Ask your AI assistant:
"What’s the status of the Couchbase MCP server?"
The assistant will call get_server_configuration_status and return the server’s configuration, including transport mode, read-only mode status, and loaded tools.
If the tool is not available, the server did not start correctly. Check the logs for your client (listed above in each client tab).
Check cluster health and services
"Check the health of my Couchbase cluster and list all running services."
The assistant will call get_cluster_health_and_services, which connects to the cluster and returns the cluster health status along with all running services (Data, Query, Index, Search, etc.).
If the connection fails, verify your CB_CONNECTION_STRING, CB_USERNAME, and CB_PASSWORD values.
Try sample queries
Once connected, try these prompts:
-
"List all buckets in my cluster"
-
"Show me the scopes and collections in the
travel-samplebucket" -
"What does a document in the airline collection look like?"
-
"Find all airlines based in the United States"
-
"Run a query: `SELECT COUNT(*) FROM airline`"
-
"What are the longest running queries on my cluster?"
-
"Check my cluster health"
Read Only Mode
By default, the server runs in read-only mode (CB_MCP_READ_ONLY_MODE=true):
-
All KV write tools (upsert, insert, replace, delete) are not loaded
-
SQL++ write statements (INSERT, UPDATE, DELETE, etc.) are blocked at runtime by
run_sql_plus_plus_query(the tool itself is still loaded for reads)
To enable write operations, set CB_MCP_READ_ONLY_MODE=false in your configuration.
See Read-Only Mode for details.
Next Steps
-
Review all available Tools
-
Explore Configuration options
-
Want to customize or build from source? See Build from Source
-
Having issues? See Troubleshooting