Introduction to Couchbase
A newer version of this software is available
You are viewing the documentation for an older version of this software. To find the documentation for the current version, visit the Couchbase documentation home page.
Couchbase Server is a NoSQL document database for interactive web applications. It has a flexible data model, is easily scalable, provides consistent high performance and is “always-on,” meaning it is can serve application data 24 hours, 7 days a week. Couchbase Server provides the following benefits:
-
Flexible Data Model
With Couchbase Server, JSON documents are used to represent application objects and the relationships between objects. This document model is flexible enough so that you can change application objects without having to migrate the database schema, or plan for significant application downtime. Even the same type of object in your application can have a different data structures. For instance, you can initially represent a user name as a single document field. You can later structure a user document so that the first name and last name are separate fields in the JSON document without any downtime, and without having to update all user documents in the system.
The other advantage to the flexible, document-based data model is that it is well suited to representing real-world items and how you want to represent them. JSON documents support nested structures, as well as field representing relationships between items which enable you to realistically represent objects in your application.
-
Easy Scalability
It is easy to scale your application with Couchbase Server, both within a cluster of servers and between clusters at different data centers. You can add additional instances of Couchbase Server to address additional users and growth in application data without any interruptions or changes in your application code. With one click of a button, you can rapidly grow your cluster of Couchbase Servers to handle additional workload and keep data evenly distributed.
Couchbase Server provides automatic sharding of data and rebalancing at runtime; this lets you resize your server cluster on demand. Cross-data center replication providing in Couchbase Server 2.1.0 enables you to move data closer to your user at other data centers.
-
Consistent High Performance
Couchbase Server is designed for massively concurrent data use and consistent high throughput. It provides consistent sub-millisecond response times which help ensure an enjoyable experience for users of your application. By providing consistent, high data throughput, Couchbase Server enables you to support more users with fewer servers. The server also automatically spreads workload across all servers to maintain consistent performance and reduce bottlenecks at any given server in a cluster.
-
“Always Online”
Couchbase Server provides consistent sub-millisecond response times which help ensure an enjoyable experience for users of your application. By providing consistent, high data throughput, Couchbase Server enables you to support more users with fewer servers. The server also automatically spreads workload across all servers to maintain consistent performance and reduce bottlenecks at any given server in a cluster.
Features such as cross-data center replication and auto-failover help ensure availability of data during server or datacenter failure.
All of these features of Couchbase Server enable development of web applications where low–latency and high throughput are required by end users. Web applications can quickly access the right information within a Couchbase cluster and developers can rapidly scale up their web applications by adding servers.
Understanding Couchbase Concepts
Before you develop applications on the Couchbase Server, you will want to understand key concepts and components that are related to application development on Couchbase Server. For more information about underlying functions of Couchbase Server, data storage, and cluster management, see the Couchbase Server Manual.
Couchbase as Document Store
The primary unit of data storage in Couchbase Server is a JSON document, which is a data structure capable of holding arrays and other complex information. JSON documents are information-rich, flexible structures that enable you to model objects as individual documents. By using JSON documents to model your data, you can construct your application data as individual documents which would otherwise require rigidly-defined relational database tables. This provides storage for your web application which is well suited to serialized objects and the programming languages that use them.
Note
Binary objects, such as integers and strings, can also be stored.
Because application objects are modeled as documents, schema migrations do not need to be performed. The documents and the fields they store indicate the relationships between application objects; therefore, to update the structure of objects you store, change the document structure that is written to Couchbase Server.
When Couchbase Server is used as a store for JSON documents, the records can be indexed and queried. Couchbase Server provides a JavaScript-based query engine to find records based on field values. For more information, see Finding Data with Views.
For more information about working with JSON documents and Couchbase, see Modeling Documents.
Data Buckets
Your web application stores data in a Couchbase cluster using buckets. Buckets are isolated, virtual containers which logically group records within a cluster; they are the functional equivalent to a database. Buckets can be accessed by multiple client applications across a cluster. They provide a secure mechanism for organizing, managing and analyzing data storage. As an application developer you will most likely create buckets for your development and production environment.
For more information about data buckets in Couchbase Server and how to create them, see About Data Buckets and Data storage in the Couchbase Server Manual.
Keys and Metadata
All information that you store in Couchbase Server are documents with keys. Keys are unique identifiers for a document, and values are either JSON documents or if you choose the data you want to store can be byte stream, data types, or other forms of serialized objects.
Keys are also known as document IDs and serve the same function as a SQL primary key. A key in Couchbase Server can be any string, including strings with separators and identifiers, such as ‘person_93679.’ A key is unique.
By default, all documents contain three types of metadata which are provided by the Couchbase Server. This information is stored with the document and is used to change how the document is handled:
Cas Value —Also called cas token or cas ID ; this is a unique identifier associated with a document, and verified by the Couchbase Server before a document is deleted or changed. This provides a form of basic optimistic concurrency; when Couchbase Server checks a CAS value before changing data, it effectively prevents data loss without having to lock records. Couchbase Server will prevent a document from being altered by an operation if another process alters the document and its CAS value, in the meantime.
-
Time to Live (ttl) — This is an expiration for a document typically specified in seconds. By default, any document created in Couchbase Server that does not have a given ttl will have an indefinite life span and will remain in Couchbase Server unless an explicit delete call from a client removes it. The Couchbase Server will delete values during regular maintenance if the ttl for an item has expired.
Note
The expiration value deletes information from the entire database. It has no effect on when the information is removed from the RAM caching layer.
- Flags —These are SDK- specific flags which are used to provides a variety of options during storage, retrieval, update, and removal of documents. Typically flags are optional metadata used by a Couchbase client library to perform additional processing of a document. An example of flags include the ability to specify that a document be formatted a specific way before it is stored.
Couchbase SDKs
Couchbase SDKs, sometimes also referred to as client libraries, are the language-specific SDKs provided by Couchbase and third-party providers that are installed on your web application server. A Couchbase SDK is responsible for communicating with the Couchbase Server and provides language-specific interfaces your web application can use to perform database operations.
All Couchbase SDKs automatically read and write data to the right node in a cluster. If database topology changes, the SDK responds automatically and correctly distributes read/write requests to the right cluster nodes. Similarly, if your cluster experiences server failure, SDKs will automatically direct requests to still-functioning nodes. SDKs are able to determine the locations of information, the status of nodes, and the status of the cluster using a REST API for administration. For more information about the REST API for Administration, see the Couchbase Server REST API.
The following diagram shows a single web application server, the Couchbase SDK, and a Couchbase Server cluster. In real deployments, multiple web application servers can communicate via a Couchbase SDK to a cluster.

Nodes and Clusters
You deliver your application on several grouped servers, also known as a cluster. Each cluster consists of multiple nodes :
Couchbase Server or Node: A node is a single instance of a Couchbase Server running on a physical or virtual machine, or other environment.
Cluster: This is a collection of one or more nodes. All nodes in a cluster are identical in function, interfaces, components and systems. Couchbase Server manages data across nodes in a cluster. When you increase the size of a cluster, the cluster scales linearly; that is, there is no hierarchy or parent/child relationships between multiple nodes in a cluster.
Nodes or clusters typically reside on a separate physical machine than your web server. Your Couchbase node/cluster will communicate with your web application via a Couchbase SDK, which we describe in detail in this guide. Your application logic does not need to handle information about nodes or clusters; the Couchbase SDKs are able to automatically communicate with the appropriate Couchbase cluster node.
Information about the Cluster
Your web application does not need to directly handle any information about where a document resides; Couchbase SDKs automatically retrieve updates from Couchbase Server about the location of items in a cluster. Multiple web application instances can access the same item at the same time using Couchbase SDKs.
How an SDK gets updates on cluster topology is a slightly more advanced topic and is mainly relevant for those developers who want to create their own Couchbase SDK. For instance developers who want to create a Couchbase SDK for a language not yet supported would be interested in this topic. For more information, see, Getting Cluster Topology.
Comparing Couchbase and Traditional RDMS
If you are an application developer with a background primarily in relational databases, Couchbase Server has some key characteristics and advantages that you should be familiar with. The following compares the different database systems:
Couchbase Server Traditional Relational Database (RDBMS) Rapidly scalable to millions of users. Scalable to thousands of users. Data can be structured, semi-structured, and unstructured. Data must be normalized. Built on modern reality of relatively inexpensive. plentiful memory. Built on assumption of scarce, expensive memory. Built for environments with high-speed data networking. Built at a time when networking still formative and slow. Data can be flexibly stored as JSON documents or binary data. No need to predefine data types. Data types must be predefined for columns. Does not require knowledge or use of SQL as query language. Requires SQL as query language. Highly optimized for retrieve and append operations; high-performance for data-intensive applications, such as serving pages on high-traffic websites; can handle a large number of documents and document read/writes. Significantly slower times for retrieving and committing data. Designed for occasional, smaller read/write transactions and infrequent larger batch transactions. Data stored as key-document pairs; well suited for applications which handle rapidly growing lists of elements. Data stored in tables with fixed relations between tables. Does not require extensive data modeling; data structure is of lesser significance during development. Data modeling and establishing relational model for data structures required during application development. Asynchronous operations and optimistic concurrency enable applications designed for high throughput. Strict enforcement of data integrity and normalization, with the tradeoff of lower performance and slower response times. Before you develop your application and model application data, you should consider the issues faced when you use a traditional RDBMS. Couchbase Server is well suited to handle these issues:
Stores many serialized objects,
Stores dissimilar objects that do not fit a single schema,
Scales out from thousands to millions of users rapidly,
Performs large volume reads/writes,
Supports schema and application data changes on running system.
If you need a system that provides a high level of scalability, flexibility in data structure, and high performance, a NoSQL solution such as Couchbase is well suited. If you want to handle multi-record transactions, have complex security needs, or need to perform rollback of operations, a traditional RDBMS may be the better alternative for your application. There may also be many cases in which you perform an analysis of your application needs and determine you use both a RDBMS and Couchbase Server for your data. For more detailed information about the topic, see our resource library, webinars and whitepapers on the topic at Couchbase, Why NoSQL, Why Now?
Support for Memcached Protocol
The Couchbase Server is completely compatible with the memcached protocol, which is a widely adopted protocol for storing information in high-performance, in-memory caches. This means than any existing memcached client libraries and applications using these libraries can be migrated to Couchbase Server with little or no modification.
There are numerous challenges faced by developers who currently use memcached with a traditional RDBMS which are resolved by a move to Couchbase Server. For instance, if you currently use a memcached layer for data service and a traditional RDBMS, your database could become overloaded and non-responsive when memcached nodes go down. With a Couchbase Server cluster, your information will be automatically replicated across the cluster, which provides a high availability of data, even during node failure.
For more information about Couchbase Server as a replacement for memcached and RDBMS systems, see Replacing a Memcached Tier with a Couchbase Cluster and the Couchbase SDKs.
Server Rebalancing
During a server rebalance, Couchbase Server automatically updates information about where data is located. During the rebalance, a Couchbase SDK can therefore still write to an active node in a cluster and the Couchbase Server will update information about the newly saved data location. Once the rebalance is complete, the Couchbase SDK automatically switches to the new topology. For more information, see the Couchbase Server Manual.
Server Failover
Couchbase SDKs can connect to any node in a cluster; at runtime SDKs also automatically receive information from Couchbase Server if any nodes are unavailable. If a node that is used by your application fails, the SDK is informed by Couchbase Server and mark that node as down and will also have information about alternate nodes that are still available. You use the Couchbase Admin tool to manually indicate a node has failed, or you can configure couchbase Server to use auto-failover. For more information, see the Couchbase Server Manual. During node failure, Couchbase SDKs receive errors trying to read or write any data that is on a failed node. Couchbase SDKs are still able to read and write to all other functioning nodes in the cluster. After the node failure has been detected and the node has been failed-over, SDKs are updated by the Couchbase Server and will resume functioning with the cluster and nodes as they normally would. In this way, Couchbase SDKs and the applications you build on them are able to cope with transient node failures and still conduct reads and writes.
For more information about node failover, see the Couchbase Server Manual.
Applications on Couchbase Server
If you look at successful Couchbase deployments, you will see there several patterns of use; these patterns tend to rely on Couchbase Server’s unique combination of 1) linear, horizontal scalability, 2) sustained low latency and high throughput performance, and 3) the extensibility of the system. This section highlights ways you might want to think about using the Couchbase Server for your application. For more detailed information, including case studies and whitepapers, see Couchbase NoSQL Use Cases.
Session Store
User sessions are easily stored and managed in Couchbase, for instance, by using the document ID naming scheme, “user:USERID”. With Couchbase Server, you can flag items for deletion after a certain amount of time, and therefore you have the option of having Couchbase automatically delete old sessions.
Optimistic concurrency operations can be used to ensure concurrent web requests from a single user do not lose data. For more information, see Check and Set (CAS).
Many web application frameworks such as Ruby on Rails and various PHP and Python web frameworks also provide pre-integrated support for storing session data using Memcached protocol. These are supported by default by Couchbase.
For more detailed information, including case studies and whitepapers, see Couchbase NoSQL Use Cases.
Social Gaming
You can model and store game state, property state, time lines, conversations and chats with Couchbase Server. The asynchronous persistence algorithms of Couchbase were designed, built and deployed to support some of the highest scale social games.
In particular, the heavy dual read and write storage access patterns of social games, where nearly every user gesture mutates game state, is serviced by Couchbase by asynchronously queueing mutations for disk storage and also by collapsing mutations into the most recently queued mutation. For example, a player making 10 game state mutations in 5 seconds, such as planting 10 flowers in 5 seconds, is compressed by Couchbase automatically into just one queued disk mutation.
Couchbase Server can also force-save mutated item data to disk, even if an item is heavily changed, such as when the user keeps on clicking and clicking. Additionally, game state for that player remains instantly readable as long as it is in the memory working set of Couchbase.
For more detailed information, including case studies and whitepapers, see Couchbase NoSQL Use Cases.
Ad, Offer and Content Targeting
The same attributes which serve Couchbase in the gaming context also apply well for real-time ad and content targeting. For example, Couchbase provides a fast storage capability for counters. Counters are useful for tracking visits, associating users with various targeting profiles, tracking ad-offers, and for tracking ad-inventory.
Multi-retrieve operations in Couchbase allow ad applications to concurrently distribute data and then gather it against profiles, counters, or other items in order to allow for ad computation and serving decisions under strict response latency requirements.
For more detailed information, including case studies and whitepapers, see Couchbase NoSQL Use Cases.
Modeling Documents
This section describes core elements you will use to handle data in Couchbase Server. It describes the ways you can structure individual JSON documents for your application, how to store the documents from a Couchbase SDK, and describe different approaches you may take when you structure data in documents.
Couchbase Server is a document database ; unlike traditional relational databases, you store information in documents rather than table rows. Couchbase has a much more flexible data format; documents generally contain all the information about a data entity, including compound data rather than the data being normalized across tables.
A document is a JSON object consisting of a number of key-value pairs that you define. There is no schema in Couchbase; every JSON document can have its own individual set of keys, although you may probably adopt one or more informal schemas for your data.
With Couchbase Server, one of the benefits of using JSON documents is that you can index and query these records. This enables you to collect and retrieve information based on rules you specify about given fields; it also enables you to retrieve records without using the key for the record. For more information about indexing and querying using Couchbase SDK, see Finding Data with Views.
Comparing Document-Oriented and Relational Data
Note
Want to learn more about moving from relational to document-oriented databases? See Relational to NoSQL.
In a relational database system you must define a schema before adding records to a database. The schema is the structure described in a formal language supported by the database and provides a blueprint for the tables in a database and the relationships between tables of data. Within a table, you need to define constraints in terms of rows and named columns as well as the type of data that can be stored in each column.
In contrast, a document-oriented database contains documents, which are records that describe the data in the document, as well as the actual data. Documents can be as complex as you choose; you can use nested data to provide additional sub-categories of information about your object. You can also use one or more document to represent a real-world object. The following compares a conventional table with document-based objects:
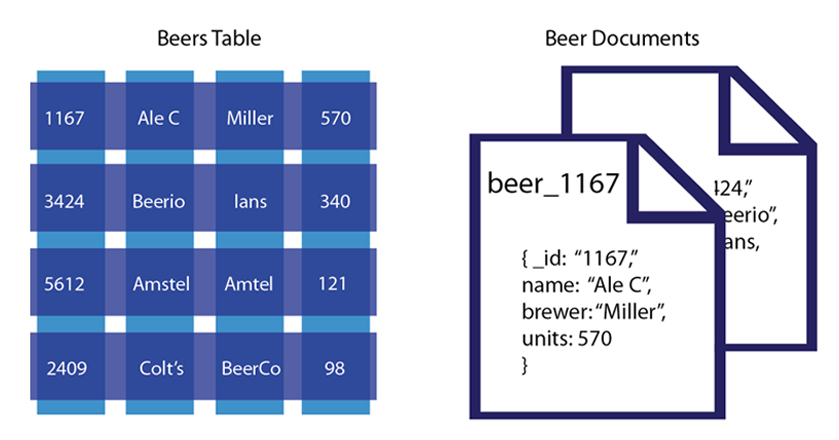
In this example we have a table that represents beers and their respective attributes: id, beer name, brewer, bottles available and so forth. As we see in this illustration, the relational model conforms to a schema with a specified number of fields which represent a specific purpose and data type. The equivalent document-based model has an individual document per beer; each document contains the same types of information for a specific beer.
In a document-oriented model, data objects are stored as documents; each document stores your data and enables you to update the data or delete it. Instead of columns with names and data types, we describe the data in the document, and provide the value for that description. If we wanted to add attributes to a beer in a relational model, we would need to modify the database schema to include the additional columns and their data types. In the case of document-based data, we would add additional key-value pairs into our documents to represent the new fields.
The other characteristic of relational database is data normalization ; this means you decompose data into smaller, related tables. The figure below illustrates this:
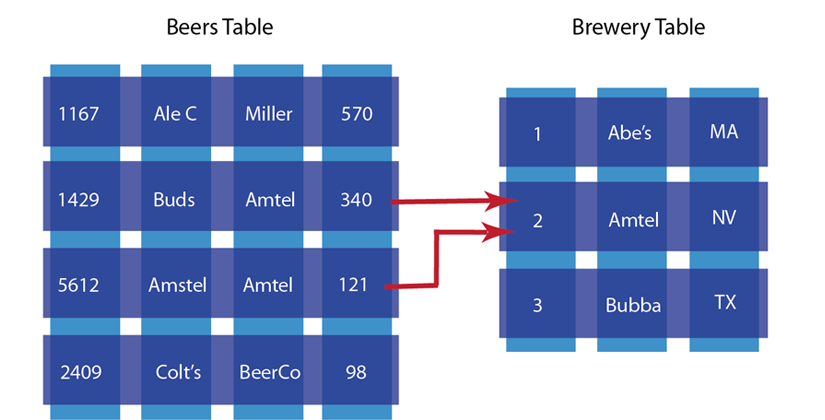
In the relational model, data is shared across multiple tables. The advantage to this model is that there is less duplicated data in the database. If we did not separate beers and brewers into different tables and had one beer table instead, we would have repeated information about breweries for each beer produced by that brewer.
The problem with this approach is that when you change information across tables, you need to lock those tables simultaneously to ensure information changes across the table consistently. Because you also spread information across a rigid structure, it makes it more difficult to change the structure during production, and it is also difficult to distribute the data across multiple servers.
In the document-oriented database, we could choose to have two different document structures: one for beers, and one for breweries. Instead of splitting your application objects into tables and rows, you would turn them into documents. By providing a reference in the beer document to a brewery document, you create a relationship between the two entities:

In this example we have two different beers from the Amstel brewery. We represent each beer as a separate document and reference the brewery in the
brewerfield. The document-oriented approach provides several upsides compared to the traditional RDBMS model. First, because information is stored in documents, updating a schema is a matter of updating the documents for that type of object. This can be done with no system downtime. Secondly, we can distribute the information across multiple servers with greater ease. Since records are contained within entire documents, it makes it easier to move, or replicate an entire object to another server.Using JSON Documents
JavaScript Object Notation (JSON) is a lightweight data-interchange format which is easy to read and change. JSON is language-independent although it uses similar constructs to JavaScript. JSON documents enable you to benefit from all new Couchbase features, such as indexing and querying; they also to provide a logical structure for more complex data and enable you to provide logical connections between different records.
The following are basic data types supported in JSON:
Numbers, including integer and floating point,
Strings, including all Unicode characters and backslash escape characters,
Boolean: true or false,
Arrays, enclosed in square brackets: [“one”, “two”, “three”]
Objects, consisting of key-value pairs, and also known as an associative array or hash. The key must be a string and the value can be any supported JSON data type.
For more information about creating valid JSON documents, please refer to JSON.
When you use JSON documents to represent your application data, you should think about the document as a logical container for information. This involves thinking about how data from your application fits into natural groups. It also requires thinking about the information you want to manage in your application. Doing data modeling for Couchbase Server is a similar process that you would do for traditional relational databases; there is however much more flexibility and you can change your mind later on your data structures. As a best practice, during your data/document design phase, you want to evaluate:
What are the things you want to manage in your applications, for instance, users, breweries, beers, and so forth.
What do you want to store about the things. For example, this could be alcohol percentage, aroma, location, etc.
How do the things in your application fit into natural groups.
For instance, if you are creating a beer application, you might want a particular document structure to represent a beer:
{
    "name":
    "description":
    "category":
    "updated":
}
For each of the keys in this JSON document you would provide unique values to represent individual beers. If you want to provide more detailed information in your beer application about the actual breweries, you could create a JSON structure to represent a brewery:
{
    "name":
    "address":
    "city":
    "state":
    "website":
    "description":
}
Performing data modeling for a document-based application is no different than the work you would need to do for a relational database. For the most part it can be much more flexible, it can provide a more realistic representation or your application data, and it also enables you to change your mind later about data structure. For more complex items in your application, one option is to use nested pairs to represent the information:
{
    "name":
    "address":
    "city":
    "state":
    "website":
    "description":
    "geo":
    {
    "location": ["-105.07", "40.59"],
    "accuracy": "RANGE_INTERPOLATED"
    }
    "beers": [ _id4058, _id7628]
}
In this case we added a nested attribute for the geolocation of the brewery and for beers. Within the location, we provide an exact longitude and latitude, as well as level of accuracy for plotting it on a map. The level of nesting you provide is your decision; as long as a document is under the maximum storage size for Couchbase Server, you can provide any level of nesting that you can handle in your application.
In traditional relational database modeling, you would create tables that contain a subset of information for an item. For instance a brewery may contain types of beers which are stored in a separate table and referenced by the beer id. In the case of JSON documents, you use key-values pairs, or even nested key-value pairs.
Schemaless Data Modeling
When you use documents to represent data, a database schema is optional. The majority of your effort will be creating one or more documents that will represent application data. This document structure can evolve over time as your application grows and adds new features.
In Couchbase Server you do not need to perform data modeling and establish relationships between tables the way you would in a traditional relational database. Technically, every document you store with structure in Couchbase Server has its own implicit schema; the schema is represented in how you organize and nest information in your documents.
While you can choose any structure for your documents, the JSON model in particular will help you organize your information in a standard way, and enable you to take advantage of Couchbase Server’s ability to index and query. As a developer you benefit in several ways from this approach:
Extend the schema at runtime, or anytime. You can add new fields for a type of item anytime. Changes to your schema can be tracked by a version number, or by other fields as needed.
Document-based data models may better represent the information you want to store and the data structures you need in your application.
You design your application information in documents, rather than model your data for a database.
Converting application information into JSON is very simple; there are many options, and there are many libraries widely available for JSON conversion.
Minimization of one-to-many relationships through use of nested entities and therefore, reduction of joins.
When you use JSON documents with Couchbase, you also create an application that can benefit from all the new features of Couchbase 2.0, particularly indexing and querying. For more information, see Finding Data with Views.
There are several considerations to have in mind when you design your JSON document:
Whether you want to use a type field at the highest level of your JSON document in order to group and filter object types.
What particular keys, ids, prefixes or conventions you want to use for items, for instance ‘beer_My_Brew.’
When you want a document to expire, if at all, and what expiration would be best.
If want to use a document to access other documents. In other words, you can store keys that refer other documents in a JSON document and get the keys through this document. In the NoSQL database jargon, this is often known as using composite keys.
You can use a
typefield to group together sets of records. For example, the following JSON document contains atypefield with the valuebeerto indicate that the document represents a beer. A document that represents another kind of beverage would use a different value in the type field, such asaleorcider.{ "beer_id": "beer_Hoptimus_Prime", "type” : “beer”, "abv": 10.0, "category": "North American Ale", "name": "Hoptimus Prime", "style": “Double India Pale Ale” }Here is another type of document in our application which we use to represent breweries. As in the case of beers, we have a
typefield we can use now or later to group and categorize our beer producers:{ "brewery_id": ”brewery_Legacy_Brewing_Co", "type” : “brewery", "name" : "Legacy Brewing Co.", "address": "525 Canal Street Reading, Pennsylvania, 19601 United States", "updated": "2010-07-22 20:00:20" }What happens if we want to change the fields we store for a brewery? In this case we just add the fields to brewery documents. In this case we decide later that we want to include GPS location of the brewery:
{
    "brewery_id": ”brewery_Legacy_Brewing_Co”,
    "type” : “brewery”,
    "name" : "Legacy Brewing Co.",
    "address": "525 Canal Street
                Reading, Pennsylvania, 19601
                United States",
    "updated": "2010-07-22 20:00:20",
    "latitude": -75.928469,
    "longitude": 40.325725
}
So in the case of document-based data, we extend the record by just adding the two new fields for
latitudeandlongitude. When we add other breweries after this one, we would include these two new fields. For older breweries we can update them with the new fields or provide programming logic that shows a default for older breweries. The best approach for adding new fields to a document is to perform a check-and-set operation on the document to change it; with this type of operation, Couchbase Server will send you a message that the data has already changed if someone has already changed the record. For more information about check-and-set methods with Couchbase, see Check and Set (CAS)To create relationships between items, we again use fields. In this example we create a logical connection between beers and breweries using the
breweryfield in our beer document which relates to theidfield in the brewery document. This is analogous to the idea of using a foreign key in traditional relational database design.This first document represents a beer, Hoptimus Prime:
{
    "beer_id": "beer_Hoptimus_Prime",
    "type” : “beer”,
    "abv": 10.0,
    "brewery": ”brewery_Legacy_Brewing_Co",
    "category": "North American Ale",
    "name": "Hoptimus Prime",
    "style": “Double India Pale Ale”
}
This second document represents the brewery which brews Hoptimus Prime:
{
    "brewery_id": ”brewery_Legacy_Brewing_Co”,
    "type” : “brewery”,
    "name" : "Legacy Brewing Co.",
    "address": "525 Canal Street
                         Reading, Pennsylvania, 19601
                         United States",
    "updated": "2010-07-22 20:00:20",
    "latitude": -75.928469,
    "longitude": 40.325725
}
In our beer document, the
breweryfield points to ‘brewery_Legacy_Brewery_Co’ which is the key for the document that represents the brewery. By using this model of referencing documents within a document, we create relationships between application objects.Document Design Considerations
When you work on document design, there are a few other considerations you should have in mind. This will help you determine whether you use one or more documents to represent something in your application. It will also help you determine how and when you provide references to show relationships between multiple documents. Consider:
Whether you will represent the items as separate objects.
Whether you want to access the objects together at runtime.
If you want some data to be atomic; that is, changes occur at once to this data, or the change fails and will not made.
Whether you will index and query data through views, which are stored functions you use to find, extract, sort, and perform calculations on documents in Couchbase Server. For more information see Finding Data with Views.
The following provides some guidelines on when you would prefer using one or more than one document to represent your data.
When you use one document to contain all related data you typically get these benefits:
Application data is de-normalized.
Can read/write related information in one operation.
Eliminate need for client-side joins.
If you put all information for a transaction in a single document, you can better guarantee atomicity since any changes will occur to a single document at once.
When you provide a single document to represent an entire entity and any related records, the document is known as an aggregate. You can also choose to use separate documents for different object types in your application. This approach is known as denormalization in NoSQL database terms. In this case you provide cross references between objects as we demonstrated earlier in the beer-brewery documents. You typically gain the following from separate documents:
Reduce data duplication.
May provide better application performance and scale by keeping document size smaller.
Application objects do not need to be in same document; separate documents may better reflect the objects as they are in the real world.
The following examples demonstrate the use of a single document compared to separate documents for a simple blog. In the blog application a user can create an entry with title and content. Other users can add comments to the post. In the first case, we have a single JSON document to represent a blog post, plus all the comments for the post:
{
    "post_id": "dborkar_Hello_World",
    "author": "dborkar",
    "type": "post"
      "title": "Hello World",
      "format": "markdown",
      "body": "Hello from [Couchbase](http://couchbase.com).",
      "html": "<p>Hello from <a href=\"http:  …
              "comments":[
              ["format": "markdown", "body":"Awesome post!"],
              ["format”: "markdown", "body":"Like it." ]
           ]
}
The next JSON documents show the same blog post, however we have split the post into the actual entry document and a separate comment document. First is the core blog post document as JSON. Notice we have a reference to two comments under the
commentskey and two values in an array:{ "post_id": "dborkar_Hello_World", "author": "dborkar", "type": "post", "title": "Hello World", "format": "markdown", "body": "Hello from [Couchbase](http://couchbase.com).", "html": “<p>Hello from <a href="http: …"> "comments" : ["comment1_jchris_Hello_world", "comment2_kzeller_Hello_World"] }The next document contains the first actual comment that is associated with the post. It has the key
comment_idwith the first value of ‘comment1_dborkar_Hello_world’; this value serves as a reference back to the blog post it belongs to:{ "comment_id": "comment1_dborkar_Hello_World", "format": "markdown", "body": "Awesome post!" }The next example demonstrates our beer and breweries example as single and separate documents. If we wanted to use a single-document approach to represent a beer, it could look like this in JSON:
{
    "beer_id": 10.0,
    "name": "Hoptimus Prime",
    "category": "North American Ale",
    "style": "Imperial or Double India Pale Ale",
    "brewery": "Legacy Brewing Co." : {
            "address1" : "Easy Peasy St.",
            "address2" : "Suite 4",
            "city" : "Baltimore",
            "state" : "Maryland",
            "zip" : "21215",
            "capacity" : 10000,
                     },
    "updated": [2010, 7, 22, 20, 0, 20],
    "available": true
}
In this case we provide information about the brewery as a subset of the beer. But consider the case where we have more than one beer from the brewery, in this case:
{
    "beer_id": 12.0,
    "name": "Pleny the Hipster",
    "category": "Wheat Beer",
    "style": "Koelsch",
    "brewery": "Legacy Brewing Co." : {
            "address1" : "Easy Peasy St.",
            "address2" : "Suite 4",
            "city" : "Baltimore",
            "state" : "Maryland",
            "zip" : "21215",
            "capacity" : 10000,
                     },
    "updated": [2011, 8, 2, 20, 0, 20],
    "available": true
}
Here we are starting to develop duplicate information because we have the same brewery information in each beer document. In this case it makes sense to separate the brewery and beers as different documents and relate them through fields. The revised, separate beer document appears below. Notice we have added a new field to represent the brewery and provide the brewer id:
{
    "beer_id": 10.0,
    "name": "Hoptimus Prime",
    "category": "North American Ale",
    "style": "Imperial or Double India Pale Ale",
    "brewery" : "leg_brew_10"
    "updated": [2010, 7, 22, 20, 0, 20],
    "available": true
}
And here is the associated brewery as a separate brewery document. In this case, we may simplify the document structure since it is separate from the beer data, and provide all the brewery information at the same level:
{
    "brewery_id" : "leg_brew_10",
    "name": "Legacy Brewing Co.",
    "address1" : "Easy Peasy St.",
    "address2" : "Suite 4",
    "city" : "Baltimore",
    "state" : "Maryland",
    "zip" : "21215",
    "capacity" : 10000,
}
Modeling Documents for Retrieval
Once you grasp the concept that you can model real-world objects as documents and you understand the idea that you can create relationships between documents, you may wonder how
shouldyou go about representing the relationships? For instance, if you have an object that has a relationship of ownership/possession, do you always want to include fields in that object which reference all the objects it owns? In other words, if you follow this approach, when an asteroid has craters, the asteroid document should contain references to each crater document. In traditional relational database terminology, this is called a one-to-many relationship, and is often also called a has-many relationship. In an asteroid example we say the “asteroid has many craters” and conceptually it would appear as follows: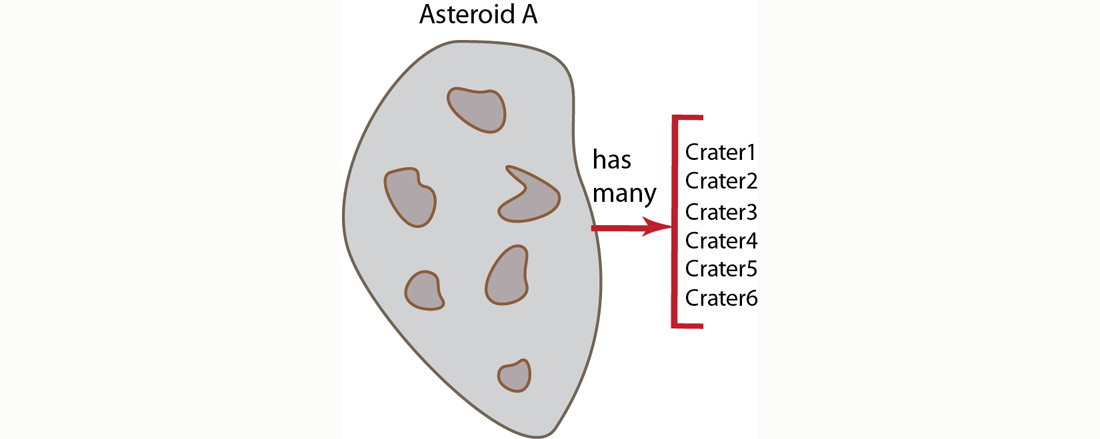
Imagine we are creating a virtual universe containing asteroids. And all asteroids can have zero or more craters; users in the environment can create more craters on the asteroids, and the environment can also create more craters on an asteroid. In this case, we have a relationship of ownership/possession by our asteroid since an asteroid contains the craters that are on it. If we choose to express ownership of the craters by the asteroid and say the asteroid has-many craters, we would provide an asteroid document as follows:
{
"a_id" : "asteroidA",
"craters" : ["crater1", "crater2" .... ],
....
}
In the asteroid document, we reference the crater by crater ID in an array of craters. Each of the craters could be represented by the following JSON document:
{
"crater_id" : "crater1",
"location" : [ "37.42N", "-112.165W" ],
"depth" : 80
....
}
But because we are working with a flexible, document-centric design, we could instead put all the references to the object-that-owns in the objects that are owned. In the asteroid example, we would have references from each crater document to the asteroid document. In the relational world, we refer to this as a many-to-one relationship which is sometimes also called a belongs-to relationship. This alternate approach would appear as follows:
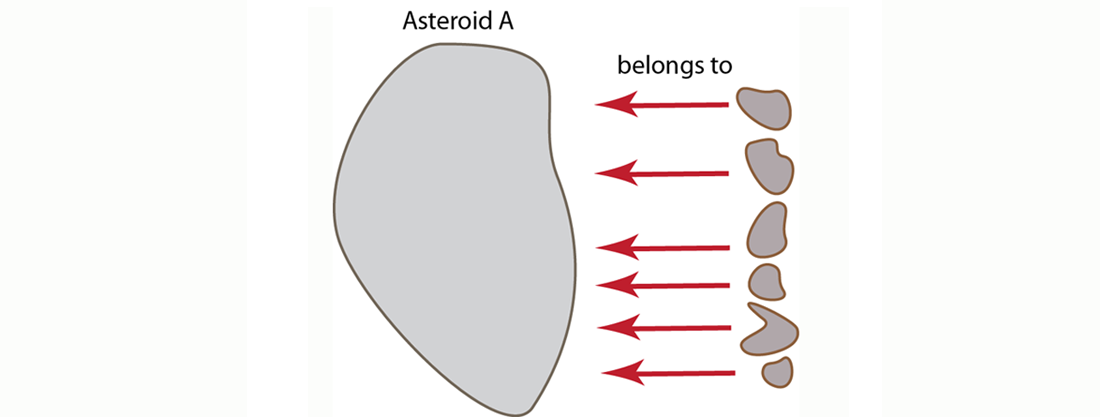
The respective asteroid and crater JSON documents for this approach would now appear as follows:
{
"a_id" : "asteroidA",
....
}
In the asteroid document we have a unique asteroid ID field,
a_idwhich we can reference from our crater documents. Each of the craters could be represented by the following JSON document:{ "crater_id" : "crater1", "on_asteroid" : "asteroidA" "location" : [ "37.42N", "-112.165W" ], "depth" : 80 .... }With this alternate approach, we provide any information about a relationship between asteroid and crater in each crater document. We provide a field
on_asteroidin each crater document with the value linking us to the asteroid document.So which of these two approaches is preferable for relating the two documents? There are two important considerations to keep in mind when you relate documents:
-
Issues of Contention : if you expect a lot of updates from different processes to occur to a document, creating several belongs-to relationships is more desirable.
In the case of our asteroid example, if we have all craters referenced in the asteroid document, we can expect a good amount of conflict and contention over the asteroid document. As users create more craters, or as the environment creates more craters, we can expect conflicts between the processes that are all trying to update crater information on a single asteroid document. We could use locks and check-and-sets to prevent conflict, but this would diminish read/write response time. So in this type of scenario, putting the link from craters to asteroid makes more sense to avoid contention.
-
Retrieving Information: how you relate documents or how you provide references between documents will influence the way you should retrieve data at a later point. Similarly, how you want to retrieve information will influence your decision on how to model your documents.
In this asteroid model, since we choose to reference from craters to asteroid to avoid contention, we need to use indexing and querying to find all craters associated with an asteroid. If we had chosen the first approach where the asteroid contains references to all craters, we could perform a multiple-retrieve with the list of craters to get the actual crater documents.
If we did not have this concern about contention in our asteroid example, it would be preferable to use the
has-manyapproach, where one document has references to multiple documents. This is because performing a multiple-retrieve on a list of documents is always faster than getting the same set of documents through indexing and querying. Therefore, as long as there is less concern about contention, we should use thehas-manymodel as the preferred approach. The advantages of this approach apply to all cases where our object is relatively static. For example, if you have a player document and you do not expect to change the player profile object that often you could store references to player abilities in the player document and describe the abilities in separate documents.For more information about retrieving information using a multiple retrieve, or by using indexing and querying, see Retrieving Multiple Keys and Finding Data with Views
Using Reference Documents for Lookups
There are two approaches for finding information based on specific values. One approach is to perform index and querying with views in Couchbase. The other approach is to use supporting documents which contain the key for the main document. The latter approach may be preferable even with the ability to query and index in Couchbase because the document-based lookup can still provide better performance if you are the lookup frequently. In this scenario, you could separate documents to represent a main application object, and create additional documents to represent alternate values associated with the main the document.
When you store an object, you use these supporting documents which enable you to later lookup the object with different keys. For instance, if you store a user as a document, you can create additional helper documents so that you can find the user by email, Facebook ID, TwitterID, username, and other identifiers beside the original document key.
To use this approach, you should store your original document and use a predictable pattern as the key for that type of object. In this case we specifically create a unique identifier for each user so that we avoid any duplicate keys. Following the example of performing a user profile lookup, imagine we store all users in documents structured as follows:
{
"uid"
"type"
"name"
"email"
"fbid"
}
To keep track of how many users are in our system, we create a counter,
user::countand increment it each time we add a new user. The key for each user document will be in the standard form ofuser::uuid. The records that we will have in our system would be structured as follows: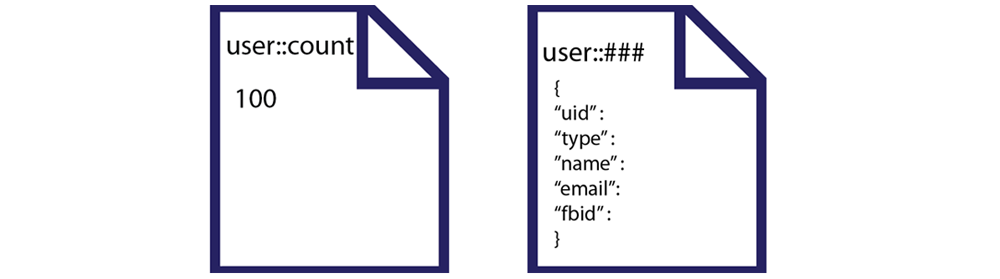
In this case we start with an initial user count of
100. In the Ruby example that follows we increment the counter and then set a new user record with a new unique user id:# => setup default connection c = Couchbase.new # => initialize counter to 100 c.set("user::count", 100) # => increment counter c.incr("user::count") # => get unique uuid, new_id = 12f1 new_id = UUID.timestamp_create().to_s user_name = "John Smith" user_username = "johnsmith" user_email = "jsm@do.com" user_fb = "12393" # save User to Couchbase user_doc = c.add("user::#{new_id}", { :uid => new_id, :type => "user", :name => user_name, :email => user_email, :fbid => user_fb })Here we create a default connection to the server in a new Couchbase client instance. We then create a new record
user::counterwith the initial value of 100. We will increment this counter each time we add a new user. We then generated a unique user ID with a standard Ruby UUID gem. The next part of our code creates local variables which represent our user properties, such asJohn Smitha the user name. In the past part of this code we take the user data and perform anaddto store it to Couchbase. Now our document set is as follows:
Then we store additional supporting documents which will enable us to find the user with other keys. For each different type of lookup we create a separate record. For instance to enable lookup by email, we create a email record with the fixed prefix
email::for a key:# using same variables from above for the user's data # add reference document for username c.add("username::#{user_username.downcase}", new_id) # => save lookup document, with document key = "username::johnsmith" => 101 # add reference document for email c.add("email::#{user_email.downcase}", new_id) # => save lookup document, with document key = "email::jsmith@domain.com" => 101 # add reference document for Facebook ID c.add("fb::#{user_fb}", new_id) # => save lookup document, with document key = "fb::12393" => 101The additional ‘lookup’ documents enable us to store alternate keys for the user and relate those keys to the unique key for the user record
user::101.The first document we set is for a lookup by username, so we do anaddusing the keyusername::. After we create all of our lookup records, the documents in our system that relate to our user appear as follows: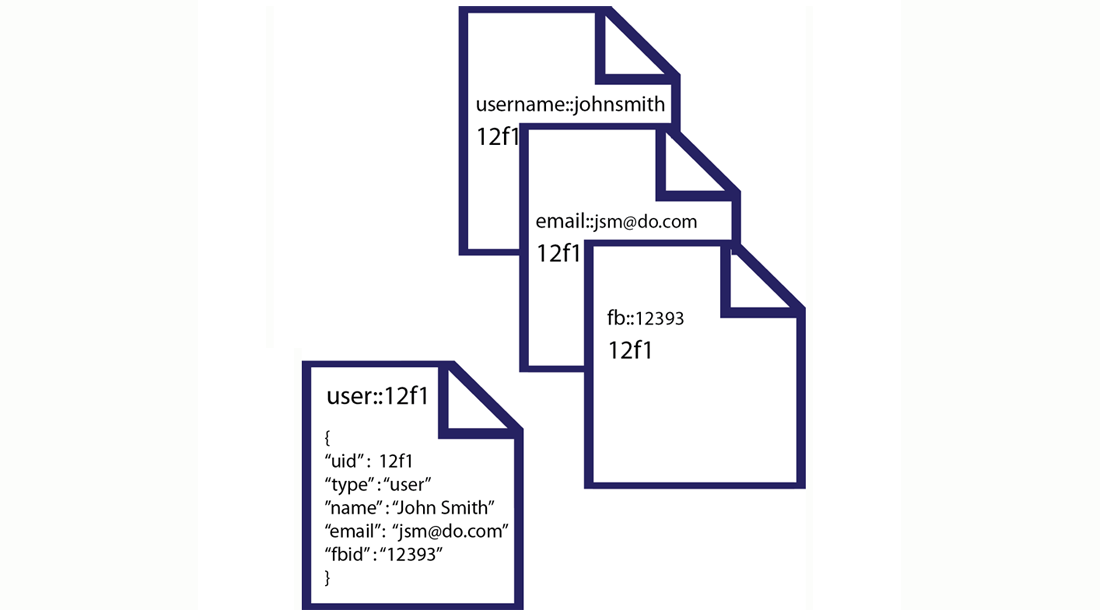
Once these supporting documents are stored, we can attempt a lookup using input from a form. This can be any type of web form content, such as an entry in a login, an item from a customer service call, or from an email support system. First we retrieve the web form parameter:
#retrieve input from a web form
user_username = params["username"]

# retrieve by user_id value using username provided in web form
user_id = c.get("username::#{user_username.downcase}")    # => get the user_id   # => 12f1
user_hash = c.get("user::#{user_id}")            # => get the primary User document (key = user::12f1)

puts user_hash
# => { "uid" => 101, "type" => "user", "name" => "John Smith", "email" => "jsmith@domain.com", "fbid" => "12393" }

#get additional web form parameter, email
user_email = params["email"]

# retrieve by email
user_id = c.get("email::#{user_email.downcase}")    # => get the user_id  # => 12f1
user_hash = c.get("user::#{user_id}")            # => get the primary User document (key = user::12f1)

#get facebook ID
user_fb = auth.uid

# retrieve by Facebook ID
user_id = c.get("fb::#{user_fb}")            # => get the user_id  # => 12f1
user_hash = c.get("user::#{user_id}")            # => get the primary User document (key = user::12f1)
The first part of our code stores the
usernamefrom a web form to variable we can later use. We pass the lowercase version of the form input to agetto find the unique user id 12f1. With that unique user id, we perform agetwith the key consisting ofuser::12f1to get the entire user record. So the supporting documents enable you to store a reference to a primary document under a different key. By using a standard key pattern, such as prefix ofemail::you can get to the primary user document with an email. By using this pattern you can lookup an object based on many different properties. The following illustrates the sequence of operations you can perform, and the documents used when you do an email-based lookup:
The other use case for this pattern is to create categories for objects. For instance, if you have a beer, keyed with the id
beer::#{sku}, you can create a product category and reference products belonging to that category with they keycategory::ales::count. For this category key, you would provide a unique count and the category name, such as ales. Then you would add products to the content that references the SKU for your beers. For instance, the key-value pair, could look like this:{ "product" : "#{sku}" }When you perform a lookup, you could also do a
multi-geton all items that are keyedcategory::ales. This way you can retrieve all primary records for ales. For more information about multi-get, see Retrieving Multiple KeysSample Storage Documents
The following are some sample JSON documents which demonstrate some different types of application data which can be stored as JSON in Couchbase Server.
Here is an example of a message document:
{
    "from": "user_512",
    "to": "user_768",
    "text": "Hey, that Beer you recommended is pretty fab, thx!"
    "sent_timestamp":476560
}
The next example is a user profile document. Notice in this case, we have two versions of a user profile; in order to extend the number of attributes for a user, you would just add additional string-values to represent the new fields:
{
    "user_id": 512,
    "name": "Bob Likington",
    "email": "bob.like@gmail.com",
    "sign_up_timestamp": 1224612317,
    "last_login_timestamp": 1245613101
}

{
    "user_id": 768,
    "name": "Simon Neal",
    "email": "sneal@gmail.com",
    "sign_up_timestamp": 1225554317,
    "last_login_timestamp": 1234166701,
    "country": "Scotland",
    "pro_account" true,
    "friends": [512, 666, 742, 1111]
}
In this case we add county, account type, and friends as additional fields to our user profile. To extend our application with new user attributes, we simply start storing additional fields at the document level. Unlike traditional relational databases, there is no need for us to have server downtime, or database migration to a new schema.
To add new data fields, we simply start writing the additional JSON values for that particular transaction. You would also update your application to provide a default value for documents that do not yet have these fields.
This last example provides a sample JSON document to store information about a photo:
{
    "photo_id": "ccbcdeadbeefacee",
    "size": {
        "w": 500,
        "h": 320,
        "unit": "px"
        },
    "exposure: "1/1082",
    "aperture": "f/2.4",
    "flash": false,
    "camera": {
            "name": "iPhone 4S",
            "manufacturer": "Apple",
            }
    "user_id": 512,
    "timestamp": [2011, 12, 13, 16, 31, 07]
}
As we did in the brewery document earlier in this chapter, we nest a set of attributes for the photo size and camera by using JSON syntax.
Accessing Data with Couchbase SDKs
Couchbase Server communicates with a web application in two ways: 1) through APIs in your chosen SDK which are supported by Couchbase Server, or 2) through a RESTful interface which you can use to manage an entire cluster.
Couchbase SDKs enable you to perform read/write operations to Couchbase Server and will be responsible for getting updates on cluster topology from Couchbase Server. The SDKs provide an abstraction level so that you do not need to be concerned about handling the logic of cluster rebalance and failover in your application. All SDKs are able to automatically get updated server and cluster information so that your web application continues to function during a Couchbase Server rebalance or failover.
Couchbase SDKs are written in several programming languages so that you can interact with Couchbase Server using the same language you use for your web application. The SDKs available from Couchbase are at: Couchbase SDK Downloads
You use a Couchbase SDK for storage, retrieval, update, and removal of application data from the database. As of Couchbase 2.0 you can also use the SDKs to index and query information and also determine if entries are available to index/query. Couchbase SDK read/write methods are all built upon the binary version of the memcached protocol. When you perform an operation an SDK converts it into a binary memcached command which is then sent to Couchbase Server. For more information about memcached protocol, see memcached protocol.
Couchbase REST API can be used to get information about a cluster or make changes to a entire cluster. At an underlying level, Couchbase SDKs use the REST API to perform indexing and querying; for developers who want to write their own SDK, the REST API can also be used to provide cluster updates to a SDK. There are also some helpful bucket-level operations that you will use as an application developer, such as creating a new data bucket, and setting authentication for the bucket. With the REST API, you can also gather statistics from a cluster, define and make changes to buckets, and add or remove new nodes to the cluster. For more information about helpful bucket-level operations you will can use as you develop an application in Couchbase Server Manual REST API.
Couchbase SDKs and SQL Commands
Couchbase SDKs support all of the four standard SQL commands used for reading and writing data. These functions in Couchbase have different method names, but they are the functional equivalents of the following SQL commands:
SQL Command Couchbase SDK Method INSERT, to create.setandaddSELECT, to retrieve/read data.get, multiple-retrieves, and get-and-touch (get and update expiration).UPDATE, to modify data.setwith a given key, oraddwith a new key, orreplacewith a key, orcas, also known as Check-and-Set. Used to update a value by providing the matching CAS value for the document. There are also methods for incrementing and decrementing numeric values, changing the expiration for a value, as well as pre-pending or appending to stored objects.DELETE, to remove data.delete, deletes information associated with a given key.Reading/Writing Data
In general, all Couchbase SDKs provide the same core set of methods to read, write and update documents in the Couchbase Server’s data stores. Common features across all SDKs include:
All operations are atomic
All operations require a key
No implicit locking, such as a row lock, occur during an operation
Several update operations require a matching CAS value in order to succeed. You provide the CAS value as a parameter to a method and if the value matches the current CAS value stored with a document, it will be updated.
The following describes major data store operations you can perform in your web application using the Couchbase Client. Language-specific variations in the SDK’s do exist; please consult your chosen SDK’s Language Reference for details specific to the SDK at Develop with Couchbase.
Note: If you use the text-based memcache protocol to communicate with Couchbase Server, you will need to use moxi as a message proxy. For more information, see Moxi Manual 1.8.
-
Store Operations
Add: Stores a given document if it does not yet exist in the data store.
Set: Stores a given document, overwriting an existing version if it exists.
-
Retrieve Operations
Get: Retrieve/Fetch a specified document.
Get and touch: Fetch a specified document and update the document expiration.
Multi-retrieves: Fetch multiple documents in a single server request.
-
Update Operations
Touch: Update the Time to Live (TTL) for a given document.
Replace: Replace a given document, if it exists, otherwise do not commit any data to the store.
Check and Set (CAS): Replace a current document with a given document if it matches a given CAS value.
Append/Prepend: Add data at the start, or at the end of a specified document.
Delete: Remove a specified document from the store.
Flush: Delete an entire data bucket, including cached and persisted data.
‘Observe’: Determine whether a stored document is persisted onto disk, and is therefore also available via indexing and querying.
About Document Expiration
Time to Live, also known as TTL, is the time until a document expires in Couchbase Server. By default, all documents will have a TTL of 0, which indicates the document will be kept indefinitely. Typically when you add, set, or replace information, you would establish a custom TTL by passing it as a parameter to your method call. As part of normal maintenance operations, Couchbase Server will periodically remove all items with expirations that have passed.
Here is how to specify a TTL:
-
Values less than 30 days: if you want an item to live for less than 30 days, you can provide a TTL in seconds, or as Unix epoch time. The maximum number of seconds you can specify are the seconds in a month, namely 30 x 24 x 60 x 60. Couchbase Server will remove the item the given number of seconds after it stores the item.
Be aware that even if you specify a TTL as a relative value such as seconds into the future, it is actually stored in Couchbase server as an absolute Unix timestamp. This means, for example, if you store an item with a two-day relative TTL, immediately make a backup, and then restore from that backup three days later, the expiration will have passed and the data is no longer there.
Values over 30 days: if you want an item to live for more than 30 day you must provide a TTL in Unix epoch time; for instance, 1 095 379 198 indicates the seconds since 1970.
Be aware that Couchbase Server does lazy expiration, that is, expired items are flagged as deleted rather than being immediately erased. Couchbase Server has a maintenance process, called expiry pager that will periodically look through all information and erase expired items. This maintenance process will run every 60 minutes, but it can be configured to run at a different interval. Couchbase Server will immediately remove an item flagged for deletion the next time the item is requested; the server will respond that the item does not exist to the requesting process.
Couchbase Server offers new functionality you can use to index and find documents and perform calculations on data, known as views. For views, you write functions in JavaScript that specify what data should be included in an index. When you want to retrieve information using views, it is called querying a view and the information Couchbase Server returns is called a result set.
The result set from a view will contain any items stored on disk that meet the requirements of your views function. Therefore information that has not yet been removed from disk may appear as part of a result set when you query a view.
Using Couchbase views, you can also perform reduce functions on data, which perform calculations or other aggregations of data. For instance if you want to count the instances of a type of object, you would use a reduce function. Once again, if an item is on disk, it will be included in any calculation performed by your reduce functions. Based on this behavior due to disk persistence, here are guidelines on handling expiration with views:
-
Detecting Expired Documents in Result Sets : If you are using views for indexing items from Couchbase Server, items that have not yet been removed as part of the expiry pager maintenance process will be part of a result set returned by querying the view. To exclude these items from a result set you should use query parameter
include_docset totrue. This parameter typically includes all JSON documents associated with the keys in a result set. For example, if you use the parameterinclude_docs=trueCouchbase Server will return a result set with an additional"doc"object which contains the JSON or binary data for that key:{"total_rows":2,"rows":[ {"id":"test","key":"test","value":null,"doc":{"meta":{"id":"test","rev":"4-0000003f04e86b040000000000000000","expiration":0,"flags":0},"json":{"testkey":"testvalue"}}}, {"id":"test2","key":"test2","value":null,"doc":{"meta":{"id":"test2","rev":"3-0000004134bd596f50bce37d00000000","expiration":1354556285,"flags":0},"json":{"testkey":"testvalue"}}} ] }For expired documents if you set
include_doc=true, Couchbase Server will return a result set indicating the document does not exist anymore. Specifically, the key that had expired but had not yet been removed by the cleanup process will appear in the result set as a row where"doc":null:{"total_rows":2,"rows":[ {"id":"test","key":"test","value":null,"doc":{"meta":{"id":"test","rev":"4-0000003f04e86b040000000000000000","expiration":0,"flags":0},"json":{"testkey":"testvalue"}}}, {"id":"test2","key":"test2","value":null,"doc":null} ] } -
Reduces and Expired Documents : In some cases, you may want to perform a reduce function to perform aggregations and calculations on data in Couchbase Server. In this case, Couchbase Server takes pre-calculated values which are stored for an index and derives a final result. This also means that any expired items still on disk will be part of the reduction. This may not be an issue for your final result if the ratio of expired items is proportionately low compared to other items. For instance, if you have 10 expired scores still on disk for an average performed over 1 million players, there may be only a minimal level of difference in the final result. However, if you have 10 expired scores on disk for an average performed over 20 players, you would get very different result than the average you would expect.
In this case, you may want to run the expiry pager process more frequently to ensure that items that have expired are not included in calculations used in the reduce function. We recommend an interval of 10 minutes for the expiry pager on each node of a cluster. Note that this interval has a slight impact on node performance as it performs cleanup more frequently on the node.
For more information about setting intervals for the maintenance process, see the Couchbase Server Manual command line tool,
cbepctlassociated with specifying disk cleanup intervals and refer to the examples onexp_pager_stime. For more information about views and view query parameters, see Finding Data with Views.About Asynchronous Methods
All Couchbase SDKs provide data operations as synchronous methods. In the case of synchronous methods, your application will block and not continue executing until it receives a response from Couchbase Server. In most SDKs, notably Java, Ruby and PHP, there are data operations you can perform asynchronously; in this case your application can continue performing other, background operations until Couchbase Server responds. Asynchronous operations are particularly useful when your application accesses persisted data, or when you are performing bulk data stores and updates.
There are a few standard approaches in Couchbase SDKs for asynchronous operations: 1) performing the asynchronous method, then later explicitly retrieving any results returned by Couchbase server that are stored in run-time memory, 2) performing an asynchronous method and retrieving the results from memory in a callback, and/or 3) perform an event loop which waits for and dispatches events in the program.
The following briefly demonstrates the first approach, where we perform an asynchronous call and then later explicitly retrieve it from runtime memory with a second call. The sample is from the PHP SDK:
<?php
$cb = new Couchbase();

$cb->set('int', 99);
$cb->set('array', array(11, 12));

$cb->getDelayed(array('int', 'array'), true);

//do something else

var_dump($cb->fetchAll());
?>
In the first two lines we create a new Couchbase client instance which is connected to the default bucket. Then we set some sample variables named
intandarray. We perform an asynchronous request to retrieve the two keys. Using thefetchAllcall we can retrieve any results returned by Couchbase server which are now in runtime memory.This is only one example of the pattern of method calls used to perform an asynchronous operation. A few more examples will follow in this section, therefore we introduce the concept here. For more information, see Synchronous and Asynchronous Transactions
Storing Information
These operations are used for storing information into Couchbase Server and consist of
addandset. Both operations exist for all SDKs provided by Couchbase. For some languages, parameters, return values, and data types may differ. Unique behavior for these store methods that you should be aware of:Expiration: By default all documents you store using
setandaddwill not expire. Removal must be explicit, such as usingdelete. If you do set an expiration to the value 0, this will also indicate no expiration. For more information, see About Document ExpirationCAS ID/CAS Value: For every value that exists in Couchbase Server, the server will automatically add a unique Check and Set (CAS) value as a 64-bit integer with the item. You can use this value in your implementation to provide basic optimistic concurrency. For more information, see Retrieving Items with CAS Values
For existing keys,
setwill overwrite any existing value if a key already exists; in contrastaddwill fail and return an error. If you usereplaceit will fail if the key does not already exist.The following storage limits exist for each type of information that you provide as well as the metadata that Couchbase Server automatically adds to items:
Keys: Can be up to 250 Bytes. Couchbase Server keeps all keys in RAM and does not eject any keys to free up space.
Metadata: This is the information Couchbase Server automatically stores with your value, namely CAS value, expiration and flags. Metadata per document is 60 Bytes for Couchbase 2.0.1 and 54 for Couchbase 2.1.0. This is stored in RAM at all times, and cannot be ejected from RAM.
Values: You can store values up to 1 MB in memcached buckets and up to 20 MB in Couchbase buckets. Values can be any arbitrary binary data or it can be a JSON-encoded document.
Be aware of key and metadata size if you are handling millions of documents or more. Couchbase Server keeps all keys and metadata in RAM and does not remove them to create more space in RAM. One hundred million keys which are 70 Bytes each plus meta data at 54 Bytes each will require about 11.2 GB of RAM for a cluster. This figure does not include caching any values or replica copies of data, if you consider these factors, you would need over 23 GB. For more information, see Sizing Guidelines in the Couchbase Server Manual.
Set
setwill write information to the data store regardless of whether the key for the value already exists or not. The method is destructive; if the key exists, it will overwrite any existing value. Typically you want to usesetin cases where you do not care whether or not you overwrite an existing value, nor do you care if the key already exists or not. This method is similar to anINSERTstatement in SQL.For instance, if you have a player location document in a game, you might not care whether you overwrite the location with a new value; it is however important that you quickly create a location document if it does not already exist. In the case of this type of application logic, you might not want to waste any code to check if a player location exists; performing rapid read/writes of the player location and creating the initial score document may be more important than performing any checks in your application logic. In this case, using
setwould be suitable.Another scenario is when you populate a database with initial values. This can be a production or development database. In this case, you are creating all the initial values for an entire set of keys. Since you are starting out with an empty database, and have no risk of overwriting useful data, you would use
sethere as well. For instance, if you are populating your new test database with documents that represent different planets, you could follow this approach: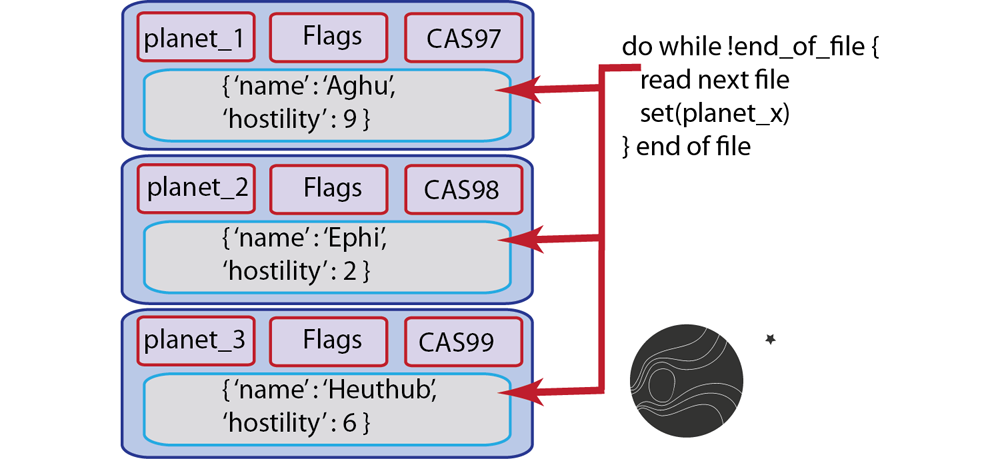
Another scenario that is appropriate for using
setis another scenario where you do not care about overwriting the last value for a key. For instance if you want to document the last visitor to your site, you would store that as a key and update it each time a new visitor is at your site. You might not care who the previous visitors are; in this case, you usesetto overwrite anything that exists and replace it with the latest visit information.This method is the functional equivalent of a RDMS commit/insert.
Setwill support the following parameters which are used during the operation:Key: unique identifier for the information you want to store. This can be a string, symbol, or numeric sequence. A required parameter.
Value: the information you want to store. This can be in byte-stream, object, JSON document, or even string. A required parameter.
Options: this includes expiration, also known as TTL (time to live), which specifies how long the information remains in the data store before it is automatically flagged for removal and then deleted. You can also specify formatting options and flags.
The following shows a simple example of using set using the Ruby SDK:
c.set("foo", "bar", :ttl => 2)This operation takes the key
fooand sets the string ‘bar’ for the key which will expire after 2 seconds. This next example is part of a data loader script in PHP which reads in different JSON files in a specified directory. It then sends requests to write each file to Couchbase Server:function import($cb, $dir) { $d = dir($dir); while (false !== ($file = $d->read())) { if (substr($file, -5) != '.json') continue; echo "adding $file\n"; $json = json_decode(file_get_contents($dir . $file), true); unset($json["_id"]); echo $cb->set(substr($file, 0, -5), json_encode($json)); echo "\n"; } }The first part of this function takes a Couchbase client instance as a parameter and a directory. It then assigns the directory to a local variable
$dand opens it. Thewhileloop will continue reading each file in the directory so long as we have not finished reading all the files. In the loop we detect if the file has the.jsonfile type or not so we know to handle it, and store it. If the file is json we decode it, remove the attribute_idand then set the key as the filename with the other file contents as value. We choose this different key for better identification in our system. The following illustrates a sample JSON file which you can use with this loader:{ "_id":"beer_#40_Golden_Lager", "brewery":"Minocqua Brewing Company", "name":"#40 Golden Lager", "updated":"2010-07-22 20:00:20" }To view the complete loader application and sample data available on GitHub, see Couchbase Labs: Beer Sample
In Couchbase SDKs you can store a value with
setwhile simultaneously providing a document expiration.Setwill return a boolean of true if it is able to successfully commit data to the databases; it can also return a CAS value, which is a unique identifier for the document, and is used for optimistic locking.The associated memcached protocol in ASCII is
setwhich stores a key. For more information, see memcached protocolThe types of errors that can occur during this operation include 1) inability to connect to a node, or 2) some error exists while attempting to format a value being set. If you have a connection-level error you may need to reattempt connection, and possibly check the status of the server. If you have an error with the size of your value or formatting, you need to check the value itself, and how it is encoded and see if there are any issues that make the document incompatible with Couchbase Server.
For more information about connections and connection-level settings, see Optimizing Client Instances and Client-Side Timeouts
Add
addwill also write information to the Couchbase Server, but unlikeset,addwill fail if the value for a given key already exists in Couchbase Server.The reason you would want to use
addinstead ofsetis so that you can create a new key, without accidentally overwriting an existing key with the same name. For Couchbase Server, keys must be unique for every bucket; therefore when you commit new keys to Couchbase Server, usingaddmay be preferable based on your application logic.For example, if you create an application where you store all new users with a unique username and you want to use usernames as a keys, you would want to store the new key with
addinstead ofset.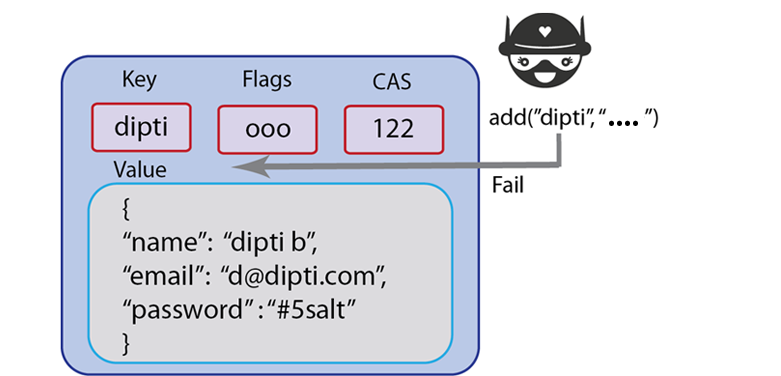
If a user already exists in your system with the unique username, you would not want to overwrite the user with a new user’s information. Instead, you could perform some real-time feedback and let the user know if the username has already been taken when the new user fills out their profile information. You can catch this type of error and report it back in your application when you use
addto create the document.Because
addfails and reports an error when a key exists, some Couchbase Server developers prefer it tosetin cases where they create a new document.#stores successfully c.add("foo", "bar") #raises Couchbase::Error::KeyExists: failed to store value #failed to store value (key="foo", error=0x0c) c.add("foo", "baz")This next example demonstrates an
addin PHP:$script_name=$_SERVER["SCRIPT_NAME"]; $script_access_count=$cb_obj->get($script_name); if($cb_obj->getResultCode() == COUCHBASE_KEY_ENOENT){ #the add will fail if it has already been added $cb_obj->add($script_name,0);In this example we try to get a script name for the script that currently runs on our web application server. We then try to retrieve any script name that is already stored in Couchbase Server. If we receive a ‘key not found’ error, we add the script name to Couchbase Server.
In Couchbase SDKs you can store a value with
addwhile simultaneously providing a document expiration.The memcached protocol equivalent for this method is
add. For more information about the underlying protocol, see memcached protocolIf you receive an unexpected ‘key exists’ error when you use
addyou should log the error, and then go back into your code to determine why the key already exists. You will want to go back into the application logic that creates these keys and find out if there is a problem in the logic. One approach to use to ensure you have unique keys for all your documents is to use a key generator that creates unique keys for all documents.There are application scenarios where you receive a ‘key exists’ error and you want that error to occur so you can handle it in your application logic. For instance, if you are handling a coupon, and if the coupon key already exists you know the coupon code has already been redeemed. In that case you can use the error to trigger a message to the user that the coupon has already been used.
The types of errors that can occur during this operation include 1) inability to connect to a node, or 2) some error exists while attempting to format a value being set. If you have a connection-level error you may need to reattempt connection, and possibly check the status of the server. If you have an error with the size of your value or formatting, you need to check the value itself, and how it is encoded and see if there are any issues that make the document incompatible with Couchbase Server.
For more information about connections and connection-level settings, see Optimizing Client Instances and Client-Side Timeouts
Retrieving Information
These operations are used for retrieving information from Couchbase and exist for all SDKs provided by Couchbase. They include
get, performing a multiple-retrieve, get-and-touch, and get-with-CAS. They enable you to retrieve individual items of information, retrieve data as a collection of documents, retrieve data while updating the expiration date for the data, and retrieving a value and the CAS value for document.Get
You can use this operation for a document you want to change, or for a document you want to read, but not necessarily update or edit. In this first scenario where you want to change a value, you would perform a
getand assign the value that Couchbase returns to a variable. After you change the value of the variable, you would store the new value to Couchbase Server with one of the store or update methods:set,add,replaceor for optimistic concurrency,cas. For instance, following our example of a spaceship game, the case of spaceship fuel is a scenario where you will probably constantly change fuel level with player interaction. In this case, you could perform a retrieve, update and then store.There are also cases where you could use
getto retrieve a value, but only as a read-only operation. An example of when you do want to read in the value but not change the value is if you have a game with player profiles. Imagine you have documents that represent different users and their attributes. The user profile are part of the player experience, but game play does not change the profile or their properties, such as contact information. In this case, we performgetto retrieve and display a play profile.A related scenario is when we use a
getto determine if a key exists, and if it does not exist, perform some action. For instance, if a player creates a user profile, we could try to read in the player profile withget, and if it does not exist, we can create the new profile including information such as the player email address:
Developers who are starting with Couchbase Server will rely heavily on
get/setrequests to do all of their read and write operations. The majority of the time,get/setoperations are the most useful Couchbase methods for your application.Over time, developers discover other Couchbase methods, and the benefits to using alternative read/write operations in their application logic. One advantage is that applications in multi-user environments may inadvertently overwrite the latest key you retrieve using only
get/set, therefore in a multi-user environment you might not be able to always rely on that value being valid and current if you plan to perform operations on it after theget. In this case, there are alternate methods, such as get-with-cas andcasthat can provide optimistic concurrency.There is one problem you can encounter if you use
getto make sure that a key exists before they perform some operation. This can cause problems if the value for a key is large and can result in slower application performance. An alternate, more efficient way to test if a key exists, without retrieving the whole key, is to usetouch, which only updates the expiration, but does not retrieve the whole value. Even this approach has a drawback; you can usetouchto determine the key exists, but you will be working on the assumption that the item does not expire by the time you perform your next operation on it.The other important assumption you are making when you use this approach is that when you touch to test for existence of an item, you must overwrite the TTL at the same time. If you know an item does not have an expiration, then you can use the touch approach as a workaround. If your application depends on the item expiration, you should not use the touch approach because this would overwrite your expiration.
Finally, if you use
getmake sure you are aware of the value size, and how many times you are repeatedly performing the operation. There may be alternate convenience methods which can handle your task with a less resource-consuming request.The simplest case of retrieving information is by using
getwith a single key. Here is an example in Ruby:c.get("foo")The following PHP example demonstrates use of
getto retrieve a user password from Couchbase Server and compare it to a password provided in a web form:$submitted_passwordHash = sha1($password); $db_passwordHash = $cb_obj -> get($userid_key); if($db_passwordHash == false) { return (false); } //do we match the password? if($db_passwordHash == $submitted_passwordHash) { $_SESSION{"userid"} = $userid; return true; } else { return false; }In this case we perform
$userid_keyand$passwordare based on parameters a user provides in a web form. We perform agetwith$userid_keyto retrieve the user password which is stored in Couchbase Server. If the password provided in the form matches the password in Couchbase Server, we create a new user session, otherwise we return false.The memcached protocol which relate to this method are
getandgetk. These first is the operation for retrieving an item; the later is for getting the value and the key. For more information about memcached protocol, see memcached protocol.If a key does not exist, you will receive a ‘key not found’ type error as a response to
get. If you expected the key to actually exist, you should check your application logic to see why it does not exist. Any logic that creates that type of key, or any logic that deletes it may inadvertently cause this result. Another reason why you might get this error is that the item expired; in this case Couchbase Server will respond to the request with a ‘key not found’ error. So you will also want to check any explicit expiration set for that key.In the case where you use a
getto determine if key does not exist and then store it, you can attempt asetoraddto create the key.The types of errors that can occur during this operation include 1) inability to connect to a node, or 2) some error exists while attempting to format a value being retrieved. If you have a connection-level error you may need to reattempt connection, and possibly check the status of the server. If you have an error with the size of your value or formatting, you need to check the value itself, and how it is encoded and see if there are any issues that make the document incompatible with Couchbase Server.
For more information about connections and connection-level settings, see Optimizing Client Instances and Client-Side Timeouts
There are variations for parameters used in the
getdepending on the SDK. For instance, some SDKs, such as the one for Java, support providing a transcoder that will manipulate a value after it retrieves it (for instance, remove and replace underscores with spaces.) Refer to an individual SDK’s API documentation for more information.Retrieving Multiple Keys
In the case of our spaceship game example, we create space environment which contains multiple planets and discussed how we could use
getto retrieve documents that represent the planets. In reality if we want to retrieve more than one document, and do so efficiently, we would use one of the forms bulk-retrieves. This enables us to send a single request from our SDK for all the keys we want to retrieve.Developers that are new to Couchbase Server tend to heavily rely on
getto retrieve values, even sets of values. However, using a form of multiple-retrieve may be a better approach if you are doing multiple retrievals.The major advantages of using a multiple-retrieve is that you can make a single request to Couchbase Server from an SDK. The alternate you could choose is to make multiple, sequential
getrequests and your application needs to wait for the SDK to make each of these requests. This approach has the performance disadvantage of creating a separate request that Couchbase Server must then individually respond to. For instance if you want to retrieve 100 keys, you could do this as a multiple-retrieve and all keys could be retrieved in 1 millisecond. If you chose to do 100getcalls, this would take the equivalent of 100 milliseconds. In short, if you are retrieving multiple keys, performing a multiple-retrieve will improve application performance compared to performing a regularget.Using a multiple-retrieve is particularly suited in cases where you have ‘object-graphs’ in your application. An object graph exists in your data model when you have one primary, ‘root’ object and that object owns or links-to several other objects. For instance, a farm can have several farm animals; or a solar system can have several planets. In the case of a solar system, you could have one JSON document represent the solar system, and that document references the planets in the solar system. You could then use a form of multiple-retrieve to construction the solar system in your application:
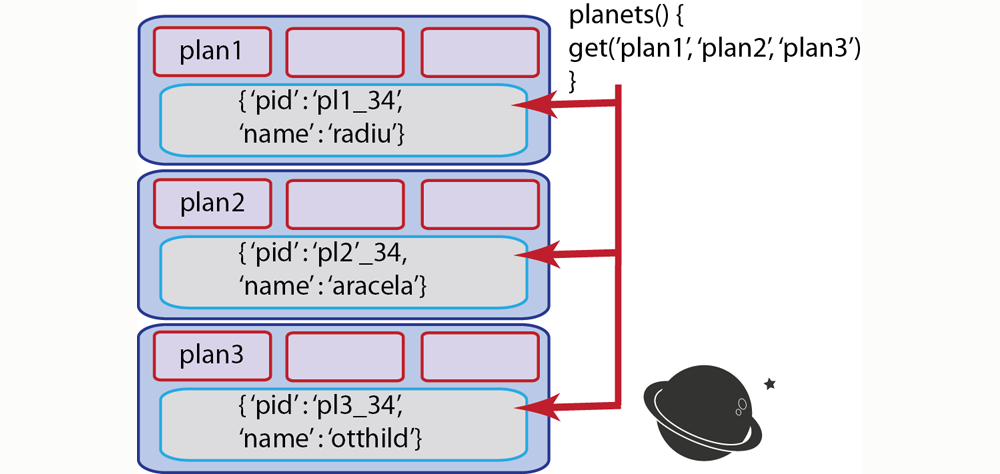
There are other cases where you have multiple objects related to a process and it would be better to use indexing and querying with views instead of a multiple-retrieve. These are typically cases where you do not have a relationship of ownership/possession by a root object. For instance in the case of a game leader board, individual user documents do not necessarily relate to the leader board object; only user documents with a high scores should be retrieved and displayed for a leader board. In this type of scenario, it is a better alternative to do indexing and querying with views in order to find the top score holders. For more information, see Finding Data with Views.
This example demonstrates how to retrieve multiple keys, using different method overloads in Ruby:
keys = ["foo", "bar","baz"]

// alternate method signatures for multiple-retrieve

conn.get(keys)

conn.get(["foo", "bar", "baz"])

conn.get("foo", "bar", "baz")
In this case, we can overload the standard
getmethod signature to include several keys.In the case of other languages, such as Java, there is a separate method, called
getBulkwhich will retrieve keys provided in a string collection:Map<String,Object> keyvalues = client.getBulk(keylist);There are some cases where you want to perform a multiple-retrieve but you know the operation will take longer than a user will want to wait, or you want to perform the operation in the background while the application performs other tasks. In a spaceship game, for instance, you want to retrieve all the profiles of users who have a high score to display in a leader board. But in the meantime, you want players to be able to continue playing their game.
In this case, you can perform a multiple-retrieve asynchronously. When you do so, multiple-retrieve will return before the SDK sends a request to Couchbase Server. Your game application continues for the player and they can play their game. In the background, Couchbase Server retrieves all the specified keys that exist and sends these documents to the client SDK. Your application can later retrieve the documents if they exist, or perform error-handling if the documents do not exist. The following demonstrates an asynchronous multiple-retrieve in PHP:
$cb->set('int', 99);
$cb->set('string', 'a simple string');
$cb->set('array', array(11, 12));

$cb->getDelayed(array('int', 'array'), true);
var_dump($cb->fetchAll());
In this case
getDelayedreturns immediately and we retrieve all the keys later by performingfetchAll.The multiple-retrieve methods in Couchbase SDKs are based on sending multiple
getqin the memcached protocol in a single binary packet.When you do a multiple-retrieve, be aware that the method will return values for the keys that exist. If a key does not exist, Couchbase Server returns a ‘key not found’ error which the SDK interprets. If a key is missing, SDK do not provide a placeholder in the result set for the missing key. Therefore do not assume that the order of results will be the same as the order of the keys you provide. If your application depends on all keys existing and being retrieved, you should provide application logic that iterates through the results and checks to see the number results matches the number of keys. You might also want to provide logic that sorts the results so they map to your sequence of keys.
If you expected a key to actually exist, but it does not appear in a result set, you should check your application logic to see why it does not exist. Any logic that creates that type of key, or any logic that deletes it may inadvertently cause this result. Another reason why you might get this result is that the item expired and Couchbase Server returns a ‘key not found’ error. So you will want to check any explicit expiration set for that key.
One option to handle this result is to create the value if it does not already exist. After you receive this result you can attempt a
setoraddto create the key.The types of errors that can occur during this operation include 1) inability to connect to a node, or 2) some error exists while attempting to format values being retrieved. If you have a connection-level error you may need to reattempt connection, and possibly check the status of the server. If you have an error with the size of your value or formatting, you need to check the value itself, and how it is encoded and see if there are any issues that make the document incompatible with Couchbase Server.
For more information about connections and connection-level settings, see Optimizing Client Instances and Client-Side Timeouts
Get and Touch
When you perform a
getyou may also want to update the expiration for that document. This is called a ‘get-and-touch’ operation and can be completed in a single request to Couchbase Server. This saves you the time from having to do a get and then a separate operation to update the expiration. This method is useful for scenarios where you have a document that should eventually expire, but perhaps you want to keep that document around when it is still in use by the application. Therefore when you retrieve the document, you also update the expiration so it will be in Couchbase Server for a bit longer.Going back to our spaceship game example, imagine that we have a special mode that a player can achieve. For instance, if they hit a special target they have temporary powers and can score more points for the next 30 seconds of play.
In this case, you could represent this temporary play mode as a document named username_power_up_mode for instance. The document could have attributes related to this special play mode, such as double-points or triple-point scoring. Since the special play mode will only last 30 seconds, when you get the power_up_mode document you could also update the expiration so that it will also only exist for the next 30 seconds. To do this, you would perform a get-and-touch operation.
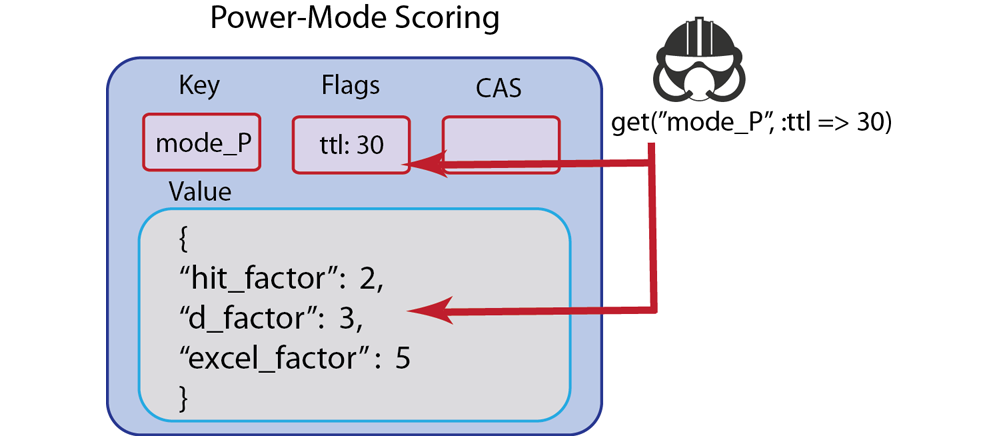
If you need to constantly retrieve a document and update it to keep it stored longer, this method will also improve your application performance, when you compare it to using separate
getandtouchcalls. When you use the separate calls, you effectively double the number of requests and responses between your application and Couchbase Server, thereby increasing response and request times and decreasing application performance. Therefore get-and-touch is preferable for heavy retrieve operations where you also want to update document expiration.The next example demonstrates a get-and-touch in Ruby:
val = c.get("foo", :ttl => 10)The Couchbase SDK get-and-touch methods are based on the memcached protocol command
getwith a specified expiration. For more information about the protocol, see memcached protocol.If a key does not exist, you will get a ‘key does not exist’ type error in response. If you did not expect this result, you should check any application logic that creates that type of key, or any logic that deletes it may inadvertently cause this result. Another reason why you might get this result is that the item expired and Couchbase Server returns a ‘key not found.’ So you will want to check any explicit expiration set for that key.
One option to handle this result is to create the value and set the new expiration; you can attempt this with
setoradd.The types of errors that can occur during this operation include 1) inability to connect to a node, or 2) some error exists while attempting to format a value being retrieved. If you have a connection-level error you may need to reattempt connection, and possibly check the status of the server. If you have an error with the size of your value or formatting, you need to check the value itself, and how it is encoded and see if there are any issues that make the document incompatible with Couchbase Server.
For more information about connections and connection-level settings, see Optimizing Client Instances and Client-Side Timeouts
Retrieving Items with CAS Values
These methods return a value and the associated CAS value for a given key. The CAS value can be used later to perform a check and set operation. Getting the CAS value for a given document while you are getting the document may be useful if you want to update it, but want to do so while avoiding conflict with another document change.
The most common scenario where you will use a get-with-cas operation is when you want to retrieve a value and update that value using a
casoperation. Thecasoperation requires a key and the CAS value of the key, so you would retrieve the CAS value using a get-with-cas operation.Another scenario where get-with-cas is useful is when you want to test and see if another process has updated a key, and then perform some check or special operation if another process has updated the key. In this case, when you perform a get-with-cas and it returns an unexpected CAS value, you can have your application logic proceed along another path, than you would if get-with-cas succeeds.
For instance, imagine you are creating a coupon redemption system, but you only want the coupon to be valid for the first 50 users. In this case, you can store a counter for the coupon and use get-with-cas to see if the CAS value has changed; if it has, you know that the number of available coupons has changed and you might want to offer a different coupon, you may need to check another system to get new deals from that vendor, or check the actual coupon count before you display the coupon. In this case we illustrate the principle that you use a get-with-cas method to find out if the CAS value has changed, and then you know you need to check another system:
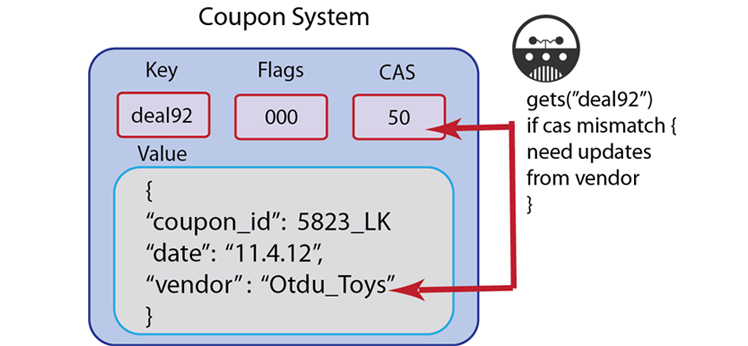
All documents and values stored in Couchbase Server will create a CAS value associated with it as metadata. Couchbase Server provides CAS values as integers; developer and server administrators do not provide these values. There are variations in the method naming and method signature; consult you respective SDK Language Reference to determine the correct method call.
When you want to perform a check-and-set, you will need to do a get-with-cas beforehand to get the current CAS value. You retrieve the CAS value for a given key, and then you can provide it as a parameter to the check and set operation.
In the case of some SDKs, such as Ruby, getting a document with a CAS value is an extension of the standard
getcall. In the example that follows, for instance, we perform a get, and provide an optional parameter to the call in order to retrieve the CAS value:val = c.get("foo", :extended => true) val.inspect #returns "foo"=>["1", 0, 8835713818674332672]In this example, the value for the “foo” key is 1, flags are set to zero, and the CAS value is 8835713818674332672.
The equivalent call in the memcached protocol is
getwhich returns the value for the key as well as the CAS value.If a key does not exist, you will get a ‘key does not exist’ error in response. If you did not expect this result, you should check any application logic that creates that type of key, or any logic that deletes it may inadvertently cause this result. Another reason why you might get this result is that the item expired; in this case Couchbase Server returns a ‘key not found’ type error. So you will want to check any explicit expiration set for that key.
The types of errors that can occur during this operation include 1) inability to connect to a node, or 2) some error exists while attempting to format a value being retrieved. If you have a connection-level error you may need to reattempt connection, and possibly check the status of the server. If you have an error with the size of your value or formatting, you need to check the value itself, and how it is encoded and see if there are any issues that make the document incompatible with Couchbase Server.
For more information about connections and connection-level settings, see Optimizing Client Instances and Client-Side Timeouts
Locking Items
Get-and-lock methods enable you to retrieve a value for a given key and lock that key; it thereby provides a form of pessimistic concurrency control in Couchbase Server. While a key is locked, other clients are not able to update the key, nor are they able to retrieve it.
When you perform a get-and-lock operation you provide an expiration for the lock as a parameter. The maximum amount of time a key can be locked is 30 seconds; any parameter you provide that is more than 30 seconds will be set to 30 seconds; negative numbers will be interpreted as 30 seconds also. When Couchbase Server locks a key, it sets a flag on the key indicating it is locked, it updates the CAS value for the key and returns the new CAS value. When you perform a
casoperation with the new CAS value, it will release the lock.You would want to use this method any time you want to provide a high level of assurance that a value you update is valid, or that a user can modify the value without any conflict with other users.
Going back to the spaceship example, imagine we want spaceships to be able to immediately put a repair item on hold when they arrive in the spaceship service station. This way, a player with a broken spaceship can immediately be assured that as long as they perform a
getland the repair part is in inventory, they will get that part: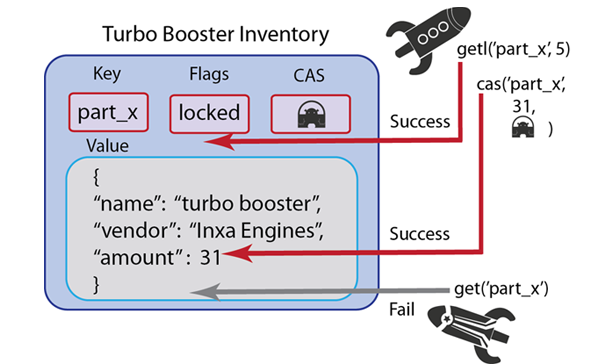
Other spaceships that arrive in open repair spots afterwards cannot take it since the entire inventory is locked. In this case, it would make sense to provide separate inventories for all the different parts so that only that type of part is locked while a ship reserves a part. The spaceship that made the lock can update the inventory and release the key by using a
casupdate.The following are two examples of using a get-and-lock operation in the Ruby SDK:
c.get("foo", :lock => true)

c.get("foo", "bar", :lock => 3)
In the first example, we use the standard method call of
get()and include the parameter:lock => trueto indicate we want to lock the when we perform the retrieve. This lock will remain on the key until we perform acasoperation on it with the correct CAS value, or the lock will expire by default in 30 seconds. In the second version of get-and-lock we explicit set the lock to a three second expiration by providing the parameter:lock => 3. If we perform acasoperation within the three seconds with the correct CAS value it will release the key; alternately the lock will expire and Couchbase Server will unlock the key in three seconds.Object myObject = client.getAndLock("someKey", 10);In this previous example we retrieve the value for ‘someKey’ and lock that key for ten seconds. In the next example we perform a get-and-lock operation and try to retrieve the value while it is still locked:
public static void main(String args[]) throws Exception {
      List<URI> uris = new LinkedList<URI>();
      uris.add(URI.create("http://localhost:8091/pools"));

      CouchbaseClient client = new CouchbaseClient(uris, "default", "");

      client.set("key", 0, "value").get();

      client.getAndLock("key", 2);


      System.out.println("Set locked key result: " + client.set("key", 0, "lockedvalue").get());
      System.out.println("Get locked key result: " + client.get("key"));

      Thread.sleep(3000);

      System.out.println("Set unlocked key result: " + client.set("key", 0, "newvalue").get());
      System.out.println("Get unlocked key result: " + client.get("key"));
      client.shutdown();
}
The first attempt to set the key to ‘lockedvalue’ will output an error since the key is still locked. The attempt to output it will output the original value, which is ‘value.’ After we have the thread sleep 30 seconds we are able to set it to ‘newvalue’ since the lock has expired. When we then perform a get, it outputs the updated value, ‘newvalue.’
The other way to explicitly unlock a value using a Couchbase SDK is to perform a
casoperation on the key with a valid CAS value. After Couchbase Server successfully updates the document, it will also unlock the key.The equivalent call in the memcached protocol is
getwhich returns the value for the key and will set a timed lock if you provide it as a parameter. For more information, see memcached protocol.The types of errors that can occur during this operation include 1) inability to connect to a node, or 2) some error exists while attempting to format a value being retrieved. If you have a connection-level error you may need to reattempt connection, and possibly check the status of the server. If you have an error with the size of your value or formatting, you need to check the value itself, and how it is encoded and see if there are any issues that make the document incompatible with Couchbase Server.
For more information about connections and connection-level settings, see Optimizing Client Instances and Client-Side Timeouts
Updating Information
These operations are for replacing, updating, deleting or modifying a stored numerical value through increment or decrement. This include check and set (CAS) operations, which enable you to perform optimistic concurrency in your application. All update operations exist for all SDKs provided by Couchbase. For some languages, parameters, return values, and data types may differ.
Touch
With the
touchmethod you can update the expiration time on a given key. This can be useful for situations where you want to prevent an item from expiring without resetting the associated value. For example, for a session database you might want to keep the session alive in the database each time the user accesses a web page without explicitly updating the session value, keeping the user’s session active and available.The other context when you might want to use touch is if you want to test if a key actually exists. As we mentioned earlier for our discussion of
get, developers will typically rely ongetto determine if a key exists. The unintended problem this can cause is if the value for a key is several megabytes instead of mere bytes. If you constantly usegetonly to test if a key exists, you nonetheless retrieve the entire value; this can cause a performance loss if the value is large, and especially if you perform thegetover thousands or millions of documents.Using
touchas an alternative way to test if a key exists may be a preferable. Sincetouchonly updates the expiration and does not retrieve the item value, the request payload and response are both small. The most important drawback to be aware of is that when you use touch to determine if a key exists, you assume that the key does not have an expiration time that is used in other parts of your application. If the expiration time for a key is important, when you usetouchit will overwrite that expiration and will impact application behavior. If you are certain the key expiration is not important, than usingtouchin this context is safe.The other drawback of using this approach is that if you perform a
touchto determine if a key exists, you are working on the assumption that it will not expire by the time you perform your next operation on that key. If you only want to test for the existence of a key, and you do not want to update the expiration, you can provide the existing expiration, or set it to 0, which indicates no expiration. The following illustrations demonstrate how you can use the result fromtouchto decide whether you store a key, or store an alternate key: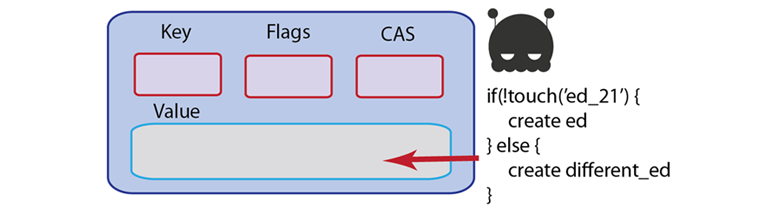

The following shows and example of using
touchin the Ruby SDK:# updates the expiration time to 10 seconds for 'foo' document c.touch("foo", :ttl => 10)As we discussed earlier in this chapter, the SDKs provide a convenience method you can use to retrieve a document and update the expiration. With these so called get-and-touch operations you do not need to perform a separate setting operation to update expiration when you are retrieving the document. This will also provide better performance compared to doing a separate
getandtouchrequests. If you use separate calls togetandtouchyou will create two requests to Couchbase Server and two responses from the server per document; in contrast you create only one request and response when you use a get-and-touch method.The equivalent call in the memcached protocol is
touchwhich updates the item expiration. For more information, see memcached protocol.As we mention previously, you can perform a
touchto explicitly test whether a key exists or not, and then create a key; you can try this withsetoradd. If a key is missing, Couchbase Server will return a ‘key not found’ type error which you can check. Be aware that when you use this approach, you are assuming the key will not expire before you perform your next operation on it.If the key is missing and you did not expect this result, you should check any application logic that creates that type of key, or any logic that deletes it may inadvertently cause this result. Another reason why you might get this result is that the item expired and Couchbase Server deleted it as part of the regular maintenance. So you will want to check any logic that sets an explicit expiration set for that key.
The types of errors that can occur during this operation include 1) inability to connect to a node, or 2) some error exists while attempting to format a value being retrieved. If you have a connection-level error you may need to reattempt connection, and possibly check the status of the server. If you have an error with the size of your value or formatting, you need to check the value itself, and how it is encoded and see if there are any issues that make the document incompatible with Couchbase Server.
For more information about connections and connection-level settings, see Optimizing Client Instances and Client-Side Timeouts
Replace
This method will update the value for a key, if the key already exists. If the key does not exist, it will fail and return an error.
Replaceis useful in cases where you do care whether or not a key exists, for instance, your application logic will perform one action if a key exists, but perform another action if the key does not exist. This method is roughly analogous to aUPDATEcommand in SQL.For instance, going back to a game application example, imagine you want to show new users a special offerings page with a variety of new games. In this case you could have a document in Couchbase Server which stores last login times for users. When a new user initially logs in, your application tries to replace the last login document with the current time, but it receive an error that the key does not exist. Your application would then know that the key does not exist because this is the first user login and could then show the special offer page.
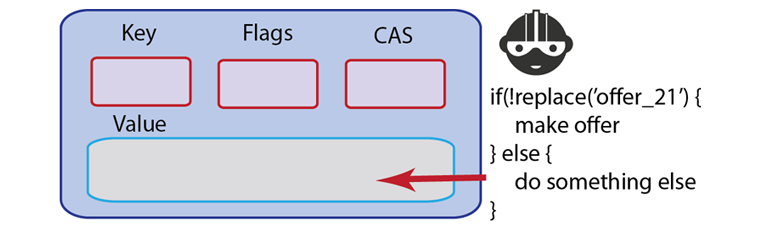
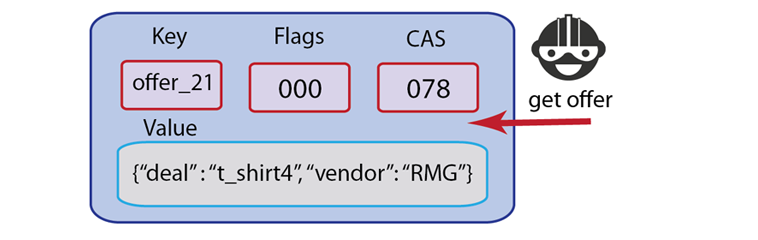
Some Couchbase Server developers prefer to exclusively use
replaceanytime they update documents. With this approach you will know whether the key exists or not prior to updating it; usingreplacewill return error information if the key is missing which you can handle in your application logic.In Couchbase SDKs you can update the value with
replacewhile simultaneously updating the document expiration.Here is a simple example of
replacein Ruby:c.replace("foo", "bar")This will replace the value for the key
foowith the new string ‘bar’; if the key does not exist, it will return a ‘key not found’ error. The following example demonstrates use ofreplacein PHP:$script_access_count=$cb_obj->get($script_name); $cb_obj->replace("DATE::" . $script_name,date("F j, Y, g:i:s a "));In this example we use the
replaceto update the latest access date and time for a server script. We update the date and time using a standard PHP date format.The equivalent call in the memcached protocol is
replace; for more information, see memcached protocol.If a key does not exist, you will receive ‘key not found’ type error. If you receive this error and you expected it to exist, you should check your application logic to see why it does not exist. Any logic that creates that type of key, or any logic that deletes it may inadvertently cause that error. Another reason why you might get this error is that the item expired; once a key is expired Couchbase Server will return a ‘key not found’ error in response to a
replacerequest. So you will want to check any explicit expiration set for that key.One option to handle this error is to create the value if it does not already exist. After you receive an error that the value could not be replaced, you can attempt an
addto create the key.The types of errors that can occur during this operation include 1) inability to connect to a node, or 2) some error exists while attempting to format a value being set. If you have a connection-level error you may need to reattempt connection, and possibly check the status of the server. If you have an error with the size of your value or formatting, you need to check the value itself, and how it is encoded and see if there are any issues that make the document incompatible with Couchbase Server.
For more information about connections and connection-level settings, see Optimizing Client Instances and Client-Side Timeouts
Check and Set (CAS)
This operation is also known as a check-and-set method; it enables you to update information only if a unique identifier matches the identifier for the document you want to change. This identifier, called a CAS value or ID, prevents an application from updating values in the database that may have changed since the application originally obtained the value.
A check-and-set operation will only allow the user with the latest CAS value to update a key. This assures you that if you get a key, and someone has changed it in the meantime, you can not change the value. Essentially the first process that accessed the document with the most current CAS value will be able to update it. When this update occurs, Couchbase Server also updates the CAS value. All other requests at this point will be sending the old, invalid CAS values.
Providing optimistic concurrency is optional in your application. All documents you create in Couchbase Server automatically have a CAS value stored as part of metadata for the document. To use it for optimistic concurrency, you include get-with-cas and check-and-set operations in your application logic as well as provide CAS values as parameters to these methods.
CAS values are in the form of 64-bit integers and they are updated every time a value is modified; if an application attempts to set or update a key/value pair and the CAS provided does not match, Couchbase Server will return an error.
For instance, imagine we want to have a repair station for our spaceship game. Players who suffer damage to their ships must go there occasionally or they cannot travel or defend themselves. However, we do not want the repair station to have an unlimited supply of spaceship replacement parts on inventory. In this example, we have a document to represent the types of spaceship parts the repair station carries, and the amounts it has in inventory.
By requiring CAS values in this scenario, we only update the inventory and provide it to a ship if we have the most current CAS value for the inventory document. If another ship has come and taken the part in the meantime, it will change the CAS value for inventory, we fail to get the part with our current CAS value and receive an error.
Typically we would perform a get-with-cas call in order to retrieve the current inventory of repair parts and the CAS value for the inventory. If the part we need is in inventory, we would use the CAS value to update our inventory document to show one less part.
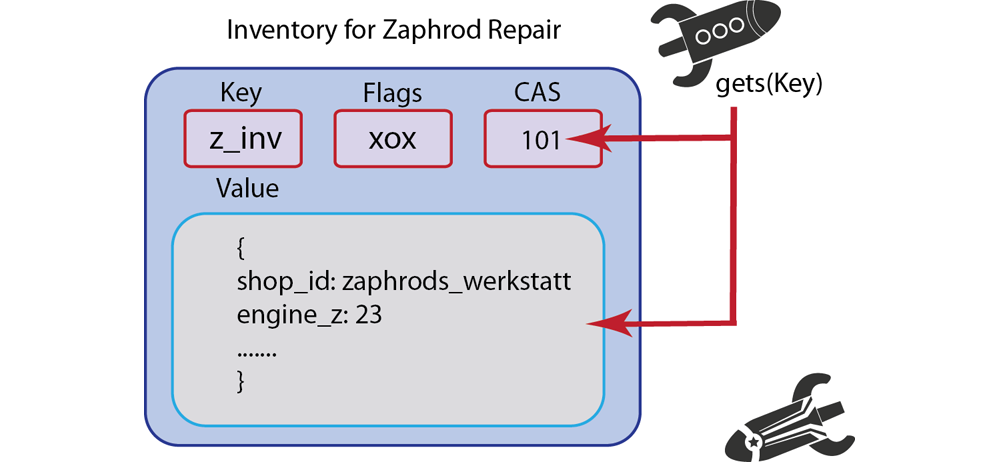
By using the CAS value we will ensure that our spaceship either gets the part given our current CAS value, or needs to check inventory again because another ship has already taken one of the parts. In this scenario performing get-with-cas and then a
cascall to update the inventory will ensure that our reduction of inventory occurs in an orderly fashion, and that spaceships can only remove inventory when they have the right to do so by providing the correct CAS value.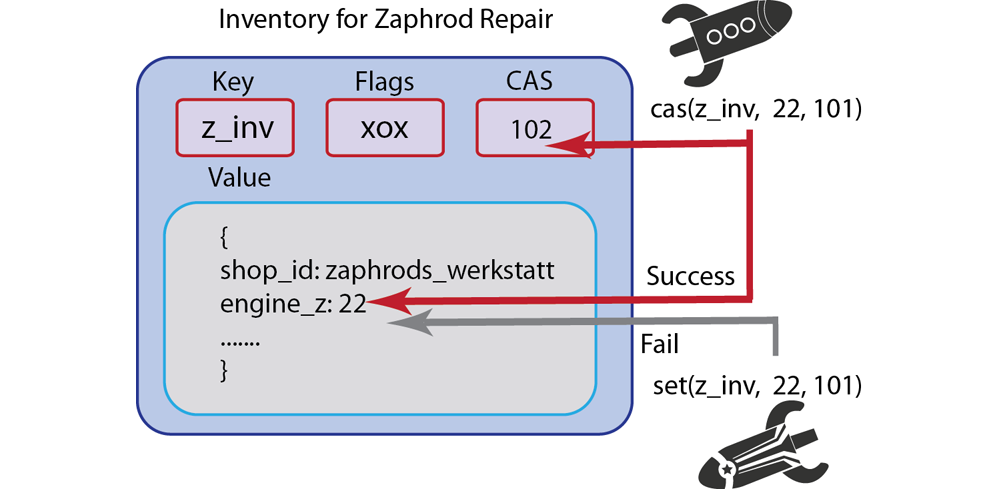
Should you choose to enforce CAS values for a certain type of key or set of application data, you should retrieve the keys and store the CAS value returned by get-with-cas. Anytime you want to update one of these keys, you should do so as a
casoperation.To be able to perform a
casupdate you not only need the key for a document, you will also need the CAS value in order to successfully update it. In this case you could also store the CAS value returned when the value was originally created and then perform acasoperation. In most cases however, you would find it easiest to use get-with-cas to retrieve the CAS for a given key, and then perform your check-and-set. In.Net, the method that retrieves a value and CAS value for a given key is calledGetWithCas.The following is an example of a cas operation using pseudo-code:
attempts_left = 10;

loop {
    cas, val = Get("aKey");

    new_value = updateValue(val);

    result = ReplaceWithCAS("aKey", new_value, cas);

    if (result == success) {
        break; # YAY, success
  }

    if (result.error == EXISTS_WITH_DIFFERENT_CAS) {
        --attempts_left;
        if (attempts_left == 0) {
            throw("Failed to update item 'aKey' too many times, giving up!")
        }
        continue;
  }

    throw("Unexpected error when updating item 'aKey': ", result.error);

}
The first part of our loop retrieves the CAS value and value and then changes the value. We then try to update the value in Couchbase Server as a cas operation. If the result object sent back by Couchbase Server is success we break, if it is a ‘key exists’ error, we make additional attempts to update the value until
attempts_leftis 0. At this point we throw and exception and exit the loop.If you perform a CAS operation and the CAS value has been changed by another process, you will get ‘key exists’ error. How you handle this error depends on the value you are trying to update. You can try again to get the key and when you get the value, actually compare the part you want to change with the value you expected. It is possible that another process made an update, but it did not update the part of the value you are interested in changing. In this case the other process will release the key with a
casoperation. You can then perform anothergetto retrieve the new CAS value and content, then examine the content. Here is the general sequence you could follow:Perform a get-with-cas to retrieve the CAS value for a key,
Try a
caswith the CAS value. If you fail,Perform a get-with-cas again to get the new CAS value, and compare the part of the value with the content you expected,
If the part of the value is still intact, try to perform
casagain with your updated content and the new CAS value.
When you try this approach, you might want to limit the number of times you re-attempt a get-with-cas and the number of times you will try to check and update the content.
The equivalent call in the memcached protocol is
setwith a CAS value provided. For more information, see memcached protocol.The only other types of errors you can typically experience with
casare issues with the new value you provide, such as formatting. The other error is that a key that is truly missing, which you should have discovered when you first performed a get-with-cas to retrieve the CAS value.The types of errors that can occur during this operation include 1) inability to connect to a node, or 2) some error exists while attempting to format a value being stored. If you have a connection-level error you may need to reattempt connection, and possibly check the status of the server. If you have an error with the size of your value or formatting, you need to check the value itself, and how it is encoded and see if there are any issues that make the document incompatible with Couchbase Server.
For more information about connections and connection-level settings, see Optimizing Client Instances and Client-Side Timeouts
Appending and Pre-pending
With
appendandprependmethods, you can add information to the start or end of a binary data that already exists in the data store. Both of these methods, along with the incrementing and decrementing methods, are considered ‘binary’ methods since they operate on binary data such as string or integers, not JSON documents. These methods can add raw serialized data to existing data for a key. The Couchbase Server treats an existing value as a binary stream and concatenates the new content to either beginning or end.Both
appendandprependare atomic operations; this means that multiple threads can be appending or pre-pending the same key without accidentally overwriting changes from anotherappend/prependrequest. Note however that the order in which Couchbase Server appends or prepends data is not guaranteed for concurrentappend/prependrequests.Note
Non-linear, hierarchical formats in the database will merely have the new information added at the start or end. There will be no logic which adds the information to a certain place in a stored document structure or object.
Therefore, if you have a serialized object in Couchbase Server and then append, or prepend, the existing content in the serialized object will not be extended. For instance, if you
appendan integer to an Array stored in Couchbase, this will result in the document containing a serialized array, and then the serialized integer.Similarly, if you have JSON document with nested attributes, when you prepend and append, the new data will appear either before or after the entire JSON object, but not within the JSON object, nor any nested attributes in the JSON.
De-serialization of objects that have data appended or prepended may result in data corruption, due to the behavior previously described.
Both
appendandprependoriginated from the request that Couchbase Server supports ‘lists’ or sets. Developers wanted to maintain documents representing the latest 100 RSS feeds, or the latest 100 tweets about a certain topic, or hash-tag. At this point, you can use it to maintain lists, but be aware that the content needs to be a binary form, such as strings or numeric information.In the chapter on more advanced development topics, we provide an example on managing a data set using
append; we provide the sample as a Python script. Please refer to Using the Fastest Methods. You can also view the entire blog post about the topic from Dustin Sallings at the Couchbase blog, Maintaining a Set.For purposes of this introduction to pre-pending and appending with Couchbase SDKs, we offer these illustrations to show how the two methods work. Imagine we are running an intergalactic empire, and we decide to knight/dame numerous users. We have also improved our document-keeping system and we want to enable users to have suffixes:
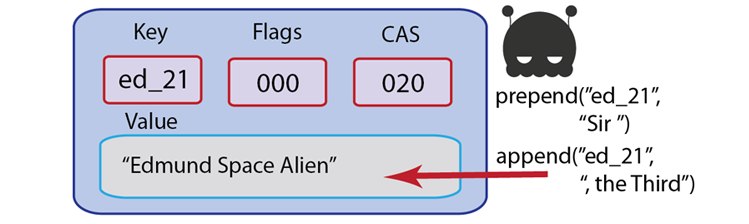
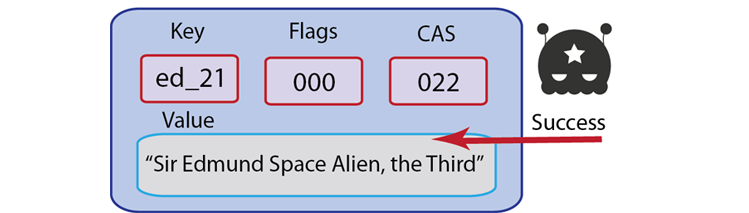
Notice that we provide the appropriate spacing and since the two methods are separate Couchbase Server requests, Couchbase Server updates the CAS value two times. Be aware that in some SDKs you may provide
prependandappendwith a CAS value as a parameter in order to perform the operation; however no SDK requires it.The next example demonstrates use of
appendin Ruby. Note in this case, providing a CAS value is optional. If provided however, it will raise an error if the given CAS value does not match the CAS value of the stored document:#simple append operation and get c.set("foo", "aaa") c.append("foo", "bbb") c.get("foo") #=> "aaabbb" #append using CAS option ver = c.set("foo", "aaa") c.append("foo", "bbb", :cas => ver) #simple prepend c.set("foo", "aaa") c.prepend("foo", "bbb") c.get("foo") #=> "bbbaaa"The following examples demonstrates
appendandprependin Java. In this case the get-with-cas operation in Java isgets:/* get cas value for sample key and then append string */ CASValue<Object> casv = client.gets("samplekey"); client.append(casv.getCas(),"samplekey", "appendedstring"); /* handling possible errors using return value of append */ OperationFuture<Boolean> appendOp = client.append(casv.getCas(),"notsamplekey", "appendedstring"); try { if (appendOp.get().booleanValue()) { System.out.printf("Append succeeded\n"); } else { System.out.printf("Append failed\n"); } } catch (Exception e) { ... } /* prepend a string to an existing value */ CASValue<Object> casv = client.gets("samplekey"); client.prepend(casv.getCas(),"samplekey", "prependedstring");The most significant error developers can make with
prependandappendis that they repeatedly use the method and create a value that is too large for Couchbase Server. Whenappendandprependadd content to a document, they do not remove the equivalent amount of content, such as removing the oldest item from a list when new list content is added.Therefore you can quickly reach the limit of data allowed for a document if you do not keep track of it as you prepend or append. The limit for values is 20MB so if you repeatedly use these two methods, you may receive an error from the server as well as inconsistent results. When you start getting these errors you need to go back to your application logic, determine how often you are actually triggering an
appendandprependfor the document. The three possible approaches, which can be used simultaneously are:Change Methods Used: Instead of using
append/prependuse asetoraddand additional programming logic to add the new content, but also remove old content. This will maintain a more constant document size and reduce oversized documents.Reduce Use: Reduce the number times you are appending and pre-pending, or reduce the amount of information you add to the document.
Split Documents: To avoid documents that are too large, logically separate the documents. For instance, instead of one document for set of tweets on Etsy products, break it up into several documents on different types of Etsy products, or tweets occuring during different time periods.
Compaction: In this case we explicitly remove data from a document if it makes sense to remove the data. This helps us avoid documents that are too large. For more information and an example implementation, view the entire blog post about the topic from Dustin Sallings at the Couchbase blog, Maintaining a Set.
Be aware that for Couchbase SDKs, if you try to
appendorprependa different data-type to an existing key, an SDK may perform no data cast, but rather overwrite the entire value with the new value. For instance this Ruby example shows an overwrite and cast:c.set('karen', 'karen') #returns cas value for 'karen' c.get('karen').class #returns String c.prepend('karen', 2) #returns new cas value c.get('karen').class #FixnumThe equivalent memcached protocol calls are
appendandprepend. These are the methods for appending and prepending; for more information see, memcached protocol.If you encounter a data type or generally data you did not expect, refer back to the methods that create your keys, as well as prepend or append them. Confirm that you provide the data as a consistent data-type.
If a key is missing, you will get a ‘key does not exist’ error in response. If you did not expect this result, you should check any application logic that creates that type of key, or any logic that deletes it may inadvertently cause this result. Another reason why you might get this result is that the item expired and Couchbase Server returns a ‘key not found’ type error. So you will want to check any logic that sets an explicit expiration set for that key.
The other error that can occur when you are prepending or appending is if you provide a bad value, such as a newline, or invalid character. Check the value you want to use with either of these methods so that it is valid.
The types of errors that can occur during this operation include 1) inability to connect to a node, or 2) some error exists while attempting to format a value being stored. If you have a connection-level error you may need to reattempt connection, and possibly check the status of the server. If you have an error with the size of your value or formatting, you need to check the value itself, and how it is encoded and see if there are any issues that make the document incompatible with Couchbase Server.
For more information about connections and connection-level settings, see Optimizing Client Instances and Client-Side Timeouts
Incrementing and Decrementing
These methods can increment or decrement a value for a given key, if that value can be interpreted as an integer value. Couchbase Server requires that the value be an ASCII number to be incremented or decremented
Both of these methods are atomic; this means that multiple threads can be incrementing/decrementing a key without conflicting with other threads that are also incrementing/decrementing the value. Note however that if concurrent threads make a request to increment or decrement a value, there is no guarantee on which thread will change a value first.
The operations are provided as convenience methods for scenarios where you want to have some sort of counter; they eliminate the need for you to explicitly get, update and then reset an integer document through separate database operations.
The primary use for these the
incrmethod is to increment a counter, typically to represent the number of page visits. Generally they can be used for any scenario where you have a frequently updated counter. For instance, if you have a coupon with a limited number of redemptions, you could store the redemptions as a separate key, and decrement the redemptions each time someone uses the coupon.There are several other uses for
incrthat enable you to create unique keys be incrementing a value. Here are some suggested uses:Provide an index for individual items such as comments, users, products, and other lists of items that grow considerably.
Generate keys based on an atomic counter, and use that key as a reference to other documents in Couchbase.
For instance, you can use
incrto create a unique user id for a system. First you would need a document that represents the counter. In Ruby we could do this:c = Couchbase.new # => setup default connection c.set("user::count", 0)Then you would increment the counter each time you store a new user to the system and store the new counter value as part of the unique key for the new user:
# increment the counter-id and assign to user id

new_id = c.incr("user::count")

# store the counter-id as a self-reference

user_hash = {
    :uid => new_id,
    :username => "donp",
    :firstname => "Don",
    :lastname => "Pinto"
}

# create the document with the counter-id and hash

c.add("user::#{new_id}", user_hash)
The entire process would be as follows, if you imagine we want to create a unique user id for a spaceship game. In this case we increment the user count, and then apply it to the new key for the user:
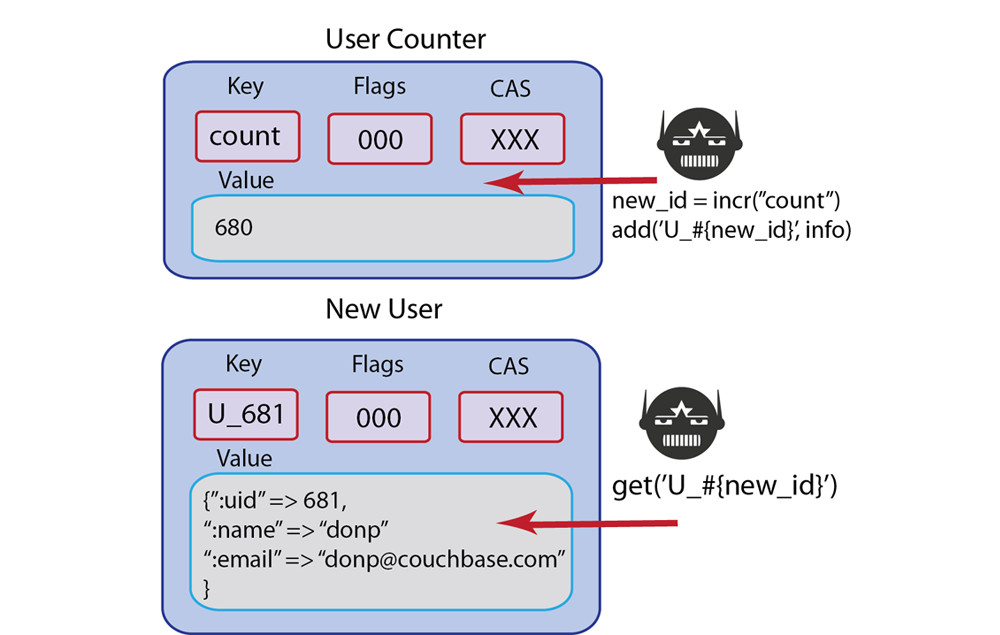
Both
incranddecrare considered ‘binary’ methods in that they operate on binary data, not JSON documents. Because of this, keys used byincranddecrcannot be queried or indexed with Couchbase Server.Tip
Couchbase Server stores and transmits numbers as unsigned numbers, therefore if you try to store negative number and then increment, it will cause overflow. In this case, an integer overflow value will be returned. See the integer overflow example that follows. In the case of decrement, if you attempt to decrement zero or a negative number, you will always get a result of zero.
The next example demonstrates use of
incrto identify documents with unique ids and retrieve them with the id:# initialize the counter c = Couchbase.new # => setup default connection c.set("user::count", 0) # => initialize counterFirst we create a new Couchbase client instance and create a new document which represents the counter. then we increment the counter each time we create a new user in Couchbase Server:
# retrieve the latest (so you see incr adds one...)
c.get("user::count")                # => 3

# increment the counter-id
new_id = c.incr("user::count")            # => new_id = 4

# store the counter-id as a reference to the new user
user_hash = {
               :uid => new_id,
               :username => "jsmith",
               :firstname => "John",
               :lastname => "Smith"
            }

# create the document with the counter-id as key and hash as value
c.add("user::#{new_id}", user_hash)        # => save new user, with document key = "user::4"
We first start by retrieving the current counter, to find out the most recently used number for current users. Then we increment the counter by one and store this new count to
new_idwhich we will use as part of the new key. Finally weaddthe new user document.If we want to retrieve the newest user to the system, we can use the latest counter document and use that in the key we retrieve:
# retrieve the latest

latest_user = c.get("user::count")        # => latest_user = 4

# retrieve the document with the index

user_info = c.get("user::#{latest_user}")    # => retrieve user document

# outputs { "uid" => 4, "username" => "jsmith", "firstname" => "John", "lastname" => "Smith" }

puts user_info
The memcached protocol equivalents for this method are
incranddecrwhich are the commands for incrementing and decrementing. For more information about the underlying protocol, see memcached protocol.Couchbase Server returns no specific operation-level error objects when you perform this operation. If a key does not exist,
incranddecrat the SDK-level will create the new key and initialize it with the value you provide, or set the default of 0. As demonstrated above, if you try to increment a negative number, Couchbase Server will return an integer overflow number. If you try to decrement so the result is a negative number, Couchbase server will return 0.The types of errors that can occur during this operation include 1) inability to connect to a node, or 2) some error exists while attempting to use a key being stored. If you have a connection-level error you may need to reattempt connection, and possibly check the status of the server.
For more information about connections and connection-level settings, see Optimizing Client Instances and Client-Side Timeouts
Deleting Information
This operation erases an individual document from the data store for a given key. In some SDKs you can specifically check a document’s CAS value, a unique identifier, and if the number provided as a
deleteparameter does not match the deletion will fail and return an error. If Couchbase Server successfully deletes a document, it returns a status code indicating success or failure.Note
Be aware that when you
deletea key it may not be removed immediately from the server. Instead Couchbase Server flags an item for deletion and if the key is requested by another client, the server returns a 'key not found' error. Couchbase Server will actually remove the item from the server upon the next request for it. Alternately, Couchbase Server has a maintenance process that runs by default every hour and which removes any items flagged for deletion.It is important to note that in some SDK’s such as in Ruby, a
deletecan be performed in synchronous or asynchronous mode; in contrast other SDK’s such as Java supportdeleteas an asynchronous operation only. Consult your respective language reference to find out more about your chosen SDK. For more information about asynchronous calls in Couchbase SDKs, see Synchronous and Asynchronous TransactionsThe following example demonstrates a
deletein Ruby. In this case, parameters can be provided to check the unique identifier for a value, so that if there is mismatch, thedeletefails:# returns the cas/unique identifier on set and assigns to ver ver = c.set("foo", "bar") # cas mismatch, raises Couchbase::Error::KeyExists c.delete("foo", :cas => 123456) #returns true c.delete("foo", :cas => ver)When you delete a document for some SDKs you can provide CAS value for the document in order for
deleteto succeed. As in other update methods, you can obtain the CAS value by performing a get-with-CAS operation and then pass the CAS value as a parameter:#returns value, flags and cas val, flags, cas = client.get("rec1", :extended => true) #removes document as cas operation client.delete("rec1", :cas => cas)The memcached protocol equivalents for this method is
delete. For more information about the underlying protocol, see memcached protocol.Permanently Destroying Data
Should you choose to destroy cached and persisted data, the
flush_alloperation is available at the SDK level.Warning
This operation is disabled by default as of the 1.8.1 Couchbase Server and above. This is to prevent accidental, detrimental data loss. Use of this operation should be done only with extreme caution, and most likely only for test databases as it will delete, item by item, every persisted document as well as destroy all cached data.
Warning
Third-party client testing tools may perform a
flush_alloperation as part of their test scripts. Be aware of the scripts run by your testing tools and avoid triggering these test cases/operations unless you are certain they are being performed on your sample/test database.Inadvertent use of
flush_allon production databases, or other data stores you intend to use will result in permanent loss of data. Moreover the operation as applied to a large data store will take many hours to remove persisted documents.This next example demonstrates how to perform a synchronous and asynchronous
flushin Ruby:#synchronous flush c.flush #=> true #asynchronous flush c.run do c.flush do |ret| ret.operation #=> :flush ret.success? #=> true ret.node #=> "localhost:11211" end endIn the case of asynchronous operations we use the event loop in Ruby. Within the loop we try to perform a
flush.When you perform a
flushyou provide the URI for one node in the cluster as a parameter and it will operate against all nodes in a cluster.Monitoring Data (Using Observe)
With Couchbase you can use observe-functions in the SDKs to determine the status of a document in Couchbase Server. This provides a level of assurance in your application that data will be available in spite of node failure.
For instance, you may want to create a ticketing application and you want to place a hold on tickets while you perform a credit card authorization to pay for the ticket. If a node fails during that time, you may not be able to recover the current state of the ticket, and determine whether it was on hold for a user, or not. If the ticket is in RAM only, you may not be able to retrieve the ticket at all. By using an observe command, you can determine whether the ticket is persisted or whether it has been replicated. You can then determine if you retrieve the ticket state you can get the most current version that is on disk.
This section describes when you would want to use observe-functions and how to implement it in your application.
Why Observe Items?
One of the challenges working with items that can be in-memory or on-disk is that you may want to keep track of the state of your document in the system. For instance, in your application you may also want to know if a document has been stored to disk or not. You may also want to specify how many copies of a document are stored on replicas. Both of these enhancements enable you to recover important documents and provide consistent information in your application despite server failure.
With Couchbase Server, you can use Couchbase SDK observe-functions to do the following in your application logic:
Determine whether a document has been persisted,
Determine whether a document has been replicated.
One of the new features of Couchbase Server is support for indexing and querying of data. We provide this functionality as views. Views enable you to find specific information in Couchbase Server, extract information, sort information, and also perform a wide variety of calculations across a group of entries in the database. For instance if you want to generate an alphabetical list of users in your system you would use views to do so.
Couchbase Server can index and query information from a document when that document is actually persisted to disk. Therefore you may want to use an observe-function to determine if the document is persisted and therefore available for use in views. To do so, you would make an observe request, and after you know Couchbase Server persists the item, you can retrieve the relevant view.
The other scenario you may want to handle in your application is where you want to make sure a document has been replicated. As of Couchbase Server 2.0, you can automatically configure replication of data from one cluster to another cluster and from one data bucket to another bucket. Collectively, this new functionality is known as cross datacenter replication, or XDCR. For more information, see Cross Datacenter Replication in the Couchbase Server Manual.
The final scenario where you would want to use an observe-function is for documents that should be durable in nature. For instance, imagine you have a shopping cart in your application and you want to maintain the state of the shopping cart in the application while a user continues searching for other items. When a user returns to a shopping cart the latest items they have selected should still be there for purchase. You also want the state of the shopping cart to not only be current but also to survive a node failure if possible.
In this type of scenario, you can use the observe command so that you know the state of the shopping cart data in Couchbase Server. By knowing the state of the shopping cart document in the server, you can provide the correct application logic to handle the document state. If you know you are unable to recover the shopping cart data, you might want to provide an error message to the user and ask them to reselect items for the cart; if you are able to recover a persisted or replica document, you can provide another message and provide the most current recovered shopping cart items.
The following illustrates two different scenarios using an observe-function. The first illustration is how you might handle a scenario where a node fails and the observe-function indicates the cart is not yet on disk or in replica:
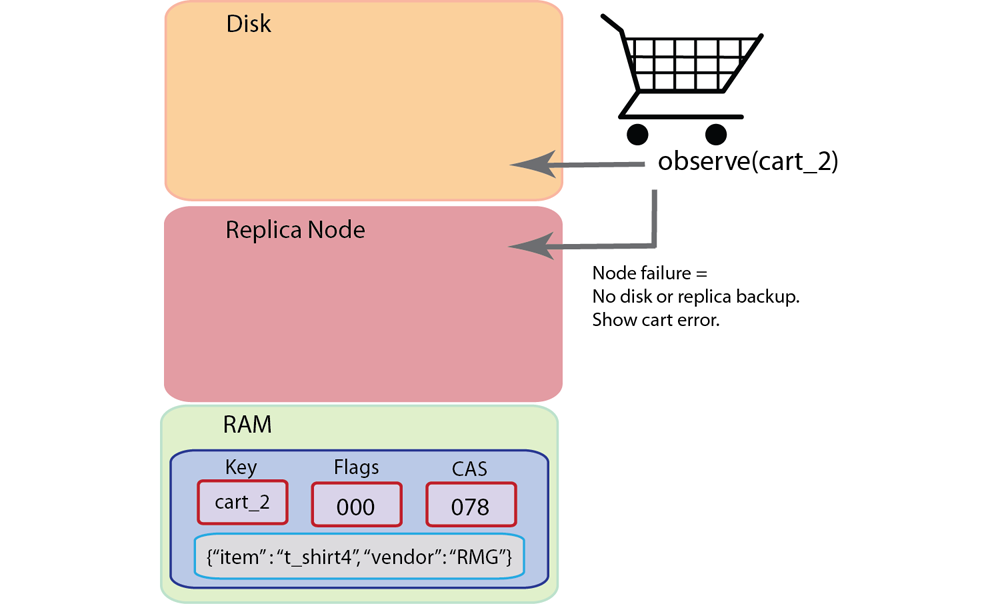
In this case where node fails and the data is not yet persisted or replicated on another node, it will disappear from RAM and is not recoverable. When you observe this type of scenario, an observe-function will indicate the data is not replicated or persisted and therefore it cannot be recreated into RAM and retrieved from RAM. So your application logic would need to compensate for that lack of data by showing for instance, an empty cart, or a cart error message letting the user know they need to add items once again. In the next illustration we show the scenario where a node fails but we successfully determine that the cart is persisted or on a replica node:
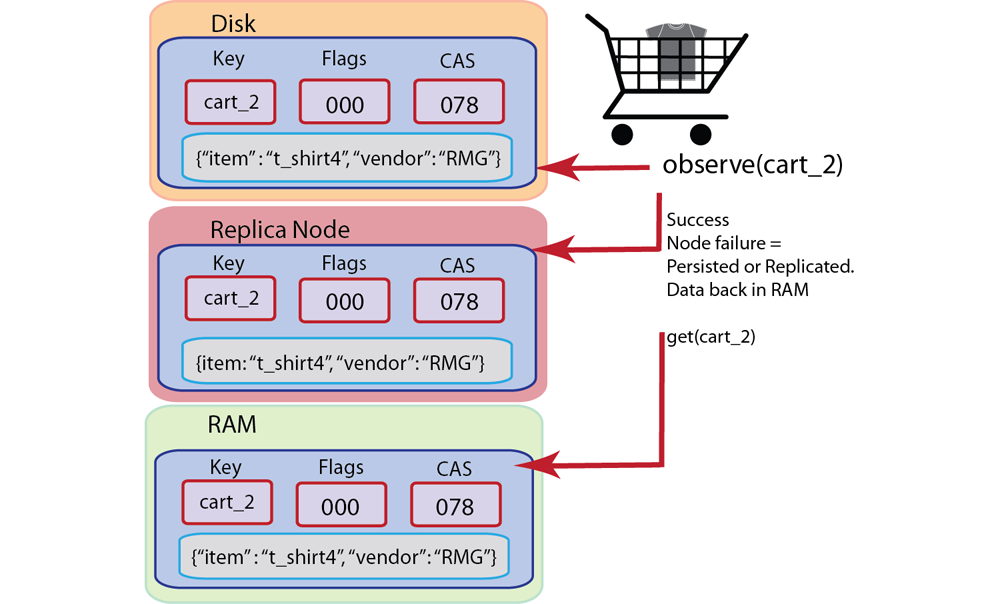
In this second scenario we have a backup of the shopping cart on disk or on a replica node; we can retrieve the shopping cart data once it is brought back into RAM by Couchbase Server. After a node fails an observe-function will indicate when the item returns back into RAM and then we can retrieve it to rebuild the user shopping cart.
When you observe a key, this will survive node rebalance and topology changes. In other words if your application observes a key, and the key moves to another node due to rebalance or cluster changes, a Couchbase SDK will be able to continue monitoring the status of the key in the new location.
There are important points to understand about data replication and data persistence. When Couchbase Server creates replica data, it adds this data in the RAM of another Couchbase node. This supports very rapid reads/writes for the data once the data has been replicated. When Couchbase Server persists data, the data must wait in a queue before it is persisted to disk. Even if there are only a few documents ahead of document, it will take longer to be stored on disk from the queue than it would be to create a replica on another node. Therefore if rapid access to data is your priority, but you want to provide high availability of the data, you may prefer to use replication.
Observing Documents
Couchbase SDK observe-functions indicate whether a document is on disk or on a replica node. Documents in Couchbase Server can be in RAM only, can be persisted to disk, or can also be on a replica node as a copy. When data is persisted onto disk or is on a replica node, when the node that contains that data fails, you can still recover the data.
Once the node fails, the document can be recovered from disk back into RAM and then retrieved by your application. If the document is available on a replica node that is still functioning, you can request the document and it will be retrieved from the replica node. You use observe-functions to determine whether important application data has been persisted or replicated so that you have some assurance you can recreate the document or not if a Couchbase node is down.
There are two approaches for providing ‘observe’/monitoring functionality in Couchbase SDKs:
Provide ability to monitor the state of a document and determine if it is persisted or on replica node.
Provide ability to explicitly persist or replicate documents to a certain number of disks or replica nodes.
The first example we demonstrate in the Ruby SDK takes the first approach where you can monitor a given key. The Couchbase Ruby SDK will return a
Resultobject with the status of a given key:stats = conn.observe("foo")In this case, we perform the
observewith a Couchbase cluster containing one replica node. The results we receive will be as follows:<Couchbase::Result:0x0000000182d588 error=0x0 key="foo" status=:persisted cas=4640963567427715072 from_master=true time_to_persist=0 time_to_replicate=0>This
Resultsobject provides the status for the keyfoo: the symbol:persistedtells us that it has been persisted to disk, and thefrom_master=trueresult indicates that the document has been replicated. The Couchbase Ruby SDK also supports the second approach where we can specify our preferences for replica and persistence when we store a document:conn.set("foo", "bar", :observe => {:persisted => 2, :timeout => 5})For store and update operations, we can provide a parameter to specify that a document be persisted or replicated a certain number of times. In this example above we indicate that the key
foobe persisted onto disk on two nodes. The:timeoutparameter is specific to this operation and indicates the operation should time out after waiting five (5) seconds for the two document writes to disk.One common approach for using an observe-function is to verify that a document is on at least one replica node. If you want to be extremely certain about the durability of some documents, you may want to verify that the document is replicated to at least three nodes and persisted to at least four servers. This represents the maximum number of replicas and on-disk copies that Couchbase Server currently supports.
For asynchronous observe requests, a Couchbase SDK determines that an observe request is complete by polling the Couchbase Server. A Couchbase SDK will determine which observe requests have completed all the events that are being observed for a key, namely replication and persistence.
The types of errors that can occur during this operation include 1) inability to connect to a node, or 2) some error exists while attempting to format a value being used. If you have a connection-level error you may need to reattempt connection, and possibly check the status of the server. If you have an error with the size of your value or formatting, you need to check the value itself, and how it is encoded and see if there are any issues that make the document incompatible with Couchbase Server.
For more information about connections and connection-level settings, see Optimizing Client Instances and Client-Side Timeouts
Finding Data with Views
In Couchbase 2.1.0 you can index and query JSON documents using views. Views are functions written in JavaScript that can serve several purposes in your application. You can use them to:
Find all the documents in your database that you need for a particular process,
Create a copy of data in a document and present it in a specific order,
Create an index to efficiently find documents by a particular value or by a particular structure in the document,
Represent relationships between documents, and
Perform calculations on data contained in documents. For example, if you use documents to represent users and user points in your application, you can use a view to find out which ten users have the top scores.
This chapter will describe how you can do the following using Couchbase SDKS and view functions:
Extract and order specific data,
Creating an index and use it to perform efficient document lookups,
Retrieve a range of entries, and
Perform a reduce function, which computes a value based on entry values.
This section is not an exhaustive description of views and managing views with Couchbase Server; it is merely a summary of basic concepts and SDK-based examples to start using views with Couchbase SDKs. For more detailed information about views, managing views, and handling views using Couchbase Web Console, see Couchbase Server Manual. To see examples and patterns you can use for views, see the Couchbase Server Manual)
Understanding Views
If you are coming from a relational database background and are familiar with SQL, you know how to use the query language to specify exactly what data you want out of the database. In Couchbase 2.1.0, you use views to perform these types of operations.
You can use views in Couchbase Server 2.1.0 to extract, filter, aggregate, and find information. View are essentially functions you write which Couchbase Server will then use to find information or perform calculations on information. For Couchbase Server, finding information with views is a two-stage process, based on a technique called map/reduce.
First you create a view by you providing a map function which will filter entries for certain information and can extract information. The result of a map function is an ordered list of key/value pairs, called an index. The results of map functions are persisted onto disk by Couchbase Server and will be updated incrementally as documents change.
You can also provide an optional reduce function which can sum, aggregate, or perform other calculations on information.
Couchbase Server stores one or more view functions as strings in a single JSON document, called a design document ; each design document can be associated with a data bucket. To see the relationship between these logical elements, see the illustration below:

Once you have your view functions, the next step is to query a view to actually get back data from Couchbase Server. When you query a view, you are asking for results based on that view. Based on the functions in a view, Couchbase Server will create a result set, which contains key value pairs. Each key and value in the result set is determined by the logic you provide in your views functions. Imagine you have several thousand contacts in Couchbase Server and you want to get all the phone numbers which begin with the prefix 408. Given a view function that defines this, Couchbase Server would return results that appears as follows:

In this case our results are an ordered list of key and values where the keys are phone numbers starting with a 408, and we have no value in our results except the ids of documents containing matching prefixes. The keys will be sorted based on the key value in ascending, alphabetical order. We can potentially use these ids to lookup more information from the documents containing the 408 phone number such as name, city, or address. We could have also used the map function to provide values from matching entries in our index, such as names.
Couchbase Server will create an index based on a view for all items that have been persisted to disk. There may be cases where you want to ensure an item has been persisted to disk and will therefore appear in a result set when you query a view. Couchbase SDKs provide helper methods, collectively referred to as observe-functions to get more information about an item you want to persist and then index. For more information, see Monitoring Data (Using Observe).
Notice also that Couchbase Server generates an index and returns a result set when you actually query the view. Building an index is a resource-intensive process that you may not want to trigger each time you query a view. There may be cases where you will want Couchbase Server to explicitly rebuild an index and include any new documents that have been persisted since your last query; in other cases, you may not care about retrieving an index that contains the most recent items. Couchbase SDKs enable you to specify if you want to query and refresh the index to include current items, or if you only want the index that is currently stored. For more information about this topic, see Building an Index
For more detailed information about views, including how and when Couchbase Server creates an index based on views, see the Couchbase Server Manual.
Filtering and Extracting Data
One of the simplest ways to learn about views is to create a basic map function which extracts data from entries. Imagine we have our own blog application and we want to provide a list of blog posts by title. First imagine what the JSON documents would look like for our blog posts:
{
  "title":"Move Today",
  "body":"We just moved into a new big apartment in Mountain View just off of....",
  "date":"2012/07/30 18:12:10"
}

{
  "title":"Bought New Fridge",
  "body":"Our freezer broke down so ordered this new one on Amazon....",
  "date":"2012/09/17 21:13:39"
}

{
  "title":"Paint Ball",
  "body":"Had so much fun today when my company took the whole team out for...",
  "date":"2012/9/25 15:52:20"
}
Then we create our map function which will extract our blog post titles:
function(doc) {
    if(doc.title) {
        emit(doc.title, null);

  }
}
This function will look at a JSON document and if the document has a
titleattribute, it will include that title in the result set as a key. Thenullindicates no value should be provided in the result set. In reality if you look at all the details, a standard view function syntax is a bit more complex in Couchbase 2.1.0.Here is how the map function appears when you provide full handling of all JSON document information:
function (doc, meta) {
  if (meta.type == "json" && doc.title && doc.date) {
    // Check if doc is JSON
    emit(doc.title, doc.date);
  } else {
    // do something with binary value
  }
}
As a best practice we want make sure that the fields we want to emit in our index actually exist before we emit it to the index. Therefore we have our map function within a conditional:
if (doc.title && doc.date). For instance, if we wanted to perform a views function that tried to emitdoc.name.lengthwe would get a “undefined reference” exception if the field does not exist and the view function would fail. By checking for the field we avoid these potential types of errors.If you have ever looked at a view in Couchbase Admin Console, this map function will be more familiar. In Couchbase 2.1.0 we separate metadata about an entry such as expiration and the entry itself into two parts in a JSON document. So in our function we have the parameter
metafor all document meta-data anddocas the parameter for document values, such as the title and blog text. Our function first looks at the metadata to determine if it is a JSON document by doing aif..else. If the document is JSON, the map function extracts the blog title and the date/time for the blog entry. For more information about how meta-data is stored and handled in JSON documents, see the Couchbase Server Manual.If the document is binary data, you would need to provide some code to handle it, but typically if you are going to query an index data, you would do so on JSON documents. For more information about using views with binary data, see the Couchbase Server Manual
The
emit()function takes two arguments: the first one iskey, and the second one isvalue. Theemit()creates an entry, or row, in our result set. You are able to call theemitfunction multiple times in a map function; this will create multiple entries in the result set from a single document. We will discuss that more in depth later.Once you have your view functions, you store them to Couchbase Server and then query the view to get the result set. When you query your view, Couchbase Server takes the code in your view and runs it on every document persisted on disk. You store your map function as a string in a design document as follows:
{
  "_id": "_design/blog",
  "language": "javascript",
  "views": {
    "titles": {
      "map": "function(doc, meta){
          if (meta.type == "json" && doc.date && doc.title) {
                // Check if doc is JSON
                emit(doc.date, doc.title);
              } else {
                // do something with binary value
              }
      }"
    }
  }
}
All design documents are prefixed with the id
_design/and then your name for the design document. We store all view functions in theviewsattribute and name this particular viewtitles. Using a Couchbase SDK, you can read the design document in as a file from the file system and store the design document to the server. In this case we name our design document fileblog.json:client = Couchbase.connect("http://localhost:8091/pools/default/buckets/bucketName") client.save_design_doc(File.open('blog.json'))This code will create a Couchbase client instance with a connection to the bucket,
bucketName. We then read the design document into memory and write it to Couchbase Server. At this point we can query the view and retrieve our map function results:posts = client.design_docs['blog'] posts.views #=> ["titles"] posts.titlesCouchbase Server will take each document on disk, determine if the document is JSON and then put the blog title and date into a list. Each row in that list includes a key and value:
KeyValue
"2012/07/30 18:12:10"            "Move Today"
"2012/09/17 21:13:39"            "Bought New Fridge"
"2012/09/25 15:52:20"            "Paint Ball"
You may wonder how effective it is to run query your view if Couchbase Server will run it on every persisted document in the database. But Couchbase Server is designed to avoid duplicate work. It will run the function on all documents once, when you first query the view. For subsequent queries on the view Couchbase Server will recompute the keys and values only for documents that have changed.
When you query this view, Couchbase Server will send the list of all documents as JSON. It will contain the key, value and the document id, plus some additional metadata. For more information about JSON document metadata in Couchbase, see the Couchbase Server Manual.
Building an Index
To retrieve the information you want, you query a view and receive a result set from Couchbase Server. There are two possible types of views which influence when Couchbase Server will actually build an index based on that view:
Development : when you query a view that is still in development, by default Couchbase Server will create an index using a subset of all entries. A view that is still under development is known as a development view and will always be stored with the naming convention
_design/dev_viewnamewhere_designis a directory containing all views and the prefixdev_indicates it is a development view. These views are editable in Couchbase Admin ConsoleProduction : these views are known as production views and are available to all processes that have access/credentials to Couchbase Server; they are the views you make available to a live production application built on Couchbase Server. Couchbase Server will create an index based on entries that are stored on disk. The naming convention for production views is
_design/viewnamewhere_designis the directory containing all views. Production views are not editable in Couchbase Admin Console.
When you are almost done with design and testing of a view, you can query the development view and have Couchbase Server index based on the entire set of entries. This becomes a matter of best practice that you create an index based on all entries shortly before you put a view into production. Generating an index may take several hours over a large database, and you will want a fairly complete index to already be available as soon as you put the view into production.
When Couchbase Server creates an index based on a view, it sorts results based on the keys. The server puts keys in order based on factors such as:
- alphabetical order
- numeric order
- object type or value.
Forinformation about the sort order of indexes, see the Couchbase Server Manual.
The real-time nature of Couchbase Server means that an index can become outdated fairly quickly when new entries and updates occur. Couchbase Server generates the index when it is queried, but in the meantime more data can be added to the server and this information will not yet be part of the index. To resolve this, Couchbase SDKs and the REST API provide a
staleparameter you use when you query a view. With this parameter you can indicate you will accept the most current index as it is, you want to trigger a refresh of the index and retrieve these results, or you want to retrieve the existing index as is but also trigger a refresh of the index. For instance, to query a view with the stale parameter using the Ruby SDK:doc.recent_posts(:body => {:stale => :ok})In this case, we query a view named
recent_postsin a design document nameddoc. In the query we pass the parameter:staleset to the value:okto indicate that Couchbase Server can return the most current index as it exists. For more detailed information about thestaleparameter, consult the Language Reference for your SDK. For general information and underlying server operations for thestaleparameter see the Couchbase Server Manual.For more information and details on how and when Couchbase Server generates an index and updates an index, see the Couchbase Server Manual.
Providing Efficient Lookups
Views enable us to find documents based on any value or structure that resides in the document. In Filtering and Extracting Data we demonstrated how you can find the data and have Couchbase Server generate it in an index; this section describes how you can use query parameters to constrain the result set. For instance, imagine you know the date of a particular blog post. To find a single document based on that date, you can provide parameters which specify which items in a index Couchbase Server should return.
Imagine we want to find all blog posts with comments that were made between certain dates. In this case we have a map function in our view and we have generated an index for the view with numerous blog posts indexed. In the Ruby SDK we demonstrate below how we can query a view and pass in query parameters. In this case, we go back to the example index of blog post timestamps and titles that we created with our view. The index is as follows:
KeyValue
"2012/07/30 18:12:10"            "Move Today"
"2012/09/17 21:13:39"            "Bought New Fridge"
"2012/09/25 15:52:20"            "Paint Ball"
doc.recent_posts(:body => {:keys => ["2012/07/30 18:12:10"]})Here we specify the blog post that we want to retrieve from the index by timestamp. Couchbase Server will return the blog item “Move Today” in response to this query. You can use query parameters to specify ranges of results you are looking for:
doc.recent_posts(:start_key => "2012/09/10 00:00:00",
                               :end_key => "2012/9/30 23:59:59")
In this case we specify the start of our range and end of our range with the parameters
:start_keyand:end_keyrespectively. The values we provide for our query parameters indicate we want to find any blog post from the start of the day on September 9th until the end of the day on September 30th. In this case, Couchbase Server will return the following result set based on the index and our query parameters:KeyValue "2012/09/17 21:13:39" "Bought New Fridge" "2012/09/25 15:52:20" "Paint Ball"There is alternate approach for finding documents which does not require indexing and querying via views. This approach would be based on storing one or more keys to a related object in a source document and then performing a retrieve on those keys. The advantage of this alternate approach is that response time will be significantly lower. The disadvantage of this approach is that it could potentially introduce too much contention for the source object if the object contains data that you expect to update frequently from different processes. In this later case where you expect numerous changes to a source document, it is preferable to model the document to be independent of related objects and use indexing and querying to retrieve the related object.
For more information about different ways to model related objects for future search and retrieval, see Modeling Documents for Retrieval and Using Reference Documents for Lookups. For information about performing multiple-retrieves, see Retrieving Multiple Keys.
Ordering Results
When you query a view, you can provide parameters that indicate the order of results; there are also parameters you use to indicate a start and end for a result set as we described earlier. When you provide these types of query parameters, this is how Couchbase functions:Begin collecting results from the top of the index, or at the start position specified.
Provide one row from the index at a time, until the end of the index, or until the specified end key.
For instance imagine the simplest case where Couchbase Server generates this index based on a view:
KeyValue
0        "foo"
1        "bar"
2        "baz"
We use the Ruby SDK to retrieve all the results in descending order:
doc.foo_bar(:descending => :true )We query the view named
foo_barand indicate we want the results to be in descending order by providing the:descendingparameter set to true. In this case our result set would appear as follows:KeyValue 2 "baz" 1 "bar" 0 "foo"Imagine we want to provide another query parameter along with the
:descending, such as a start key. In this case our query would look like this in Ruby:doc.foo_bar(:descending => :true, :start_key => 1)Here our result set would look like this:
KeyValue
1        "bar"
0        "foo"
This might not be what you expected: when you indicated the start key, you probably expected the last two items in the index sorted in descending order. But when you specify the order
:descendingto be true, Couchbase Server will read index items from the bottom of the index upwards. Therefore you get the items in position 1 then 0 from the index. To get the results in position 1 and 2, you would invert the logic of your query and use the:endkeyparameter set to 1:doc.foo_bar(:descending => :true, :end_key => 1)In this case Couchbase Server will start reading items at the last position of 2, and then add the item from position 1. Your result set will appear as follows:
KeyValue
2        "baz"
1        "bar"
Couchbase Server sorts results in ascending or descending order based on the value of the key; for instance if you sort in ascending order, keys starting with ‘a’ will be in a higher position than those starting with ‘c’. For more information about sorting rules and values in Couchbase Server, see the Couchbase Server Manual.
Handling Result Sets
When you query a view, Couchbase Server generates an index which can contain zero or more results. Couchbase SDKs provide helper methods which enable you to iterate through the items in an index and perform operations on each individual result. For instance, going back to our blog example we performed a map function to get all the blog post dates and titles. In this case, we have a result set as follows:
KeyValue
"2012/07/30 18:12:10"        "Move Today"
"2012/09/17 21:13:39"        "Bought New Fridge"
"2012/09/25 15:52:20"        "Paint Ball"
The result set returned by Couchbase Server inherits from Ruby
Enumerableinterface, and can therefore be treated like any otherEnumerableobject:blog.recent_posts.each do |doc| # do something # with doc object doc.key # gives the key argument of the emit() doc.value # gives the value argument of the emit() endWe can access each result in the result set with the
each..do |value|block; in this example we output each key and value form the result set. Here is another example in.Net where the result set is provided as an enumerated value. This example is part of the sample beer application provided with your Couchbase install:var view = client.GetView("beer", "by_name"); foreach (var row in view) { Console.WriteLine("Key: {0}, Value: {1}", row.Info["key"], row.Info["value"]); }In the first line we query a view stored in the design document
beercalledby_name. Then we output each item in the result set, which will give us a list of beer names for all beer documents. For more information about the sample application, see the individual Getting Started Guide and Language Reference for your chosen SDK at Develop with Couchbase.Using Built-In Reduces
We discussed earlier how a Couchbase view includes a map function for finding and extracting into an index. Reduce functions are optional functions which can perform calculations and other operations on items in an index. There are two types of reduce functions: those that are provided by Couchbase Server, known as built-in reduces, and reduce function you create as custom JavaScript. The built-in reduce function for Couchbase Server 2.1.0 include:
_count : this function will count the number of emitted items. For instance if you perform a query on a view and provide a start key and end key resulting in 10 items in a result set, you will get the value 10 as a result of the reduce.
_sum : will add up all values emitted to an index. For instance, for the values 3, 4, and 5 in a result set the result of the reduce function will be 12.
_stats : calculates statistics on your emitted values, including sum of emitted values, count of emitted items, minimum emitted value, maximum emitted value and sum of squares for emitted values.
To understand how a built-in reduce works, imagine an application for beers and breweries. Each brewery document would appear as follows in JSON:
{
"name":"Allguer Brauhaus AG Kempten",
"state":"Bayern",
"code":"",
"country":"Germany",
"phone":"49-(0)831-/-2050-0",
"website":"",
"type":"brewery",
"updated":"2010-07-22 20:00:20",
"description":"",
"address":["Beethovenstrasse 7"],
"geo":{"accuracy":"ROOFTOP","lat":47.7487,"lng":10.5694}
}
This specific brewery document contains information for a brewery in Bavaria, but all other breweries in our application would follow the same document model. Imagine we want to be able to count the number of breweries in each unique city, state or country. In this case we need both a map and reduce function; in this case the map function of our view would look like this:
function (doc, meta) {
  if (doc.country, doc.state, doc.city) {
    emit([doc.country, doc.state, doc.city], 1);
  } else if (doc.country, doc.state) {
    emit([doc.country, doc.state], 1);
  } else if (doc.country) {
    emit([doc.country], 1);
  }
}
As a best practice we want make sure that the fields we want to include in our index actually exist. Therefore we have our map function build on index based on a conditional, and the same conditional ensures the prescence of the items we want to index. This ensures the fields exist in documents when we query the view and we therefore avoid a view failure when Couchbase Server generates the index.
If a brewery has all categories of information, namely country, state, and city, we will create an index with the country, state and city as key with the value equal to one. If the brewery only has country and state, we create an index with country and state as key with the value equal to one. Finally if we only have the country of origin, we create an index with only the country as key and the value set to one. As a result of the map function, we would have an index that appears as follows:
KeyValue
["Germany", "Bayern"]            1
["Belgium", "Namur"]            1
["Germany", "Bayern"]            1
....
For our reduce function we use a built-in reduce function,
_count. This function which will sum the values for all unique keys. In this case, the result set for our view query will be as follows:KeyValue ["Germany", "Bayern"] 2 ["Belgium", "Namur"] 1When you create reduce function and store it in a design document, it will appear in JSON as follows:
{
  "_id": "_design/beers",
  "language": "javascript",
  "views": {
    "titles": {
      "map": "function(doc, meta){
        if (meta.type == "json" && doc.date && doc.title) {
        // Check if doc is JSON
        emit(doc.date, doc.title);
         } else {
        // do something with binary value
         }
      }",
      "reduce" : "_count"
    }
  }
}
For more information about built-in reduce functions, consult the Language Reference for your chosen SDK at Develop with Couchbase and the Couchbase Server Manual.
Using Compound Keys and Group-By Functions
When Couchbase Server generates an index, it can create compound keys ; a compound key is an array that contains multiple values. Couchbase Server will sort items in an index based on the sequence of keys provided in a compound key. Couchbase Server will sort items in an index based on the key in position 0, and then for all items with matching keys for position 0, sort based on the key in position 1 and so forth. This enables you to control how an index is sorted, and ultimately how you can retrieve information that is grouped the way you need it. For example here is an index created by Couchbase Server using compound keys:
KeyValue
["a","b","c"]        1
["a","b","e"]        1
["a","c","m"]        1
["b","a","c"]        1
["b","a","g"]        1
Each of the keys above is a compound key consisting of three different array elements. The keys at the beginning of the index all have ‘a’ in position 0 of the array; within the first group of items starting with ‘a’, the items with ‘b’ in position 1 are placed before those with ‘c’ in position 1. By providing multiple keys we have a first key for sorting, and within the first keys that match, a secondary key for sorting within that group, and so forth.
To retrieve results from this index, we can use a group-by function to extract the items which meet our criterion. The criterion we use to select an item for a group-by function is called a prefix. When you run a group-by query you run a reduce query on each range that exists at the level you want. Couchbase Server will return results grouped by the unique prefix at that level. For instance, if you specify level 1 a unique prefix is
["a"]; if you specify level 2, a unique prefix is["a","b"]. Here is an example using the Ruby SDK:doc.myview(:group_level => 1)We query
myviewand provide the parameter:group_levelset to 1 to indicate the first position in a compound key. The result set returned by Couchbase Server will appear as follows:KeyValue ["a"] 3 ["b"] 2In this case we perform the built-in reduce function of
_countwhich will count the unique instances of keys at level 1, which corresponds to position 0 of the compound key. Since we have three instances of["a"]we have the first row in the result set have 3 as the value, and since there are two instances of a["b"]as a prefix, we have 2 for the second result. The next example demonstrates the result set we receive if we query a view with a group level of 2. Our query would be as follows:doc.myview(:group_level => 2)In this case we query the view with the group-by level set to 2, and the unique prefix will consist of items in position 0 and 1 of the array. We receive this result set:
KeyValue
["a", "b"]            2
["a", "c"]            1
["b", "a"]            2
Since there are two instances of the unique prefix
["a","b"], we have the value of 2 for the first result. The second result is the next unique item based on the unique prefix["a","c"]. In this case the item only occurs one time in our index, therefore we have the value of 1. The last item is the unique prefix["b","a"]which occurs 2 times in the index, therefore we have a value of 2 for that result. To learn more about group-by parameters used in view queries, see the individual Language Reference for your SDK at Develop with Couchbase.A common question from developers is how to extract items based on date or time using views. For more information and examples, see the Couchbase Server Manual.
Using Views from an Application
When you develop a new application using views, you sometimes need to create a view dynamically from your code. For example you may need this when you install your application, when you write a test, or when you are building a framework and want to create views and query data from the framework. This sections describes you how to do it. Make sure you have installed the beer sample dataset which comes as an option when you install Couchbase Server. For more information about Couchbase Server installation, see the Couchbase Server Manual
For more information about using views from the Java SDK, see Tug’s Blog.
The first thing we do in our application is to connect to the cluster from our Couchbase client. As a best practice we typically provide a list of URIs to different nodes in the cluster in case the initial node we try to connect to is unavailable. By doing so we can attempt another initial connection to the cluster at another node:
import com.couchbase.client.CouchbaseClient;

    List<uri> uris = new LinkedList<uri>();

    uris.add(URI.create("http://127.0.0.1:8091/pools"));

    CouchbaseClient client = null;

    try {

        client = new CouchbaseClient(uris, "beer-sample", "");


        // put your code here
        client.shutdown();
    } catch (Exception e) {
        System.err.println("Error connecting to Couchbase: " + e.getMessage());
        System.exit(0);
    }


</uri></uri>
Here we create a list of URIs to different nodes of the cluster; for the sake of convenience we are working with a single node cluster. Then we connect to our bucket, which in this case is
beer-sample.Creating View Functions with an SDK
Couchbase SDKs provide all the methods you need to save, index, and query views. Imagine we want to get all the beer names out of our sample database. In this case, our map function would appear as follows:
function (doc, meta) {
  if(doc.type && doc.type == "beer") {
    emit(doc.name, null);
  }
}
At first, we import the Java SDK libraries that we need to work with views. Then we can create a design document based on the
DesignDocumentclass and also create our view as an instance of theViewDesignclass:import com.couchbase.client.protocol.views.DesignDocument; import com.couchbase.client.protocol.views.ViewDesign; DesignDocument designDoc = new DesignDocument("dev_beer"); String viewName = "by_name"; String mapFunction = "function (doc, meta) {\n" + " if(doc.type && doc.type == \"beer\") {\n" + " emit(doc.name);\n" + " }\n" + "}"; ViewDesign viewDesign = new ViewDesign(viewName,mapFunction); designDoc.getViews().add(viewDesign); client.createDesignDoc( designDoc );In this case we create a design document named ‘dev_beer’, name our actual view ‘by_name’ and store the map function in a String. We then create a a new view provide the constructor the name and function. Finally we add this view to our design document and store it to Couchbase Server with
createDesignDoc.Querying View from SDKs
At this point you can index and query your view. Be aware that when you first create a view, whether this in Couchbase Web Console, or via an SDK, the view is in development mode. You need to put the into production mode in order to query it:
import import com.couchbase.client.protocol.views.*;

System.setProperty("viewmode", "production"); // before the connection to Couchbase

// Create connection if needed

View view = client.getView("beer", "by_name");
Query query = new Query();
query.setIncludeDocs(true).setLimit(20);
query.setStale( Stale.FALSE );
ViewResponse result = client.query(view, query);

for(ViewRow row : result) {
  row.getDocument(); // deal with the document/data
}
Before we create a Couchbase client instance and connect to the server, we set a system property ‘viewmode’ to ‘production’ to put the view into production mode. Then we query our view and limit the number of documents returned to 20 items. Finally when we query our view we set the
staleparameter to FALSE to indicate we want to reindex and include any new or updated beers in Couchbase. For more information about thestaleparameter and index updates, see Index Updates and the Stale Parameter in the Couchbase Server Manual.The last part of this code sample is a loop we use to iterate through each item in the result set. You can provide any code for handling or outputting individual results here.
For more information about developing views in general, the follow resources describe best practices, and how indexing works on the server, along with other topics see the Couchbase Server Manual.
Creating Custom Reduces
In the majority of cases most developers will use built-in reduce functions provided by Couchbase Server to perform calculations on index items. Even more complex operations can be performed using a combination of logic in a map function combined with built-in reduce functions. The advantage of using built-in reduces with map functions is that your view functions will tend to be less complex, and will tend to be less error-prone. There are however some cases where you will need to build a custom reduce function either alone, or in conjunction with a built-in reduce. This section demonstrates the use of custom reduce functions.
For more information about the sample application described in this section, as well as the custom reduce function used in it, see Creating a Couchbase view from Reddit.
The goal of our application is to show the frequency of Reddit posts that occur over the course of a day. To do this we aggregate information from Reddit, the online source for user-nominated and user-voted links. In this sample we already have information from a Reddit page as JSON documents stored in Couchbase Server. Here is the output we would like to present as graph:
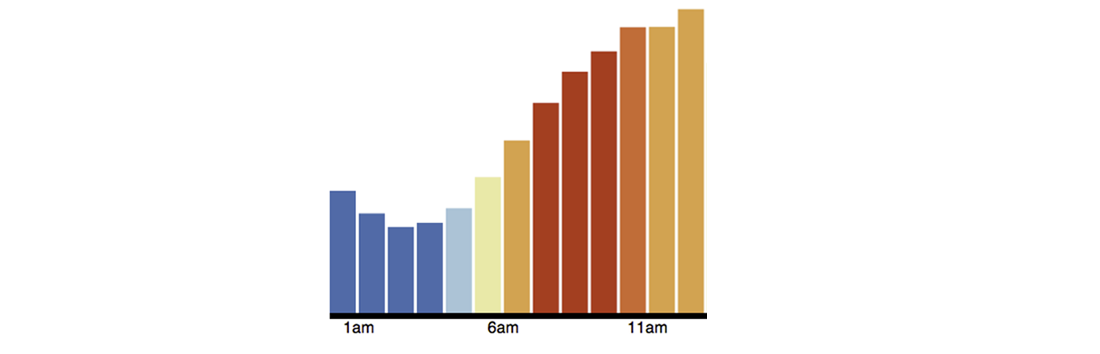
In this graph we have a x-axis to represent the 24 hours in a day. Each bar that appears in the graph represents the number of Reddit posts that occurred in a one-hour time block during the day, such as the time between 6:00AM to 7:00AM. To start, we extract information from the page and create JSON documents to represent each Reddit post. An example document would look like this:
{
    ....

    "kind": "link",
    ....

    "title": "I don't buy the bottled Thai Sweet Chili Sauce anymore...",
    "thumbnail": "",
    "permalink": "/r/food/comments/yph1p/i_dont_buy_the_bottled_thai_sweet_chili_sauce/",
    "url": "http://www.ibelieveicanfry.com/2012/08/thai-sweet-chili-sauce.html",
    "created": 1345745189,
    "num_reports": null,
    "saved": false,
    "subreddit": "food",
    "ups": 10,
    "created_utc": 134759064,

    ....
}
For the sake of brevity we do not show some of the document attributes which we do not use in our application. When we extract JSON from Reddit, we add an attribute
kindwith the value of “link” to indicate this is a Reddit link. The attributes we want to extract with a map function and output as a compound key are[subreddit, day-of-week, date].The logic used to index items in Couchbase Server require that compound keys be sorted first by the first element, and then by the second element, and so on. This means that items in an index from the same
subredditwill be grouped, and within that group, items are sorted byday-of-weekand so on. For more information about compound keys and sorting, see Using Compound Keys and Group-By Functions.Creating compound keys sorts the keys so that we can specify what range we want to retrieve from the index using query parameters. When we query the view for this data we can use the query parameters
startkeyandendkeyto get the items in a particular subreddit post, in all the subreddits between days of the week, or in all subreddits on a day based on the time of day. The following is the map function we use to generate a compound key and provide the post time, date, and score:function (doc, meta) { if (meta.type == "json" && doc.kind && doc.created_utc) { if(doc.kind == "link") { var dt = new Date(doc.created_utc * 1000); var hrs = dt.getUTCHours(); var out = {total: 1, freqs: [], score: []}; //Get day of week, but start week on Saturday, not Sunday, so that //we can pull out the weekend easily. var ssday = dt.getUTCDay() + 1; if (ssday == 7) ssday = 0; out.freqs[hrs] = 1; out.score[hrs] = doc.score; emit([doc.subreddit, ssday, dt], out); } } }As a best practice we want make sure that the fields we want to include in our index actually exist. Therefore we have our map function within a conditional which determines the document is JSON and also checks that the fields
doc.kindanddoc.created_utcactually exist. This ensures the fields exist in documents when we query the view and we therefore avoid a view failure when Couchbase Server generates the index.The first thing we do is determine if the document is JSON and whether it is a Reddit link. Then we create instance variables
dtto store the date of the post as a UTC value multiplied by 1000. We then have a variablehrsto store the hour of the post. We will use these two variables for the second and third elements of our compound key. The variableoutwill be a hash value that we emit for each compound key. It will contain the total instances of the post that occur, the frequency of the post, and the score for the post. The final variable we set up,ssdayconverts the UTC to the day of the week plus one and if it is the last day of the week, we set it to 0. So following our logic, Saturday would be set to 0, Sunday will be 1, and Thursday would be 5.Then we generate the value for our index. We set position
hrsof the array to 1, for instance, if the post timestamp is the 2:00 in the morning, we have the array[null, null, 1]. Finally we emit the value in our index with the compound key and theouthash as our value.A sample index entry based on this map function will appear as follows:
Key
["food", 5, "2012-09-14T02:44:07.230Z"]

Value
{total:1, freqs: [null, null, 1], score: [null, null, 5]}
The map function outputs the hour of the day by storing 1 in
freqsat the position representing the hour of day. In thescorearray we output the score at the position representing the hour of day. In this case we have a post that occurred at 2:00AM so the score of 5 is at position 2 of the array. To aggregate the frequency of posts into each 24-hour time periods in a day, we use this custom reduce function:function (keys, values, rereduce) { var out = {}; out.freqs = []; out.score = []; for(i = 0; i < 24; i++) { out.freqs[i] = 0; out.score[i] = 0; } out.total = 0; for(v in values) { for(h in values[v].freqs) { out.freqs[h] += values[v].freqs[h]; out.score[h] += values[v].score[h]; } out.total += values[v].total; } return out; }The reduce function will aggregate the output of the map and can later be queried to get a range of keys within the result set. We create arrays to store our aggregated frequency and aggregated scores, and then create array elements for the 24 hours in a day. We then sum the frequency and sum the scores in each array element and store it in the array position for the hour of the day. When we query the view, the result of the reduce function will appear as follows:
{"rows":[{"key":null,
          "value":{"freqs":[20753,19760,15821,15284,14627,13699,11012,8991,
                            7330,6327,6637,7711,10003,12705,15464, 17765,
                            19265,21043,21068,22372,18423,17951,20382,20404],
                   "score":[640304,620266,543505,507882,444247,362853,307157,
                            269177,249111,299142,336299,484781,701107,885255,
                            1006005,1095631,1020605,982352,849484,864482,
                            727186,689255,666884,692730],
                   "total":364797}}]}
So for the first hour of the day, which is midnight to 1:00 AM we have 20753 posts on Reddit with the aggregate score of 640304. Both the
freqsandscoreattributes have arrays with 24 values. The values infreqsare the total number of Reddits posts that occured in 1 hour time blocks, and the values inscoresare the aggregate scores for posts that occured in 1 hour time blocks over a day. The final item in the reduce istotal, which is the total number of Reddit posts that occurred in an entire day. We use the array values infreqsfrom our custom reduce to generate our frequency graph. Each frequency can be plotted to the corresponding hour in a day and color-coded: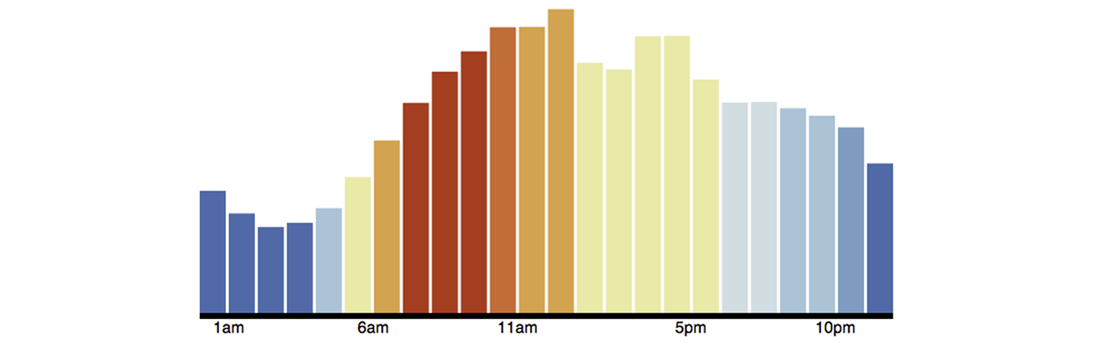
To create a graph from the JSON result set, we use open source data visualization code available from Data-Driven Documents. The graph is created using HTML and JQuery.
Understanding Custom Reduces and Re-reduce
If you are going to write your own custom reduces, you should be aware of how the rereduce option works in Couchbase Server. Rereduces are a form of recursion where Couchbase Server pre-calculates preliminary results and stores these results in a structure known in computer science as a b-tree. First it applies the reduce function to groups of data in a result set and then stores these calculated values in the b-tree. The Server will then apply the reduce function to the calculated values, and will repeat the process on these resulting values, if needed. Couchbase Server performs the reduce as an initial reduction and then re-reduces repeatedly to provide better performance, and faster access to results.
If you have a large initial result set, Couchbase Server may create a b-tree structure with several levels, where the results from the initial reduce are stored at one level, and results from the following re-reduces are stored at the second, third, and forth level, and so on. The number of pre-calculated results decreases at each level, as Couchbase Server re-applies the reduce function:

This example shows the initial result set, and the different levels of results that exist when we sum numbers as part of our reduce and rereduces. The first level represents the result set generated by a map function where the key is a letter and the value is a number. Additional levels represents the results from two rereduces. In this example, we assume the server applies a reduce and then applies rereduces to groups of three items. In reality the size of the blocks are arbitrary and determined by internal logic in Couchbase Server. When Couchbase Server applies the reduce function to groups of three from the original result set, it sums each set and stores 4, 6, and 8 as pre-calculated results. The last items in a result set only consist of two items, so those are summed and stored as the value 3, The second time Couchbase Server applies the function as a rereduce, we get 18 which is the sum of the set of three numbers: 4 + 6 + 8. The second value for our rereduce is the remaining number 3, which has no other values to form a group of three and to be summed with.
Now that you see the logic of rereduces with Couchbase Server, you may wonder if this matters to you at all. It does matter if you perform want to perform a calculation based on the original result set. Because you have the option of performing a reduce and rereduce, when you choose this option you can no longer assume that you final result will be the same result you would have gotten if you performed the reduce on the initial data set.
For instance, this may be a consideration if you create a custom reduce which performs some type of counting. Couchbase Server already provides a built-in version of a count function which you can use for a reduce, but imagine you have a scenario where you need to do custom counting for your scenario. In this case, if you provided a count-type function the rereduce would apply the count to the pre-calculated values, not the original result set. You would get a count based on a reduced set, not the true number of values in the initial result. In the example below, if you use a count-type function to rereduce, you would get 3, which represent the number of values stored after the initial reduce:
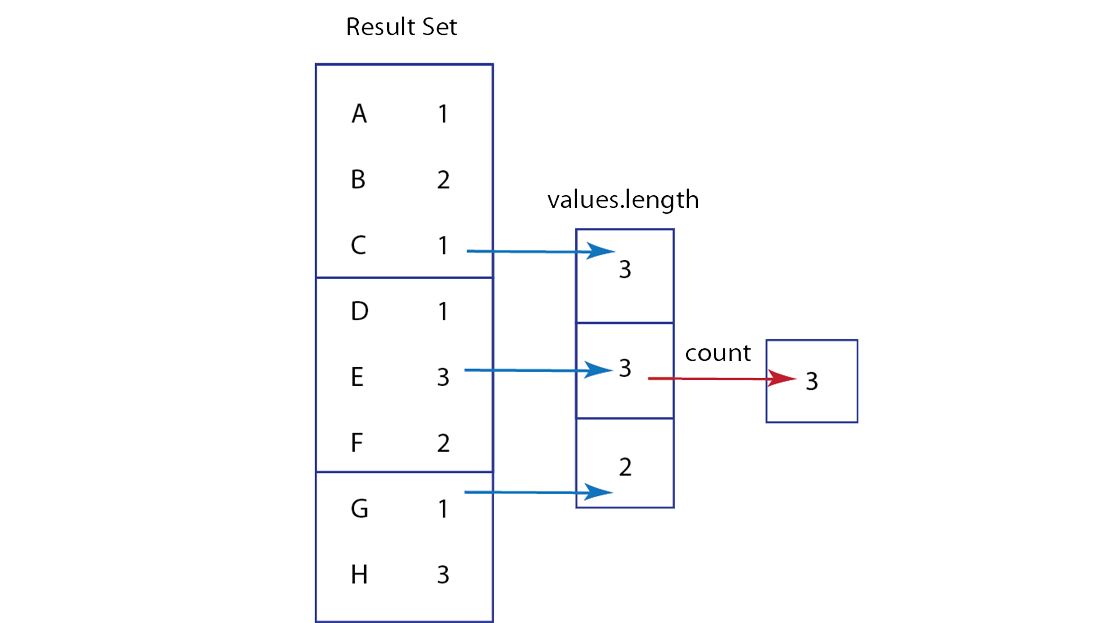
So instead of getting the number of keys, which is 8, you get the number of values in the reduction, which is only 3. This is not what you might have expected, had you known about rereduce before you built your custom reduce. Instead of using a type of counting function for and performing rereduce, you actually need to sum after the initial reduction. The following code samples demonstrates the custom reduce function you would use:
function (keys, values, rereduce) {
    if(!rereduce) {
        return values.length;
    } else {
        var sum = 0;
        for (i in values) {
            sum += values[i];
        }
        return sum;
    }
}
For all custom reduces you will write the reduce function to take
keys,values, andrereduceas parameters. Couchbase Server will execute the custom reduce and provide the function keys and values from a map function, and will provide a boolean forrereduce. Whether this boolean is true or false is determined by internal Couchbase Server logic. So we should always provide a custom reduce function that can handle the case whererereducecan be false orrereduceis true. This way we cover our bases and create a custom reduce which produces results we expect.For this example if
rereduceis false, Couchbase Server will not perform the reduce on a reduction, rather it will perform it on the original result set from a map function; therefore we can return the length of all values in the result set. In this case we will get the value 8. Ifrereduceis true, we need to handle this by performing a sum of the reduction which is the correct number of items, 8. The logic for this second case is illustrated below:
Be aware that this is a very contrived example to demonstrate the rereduce and how to handle it in your custom reduce. In reality Couchbase Server provides a built-in function
_countwhich automatically handles the rereduce so that you get a count of all items in a result set, not the count of the reduced set. Nonetheless you should keep this behavior in mind if you perform a custom reduce which assumes the calculations are performed on the initial result set. If you want to find more information about the re-reduce, and other forms of custom reduces, see the Couchbase Server Manual.Error Handling for Views
When you query a view, Couchbase Server might return errors when it is generating a result set. For instance, the server may only be able to retrieve results from two of three server nodes in response to a view query. Couchbase Server includes any successfully created results as a JSON object; any errors that the server encountered are a part of the JSON object. Couchbase SDKs include helper methods you can use to handle any detected errors. For instance in the Ruby SDK:
view = blog.recent_posts(:include_docs => true)
logger = Logger.new(STDOUT)

view.on_error do |from, reason|
  logger.warn("#{view.inspect} received the error '#{reason}' from #{from}")
end

posts = view.each do |doc|
  # do something
  # with doc object
end
We start by querying our view and assigning the result set to the variable
view. We then use theon_errormethod to intercept any error objects that are streaming from Couchbase Server in response to the view query. Within theon_errorloop we can do something useful with each error object; in this case we log the content from the error object to standard output.Note>
Error objects in a result set appear at the end of the response object. Therefore, the result set may have several objects that are successfully retrieved results. The error objects occur after the retrieved results.
If you are using the REST API or Couchbase Admin Console to query views, see the Couchbase Server Manual for more information about the functional equivalent of the
on_errormethod and what conditions causes errors.Creating Your First Application
This chapters assumes you have arrived at this page as a starting place for developing on Couchbase Server with a Couchbase SDK. It covers the following topics:
Resources for setting up your development environment,
Creating a first data bucket for development,
Connecting to Couchbase Server from Couchbase SDKs,
Performing a basic query from Couchbase SDKs,
Introduction to telnet operations to view database entries.
Another useful place to start if you are just beginning to develop with a Couchbase SDK is the Getting Started Guides and tutorials which are provided in each SDK language. For more information, see Develop with Couchbase.
Setting Up the Development Environment
Beyond a standard web application development environment, including a development machine/OS and a web application server, you will need the following components for your development environment:
Couchbase Server: installed on a virtual or physical machine separate from the machine containing your web application server. Download the appropriate version for your environment here: Couchbase Server Downloads
Couchbase SDK: installed for runtime on the machine containing your web application server. You will also need to make the SDK’s available in your development environment in order to compile/interpret your client-side code. The SDKs are programming-language and platform-specific. You will use your SDK to communicate with the Couchbase Server from your web application. Downloads for your chosen SDK are here: Couchbase SDK Downloads
Couchbase Admin Console: administering your Couchbase Server is done via the Couchbase Admin Console, a web application viewable in most modern browsers. Your development environment should therefore have the latest version of Mozilla Firefox 3.6+, Apple Safari 5+, Google Chrome 11, or Internet Explorer 8, or higher. You should set your browser preference to be JavaScript enabled.
The following are supported platforms for the majority of Couchbase Client SDK’s:
CentOS 5.5 (Red Hat and Fedora compatible), 32- and 64- bit
Ubuntu 10.04 (Red Hat and Fedora compatible), 32- and 64- bit
Microsoft Windows, for the case of.NET, Java and Ruby SDKs
The following virtual machines are supported:
Java VM
Microsoft.NET VM
The following are development languages supported by the Couchbase Client SDK Libraries:
Java
.NET
PHP
Ruby
C
Warning
The TCP/IP port allocation on Windows by default includes a restricted number of ports available for client communication. For more information on this issue, including information on how to adjust the configuration and increase the available ports, see MSDN: Avoiding TCP/IP Port Exhaustion.
Depending upon the OS for your development platform and web application server platform, choose the 32- or 64- bit versions of the SDK. Download and install the following three packages which contain the SDK’s:
64- or 32- bit, OS-specific package.
64- or 32- Library Headers.
64- or 32- Debug Symbols.
The.NET and Java SDKs provide their own packages which contain all the libraries required. Please refer to the individual SDK documentation for these two languages for more information on installation.
Beyond installation of these three core packages for any given language or framework, language/framework specific installation information and system prerequisites can be found in each respective SDK guide, e.g. Java SDK Guides. Notably, the scripting languages SDKs, such as those for Ruby and PHP, will also require installation of Couchbase SDKs for C.
Connecting to Couchbase Server
After you have your Couchbase Server up and running, and your chosen Couchbase Client libraries installed on a web server, you create the code that connects to the server from the client.
Create Your First Bucket
The first thing you will want to do after setting up Couchbase Server and exploring the SDKs is to create a data bucket. You can do so with the Couchbase Admin Console, or you can use the REST API. For your first application in this chapter, we will show the REST API approach, which you may be less familiar with after your initial server install. For more information about creating named buckets via the Couchbase Admin Console, see the Couchbase Server Manual.
You create either a Couchbase or memcached bucket using the REST API. When you make a request, you provide a REST request using a REST client or a UNIX utility such as curl.
-
Make a new bucket request to the REST endpoint for buckets and provide the new bucket settings as request parameters:
shell> curl -u Administrator:password \
                     -d name=newBucket -d ramQuotaMB=100 -d authType=none \
                     -d replicaNumber=1 -d proxyPort=11215 http://localhost:8091/pools/default/buckets
To create a bucket we first provide our credentials for the bucket. These are the same credentials we established when we first installed Couchbase Server. For the sake of convenience, we create a single Couchbase bucket named
newBucketwith a RAM quota of 100MB. We require no authentication for the bucket and set the proxy port for the bucket to 11215.Couchbase Server sends back this HTTP response:
202 -
You can check your new bucket exists and is running by making a request REST request to the new bucket:
curl http://localhost:8091/pools/default/buckets/newBucketCouchbase Server will respond with a JSON document containing information on the new bucket:
{"name":"newcachebucket","bucketType":"couchbase",….
"bucketCapabilities":["touch","couchapi"]}
For this request we go to the same REST URI used when we created the bucket, plus we add the endpoint information for the new bucket,
/newBucket. For this type of request we do not need to provide any credentials. The response document contains other REST requests you can make for the bucket as well as bucket settings/properties.
After you create your first data bucket, you can begin interacting with that bucket using a Couchbase SDK. To learn more about the Couchbase REST API, particularly for administrative functions, see the Couchbase Server Manual REST API
Connecting with Couchbase SDKs
To create a connection to Couchbase Server you create a Couchbase client instance which contains and manages connection information to the server. By default Couchbase Server uses the URI
http://localhost:8091/poolsfor connections with Couchbase SDKs. This is the URI you can use to establish an initial connection to the cluster. A Couchbase SDK will also automatically adjust the port uses to communicate to the Couchbase Server based on any changes to cluster topology. Therefore it is not necessary to adjust your code for connecting to accommodate cluster rebalance, or to accommodate node addition or deletion.In order to connect and perform data operations, you will need to have at least one default data bucket established, for instance one that you have made in the Couchbase Administrative Console or the REST API.
The following shows a basic steps for creating a connection:
Include, import, link, or require Couchbase SDK libraries into your program files. In the example that follows, we
require 'couchbase'.Provide connection information for the Couchbase cluster. Typically this includes URI, bucket ID, a password and optional parameters and can be provided as a list or string. To avoid failure to initially connect, you should provide and try at least two URL’s for two different nodes. In the following example, we provide connection information as
"http://<host>:<port>/pools". In this case there is no password required.Create an instance of a Couchbase client object. In the example that follows, we create a new client instance in the
client = Couchbase.connectstatement.Perform any database operations for your applications, such as read, write, delete, or query.
If needed, destroy the client, and therefore disconnect.
The following demonstrates this process using the Ruby SDK to connect to a default data bucket:
require 'couchbase'

client = Couchbase.connect "http://<host>:8091/pools"

begin
  client.set "hello", "Hello World!", :ttl => 10
  spoon = client.get "hello"
  puts spoon
rescue Couchbase::Error::NotFound => e
  puts "There is no record."
end
In this example, we set and retrieve data in a Ruby
begin rescue endblock. The code block attempts to set the value “Hello World!” for the key “spoon” with an expiration of 10 seconds. Then gets the value for the “spoon” key and outputs it. If the Couchbase client receives and error, it outputs “There is no spoon.”Tip
Depending on the language you are using, you may need to be responsible for explicitly destroying the Couchbase client object, and thereby destroying the connection. Typically it is a best practice to try to reuse the same client instance across multiple processes and threads, rather than constantly create and destroy clients. This will provide better application performance and reduce processing times. For more information about client instance reuse and connection pooling, see Optimizing Client Instances and Maintaining Persistent Connections.
The next example in Java we demonstrate how it is safest to create at least two possible node URIs while creating an initial connection with the server. This way, if your application attempts to connect, but one node is down, the client automatically reattempt connection with the second node URL:
// Set up at least two URIs in case one server fails

List<URI> servers = new ArrayList<URI>();
servers.add("http://<host>:8091/pools");
servers.add("http://<host>:8091/pools");

// Create a client talking to the default bucket

CouchbaseClient cbc = new CouchbaseClient(servers, "default", "");

// Create a client talking to the default bucket

CouchbaseClient cbc = new CouchbaseClient(servers, "default", "");

System.err.println(cbc.get(“thisname") +
  " is off developing with Couchbase!");
A similar approach should be followed in any language when you attempt to connect to a Couchbase cluster. That is, you should set up an array of two or more possible nodes and then attempt to connect to at least one node in an array before performing other operations. The following demonstrates creating a connection with more than one possible URI in Ruby:
Couchbase.connect(:node_list => ['<host>:8091', '<host>:8091',
   'example.net'])
After your initial connection with Couchbase Server, you will not need to reattempt server connection using an explicit list of node URLs after rebalance or node failure. After this initial connection, your Couchbase client will receive cluster information with all nodes available for connection. After rebalance and failover, if a client instance still exists, it will get updated cluster information with updated node URLs.
Authenticating a Client
When you create a connection to the Couchbase Server, you are actually creating a new instance of a Couchbase client object which contains your connection information. Typically when you establish a bucket for your application, either in Couchbase Admin Console, or via a REST API call, you provide required credentials. When you connect to the bucket, provide your username and password as parameters in your SDK call to
Couchbase.connect():Couchbase.connect("http://<host>:8091/pools", :bucket => 'bucket1', :username => 'Administrator', :password => 'password')This next example demonstrates use of credentials in PHP:
<?php
        $cb = new Couchbase(”<host>:8091", "bucketname", "password", "user");
        ?>
Performing Connect, Set and Get
After you create a connection to Couchbase Server with a client instance, you can perform reads/writes of data with that client instance. Documents reads and writes require a key as parameter; in the case of a document write, you also provide the document value as JSON or binary. The following example demonstrates connecting, setting, then getting a record in PHP:
<?php

$cb = new Couchbase(”host:8091", "user", "password");

$cb->set("hello", "Hello World");

var_dump($cb->get("hello"));

?>
In this case, we create a Couchbase client instance and connect to the default bucket with the username and password of
userandpassword. The same pattern would be used in any given SDK: connect, then perform a set with key/value, and within the same connection, get and output the new value. Here is another example we will build upon later when we do a basic first query. In this case we connect then store the name and age of students. This is using the Ruby SDK.require 'couchbase' client = Couchbase.connect("http://localhost:8091/pools/default/buckets/newBucket") names = [{'id' => 'doc1', 'name' => 'Aaron', 'age' => 20}, {'id' => 'doc2', 'name' => 'John', 'age' => 24}, {'id' => 'doc3', 'name' => 'Peter', 'age' => 16}, {'id' => 'doc4', 'name' => 'Ralf', 'age' => 12} ] names.each do |name| client.set(name['id'], name ) end begin name = client.get "doc1" puts name rescue Couchbase::Error::NotFound => e puts "There is no record" endTo begin this example, we import any libraries we require for our application. Then we create a connection to the Couchbase bucket
newBucketthat we created earlier in Create Your First Bucket.After we create a Couchbase client instance, we create a Ruby array containing individual hashes. Each hash contains information for a user. We look through each element in the array and store an entry with the
idfield as key and the hash contents as JSON documents.In a
begin rescue endblock we try to retrieve the first record from Couchbase Server and output it. If the Couchbase client receives an error, it outputs “There is no record.”Performing a First Query
As of Couchbase 2.0, you can index and query entries using views. Views are functions you define and use to filter, extract and perform calculations on entries that are persisted in a given data bucket. The functions you create will provide a ‘map’ function, which can filter/extract items based on rules you specify, and may optionally perform a ‘reduce’ function, which can perform calculations and operations across a selected group of entries. There are a few possible ways you can initially store and use views functions as JSON documents:
Create and manage using Couchbase Admin Console, or
Create and manage using the REST API, or
Create, store, and query using your chosen Couchbase SDK.
Since this content is for the developer audience, we will focus here on using the SDKs to perform queries and describe the REST API as an alternative approach.
Imagine in our previous example that we also want to find all the names of users who are under 21. In this scenario we would use a view; in fact we would want to use views in any other scenario where we want to filter entries based on certain field values, or provide lists and tables of certain entries. For this example we provide the map function for you. If you are more familiar with views in Couchbase 2.0, you may notice some missing elements in our map function. For the sake of brevity here and for newcomers to views, we omitted some of the complexity for now:
function (doc) {
    if ( doc.age && doc.name ) {
    if ( doc.age < 21 ) { emit(doc.name, doc.age) };
  }
}
You may not have used JavaScript before, but if you have used other programming languages such as C, Java, or PHP, this should look familiar to you. This is a standard function definition with one parameter,
docwhich is a JSON document stored in Couchbase Server.The key part of this function to understand is the conditional statement
if
(doc.age < 21 )....
. This is how you specify the core logic of your map function. In this case, we are saying that ifagefield has a value less than 21, we want information from that record extracted and put in the result set. The next part of the code,emit(doc.name, doc.age)indicates when Couchbase Server finds a matching record, it should include value from thenamefield and should include value from theagefield in the result set.As a best practice we want make sure that the fields we want to include in our index actually exist. Therefore we have our map function within a conditional:
if (doc.age && doc.name). This ensures the fields exist in documents when we query the view and we therefore avoid a view failure when Couchbase Server generates the index.For the sake of convenience, we can store our view in a ‘design document’ and then use a Couchbase SDK to store it from the file. Design documents are JSON documents where we store our views functions as strings; they are stored in Couchbase Server and are associated with a Couchbase Bucket. First we create the design document and include our view function in it:
{
  "_id": "_design/students",
  "language": "javascript",
  "views": {
    "underage": {
      "map": "function(doc) {if (doc.age && doc.name)
{if(doc.age < 21){emit(doc.name, doc.age);}}}"
    }
  }
}
The first two fields indicate the JSON document is a design document named
studentsand it follows the syntax used in JavaScript. The next field is a hash that contains any views and in this case we have one view calledunderage. Within the view we provide the map function described above. We can store this to the file system asstudents.jsonand then write the design document to Couchbase Server using an SDK.As a best practice we want make sure that the fields we want to include in our index actually exist. Therefore we have our map function within a conditional:
if (doc.age && doc.name). This ensures the fields exist in documents when we query the view and we therefore avoid a view failure when Couchbase Server generates the index.client = Couchbase.connect("http://localhost:8091/pools/default/buckets/newBucket") client.save_design_doc(File.open('students.json'))We open the
students.jsonfile and then write it to Couchbase Server with thesave_design_doccall. Couchbase Server will store a new design document with the keystudentswhich is available from our SDK. At this point we can query the view and retrieve matching results:students = client.design_docs['students'] students.views #=> ["underage"] students.underageThe first things we do is retrieve the design document from Couchbase Server. We do this by first calling
design_docswith the named design documentstudents, and then callviewsto get the views it contains. Finally we perform the query by calling the view, in this case we callunderage. Couchbase Server will execute the map function in our view and return this information in the result set:.... @id="doc1" @key="Aaron" @value=20 .... .... @id="doc3" @key="Peter" @value=16 .... .... @id="doc4" @key="Ralf" @value=12 ....If you go back and look at our map function, we indicate we want to extract
doc.nameanddoc.age. Couchbase Server provides the key for the document containing a matching field value under 21, which isdocNum, as well as the name and age of the student. As an alternate approach, you can also store a view in Couchbase Server by using the REST API and then query it using a REST request. To store the view, you would make a REST request as follows:curl -X PUT -u newBucket:password -H 'Content-Type: application/json' \ 'http://server_ip:8092/newBucket/_design/students' \ -d '{"views": {"underage":{"map":"function(doc) {if(doc.age && doc.name) \ {if(doc.age<21){emit(doc.name, doc.age);}}}"}}}'We perform the REST request as a put and provide the bucket name and password for that bucket. We indicate the content will be JSON, and the rest endpoint is the Couchbase bucket along with
/_design/students. Finally we provide the view as the request payload. After Couchbase Server successfully stores the new design documentstudentswith theunderageview, it provides a response in JSON:{"ok":true, "id":"_design/students"}Now we can query the view by performing a REST request as follows:
curl -X GET -u newBucket:password 'http://server_ip:8092/newBucket/_design/students/_view/underage?'Couchbase Server responds with the following results as JSON:
{"total_rows":3,"rows":[
{"id":"doc1", "key":"Aaron", "age":20},
{"id":"doc3", "key":"Peter", "age":16},
{"id":"doc4", "key":"Ralf", "age":12}
]
}
This section is intended as a brief introduction to querying and indexing JSON documents with Couchbase SDKs. There is definitely much more to learn about the topic. For more detailed information about the topic, see Finding Data with Views for using views with the SDKs, and the Couchbase Server Manual for understanding indexing and querying in general with Couchbase Server.
Performing Basic Telnet Operations
When you first begin developing with Couchbase SDKs it is useful to know you can also create a telnet connection to the Couchbase Server. Once you create the connection, you can also experiment with simple gets and sets, to check to see if your SDK-level operations are actually working. When you telnet to Couchbase Server, you can perform retrieves and writes for a specific key.
To connect Couchbase Server via telnet, provide the host and port where it is located. The default bucket created on the Couchbase Server is on port 11211 for purposes of telnet. This does not require any authentication:
telnet localhost 11211Note that when we telnet to port 11211 this is connecting to the default bucket at Couchbase Server. There are some cases that you may need to telnet to another port for instance if you are using moxi, or if you want to connect to a different bucket. After you successfully connect, you can enter commands at the telnet prompt. In the example that follows we set a key/value pair via the telnet session.
set name1 0 0 5
     karen
In this example we provide they key as ‘name1’, the flags as 0, TTL as 0, and the length of value to be set as 5 characters, respectively. After we return the set command via telnet, we can enter the actual value, which is ‘karen’ in this case. After Couchbase Server successfully stores the key/value, it will return STORED via telnet. The next examples demonstrate use of get and delete via telnet:
get name2
     VALUE name2 0 3
     ari
     END
Couchbase Server will return the value followed by an END statement. Notice that TTL is not returned in this case. When you delete a value, Couchbase Server will respond via telnet with DELETED if it successfully removes the item, and if is unsuccessful it will return NOT_FOUND:
delete name3
    DELETED
    delete name3
    NOT_FOUND
For this next example we demonstrate adding a record via telnet. This shows the general distinction between adding and setting a record. If a given key already exists, setting a record will overwrite it; if you try to add the record, Couchbase Server will return an error and preserve the existing record:
add name1 0 0 4
      erin
      STORED
      add name1 0 0 2
      ed
      NOT_STORED
In this case we first add a new key/value of name1/erin via telnet and received the message STORED from Couchbase Server. When we attempt to add the same key with a new value, Couchbase Server returns NOT_STORED via telnet. This helps provide some form of consistency and atomicity for the record when you use
addand it fails for an existing key. In order to change the value of an existing key, we need to use thereplacemethod.To update a value via telnet, you use the
replacecommand with the original key:set sue 0 0 2 ok STORED replace sue 0 0 3 new STORED get sue VALUE sue 0 3 new ENDIn the first three lines of the session, we set the new key ‘sue’ with 0 as flags, 0 as TTL, a value ‘ok’ of length 2. Couchbase sets the new record successfully and returns STORED. Then we replace the key sue with a new value of length 3, ‘new’. After the new value is successfully stored, we get it and the record Couchbase retrieves reflects this change. Notice when you replace a key, you can also update the flags and TTL should you choose to do so.
This next example demonstrates a check and set command at the telnet prompt. For check and set use the
cascommand and provide any new flags, expiration, new length, and cas value. We can retrieve the cas value for a key using thegetscommand:set record1 0 0 4 sara STORED gets record1 VALUE record1 0 4 10 sara END cas record1 0 0 7 10 maybell STOREDIn this example we set record1 to have 0 flags, 0 expiration, and a length of 4 characters. We set the value to the name ‘sara’. When Couchbase Server successfully stores the record it automatically creates a cas value, which we retrieve with gets. The last number returned by gets in the telnet session is the cas value. In this next step, we perform a check and set with the record1 key with no flags, no expiration, seven characters and the value ‘maybell.’
cas record1 0 0 7 10
      maybell
      STORED
When the cas command succeeds, Couchbase server updates the cas value for record1. If you attempt to check and set the record with the wrong cas value, Couchbase Server will return the error ‘EXISTS’ to the telnet session:
cas record1 0 0 3 10
      sue
      EXISTS
For more information about using telnet with the Couchbase Server, especially for server statistics and performance, see the Couchbase Server Manual, Testing Couchbase Server.
Storing Data
This section describes how Couchbase Server stores information from your application. It includes information that you will store with every item, and how Couchbase Server structures storage in data buckets. The last sections will briefly describe basic operations you can perform on data buckets during application development.
About Keys, Values and Meta-data
Earlier we briefly described how Couchbase Server stores information; the server stores all data as key-value pairs. A value can be a string, image, integers, or serialized objects, and valid JSON documents. In general, the Couchbase Server does not attempt to interpret any structure for the value you provide.
Specifying Keys
Keys are unique identifiers that you provide as a parameter when you perform any operation on data. Each document you store in a data bucket must have a unique document ID, which is similar to the concept of a SQL primary key. The following applies to keys:
Keys are strings, typically enclosed by quotes for any given SDK.
No spaces are allowed in a key.
Separators and identifiers are allowed, such as underscore: ‘person_93847’.
A key must be unique within a bucket; if you attempt to store the same key in a bucket, it will either overwrite the value or return an error in the case of
add().Maximum key size is 250 bytes. Couchbase Server stores all keys in RAM and does not remove these keys to free up space in RAM. Take this into consideration when you select keys and key length for your application.
This last point about key size is important if you consider the size of keys stored for tens or hundreds of millions of records. One hundred million keys which are 70 Bytes each plus meta data at 54 Bytes each will require about 23 GB of RAM for document meta data. As of Couchbase Server 2.0.1, metadata is 60 Bytes and as of Couchbase Server 2.1.0 it is 54 Bytes.
Specifying Values
Any value you want to store in Couchbase Server will be stored as a document, or as a pure byte string. In the case of JSON documents, the JSON syntax enables you to provide context and structure for the data. The following applies to values in Couchbase Server:
In general, values have no implied meaning when stored in the server.
Integers have implicit value for particular operations, namely incrementing and decrementing. This means Couchbase Server recognizes integers as values that can be incremented and decremented.
Strings, or serialized objects can be stored.
Documents stored in memcached buckets can be up to 1 MB; values stored in Couchbase buckets can be up to 20 MB.
In general it is to your advantage to keep any documents as small as possible; this way, they require less RAM, they will require less network bandwidth, and by using smaller values Couchbase Server can better distribute the information across nodes.
More on Metadata
When you store a key-document pair in Couchbase Server, it also saves meta data that is associated with the new record. The following are the types of meta data:
Expiration, also known as Time to Live, or TTL.
Check and Set value (CAS), which is often also called a Compare and Swap value.
Flags, which are typically SDK-specific and are often used to identify the type of data stored, or to specify formatting.
Sequence number, for internal server use only. The sequence number is used for conflict resolution of keys that are updated concurrently on different clusters. This conflict resolution takes place when using Couchbases cross datacenter replication (XDCR). The sequence number keeps track of how many times a document is mutated. For more information about XDCR, see the Couchbase Server Manual.
CAS values enable you to store information and then require that a client provide the correct unique CAS value in order to update it. Be aware that performing a function with CAS does slow storing or retrieval. There are some operations that should be fast in nature where you do not want to perform with CAS, for instance
append(). For some SDKs a CAS value is nonetheless required to perform the operation. In this case, you can provide 0 as the CAS and the operation will execute without comparing the CAS value. For more information, see “Using Couchbase SDKs.”Flags are used by SDKs to perform a variety of information- and SDK-specifc function. Typically a Couchbase SDK will use a flag to determine if information should be serialized or formatted in a particular way. For instance, in the case of Java, a flag can signify the data type of an object you are storing. Some SDKs will expose flags for an application to handle; in other SDKs flags may be automatically handled by the SDK itself. For more information about the flags unique to your chosen SDK, please refer to the SDK’s API reference.
Document metadata is 54 Bytes per item as of Couchbase Server 2.1.0 and is 60 Bytes for Couchbase Server 2.0.1. Couchbase Server keeps all document metadata and keys in RAM and does not remove them from RAM to free up additional space. This means 100 million items with a 70 Byte key and 54 Byte meta data would require approximately 23 GB of RAM at runtime.
As discussed previously in this guide, you can provide an explicit expiration for a record or let Couchbase assign a default. The default expiration for any given record is 0, which signifies indefinite storage. Couchbase will keep the item stored until you explicitly perform a
delete()on that key. Alternately if you remove the entire bucket, Couchbase will delete the record. Expirations are typically set in seconds:Items < 30 days: if you want to store an item for thirty days or less, you specify the number of seconds until expiration.
Items > 30 days: if you want to store an item for thirty days or more, you specify the an absolute Unix epoch time. Milliseconds will be rounded up to the nearest second. Couchbase Server will delete an item at this time.
If you provide a time to live in seconds that is greater than the number of seconds in 30 days (60 * 60 *24 * 30) Couchbase Server will consider this to be a real Unix epoch time value, rather than interpret it as seconds. It will remove the item at that epoch time.
Understanding Document Expirations
Time to live can be a bit confusing for developers at first. There are many cases where you may set an expiration to be 30 seconds, but the record may still exist on disk after expiration.
There are two ways that Couchbase Server will remove items flagged for deletion:
Lazy Deletion: key are flagged for deletion; after the next request for the key, it will be removed. This applies to data in Couchbase and memcached buckets.
Maintenance Intervals: items flagged as expired will be removed by an automatic maintenance process that runs every 60 minutes.
When Couchbase Server performs lazy deletion, it flags an item as deleted when the server receives a delete request; later when a client tries to retrieve the item, Couchbase Server will return a message that the key does not exist and actually delete the item. Items that are flagged as expired will be removed every 60 minutes by default by an automatic maintenance process. To update the interval for this maintenance, you would set
exp_pager_stime:./cbconfig localhost:11210 set flush exp_pager_stime 7200This updates the maintenance program so that it runs every two hours on the default bucket.
Writing JSON Documents to Couchbase
When you are dealing with larger and more complex JSON documents with Couchbase Server, you can use a JSON library to handle and convert the JSON.
Note that some Couchbase SDKs provides JSON conversions as part of the method call; with these SDKs you do not need to explicitly load a JSON conversion library and do a conversion prior to reading and writing a JSON document. For more information, please consult the Language Reference for your chosen SDK.
Tip
If you are currently using serialized objects with memcached or Membase, you can continue using this in Couchbase Server 1.8+. JSON offers the advantage of providing heterogeneous platform support, and will enable you to use new features of Couchbase Server such as view, querying and indexing.
The following illustrates a simple JSON document used to represent a beer. For JSON, string-value pairs are the basic building blocks you use to represent information:
{
    "abv": 10.0,
    "brewery": "Legacy Brewing Co.",
    "category": "North American Ale",
    "name": "Hoptimus Prime",
    "style": "Imperial or Double India Pale Ale",
    "updated": [2010, 7, 22, 20, 0, 20],
    "available": true
}
The unique identifier we provide within the JSON is ‘beer_Hoptimus_Prime.’ Notice there are a variety of valid values that can be used within the JSON document to represent your real-world item: floats, strings, arrays, and booleans are used in this case to represent beer number, category, update time, and availability. The JSON document is itself a hash delimited by curly brackets, {}, with commas to separate each string-value pair. Collectively, all string-value pairs in a block are called members.
To save a JSON document into Couchbase Server, you would provide the JSON-encoded document as a parameter to your store method:
<?php
// create connection to Couchbase
// defaults to the “default” bucket

$cb = new Couchbase("localhost:8091");

// create very simple brew

$mybrew = array(“name” => “Good Beer”, “brewery” => "The Kitchen");

$cb->set("beer_My_Brew", json_encode($mybrew));
?>
In the example above we create an array
$mybrewto represent our beer with two attributes, the beer name and the brewery. We then store the beer as a valid JSON document by usingjson_encode()and passing in the result as the value toset(). When we store the JSON document, we specify the key ‘beer_My_Brew.’In the presidents example provided in the section on Performing a Bulk Set, we used one of the many JSON Libraries available that convert JSON documents in to native objects. In this case we use Gson an open source library which converts JSON documents into Java:
Gson gson = new Gson();

President[] Presidents = gson.fromJson(new FileReader("Presidents.json"), President[].class);

for (President entry : Presidents) {
    String JSONentry = gson.toJson(entry);
    c.set(entry.presidency, 1200, JSONentry);
}
About Data Buckets
Couchbase Server stores all of your application data in either RAM or on disk. The data containers used in Couchbase Server are called buckets; there are two bucket types in Couchbase, which reflect the two types of data storage that we use in Couchbase Server. Buckets also serve as namespaces for documents and are used to look up a document by key:
-
Couchbase Buckets: provide data persistence and data replication. Data stored in Couchbase Buckets is highly-available and reconfigurable without server downtime. They can survive node failures and restore data plus allow cluster reconfiguration while still fulfilling service requests. The main features are:
Supports items up to 20MB in size.
Persistence, including data sets that are larger than the allocated memory size for a bucket. You can configure persistence per bucket and Couchbase Server will persist data asynchronously from RAM to disk.
Fully supports replication and server rebalancing. You can configure one or more replica servers for a Couchbase bucket. If a node fails, a replica node can be promoted to be the host node.
Full range of statistics supported.
-
Memcached Buckets: provides in-memory document storage. Memcache buckets cache frequently-used data in memory, thereby reducing the number of queries a database server must perform in response to web application requests. Memcached buckets can work alongside relational database technology, not only NoSQL databases.
Item size limited to 1 MByte.
No persistence.
No replication; no rebalancing.
Statistics about Memcached Buckets are on RAM usage and client-side operations.
You can customize the properties of each bucket, within limits using Couchbase Admin Console, Couchbase Command Line Interface (CLI), or the Couchbase REST Admin API. Quotas for RAM and disk space can be configured per bucket so you can manage usage across a cluster. For more detailed information about buckets, See Section 11.6 of the Couchbase Manual.
Couchbase Server is best suited for fast-changing data items of relatively small size. For in-memory storage, using Couchbase Memcached buckets, the memcached standard 1 megabyte limit applies to each value. Items suitable for storage include shopping carts, user profile, user sessions, time lines, game states, pages, conversations and product catalog. Items that are less suitable include large audio or video media files.
Couchbase buckets can store any binary bytes, and the encoding is dependent on your chosen Couchbase SDK. Some SDKs offer convenience functions to serialize/de-serialize objects from your favorite web application programming language to a blob for storage. Please consult your client library API documentation for details.
On that note, some Couchbase SDKs offer the additional feature of optionally compressing/decompressing objects stored into Couchbase. The CPU-time versus space trade-off here should be considered, in addition to how you might want to version objects under changing encoding schemes. For example, you might consider using the flags field in each item to denote the encoding kind or optional compression. When starting your application development, a useful mantra to follow is to keep things simple. For more information, please consult the Language Reference for your chosen SDK.
About Sharding Data
If you are familiar with traditional relational databases, you are probably familiar with the concept of database sharding and may wonder if the same concept exists in Couchbase Server. There is a third internal, structure for organizing data in the Couchbase Sever; these structures are called vBuckets, an abbreviation for ‘virtual buckets.’ vBuckets are roughly functional equivalents of database shards for traditional relational databases. Unlike manual sharding which you may need to perform for relational database, the Couchbase SDKs automatically request updates on the location of vBucket information from Couchbase Server when you add nodes or perform failover.
vBuckets reference information across different records and distribute bucket information across a Couchbase cluster thereby supporting scalability, replicas and fail overs. Couchbase client SDKs abstract you from the level of vBuckets; your information storage and retrieval operations will be communicated between an SDK and memcached and Couchbase buckets.
In the background and at a lower level, Couchbase Server will automatically create, manage and update vBuckets; similarly your Couchbase SDK will also automatically request updates on vBucket information so that it can find information and store in the right place. In short, there is very little to worry about with vBuckets and most likely you will not be in direct contact with them. As a developer, you only need to be aware that vBuckets exist and the role they generally provide in the system.
Creating and Managing Buckets
The Couchbase Server can be accessed via a REST API, the Couchbase Administrative Console, or the Couchbase CLI. For most cases, this API is used for management and administration of a Couchbase cluster, however as a developer you should be aware that these tools available, and there are some standard bucket operations you may find helpful. For more information about these three tools, see:
Using the Couchbase Web Console, for information on using the Couchbase Administrative Console,
Couchbase CLI, for the command line interface,
Couchbase REST API, for creating and managing Couchbase resources.
The following areas can be administered using the Couchbase REST API, the Couchbase Administrative Console, or Couchbase CLI:
Managing individual Couchbase Server instances, or nodes,
Managing clusters of servers,
Managing data buckets, such as create new buckets, changing settings and so on,
Handling views,
Managing Cross datacenter replication (XDCR.)
Partitioning Data with Buckets
You can partition your data into separate buckets with Couchbase Server. Couchbase will keep separate storage for different buckets, which enables you to perform operations such as statistics. Separating buckets is also a structure you may choose if you have a particular bucket that is reserved for data removal.
As you build more complex applications, you may want to partition your application across more than one data bucket with the following goals in mind:
Improve fault tolerance by increasing replication gained in using multiple buckets.
Provide a special reserve bucket which can be cleared without affecting all other application data, which is spread across other buckets.
Partition your application’s key space among several buckets to avoid naming collisions.
Advanced Topics in Development
This chapter is dedicated to illustrating common development you will likely encounter while building a more complex web application on Couchbase SDKs. It describes the concepts and process for performing different types of data transactions available with Couchbase Server, and provides sample code and data. The following topics are covered:
Performing a Bulk Get
Asynchronous and Synchronous Transactions
Performing Transactions
Optimizing Use of Client Instances
Improving Application Performance
Handling Common Errors
Troubleshooting
Performing a Bulk Set
During development or production you will probably want to add application-specific seed data into Couchbase. This may be data you use to test your application during development, or it may be application-specific content that is pre-populated, such as catalog data.
In general, you need three elements in place to do a bulk upload:
Set of data you want to upload. This can be cleanly structured information in a file, a JSON document, or information in a database.
Program in the SDK language of your choice. This program that you write will connect to Couchbase Server, read the file or data into memory and then store it to Couchbase Server. You program will typically have an event loop to loop through all the elements you want to store and store them.
Any supporting classes used to represent that data you want to store. In some cases you may be storing simple data which can be stored in your loader program as primitive types, in which case you do not need to create a class.
The following PHP example demonstrates a bulk set of sample data on beers and breweries. Sample code and data for this example are at Github: import.php and beer and brewey sample data.
First, here is an example of a JSON record for a beer. This particular beer is in the
beer_#17_Cream_Ale.jsonfile in thebeer-sample/beerdirectory.{ "_id":"beer_#17_Cream_Ale", "brewery":"Big Ridge Brewing", "name":"#17 Cream Ale", "category":"North American Lager", "style":"American-Style Lager", "updated":"2010-07-22 20:00:20" }We also have brewery data with each brewery in a JSON file located in
beer-sample/breweries. Finally we create the script that reads in the directories and stores each file as a record in Couchbase Server:<?php // Set up Couchbase client object try { $cb = new Couchbase(COUCHBASE_HOST.':'.COUCHBASE_PORT, COUCHBASE_USER, COUCHBASE_PASSWORD, COUCHBASE_BUCKET); } catch (ErrorException $e) { die($e->getMessage()); } // import a directory function import($cb, $dir) { $d = dir($dir); while (false !== ($file = $d->read())) { if (substr($file, -5) != '.json') continue; echo "adding $file\n"; $json = json_decode(file_get_contents($dir . $file), true); unset($json["_id"]); echo $cb->set(substr($file, 0, -5), json_encode($json)); echo "\n"; } } // import beers and breweries import($cb, 'beer-sample/beer/'); import($cb, 'beer-sample/breweries/'); ?>We first create a Couchbase client, then we declare an
importfunction which will read in our files and write them to Couchbase Server. While the import function reads each file into memory, we repeat the same set of operations for each file. If the file is not a JSON file we convert it into JSON. We also omit the first attribute of ‘_id’ from the file since we already provide unique file names and use the filename itself as a key; therefore we do not need this as a unique identifier. Then we store the value to Couchbase Server as JSON and use the filename, minus the.json file extension as the key for each record.Handling Temporary Out of Memory Errors
There may be cases where you are performing operations at such a high volume, that you need to decrease your requests to a rate your environment can handle. For instance Couchbase Server may return a temporary out of memory response based on a heavy request volume, your network can be slow, or your operations may be returning too many errors. You can handle this scenario by creating a loop that performs exponential backoff. With this technique, you have your process increasingly wait to a point if your requests stall.
One of the typically errors that may occur when you bulk load of data is that Couchbase Server returns an out of memory error due to the volume of requests. To handle this, you would follow this approach:
Create a loop that continuously tries your operation within a certain number of time limit, and possible a certain number of tries,
In the loop, attempt your operation,
If you get an out of memory error, have your process/thread wait,
Try the operation again,
If you get an error again, increase your wait time, and wait. This part of the approach is known as the exponential backoff.
This is a similar approach you could use for any Couchbase SDK, and for any operation you are performing in bulk, such as getting in bulk. The following example shows this approach using the Java SDK:
public OperationFuture<Boolean> contSet(String key, int exp, Object value,
          int tries) {
    OperationFuture<Boolean> result = null;
    OperationStatus status;
    int backoffexp = 0;

    try {
        do {
            if (backoffexp > tries) {
                throw new RuntimeException("Could not perform a set after "
                  + tries + " tries.");
             }

            result = cbc.set(key, exp, value);
            status = result.getStatus(); // blocking call

            if (status.isSuccess()) {
              break;
             }

            if (backoffexp > 0) {
              double backoffMillis = Math.pow(2, backoffexp);
              backoffMillis = Math.min(1000, backoffMillis); // 1 sec max
              Thread.sleep((int) backoffMillis);
              System.err.println("Backing off, tries so far: " + backoffexp);
            }

            backoffexp++;

            if (!status.isSuccess()) {
              System.err.println("Failed with status: " + status.getMessage());
            }

            } while (status.getMessage().equals("Temporary failure"));

    } catch (InterruptedException ex) {
        System.err.println("Interrupted while trying to set.  Exception:"
              + ex.getMessage());
    }

 }
In the first part of our
try..catchloop, we have ado..whileloop which continuously tries to set a key and value. In this loop we specify the amount of time the application waits, in milliseconds, asbackoffMillis, and we increase it exponentially each time we receive a runtime exception. We will only exponentially increase the wait time a certain number of times, which we specify in the parameter,tries.The other approach you can try if you get temporary out of memory errors from the server is to explicitly pace the timing of requests you make. You can do this in any SDK by creating a timer and only perform a Couchbase request after a specific timed interval. This will provide a slight delay between server requests and will reduce the risk of an out of memory error. For instance in Ruby:
c.set("foo", 100)
n = 1

c.run do
    c.create_periodic_timer(500000) do |tm|
        c.incr("foo") do
            if n == 5
                tm.cancel
      else
        n += 1
      end
    end
  end
end
In this example we create a sample record ‘foo’ with the initial fixnum value of 100. Then we create a increment count set to one, to indicate the first time we will create a Couchbase request. In the event loop, we create a timing loop that runs every.5 seconds until we have repeated the loop 5 times and our increment is equal to 5. In the timer loop, we increment ‘foo’ per loop.
Synchronous and Asynchronous Transactions
Some Couchbase SDKs support both synchronous and asynchronous transactions. In the case of synchronous transactions, your application pauses its execution until a response is returned from the Couchbase Server. In the case of asynchronous commands, your application can continue performing other, background operations until Couchbase Server responds. Asynchronous operations are particularly useful when your application accesses persisted data, or when you are performing data sets and updates.
In the case of a typical asynchronous call, your application handles something that does not depend on a server response, and the result is still being computed on the server. The object that is eventually returned by an asynchronous call is often referred to as a future object, which is non-blocking. That is, the server returns the object sometime in the future, after the original method call requesting it, and the object is non-blocking because it does not interfere with the continued execution of the application.
Please refer to your chosen SDK to find out more about which methods are available for asynchronous transactions, as of this writing, asynchronous calls are available in the Java and Ruby SDKs only.
The following is an example showing the typical pattern you use to create an asynchronous transaction; in an asynchronous transaction, we store a record and process something in the meantime. Then we either successfully perform a
get()and retrieve the future object, or cancel the process. This example is in Java://perform a set asynchronously; return from set not important now OperationFuture<Boolean> setOp = client.set(KEY, EXP_TIME, VALUE); //do something in meantime //check to see if set successful via get, if not fail //the get will block application flow if (setOp.get().booleanValue()) { System.out.println("Set Succeeded"); } else { System.err.println("Set failed:" + setOp.getStatus().getMessage()); }Other operations such as
get()can be used asynchronously in your application. Here is a second example in Java:GetFuture getOp = client.asyncGet(KEY); //do something in meantime //check to see if get successful //if not cancel if ((getObject = getOp.get()) != null { System.out.println("Asynchronous get succeeded: " + getObject); } else { System.err.println("Asynchronous get failed: " + getOp.getStatus().getMessage()); }This last example demonstrates use of
delete()in Java as in an asynchronous transaction:// Do an asynchronous delete OperationFuture<Boolean> delOp = null; if (do_delete) { delOp = client.delete(KEY); } //do something in meantime // Check to see if our delete succeeded if (do_delete) { try { if (delOp.get().booleanValue()) { System.out.println("Delete Succeeded"); } else { System.err.println("Delete failed: " + delOp.getStatus().getMessage()); } } catch (Exception e) { System.err.println("Exception while doing delete: " + e.getMessage()); } }This next example shows how asynchronous call can be made using the Ruby SDK. When you use this mode in the Ruby SDK, you execute the operation and it returns control immediately without performing any input/output. As in the case of Java, we perform the asynchronous operation and later we use a callback that either successfully retrieve the future value or it fails and reports on the error:
Couchbase.bucket.run do |c|
    c.set("foo", "bar") do |res1|
      # res1 is the Couchbase::Bucket::Result instance
      if res1.success?
        c.get("foo") do |res2|
          puts res.value if res2.success?
      end
      else
            puts "Something wrong happened: #{res1.error.message}"
        end
    end
end
In the callback for our Ruby example, we perform a get from the SDK that will be called as soon as a response is ready. The callback received a result object, and we can check if the value was set with the
success?method. If the value is true, then the record has been successfully set; otherwise you should assume call failed and check the error property of the result, which will be an exception object.In the case of PHP,
getDelayed()andgetDelayedByKey()are the two available asynchronous methods for the SDK. Both methods can retrieve one or more key; the major difference betweengetDelayed()andgetDelayedByKey()is that the later will retrieve a record from a specified node. Here is an example ofgetDelayed():<?php $cb = new Couchbase("127.0.0.1:8091"); $cb->set('int', 99); $cb->set('string', 'a simple string'); $cb->set('array', array(11, 12)); $cb->getDelayed(array('int', 'array'), true); var_dump($cb->fetchAll()); ?>In this case
getDelayed()will make a request to Couchbase Server for multiple items in the array. The method does not wait and returns immediately. When you want to collect all the items, you perform afetch()orfetchAll()as well do in the last line of this example.All the Couchbase SDKs support synchronous transactions. In the most basic form a synchronous call will block, or wait for a response from the Couchbase Server before program execution continues. The most standard form of any method in a Couchbase SDK is synchronous in its functioning. In this case of synchronous calls, typically the return is assigned to variable, or used immediately afterwards in the applications, such as output or display.
Providing Transactional Logic
In another chapter of this guide, “Structuring Data” Modeling Documents, we discuss much more in depth the advantages you gain when you use JSON documents with Couchbase Server; we also discuss when you might want to use more than one document to represent an object. Here we want to discuss how to perform operations on data across one or more documents while providing some reliability and consistency. In traditional relational database systems, this is the concept of database concept of ACIDity:
Atomicity means that if a transaction fails, all changes to related records fail and the data is left unchanged,
Consistency means data must be valid according to defined rules, for instance you cannot delete a blog post without also deleting all of the related comments,
Isolation means that concurrent transactions would create the same data as if that transactions were executed sequentially,
Durability means that once the transaction completes, the data changes survive system failure.
Relational databases will typically rely on locking or versioning data to provide ACID capabilities. Locking means the database marks data so that no other transactions modify it until the first transaction succeeds; versioning means the database provides a version of the data that existed before one process started a process.
NoSQL databases generally do not support transactions in the traditional way used by relational databases. Yet there are many situations where you might want to use Couchbase Server to build an application with transactional logic. With Couchbase Server you can generally improve the reliability, consistency, and isolation of related commits by 1) providing ‘leases’ on information, which reserves the document for use by a single process, or 2) by performing two-phase commits on multiple documents.
Using a ‘Lease-Out’ Pattern
When you use this web application pattern, you ‘lease-out’ information, or in other words, reserve a document for use by a single process. By doing so, you manage any conflicts with any other processes that my attempt to access the document. Imagine you want to build an online ticketing system that meets the following rules:
All seats being ticketed are unique; no two seats are the same,
A user can purchase a ticket once the system guarantees a seat,
A user might not complete a ticket purchase,
The ticket should be available to the user at checkout.
To fulfill these requirements, we can use these techniques:
Document Model: Provide one document per ticket.
Lease/Reserve: Implement a lease for tickets. Once a user chooses a seat, we reserve the ticket and a user has 5 minutes to purchase it.
Manage States, and Compensate: A seat can be made available again; expired tickets can be offered once again. If there are failures when a ticket is in an intermediate state, the system can compensate.
Note
When handling document changes, it is assumed that an accurate transaction state can be retrieved from the document, which may not be possible if the system fails and the document has still not been persisted.
The following diagram shows the basic application process flow:
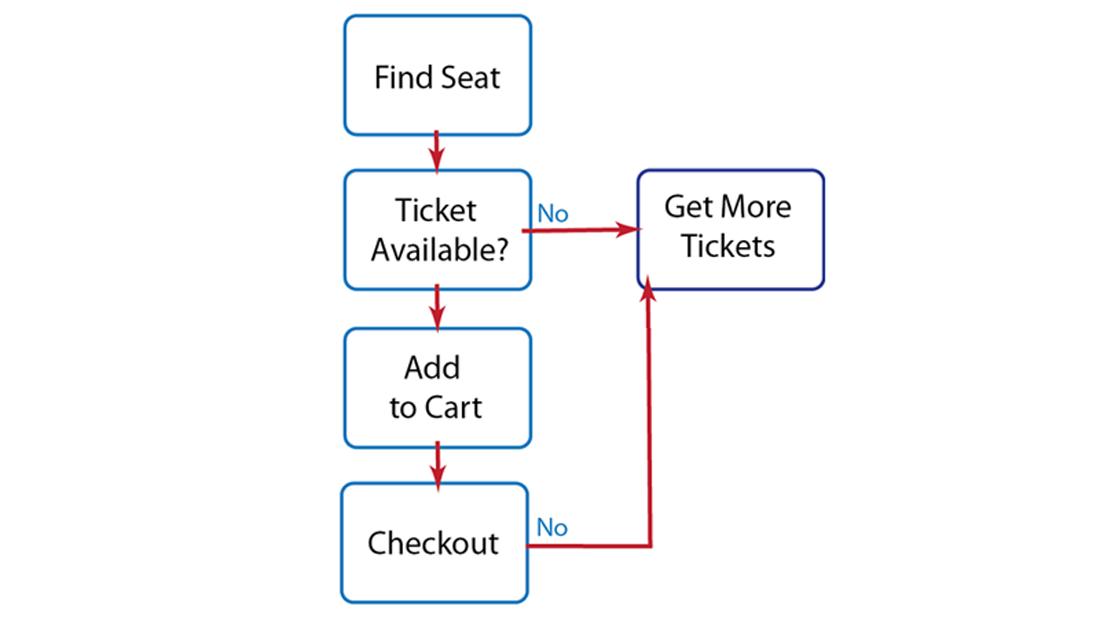
The initial stage of our ticket document, as JSON, would appear as follows:
{
    "ticket_id" : "ticket1",
    "seat_no" : 100,
    "state" : "AVAILABLE"
}
The ticket document has an unique id, an associated seat, and an explicit
statefield to store that state of our ticket transaction. We can use this information in our application logic to ensure no other process tries to reserve the seat. We can also use this information to roll-back the ticket to an initial state. Imagine a user searches for open seats, and then they want a seat that is unavailable. Our system can get all the tickets that were requested but not purchased by other users; these will all be tickets with expired leases. So we can also use this information to reserve seats and return seats to a pool of available seats that we offer to users. If a user selects a open seat, we put the ticket in their shopping cart, and indicate this in the ticket document:{ "ticket_id" : "ticket1", "seat_no" : 100, "state" : "INCART", "expiry" : <timestamp> }Notice that when we update the state of the ticket, we also provide an expiration. The
expiryin this case is 5 minutes, and serves as the lease, or time hold that is in place on the ticket so that no other processes can modify it during that period. The user now has 5 minutes to pay for the ticket. If a user moves forward with the purchase, our application should then get each ticket in the user cart from Couchbase Server and test that the tickets in the user shopping cart have not expired. If the ticket lease has not expired, we update the state toPRE-AUTHORIZE:{ "ticket_id" : "ticket1", "seat_no" : 100, "state" : "PRE-AUTHORIZE", "expiry" : <updated_timestamp> }Note at this phase we also update the timestamps to 5 minutes once again; this provides the additional time we may need to authorize payment from a credit card, or get an electronic payment for the ticket. If the payment fails, for instance the credit card is not authorized, we can reset the tickets to the state
AVAILABLE. Our system will know that the ticket can be returned to the pool of available tickets that we present to users. If the payment succeeds, we then set the ticket state toSOLDand set the expiration to 0:{ "ticket_id" : "ticket1", "seat_no" : 100, "state" : "SOLD", "expiry" : 0 }So we set the expiration explicitly to 0 to indicate the ticket has no expiration since it is sold. We keep the document in the system so that the user can print it out, and as a record until the actual event is over. Here is the process once again, this time we also demonstrate the state changes which keep track of the ticket along with the application flow:

This diagram shows some of the compensation mechanisms we can put in place. If the seat that a user selects is not
AVAILABLEwe can reset all the tickets that are expired toAVAILABLEand retrieve them for the user. If the user fails to complete the checkout, for instance their credit card does not clear, we can also reset that ticket state toAVAILABLEso that it is ready to retrieve for other users. At each phase of the user interaction, we keep track of the ticket state so that it is reserved for checkout and payment. If the system fails and the ticket is persisted, we can retrieve that state and return the user to the latest step in the purchase they had achieved. Also by preserving the ticket state and expiration, we withhold it from access and changes by other users during the payment process.An alternate approach you can use with this same pattern is to have a ticketing system that offers a fixed number of general admission tickets. In this case, we can use lazy expiration in Couchbase Server to remove all the tickets once the event has already passed.
Performing Two-Phase Commits
For traditional relational databases, we can store information for an object in one or more tables. This helps us from having a lot of duplicate information in a table. In the case of a document database, such as Couchbase Server, we can store the high level information in a JSON document and store related information in a separate JSON documents.
This leads to the challenge of transactions in document-based databases. In relational databases, you are able to change both the blog post and the comments in a single transaction. You can undo all the changes from the transaction via rollback, ensure you have a consistent version of the data during the transaction, or in case of system failure during the transaction, leave the data in a state that is easier to repair.
The Ruby and PHP examples we describe here plus two slightly more complex versions are available on Github:
Ruby class to represent the two-phase commit, including counters.
PHP Advanced Transaction, includes checks, JSON helpers, encapsulation, and counters.
Caveats On this Approach
The following approach we illustrate below is still an optimistic approach that assumes we can recover correct information about the two-phase commit state from the server after failure. It is possible that a system failure occurs and the information is not yet persisted, and therefore information used to rollback a transaction is not adequate. As of Couchbase Server 2.0+ we provide new functionality in the
observe()command which enables you to find out whether an item is persisted or not. This provides better assurance for you that a commit state is accurate so you can perform any required rollbacks.The second major caveat for this approach is that if you perform this across thousands of documents or more, you may have a larger number of remaining documents which represent the transfers. We suggest you delete documents representing transfers is an orderly way, otherwise you will have a larger number of stale, pending documents.
You should only use these patterns in production only after you test your application in all failure scenarios; for data that requires the highest level of integrity and reliability, such as cash balances, you may want to use a traditional database which provides absolute guarantees of data integrity.
With Couchbase Server, you can generally provide something functional analogous to an atomic transaction by performing a two-phase commit. You follow this approach:
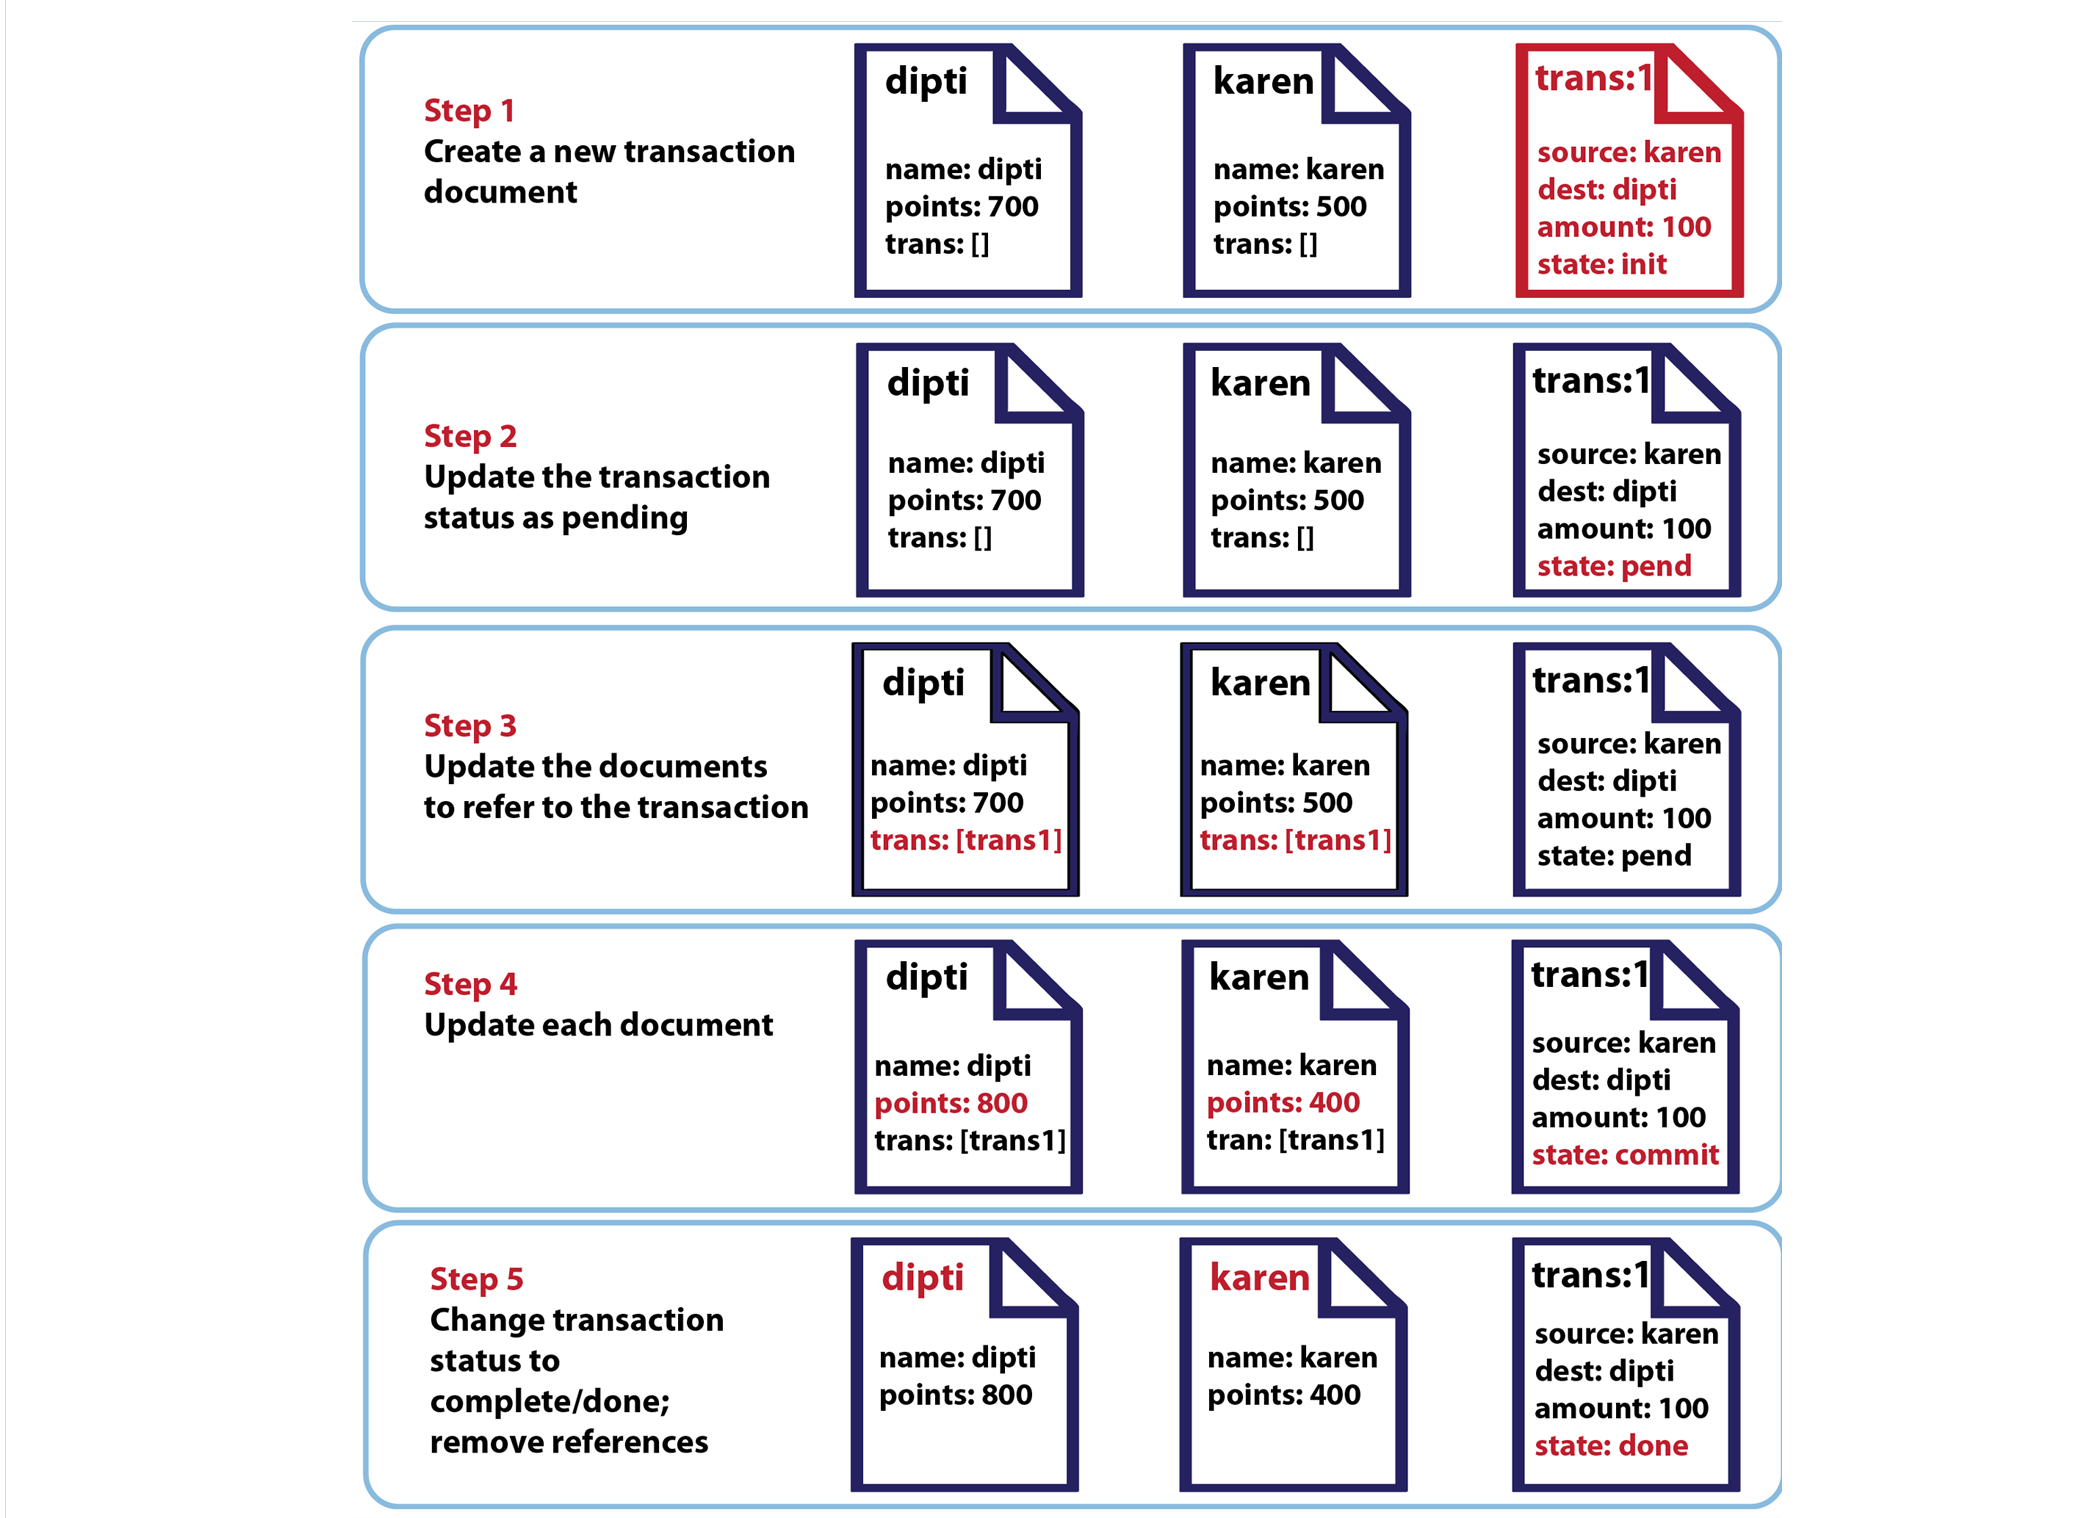
Here is the same approach demonstrated in actual code using the Couchbase Ruby SDK. To view the complete code, as well as a slightly more complex version, see sample two-phase transaction and transfer(). First we start by storing the documents/objects that we want to update. The example below shows how to create the new Couchbase client, and then store two players and their points:
require 'rubygems'
require 'couchbase'

cb = Couchbase.bucket

karen = {"name" => "karen", "points" => 500, "transactions" => []}
dipti = {"name" => "dipti", "points" => 700, "transactions" => []}

# preload initial documents

cb.set("karen", karen)
cb.set("dipti", dipti)
We then create a third record that represents the transaction between the two objects:
# STEP 1: prepare transaction document

trans = {"source" => "karen", "destination" => "dipti", "amount" => 100, "state" => "initial"}
cb.set("trans:1", trans)
Then we set the transfer state to
pending, which indicates the transfer between karen and dipti is in progress. Notice in this case we do this in abegin..rescueblock so that we can perform a rollback in therescuein case of server/system failure.Next in our
begin..rescueblock we refer the two documents we want to update to the actual transfer document. We then update the amounts in the documents and change the transfer status tocommitted:begin # STEP 2: Switch transfer into pending state cb.cas("trans:1") do trans.update("state" => "pending") end # STEP 3 + 4: Apply transfer to both documents cb.cas("karen") do |val| val.update("points" => val["points"] - 100, "transactions" => val["transactions"] + ["trans:1"]) end cb.cas("dipti") do |val| val.update("points" => val["points"] + 100, "transactions" => val["transactions"] + ["trans:1"]) end # STEP 4: Switch transfer document into committed state cb.cas("trans:1") do |val| val.update("state" => "committed") endIn this case we have combined both steps 3 and 4 into three cas operations: one operation per document. In other words, we update the documents to refer to the transfer, and we also update their points. Depending on your programming languages, it may be easier to combine these two, or keep them separate updates.
For this last step in the
begin..rescueblock we change remove the two references from the player documents and update the transfer to bedone.# STEP 5: Remove transfer from the documents cb.cas("karen") do |val| val.update("transactions" => val["transactions"] - ["trans:1"]) end cb.cas("dipti") do |val| val.update("transactions" => val["transactions"] - ["trans:1"]) end # STEP 5: Switch transfer into done state cb.cas("trans:1") do |val| val.update("state" => "done") endTo perform the rollback, we had placed all of our update operations in a
begin..rescue..endblock. If there are any failures during thebeginblock, we will execute therescuepart of the block. In order to undo the transfer when it is left in a particular state, we have acasestatement to test whether the transfer failed at a pending, commit, or done status:rescue Couchbase::Error::Base => ex # Rollback transaction trans = cb.get("trans:1") case trans["state"] when "committed" # Create new transaction and swap the targets or amount sign. # The code block about could be wrapped in the method something like # # def transfer(source, destination, amount) # ... # end # # So that this handler could just re-use it. when "pending" # STEP 1: Switch transaction into cancelling state cb.cas("trans:1") do |val| val.update("state" => "cancelling") end # STEP 2: Revert changes if they were applied cb.cas("karen") do |val| break unless val["transactions"].include?("trans:1") val.update("points" => val["points"] + 100, "transactions" => val["transactions"] - ["trans:1"]) end cb.cas("dipti") do |val| break unless val["transactions"].include?("trans:1") val.update("points" => val["points"] - 100, "transactions" => val["transactions"] - ["trans:1"]) end # STEP 3: Switch transaction into cancelled state cb.cas("trans:1") do |val| val.update("state" => "cancelled") end end # Re-raise original exception raise ex endAs the comments in the code note, it may be most useful to put the entire transfer, including the rollback into a new
transfermethod. As a method, it could include a counter, and also take parameters to represent the documents updated in a transfer. This variation also uses a cas value withupdateto rollback the transfer; this is to avoid the unintended risk of rewriting the entire transfer document. To see the complete sample code provided above, as well as a Ruby variation which includes the code as atransfer()method, see sample two-phase transaction and transfer().This next illustration shows you the diagram we initially introduced to you at the start of this section. but this we update it to show when system failures may occur and the rollback scenario you may want to provide. Depending on the programming language that you use, how you implement the rollbacks may vary slightly:
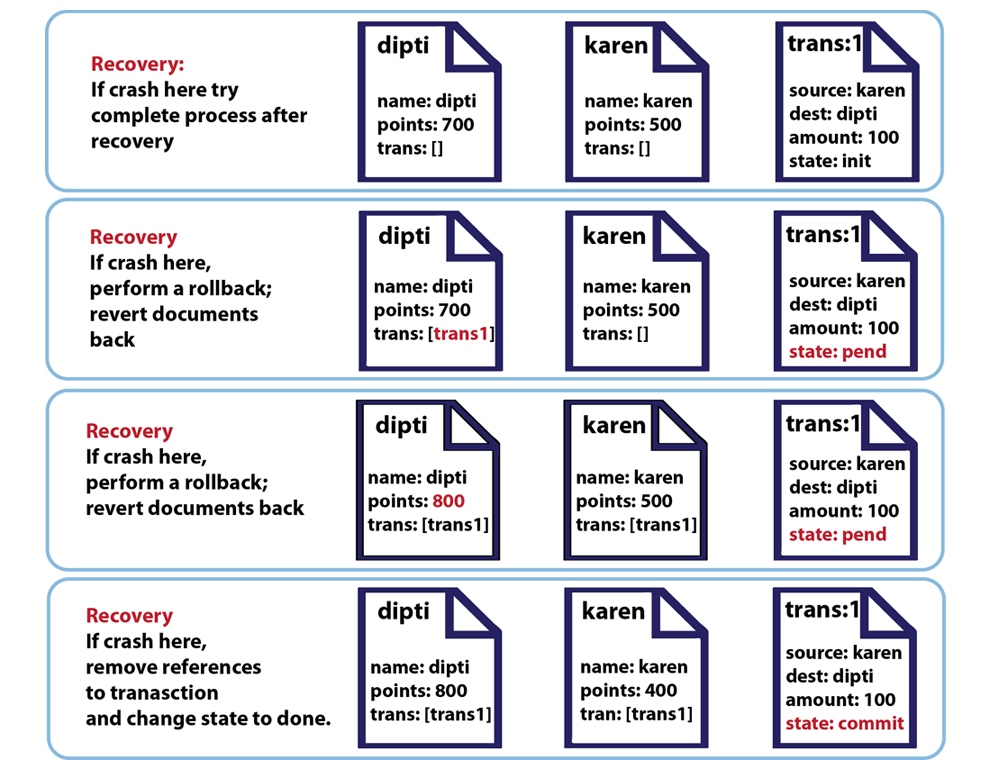
The next example demonstrates a transaction using the PHP SDK; as in the Ruby example provided above, we follow the same process of creating a separate transfer document to track the state of our changes. To see the example we illustrate above, as well as the alternate class, see Two-Phase PHP Couchbase Commit and Advanced Two-Phase PHP Couchbase Commit
In this case we provide the functionality within a single exception class which manages the commits as well as the possible rollback cases based on errors. First we establish some base elements before we actually set any documents
Here we create our
Transactionclass which will throw an error if any issues arise as we try to perform our transaction. We then provide a public method,transfer()which we can use to retrieve the documents and decode the JSON. We can provide parameters to this method that specify the document from which we remove points, also known as the source document, and the document to which we add points, also known as the destination document. We can also provide the client instance and the amount of the transaction as parameters. We will use the client instance as our connection to the server. Within thetransfer()function we try to create and store the new document which represents the actual transfer:<?php class TransactionException extends RuntimeException {} function transfer($source, $destination, $amount, &$cb) { $get = function($key, $casOnly = false) use (&$cb) { $return = null; $cb->getDelayed(array($key), true, function($cb, $data) use(&$return, $casOnly) { $return = $casOnly ? $data['cas'] : array(json_decode($data['value'], true), $data['cas']); }); return $return; }; if($cb->get('transaction:counter') === null) { $cb->set('transaction:counter', 0); } $id = $cb->increment('transaction:counter', 1); $state = 'initial'; $transKey = "transaction:$id"; $transDoc = compact('source', 'destination', 'amount', 'state'); $cb->set($transKey, json_encode($transDoc)); $transactionCas = $get($transKey, true); if(!$transactionCas) { throw new TransactionException("Could not insert transaction document"); }The first thing we do is try to retrieve any existing, named document
transaction:counterand if it does not exist, create a new one with the default counter of 0. We then increment the id for our transfer and set the state and key. Finally we perform the SDK store operationset()to save the document as JSON to Couchbase Server. In thetransfer()function, we use atry..catchblock to try to update the transfer to a pending state and throw an exception if we cannot update the state:In the
tryblock we try to retrieve the stored documents and apply the attributes from the documents provided as parameters. We also provide a reference to the new transfer document in the source and destination documents as we described in our illustration.We perform a check and set operations to update the source and destination documents in the
tryblock; if either attempts fail and return false, we raise an exception. We then update the transfer document in Couchbase Server to indicate the commit state is now committed:try { $transDoc['state'] = 'pending'; if(!$cb->cas($transactionCas, $transKey, json_encode($transDoc))) { throw new TransactionException("Could not switch to pending state"); } list($sourceDoc, $sourceCas) = $get($source); list($destDoc, $destCas) = $get($destination); $sourceDoc['points'] -= $amount; $sourceDoc['transactions'] += array($transKey); $destDoc['points'] += $amount; $destDoc['transactions'] += array($transKey); if(!$cb->cas($sourceCas, $source, json_encode($sourceDoc))) { throw new TransactionException("Could not update source document"); } if(!$cb->cas($destCas, $destination, json_encode($destDoc))) { throw new TransactionException("Could not update destination document"); } $transDoc['state'] = 'committed'; $transactionCas = $get($transKey, true); if(!$cb->cas($transactionCas, $transKey, json_encode($transDoc))) { throw new TransactionException("Could not switch to committed state"); }Again in the
tryblock we throw an exception if we fail to update the transfer state. We then remove the reference to the transfer for the source and destination documents. At the end of ourtrywe update the transfer document so that it is marked as ‘done’:list($sourceDoc, $sourceCas) = $get($source); list($destDoc, $destCas) = $get($destination); $sourceDoc['transactions'] = array_diff($sourceDoc['transactions'], array($transKey)); $destDoc['transactions'] = array_diff($destDoc['transactions'], array($transKey)); if(!$cb->cas($sourceCas, $source, json_encode($sourceDoc))) { throw new TransactionException("Could not remove transaction from source document"); } if(!$cb->cas($destCas, $destination, json_encode($destDoc))) { throw new TransactionException("Could not remove transaction from destination document"); } $transDoc['state'] = 'done'; $transactionCas = $get($transKey, true); if(!$cb->cas($transactionCas, $transKey, json_encode($transDoc))) { throw new TransactionException("Could not switch to done state"); }We can now handle any system failures in our
transfer()function with exception handling code which looks at the state of our two-phase commit:} catch(Exception $e) { // Rollback transaction list($transDoc, $transCas) = $get($transKey); switch($transDoc['state']) { case 'committed': // create new transaction and swap the targets transfer($destination, $source, $amount, $cb); break; case 'pending': // STEP 1: switch transaction into cancelling state $transDoc['state'] = 'cancelling'; $transactionCas = $get($transKey, true); if(!$cb->cas($transactionCas, $transKey, json_encode($transDoc))) { throw new TransactionException("Could not switch into cancelling state"); } // STEP 2: revert changes if applied list($sourceDoc, $sourceCas) = $get($source); list($destDoc, $destCas) = $get($destination); if(in_array($transKey, $sourceDoc['transactions'])) { $sourceDoc['points'] += $amount; $sourceDoc['transactions'] = array_diff($sourceDoc['transactions'], array($transKey)); if(!$cb->cas($sourceCas, $source, json_encode($sourceDoc))) { throw new TransactionException("Could not revert source document"); } } if(in_array($transKey, $destDoc['transactions'])) { $destDoc['points'] -= $amount; $destDoc['transactions'] = array_diff($destDoc['transactions'], array($transKey)); if(!$cb->cas($destCas, $destination, json_encode($destDoc))) { throw new TransactionException("Could not revert destination document"); } } // STEP 3: switch transaction into cancelled state $transDoc['state'] = 'cancelled'; $transactionCas = $get($transKey, true); if(!$cb->cas($transactionCas, $transKey, json_encode($transDoc))) { throw new TransactionException("Could not switch into cancelled state"); } break; } // Rethrow the original exception throw new Exception("Transaction failed, rollback executed", null, $e); } }If the transfer is in a indeterminate state, such as ‘pending’ or ‘committed’ but not ‘done’, we flag the document as in the process of being cancelled and then revert the values for the stored documents into their original states. To revert the documents, we use the
transfer()method again, but this time we invert the parameters and provide the destination as the source of points and source as the destination of points. This will take away the amount from the destination and revert them back to the source. This final sample code illustrates our new class andtransfer()method in action:$cb = new Couchbase('localhost:8091'); $cb->set('karen', json_encode(array( 'name' => 'karen', 'points' => 500, 'transactions' => array() ))); $cb->set('dipti', json_encode(array( 'name' => 'dipti', 'points' => 700, 'transactions' => array() ))); transfer('karen', 'dipti', 100, $cb); ?>There is also another variation for handling transactions with the Couchbase PHP SDK that relies on helper functions to create the document objects, and to provide the additional option to create a document if it does not exist in Couchbase Server. The sample is slightly more complex, but handles cases where the documents do not already exist in Couchbase Server, and cases where the documents provided as parameters are only partial values to be added to the stored documents. To see the example we illustrate above, as well as the alternate class, see Two-Phase PHP Couchbase Commit and Advanced Two-Phase PHP Couchbase Commit
Getting and Locking
Retrieving information from back end or remote systems might be slow and consume a lot of resources. You can use advisory locks on records in order to control access to these resources. Instead of letting any client access Couchbase Server and potentially overwhelm the server with high concurrent client requests, you could create an advisory lock to allow only one client at a time access the information.
You can create a lock in Couchbase by setting an expiration on specific item and by using the
add()anddelete()methods to access that named item. Theadd()anddelete()methods are atomic, so you can be assured that only one client will become the advisory lock owner.The first client that tries to add a named lock item with an expiration timeout will succeed. Other clients will see error responses to an
add()command on that named lock item; they will know that some other client owns the named lock item. When the current lock owner is finished owning the lock, it can send an explicitdelete()command on the named lock item to free the lock.If a client that owns a lock crashes, the lock will automatically become available to the next client that requests for lock via
add()after the expiration timeout.As a convenience, several Couchbase SDKs provide
get-and-lockas a single operation and single server request. This will accomplish the functional equivalent of adding a lock and deleting it. The following is an example from the Python SDK:import uuid key, value = str(uuid.uuid4()), str(uuid.uuid4()) client.set(key, 0, 0, value) client.getl((key)[2], value) client.set(key, 0, 0, value)After we set the key and values to unique strings, we lock the key. The subsequent
set()request will fail and return an error.Improving Application Performance
There are few main variables that can impact application performance which you can help control and manage:
Getting cluster sizing correct for your application load,
Structuring documents for efficient reads/writes,
Using SDK methods which are more efficient for the operation you want to perform.
Optimize your use of Couchbase client connections.
Correctly sizing your cluster is one of the most important tasks you need to complete in order to provide good performance. Couchbase Server performs best when you have smaller documents in your data set, and when a large majority of this data set is in RAM. This means you need to take into consideration the size of your application data set and how much of this data set will be in active, constant use. This set of actively used data is also called your ‘working set.’ In general, 99% of your working set should be in RAM. This means you need to plan your cluster and size your RAM data buckets to handle your working set.
Performing Cluster Sizing
Before your application goes into production, you will need to determine your cluster size. This includes:
Determine how many initial nodes will be required to support your user base,
Determine how much capacity you need for data storage and processing in terms of RAM, CPU, disk space, and network bandwidth.
Determine the level of performance availability you want.
For instance, if you want to provide high-availability for even a smaller dataset, you will need a minimum of three nodes for your cluster. For detailed information about determining cluster and resource sizing, see Couchbase Server Manual: Sizing Guidelines.
Improving Document Access
The way that you structure documents in Couchbase Server will influence how often retrieve them for their information, and will therefore influence application performance. Given identical document size for your entire data set, it takes more operations to retrieve two documents than it does one document; therefore there are scenarios where you can reduce the number of reads/write you perform on Couchbase Server if you perform the reads/writes on one document instead of many documents. In doing so, you improve application performance by structuring your documents in way that optimizes read/write times.
The following goes back to our beer application example and illustrates all the additional operations you would need to perform if you used separate documents. In this case, pretend our beer application has a ‘leader board.’ This board has all of the top 10 best selling beers that exist in our application. Imagine what this leader board document would look like:
{
    "board_id": 222
    "leader_board": "best selling"
    "top_sales" : [ "beer_id" : 75623,
                    "beer_id" : 98756,
                    "beer_id" : 2938,
                    "beer_id" : 49283,
                    "beer_id" : 204857,
                    "beer_id" : 12345,
                    "beer_id" : 23456,
                    "beer_id" : 56413,
                    "beer_id" : 24645,
                    "beer_id" : 34502
                  ],
     "updated": "2010-07-22 20:00:20"
}
In the example document above, we store a reference to a top-selling beer in the ‘top_sales’ array. A specific beer in that list of beers could look like this document:
{
    "beer_id" :  75623,
    "name" : "Pleny the Felder"
    "type" : "wheat",
    "aroma" : "wheaty",
    "category": "koelsch",
    "units_sold": 37011,
    "brewery" : ”brewery_Legacy_Brewing_Co”
}
If we use this approach, we need to 1) retrieve the leader board document from Couchbase Server, 2) go through each element in the ‘top_sales’ array and retrieve each beer from Couchbase Server, 3) get the ‘units_sold’ value from each beer document. Consider the alternative when we use a single leader board document with the relevant beer sales:
{
    "board_id": 222
    "leader_board": "best selling"
    "top_sales" : [ { "beer_id" : 75623, "units_sold": 37011, "name": "Pleny the Felder" },
                    { "beer_id" : 98756, "units_sold": 23002, "name": "Sub-Hoptimus" },
                    { "beer_id" : 2938, "units_sold": 23001, "name": "Speckled Hen" },
                    { "beer_id" : 49283, "units_sold": 11023, "name": "Happy Hops" },
                    { "beer_id" : 204857, "units_sold": 9856, "name": "Bruxulle Rouge" },
                    { "beer_id" : 12345, "units_sold": 7654, "name": "Plums Pilsner" },
                    { "beer_id" : 23456, "units_sold": 7112, "name": "Humble Amber Lager" },
                    { "beer_id" : 56413, "units_sold": 6723, "name": "Hermit Dopplebock" },
                    { "beer_id" : 24645, "units_sold": 6409, "name": "IAM Lambic" },
                    { "beer_id" : 34502, "units_sold": 5012, "name": "Inlaws Special Bitter" }
                  ],
    "updated": "2010-07-22 20:00:20"
}
In this case, we only need to perform a single request to get the leader board document from Couchbase Server. Then within our application logic, we can get each of leading beers from that document. Instead of eleven database requests, we have a single request, which is far less time- and resource- consuming as having multiple server requests. So when you creating or modifying document structures, keep in mind this approach.
Using the Fastest Methods
There are several Couchbase SDK APIs which are considered ‘convenience’ methods in that they provide commonly used functionality in a single method call. They tend to be less resource intensive processes that can be used in place of a series of
get()/set()calls that you would otherwise have to perform to achieve the same result. Typically these convenience methods enable you to perform an operation in single request to Couchbase Server, instead of having to do two requests. The following is a summary of recommended alternative calls:-
Multi-Get/Bulk-Get: When you want to retrieve multiple items and have all of the keys, then performing a multi-get retrieves all the keys in a single request as opposed to a request per key. It is therefore faster and less resource intensive than performing individual, sequential
get()calls. The following demonstrates a multi-get in Ruby:keys = ["foo", "bar","baz"]// alternate method signatures for multi-get
conn.get(keys)
conn.get(["foo", "bar", "baz"])
conn.get("foo", "bar", "baz")
Each key we provide in the array will be sent in a single request, and Couchbase Server will return a single response with all existing keys. Consult the API documentation for your chosen SDK to find out more about a specify method call for multi-gets.
-
Increment/Decrement: These are two other convenience methods which enable you to perform an update without having to call a
get()andset(). Typically if you want to increment or decrement an integer, you would need to 1) retrieve it with a request to Couchbase, 2) add an amount to ithe value if it exists, or set it to an initial value otherwise and 3) then store the value Couchbase Server. If a key is not found, Couchbase Server will store the initial value, but not increment or decrement it as part of the operation. With increment and decrement methods, you can perform all three steps in a single method call, as we do in this Ruby SDK example:client.increment("score", :delta => 1, :initial => 100);In this example in we provide a key, and also two other parameters: one is an initial value, the later is the increment amount. Most Couchbase SDKs follow a similar signature. The first parameter is the key you want to increment or decrement, the second parameter is an initial value if the value does not already exist, and the third parameter is the amount that Couchbase Server will increment/decrement the existing value. In a single server request and response, increment and decrement methods provide you the convenience of establishing a key-document if it does not exist, and provide the ability to increment/decrement. Over thousands or millions of documents, this approach will improve application performance compared to using
get()/set()to perform the functional equivalent. -
Prepend/Append: These two methods provide the functional equivalent of: 1) retrieving a key from Couchbase Server with a request, 2) adding binary content to the document, and then 3) making a second request to Couchbase Server to store the updated value. With prepend and append, you can perform these three steps in a single request to Couchbase Server. The following illustrates this in Python. To see the full example in Python, including encoding and decoding the data, see Maintaining a Set :
def modify(cb, indexName, op, keys): encoded = encodeSet(keys, op) try: cb.append(indexName, encoded) except KeyError: # If we can’t append, and we’re adding to the set, # we are trying to create the index, so do that. if op == ‘+’: cb.add(indexName, encoded)def add(mc, indexName, *keys): """Add the given keys to the given set.""" modify(cb, indexName, ‘+’, keys)
def remove(cb, indexName, *keys): """Remove the given keys from the given set.""" modify(cb, indexName, ‘-’, keys)
This example can be used to manage a set of keys, such as
'a', 'b', 'c'and can indicate that given keys are including or not included in a set by usingappend. For instance, given a set'a', 'b', 'c', if you update the set to read+a +b +c -bthis actually represents{a, c}. We have methodmodify()which will take a Couchbase client object, a named set, an operator, and keys. Themodify()tries to append the new key with the operator into the named set, and since append fails if the set does not exist,modifycan add the new set.Compared to using a separate
get()call, appending the string to the start of the document, then saving the document back to Couchbase with another request, we have accomplished it in a single call/request. Once again you improve application performance if you substituteget()/set()sequences, with a single append or prepend; this is particular so if you are performing this on thousands or millions of documents.
Tip
Append()/Prepend()can add raw serialized data to existing data for a key. The Couchbase Server treats an existing value as a binary stream and concatenates the new content to either beginning or end. Non-linear, hierarchical formats in the database will merely have the new information added at the start or end. There will be no logic which adds the information to a certain place in a stored document structure or object.Therefore, if you have a serialized object in Couchbase Server and then append or prepend, the existing content in the serialized object will not be extended. For instance, if you
append()an integer to an Array stored in Couchbase, this will result in the record containing a serialized array, and then the serialized integer.Optimizing Client Instances
Creating a new connection to Couchbase Server from an SDK, is done by creating an instance of the Couchbase client. When you create this object, it is one of the more resource-consuming processes that you can perform with the SDKs.
When you create a new connection, Couchbase Server needs to provide current server topology to the client instance and it may also need to perform authentication. All of this is more time consuming and resource intensive compared to when you perform a read/write on data once a connection already exists. Because this is the case, you want to try to reduce the number of times you need to create a connection and attempt to reuse existing connections to the extent possible.
There are different approaches for each SDK on connection reuse; some SDKs use a connection-pool approach, some SDKs rely more on connection reuse. Please refer to the Language reference for your respective SDK for information on how to implement this. The other approach is to handle multiple requests from a single, persistent client instance. The next section discusses this approach.
Maintaining Persistent Connections
Couchbase SDKs support persistent connections which enable you to send multiple requests and receive multiple responses using the same connection. How the Couchbase SDKs implement persistent connections varies by SDK. Here are the respective approaches you can use:
-
PHP: Persistent connections for PHP clients are actually persistent memory that we use across multiple requests in a PHP process. Typically you use one PHP process per system process. The web server that is currently in use in your system will determine this. To configure the PHP SDK to maintain a persistent connection you would use these parameters in your connection:
$cb = new Couchbase("192.168.1.200:8091", "default", "", "default", true);// uses the default bucket
This example uses the default bucket. Arguments include host:port, username, password, bucket name, and true indicates we want to use a persistent connection.
Java: When you create connection with the Java SDK, the connection is a thread-safe object that can be shared across multiple processes. The alternative is that you can create a connection pool which contains a multiple connection objects.
.Net: Connections that you create with the.net SDK are also thread-safe objects; for persisted connections, you can use a connection pool which contains multiple connection objects. You should create only a single static instance of a Couchbase client per bucket, in accordance with.Net framework. The persistent client will maintain connection pools per server node. For more information, see MSDN: AppDomain Class.aspx).
-
You can persist a Couchbase client storing it in a way such that the Ruby garbage collector does not remove from memory. To do this, you can create a singleton object that contains the client instance and the connection information. You should access the class-level method,
Couchbase.bucketinstead ofCouchbase.connectto get the client instance.When you use
Couchbase.bucketit will create a new client object when you first call it and then store the object in thread storage. If the thread is still alive when the next request is made to the ruby process, the SDK will not create a new client instance, but rather use the existing one:# Simple example to connect using thread local singletonCouchbase.connection_options = { :bucket => "my", :hostname => "example.com", :password => "secret" }
# this call will user connection_options to initialize new connection. # By default Couchbase.connection_options can be empty Couchbase.bucket.set("foo", "bar")
# Amend the options of the singleton connection in run-time Couchbase.bucket.reconnect(:bucket => "another")
The first example demonstrates how you can create a client instance as a singleton object, the second one will use the class-level
Couchbase.bucketconstructor to create a persistent connection. The last example demonstrates how you can update the properties of the singleton connection if you reconnect.
For more information about persistent connections for an SDK, see the individual Language Reference for your chosen SDK.
Thread-Safety for Couchbase SDKs
Developers typically want to know which Couchbase SDKs are thread-safe. In most programming languages a thread is associated with a single use of a program to serve one user. For multiple users you typically create and maintain a separate thread for each user. ‘Thread-safe’ means the Couchbase SDK can spawn additional processes at the system level; the processes will access and change shared objects and data in the runtime environment in a way that guarantees safe execution of multiple process.
When a language or framework is not truly thread safe, multiple processes that try to share objects may corrupt object data, and may lead to inconsistent results. For instance sharing the same client object from multiple threads could lead to retrieving the wrong value for a key requested by a thread, or no value at all.
When you develop with Couchbase Server, creating a multi-threaded application is particularly helpful for sharing a client instance across multiple processes. When you create a new client instance, it is a relatively time-consuming and resource intensive process compared to other server requests. When you can reuse a client instance, multiple processes with multiple requests can reuse the connection to Couchbase Server. Therefore being able to safely reuse client objects across multiple processes can improve application performance.
Languages such as.Net and Java have in built-in support for thread-safety, and the Couchbase Java and.Net SDKs have been certified as being thread-safe if you utilize thread-safety mechanisms provided by the two languages with the SDKs.
Note that the client object you create with a Couchbase SDK does not spawn additional threads to handle multiple requests. Therefore to provide multi-threading and client object reuse even for SDKs that are thread-safe, you will need to implement connection pools and other language-specific thread-safety measures.
The following Couchbase SDKs are developed and tested as thread safe:
Java SDK 1.0 and above
.Net SDK 1.0 and above
The Couchbase C library is not tested or implemented as thread-safe. This means you cannot safely share a connection instance between threads. You also cannot make a copy of the connection with the current connection settings and pass it to another thread.
There are several Couchbase SDKs that rely on the underlying Couchbase C library for Couchbase Server communications, namely Couchbase SDKs based on scripting languages. Since these libraries are also dependent on the C library, they not certified as thread-safe. This includes the ruby, PHP, and Perl SDKs for Couchbase.
However there are alternatives for these SDKs that can enable safe reuse of client objects for multiple processes. The rest of this section describes some of these techniques.
The Ruby languages provides a class called
Threadso you can reuse a client object for multiple requests:require 'couchbase' # setup default connection options Couchbase.connection_options = {:bucket => 'mybucket', :port => 9000} threads = [] 5.times do |num| threads << Thread.new do Couchbase.bucket.set("key-#{num}", "val-#{num}") sleep(1) end end threads.map(&:join)In the example we create a new local variable called
Thread, with one local variable per thread. Each local instance has an individual client object which share the same connection objects. Individual thread instances could also establish more connections if needed. An alternate is to clone a client object. The following shows how you can duplicate an existing connection to a separate object which maintains the same connection information, but can be used safely by another thread:conn1 = Couchbase.connect(:bucket => 'mybucket') conn2 = conn1.dupWhen you use the Ruby method
dupit will make a copy of the Couchbase client object and will create a new connection for that object using parameters from the original client object.Handling Common Errors
This section describes resources and approaches to handling client- and server- side errors.
Client-Side Timeouts
Timeouts that occur during your application runtime can be configured on the Couchbase Client SDK side. In most cases, you should also assume that your client application will need to receive Couchbase timeout information and handle the timeout appropriately.
This section is not intended to be a comprehensive guide on timeouts and performance tuning for your application; it provides some of the most useful, basic information about SDK-level timeout settings. It also describes considerations and trade-offs you should have in mind when you design your application to address timeouts.
You can handle timeouts from Couchbase client SDKs in the following ways:
Trigger another action, such as displaying default content or providing user with alternative action.
Slow down the number of requests you are making from your application.
Indicate system overload.
In many cases, a developer’s first instinct is to set very low timeouts, such as 100ms or less, in the hope that this will guarantee requests/responses happen in a certain time. However one possible consequence of setting very low timeouts is even a minor network delay of a few milliseconds can trigger a timeout. Timeouts usually mean that a Couchbase SDK will retry an operation which puts more unneeded traffic on the networks and other systems used in your application. In other scenarios developers may have inherited an application they want to use with Couchbase Server, but the application has not been originally designed to handle timeout information returned by Couchbase Server.
In either of these scenarios, the risk is to assume that setting aggressive timeouts at the SDK-level will make a transaction occur in a certain time. Doing so may erroneously lead to even more performance bottlenecks for your application.
Timeouts are actually intended as a way to trigger your application to make a decision should a response not happen by a certain time. In other words, it is still your application’s responsibility, and your responsibility as a developer to appropriately handle types of requests that will take longer, or not return at all. Time requirements for your application are best handled in your own application logic.
Setting timeouts so that an operation can fail fast can frequently be the right approach if your application is appropriately designed to do something in the case of a timeout, or slow response. For instance, if you want to set data and it does not happen quickly, it may not be significant for your application’s usability. You may want your application to provide some default result to display, or do nothing. In other cases, your application may have to display a general “all systems busy” to reflect the heavy concurrent demand.
One common error to avoid is the case where you destroy a client instance and recreate a new client object every time a timeout occurs. This is especially so when you set an aggressively low timeout. Creating a new client is a heavier, slower process; if you developed an application that responded to timeouts this way, you would significantly impact performance.
The other approach to consider in your application logic is to actually provide a ‘relief valve’ by slowing your application down during certain operations. For instance, in the context of bulk loading, you want to load as much information as quickly as possible, but slow down the response of your application for the user when the load is not progressing.
Be aware too that with web applications, there may be a timeout that occurs elsewhere in the system which is generated outside of the control of Couchbase Server and Couchbase Client SDKs. For instance, most web application servers will not let a request continue indefinitely.
The default timeout for any given node in a Couchbase cluster is 2.5 seconds. If a Couchbase SDK does not receive a response from the server by this time, it will drop the connection to Couchbase Server and attempt to connect to another node.
Applications built on Couchbase can have timeouts configured at the following levels:
Connection-level settings
Authentication-level settings
Request-level settings
The Couchbase PHP SDK does not have any connection, authentication, or request timeouts which are configurable, however you can build timeouts which are managed by your own application.
The following are timeouts that can be set for a connection to Couchbase Server from the Java SDK:
Parameter Description Default Setting MaxReconnectDelay Maximum number of milliseconds to wait between reconnect attempts. 30 seconds ShouldOptimize If multiple requests simultaneously occur for same record, the record will be retrieved only once from the database and then returned to each request. This eliminates the need for multiple retrievals. true OpQueueMaxBlockTime The maximum amount of time, in milliseconds a client will wait to add a new item to a queue. 10 milliseconds OpTimeout Operation timeout used by this connection. 2.5 seconds TimeoutExceptionThreshold Maximum number of timeouts allowed before this connection will shut down. 998 timeouts If you performing asynchronous transactions, you should be aware that performing these operations allocates memory at a low level. This can create a lot of information that needs to be garbage-collected by a VM, which will also slow down your application performance.
The following are some of the frequently-used timeouts that you set for a connection to Couchbase Server from the .Net SDK. for a full list of timeouts, their defaults, and their descriptions for .Net, see the Couchbase .Net SDK Developer Guide.
Parameter Description Default Setting retryTimeout The amount of time to wait in between failed attempts to read cluster configguration. 2 seconds observeTimeout Time to wait attempting to connect to pool when all nodes are down. In milliseconds. 1 minute httpRequestTimeout The amount of time to wait for the HTTP streaming connection to receive cluster configuration 1 minute connectionTimeout The amount of time the client waits to establish a connection to the server, or get a free connection from the pool 10 seconds The following are timeouts that typically can be set for a connection to Couchbase Server from the Ruby SDK:
Parameter Description Default Setting :timeout Maximum number of microseconds to wait for a connection or a read/write to occur. 2500000 microseconds. In the case of the Ruby SDK, you can set a timeout for the initial connection, and then change the timeout setting. This new connection-level setting will apply to any subsequent read/write requests made with the client instance:
conn = Couchbase.connect(:timeout => 3_000_000)
conn.timeout = 1_500_000
conn.set("foo", "bar")
In this example, we create a new Couchbase client instance with
Couchbase.connect()and set the connection time out to 3 seconds. If the client instance fails to connect in the three seconds, it will timeout and return a failure to connect error. Then we set the timeout to 1.5, which will be the timeout level of any requests made with that client instance, such as theset().The following is the standard, default, non-configurable timeout for the Couchbase C and PHP SDKs. This timeout applies to creating a connection to the server and all read- and write- operations:
Description Default Setting Default, maximum number of microseconds to wait for a connection or a read/write to occur. 2500000 microseconds. Troubleshooting
This section provides general, non-SDK specific information about logging, backups and restores, as well as failover information. For more information, please refer to the Language Reference for your chosen SDK as well as the Couchbase Server Manual
Configuring Logs
You can configure logging at a few different levels for Couchbase Server:
Couchbase Server logs. The primary source for logging information is Couchbase Administrative Console. The installation for Couchbase Server automatically sets up and starts logging for you. There are also optional, lower level logs which you can configure. For more information, see Couchbase Server Manual, “Troubleshooting.”
SDK-specific log errors. For more information, refer to the Language Reference for your chosen SDK.
Backups and Restores
Backing up your information should be a regular process you perform to help ensure you do not lose all your data in case of major hardware or other system failure.
Note
Because you typically want to perform a backup and restore with zero system downtime with Couchbase Server it is impossible to create a complete in-time backup and snapshot of the entire cluster. In production, Couchbase Server will constantly receive requests and updated data; therefore it is impossible to take an accurate snapshot of all possible information. This would be the case for any other database in production mode.
Instead, you can perform full backups, and incremental backups, and merge these two together in order to create a time-specific backup; nonetheless your information may still not be 100% complete.
For more information on backups and restores, see Couchbase Server Manual, “Backup and Restore with Couchbase.”
Handling Failover
When a Couchbase Server node fails, any other node functioning in the cluster will continue to process requests and provide responses and you will experience no loss of administrative control. Couchbase SDKs will try to communicate to a failed node, but will receive a message that the requested information cannot be found on the failed node; an SDK will then request updated cluster information from Couchbase Server then communicate with nodes that are still active. Since Couchbase Server distributes information across nodes, and also stores replica data, information from any failed node will still exist in the cluster and an SDK can access it.
There are two ways to handle possible node failures with Couchbase Server:
Auto-failover: You can specify the maximum amount of time a node is unresponsive and then Couchbase Server will remove that node from a cluster. For more information, see Couchbase Server Manual, Node Failure.
Manual-failover: In this case, a person will determine that a node is down, and then remove the node from a cluster.
In either case, when a node is removed, Couchbase Server will automatically redistribute information from that node to all other functioning nodes in the cluster. However, at this point, the existing nodes will not have replicas established for the additional data. In order to provide replication, you will want to perform a rebalance on the cluster. The rebalance will:
Redistribute stored data across remaining nodes in the cluster,
Create replica data for all buckets in the cluster,
Provide information on the new location for information, based on SDK requests.
In general, rebalances with Couchbase Server have less of a performance impact than you would expect with a traditional relational database, with all other factors such as size of data set as a constant. However, rebalances will increase the overload load and resource utilization for a cluster and will lead to some amount of performance loss. Therefore, it is a best practice to perform a rebalance after node failure during the lowest application use, if possible. After node failure, you could choose to perform one of these options:
Leave the cluster functioning with one less node. Be aware that the cluster still needs to adequately maintain the volume of requests and data with one less node,
If possible, get the failed node functioning once again, add it to the cluster and then rebalance,
Create a new node to replace the failed node, add it to the cluster, and then rebalance.
For more information about this topic, see Couchbase Server Manual, “Handling a Failover Situation.”
Developing a Client Library
This chapter is relevant for developers who are creating their own client library that communicates with the Couchbase Server. For instance, developers creating a library for language or framework that is not yet supported by Couchbase would be interested in this content.
Couchbase SDKs provide an abstraction layer your web application will use to communicate with a cluster. Your application logic does not need to contain logic about navigating information in a cluster, nor does it need much additional code for handling data requests.
Once your client makes calls into your client library the following should be handled automatically at the SDK level:
Maintain direct communications with the cluster,
Determining cluster topology,
Distribute requests to the cluster; automatically make reads and writes to the correct node in a cluster,
Direct and redirect requests based on topology changes,
Handle and direct requests appropriately during a failover.
In general, your Couchbase client library implementation will be similar to a
memcached(binary protocol) client library implementation.For instance, it may even be an extension of some existing
memcachedbinary-protocol client library), but just supports a different key hashing approach. Instead of using modulus or ketama/consistent hashing, the new hashing approach in Couchbase is instead based around “vbuckets”, which you can read about hereIn the vBucket approach, to find a server to talk to for a given key, your client library should hash the key string into a vBucket-Id (a 16-bit integer). The default hash algorithm for this step is plain CRC, masked by the required number of bits. The vBucket-Id is then used as an array index into a server lookup table, which is also called a vBucket-to-server map. Those two steps will allow your client library to find the right couchbase server given a key and a vBucket-to-server map. This extra level of indirection (where we have an explicit vBucket-to-server map) allows couchbase to easily control item data rebalancing, migration and replication.
Providing SASL Authentication
This section is relevant for developers who are creating their own client library that communicates with the Couchbase Server. Developers creating a library for language or framework that is not yet supported by Couchbase would be interested in this content.
In order to connect to a given bucket you need to run a SASL authentication with the
Couchbaseserver. The SASL authentication forCouchbaseis specified in SASLAuthProtocol.As of Couchbase Server 2.2, we provide challenge-response authentication mechanism known as CRAM-MD5 support for SASL authentication. This enables multiple data buckets to be accessed from the same process. Couchbase clients can determine which buckets they connect to using PLAIN SASL authentication and specifying the bucket name and bucket password, however you could not encrypt the bucket name, username or bucket password. As of Couchbase Server 2.2. we include CRAM-MD5 support to encrypt username and password before sending a request over the wire. For known limitation of this SASL mechanism, see IETF Tools, CRAM-MD5 SASL Mechanism.
If you want your SDK to connect to versions of Couchbase Server prior to 2.2, you will still need to support plain SASL authentication.
vbucketmigrator implements SASL Authentication by using libsasl in C if you want some example code.
List Mechanisms
To start SASL authentication you first ask Couchbase Server for the authentication mechanisms it supports. You can do so with the following binary request:
Byte/     0       |       1       |       2       |       3       |
   /              |               |               |               |
  |0 1 2 3 4 5 6 7|0 1 2 3 4 5 6 7|0 1 2 3 4 5 6 7|0 1 2 3 4 5 6 7|
  +---------------+---------------+---------------+---------------+
 0|       80      |    B2 ('+')   |       00      |       05      |
  +---------------+---------------+---------------+---------------+
 4|       08      |       00      |       00      |       03      |
  +---------------+---------------+---------------+---------------+
 8|       00      |       00      |       00      |       14      |
  +---------------+---------------+---------------+---------------+
12|       00      |       00      |       00      |       00      |
  +---------------+---------------+---------------+---------------+
16|       00      |       00      |       00      |       00      |
  +---------------+---------------+---------------+---------------+
20|       00      |       00      |       00      |       00      |
  +---------------+---------------+---------------+---------------+
24|       00      |       00      |       00      |       07      |
  +---------------+---------------+---------------+---------------+

Header breakdown
SASL List Mechanisms command
Field        (offset) (value)
Magic        (0)    : 0x80                (Request)
Opcode       (1)    : 0x20                (SASL List Mechanisms)
Key length   (2,3)  : 0x0000              (field not used)
Extra length (4)    : 0x00                (field not used)
Data type    (5)    : 0x00                (field not used)
VBucket      (6,7)  : 0x0000              (field not used)
Total body   (8-11) : 0x00000000          (field not used)
Opaque       (12-15): 0x00000000
CAS          (16-23): 0x0000000000000000  (field not used)
If the server supports SASL PLAIN and CRAM-MD5 authentication you get this response, where
Mechanismsspecifically lists ‘PLAIN CRAM-MD5.’Byte/ 0 | 1 | 2 | 3 | / | | | | |0 1 2 3 4 5 6 7|0 1 2 3 4 5 6 7|0 1 2 3 4 5 6 7|0 1 2 3 4 5 6 7| +---------------+---------------+---------------+---------------+ 0| 81 | 20 (' ') | 00 | 00 | +---------------+---------------+---------------+---------------+ 4| 00 | 00 | 00 | 00 | +---------------+---------------+---------------+---------------+ 8| 00 | 00 | 00 | 0D | +---------------+---------------+---------------+---------------+ 12| 00 | 00 | 00 | 00 | +---------------+---------------+---------------+---------------+ 16| 00 | 00 | 00 | 00 | +---------------+---------------+---------------+---------------+ 20| 00 | 00 | 00 | 00 | +---------------+---------------+---------------+---------------+ 24| 50 | 4C | 41 | 49 | +---------------+---------------+---------------+---------------+ 28| 4E | 20 | 43 | 52 | +---------------+---------------+---------------+---------------+ 32| 41 | 4D | 2D | 4D | +---------------+---------------+---------------+---------------+ 36| 44 | 35 | +---------------+---------------+ Header breakdown SASL List Mechanisms command Field (offset) (value) Magic (0) : 0x81 (Response) Opcode (1) : 0x20 (SASL List Mechanisms) Key length (2,3) : 0x0000 (field not used) Extra length (4) : 0x00 (field not used) Data type (5) : 0x00 (field not used) VBucket (6,7) : 0x0000 (field not used) Total body (8-11) : 0x0000000D (14) Opaque (12-15): 0x00000000 CAS (16-23): 0x0000000000000000 (field not used) Mechanisms (24-37): "PLAIN CRAM-MD5"If your version of Couchbase Server only supports PLAIN, you will get this response:
Byte/ 0 | 1 | 2 | 3 |
/ | | | |
|0 1 2 3 4 5 6 7|0 1 2 3 4 5 6 7|0 1 2 3 4 5 6 7|0 1 2 3 4 5 6 7|
+---------------+---------------+---------------+---------------+
0| 81 | 20 | 00 | 00 |
+---------------+---------------+---------------+---------------+
4| 00 | 00 | 00 | 00 |
+---------------+---------------+---------------+---------------+
8| 00 | 00 | 00 | 05 |
+---------------+---------------+---------------+---------------+
12| 00 | 00 | 00 | 00 |
+---------------+---------------+---------------+---------------+
16| 00 | 00 | 00 | 00 |
+---------------+---------------+---------------+---------------+
20| 00 | 00 | 00 | 00 |
+---------------+---------------+---------------+---------------+
24| 50 ('P') | 4c ('L') | 41 ('A') | 49 ('I') |
+---------------+---------------+---------------+---------------+
28| 4e ('N') |

Header breakdown
Field (offset) (value)
Magic (0): 0x81 (PROTOCOL_BINARY_RES)
Opcode (1): 0x20 (sasl list mechs)
Key length (2-3): 0x0000 (0)
Extra length (4): 0x00
Data type (5): 0x00
Status (6-7): 0x0000 (SUCCESS)
Total body (8-11): 0x00000005 (5)
Opaque (12-15): 0x00000000 (0)
CAS (16-23): 0x0000000000000000 (0)
Mechanisms (24-28): PLAIN
Please note that the server may support a different set of mechanisms. The list of mechanisms is a space-separated list of SASL mechanism names (e.g. “PLAIN CRAM-MD5 GSSAPI”).
Making Request via PLAIN
After choosing the desired mechanism from the ones that the Couchbase Server supports, you need to create an authentication request packet and send it to the server. The following packet shows a packet using PLAIN authentication of “foo” with the password “bar”:
Byte/ 0 | 1 | 2 | 3 |
/ | | | |
|0 1 2 3 4 5 6 7|0 1 2 3 4 5 6 7|0 1 2 3 4 5 6 7|0 1 2 3 4 5 6 7|
+---------------+---------------+---------------+---------------+
0| 80 | 21 ('!') | 00 | 05 |
+---------------+---------------+---------------+---------------+
4| 00 | 00 | 00 | 00 |
+---------------+---------------+---------------+---------------+
8| 00 | 00 | 00 | 10 |
+---------------+---------------+---------------+---------------+
12| 00 | 00 | 00 | 00 |
+---------------+---------------+---------------+---------------+
16| 00 | 00 | 00 | 00 |
+---------------+---------------+---------------+---------------+
20| 00 | 00 | 00 | 00 |
+---------------+---------------+---------------+---------------+
24| 50 ('P') | 4c ('L') | 41 ('A') | 49 ('I') |
+---------------+---------------+---------------+---------------+
28| 4e ('N') | 66 ('f') | 6f ('o') | 6f ('o') |
+---------------+---------------+---------------+---------------+
32| 00 | 66 ('f') | 6f ('o') | 6f ('o') |
+---------------+---------------+---------------+---------------+
36| 00 | 62 ('b') | 61 ('a') | 72 ('r') |

Header breakdown
Field (offset) (value)
Magic (0): 0x80 (PROTOCOL_BINARY_REQ)
Opcode (1): 0x21 (sasl auth)
Key length (2-3): 0x0005 (5)
Extra length (4): 0x00
Data type (5): 0x00
vBucket (6-7): 0x0000 (0)
Total body (8-11): 0x00000010 (16)
Opaque (12-15): 0x00000000 (0)
CAS (16-23): 0x0000000000000000 (0)
Mechanisms (24-28): PLAIN
Auth token (29-39): foo0x00foo0x00bar
When the server accepts this username/password combination, it returns one of two status codes: Success or “Authentication Continuation”. Success means that you are done with authentication:
Byte/ 0 | 1 | 2 | 3 |
/ | | | |
|0 1 2 3 4 5 6 7|0 1 2 3 4 5 6 7|0 1 2 3 4 5 6 7|0 1 2 3 4 5 6 7|
+---------------+---------------+---------------+---------------+
0| 81 | 21 ('!') | 00 | 00 |
+---------------+---------------+---------------+---------------+
4| 00 | 00 | 00 | 00 |
+---------------+---------------+---------------+---------------+
8| 00 | 00 | 00 | 0d |
+---------------+---------------+---------------+---------------+
12| 00 | 00 | 00 | 00 |
+---------------+---------------+---------------+---------------+
16| 00 | 00 | 00 | 00 |
+---------------+---------------+---------------+---------------+
20| 00 | 00 | 00 | 00 |
+---------------+---------------+---------------+---------------+
24| 41 ('A') | 75 ('u') | 74 ('t') | 68 ('h') |
+---------------+---------------+---------------+---------------+
28| 65 ('e') | 6e ('n') | 74 ('t') | 69 ('i') |
+---------------+---------------+---------------+---------------+
32| 63 ('c') | 61 ('a') | 74 ('t') | 65 ('e') |
+---------------+---------------+---------------+---------------+
36| 64 ('d') |

Header breakdown
Field (offset) (value)
Magic (0): 0x81 (PROTOCOL_BINARY_RES)
Opcode (1): 0x21 (sasl auth)
Key length (2-3): 0x0000 (0)
Extra length (4): 0x00
Data type (5): 0x00
Status (6-7): 0x0000 (SUCCESS)
Total body (8-11): 0x0000000d (13)
Opaque (12-15): 0x00000000 (0)
CAS (16-23): 0x0000000000000000 (0)
Info (24-36): Authenticated
Making Requests via CRAM-MD5
After you determine your Couchbase Server version supports CRAM-MD5, you can create an authentication request packet and send it to the server:
Byte/     0       |       1       |       2       |       3       |
   /              |               |               |               |
  |0 1 2 3 4 5 6 7|0 1 2 3 4 5 6 7|0 1 2 3 4 5 6 7|0 1 2 3 4 5 6 7|
  +---------------+---------------+---------------+---------------+
 0|       81      |    21 (' ')   |       00      |       00      |
  +---------------+---------------+---------------+---------------+
 4|       00      |       00      |       00      |       00      |
  +---------------+---------------+---------------+---------------+
 8|       00      |       00      |       00      |       08      |
  +---------------+---------------+---------------+---------------+
12|       00      |       00      |       00      |       00      |
  +---------------+---------------+---------------+---------------+
16|       00      |       00      |       00      |       00      |
  +---------------+---------------+---------------+---------------+
20|       00      |       00      |       00      |       00      |
  +---------------+---------------+---------------+---------------+
24|       43      |       52      |       41      |       4D      |
  +---------------+---------------+---------------+---------------+
28|       2D      |       4D      |       44      |       35      |
  +---------------+---------------+---------------+---------------+

Header breakdown
SASL List Mechanisms command
Field        (offset) (value)
Magic        (0)    : 0x81                (Response)
Opcode       (1)    : 0x21                (SASL Authenticate)
Key length   (2,3)  : 0x0000              (field not used)
Extra length (4)    : 0x00                (field not used)
Data type    (5)    : 0x00                (field not used)
VBucket      (6,7)  : 0x0000              (field not used)
Total body   (8-11) : 0x00000008          (8)
Opaque       (12-15): 0x00000000
CAS          (16-23): 0x0000000000000000  (field not used)
Mechanisms   (24-31): "CRAM-MD5"
The server then sends a challenge-response to a client. The challenge-response will be a random string that the client should use when hashing the password with MD5. The string is unique for each connection attempt to the server. This will prevent access to Couchbase Server’s memcached port by a replay attack. A challenge-response will appear as follows:
Byte/     0       |       1       |       2       |       3       |
   /              |               |               |               |
  |0 1 2 3 4 5 6 7|0 1 2 3 4 5 6 7|0 1 2 3 4 5 6 7|0 1 2 3 4 5 6 7|
  +---------------+---------------+---------------+---------------+
 0|       81      |    21 (' ')   |       00      |       00      |
  +---------------+---------------+---------------+---------------+
 4|       00      |       00      |       00      |       00      |
  +---------------+---------------+---------------+---------------+
 8|       00      |       00      |       00      |       12      |
  +---------------+---------------+---------------+---------------+
12|       00      |       00      |       00      |       00      |
  +---------------+---------------+---------------+---------------+
16|       00      |       00      |       00      |       00      |
  +---------------+---------------+---------------+---------------+
20|       00      |       00      |       00      |       00      |
  +---------------+---------------+---------------+---------------+
24|       68      |       73      |       61      |       30      |
  +---------------+---------------+---------------+---------------+
28|       62      |       66      |       32      |       38      |
  +---------------+---------------+---------------+---------------+
32|       39      |       32      |       62      |       66      |
  +---------------+---------------+---------------+---------------+
36|       77      |       66      |       6B      |       6B      |
  +---------------+---------------+---------------+---------------+

Header breakdown
SASL List Mechanisms command
Field        (offset) (value)
Magic        (0)    : 0x81                (Response)
Opcode       (1)    : 0x21                (SASL Authenticate)
Key length   (2,3)  : 0x0000              (field not used)
Extra length (4)    : 0x00                (field not used)
Data type    (5)    : 0x00                (field not used)
VBucket      (6,7)  : 0x0000              (field not used)
Total body   (8-11) : 0x00000012          (18)
Opaque       (12-15): 0x00000000
CAS          (16-23): 0x0000000000000000  (field not used)
Mechanisms   (24-39): "hsa0bf2892bfwfkk"
A client should then use the random string when it hashes a password with CRAM-MD5. The response should include the hashed password:
Byte/     0       |       1       |       2       |       3       |
   /              |               |               |               |
  |0 1 2 3 4 5 6 7|0 1 2 3 4 5 6 7|0 1 2 3 4 5 6 7|0 1 2 3 4 5 6 7|
  +---------------+---------------+---------------+---------------+
 0|       81      |    20 (' ')   |       00      |       08      |
  +---------------+---------------+---------------+---------------+
 4|       00      |       00      |       00      |       00      |
  +---------------+---------------+---------------+---------------+
 8|       00      |       00      |       00      |       24      |
  +---------------+---------------+---------------+---------------+
12|       00      |       00      |       00      |       00      |
  +---------------+---------------+---------------+---------------+
16|       00      |       00      |       00      |       00      |
  +---------------+---------------+---------------+---------------+
20|       00      |       00      |       00      |       00      |
  +---------------+---------------+---------------+---------------+
24|       75      |       73      |       65      |       72      |
  +---------------+---------------+---------------+---------------+
28|       6E      |       61      |       6D      |       65      |
  +---------------+---------------+---------------+---------------+
32|       66      |       33      |       32      |       37      |
  +---------------+---------------+---------------+---------------+
36|       68      |       66      |       67      |       6A      |
  +---------------+---------------+---------------+---------------+
40|       69      |       62      |       66      |       33      |
  +---------------+---------------+---------------+---------------+
44|       39      |       34      |       38      |       66      |
  +---------------+---------------+---------------+---------------+

Header breakdown
SASL List Mechanisms command
Field        (offset) (value)
Magic        (0)    : 0x81                (Response)
Opcode       (1)    : 0x22                (SASL Step)
Key length   (2,3)  : 0x0008              (8)
Extra length (4)    : 0x00                (field not used)
Data type    (5)    : 0x00                (field not used)
VBucket      (6,7)  : 0x0000              (field not used)
Total body   (8-11) : 0x00000018          (24)
Opaque       (12-15): 0x00000000
CAS          (16-23): 0x0000000000000000  (field not used)
Username     (24-31): "username"
Password     (32-47): "f327hfqjibf3948f"
When the server accepts this username/password combination, it returns one of two status codes: Success or “Authentication Continuation”. Success means that you have completed authentication.
The possible return codes and errors sent during CRAM-MD5 authentication include:
SASL_OK (0) - The server sends this message at the end of the authentication handshake to indicate that SASL authentication has completed successfully
-
SASL_CONTINUE (1) - Indicates that the last message sent during authentication was successfully received, but authentication is not yet complete and the server is expecting more information from a client.
For example, the server returns this code during CRAM-MD5 SASL authentication along with the challenge string.
SASL_FAIL (2) - May occur at any time during the SASL authentication and indicates that authentication has failed.
SASL_BADPARAM (3) - SASL authentication has failed because a bad or illegal authentication parameter was received.
Getting Cluster Topology
Your SDK will be responsible for storing keys on particular nodes; therefore your SDK needs to be able to retrieve current cluster topology. The way that Couchbase Server stores all addresses for existing keys in a cluster is by providing a vBucket map. Your SDK will need to request a vBucket map from Couchbase Server and maintain an open connection for streaming updates from the server. Couchbase Server will provide vBucket maps and updates as JSON. To create and maintain such a connection, you can do a REST request from your SDK, and Couchbase Server will send an initial vBucket Map and stream updates as needed.
You should provide the appropriate REST endpoints to your SDK as some initial configuration parameter specified in a developer’s application. The client application should bootstrap the REST/JSON information by building URLs discovered from a standard base URL. After following the bootstrapping sequence and retrieving the URL for vBucket maps, your client library will have a REST/JSON URL that appears as follows:
http://HOST:PORT/pools/default/bucketsStreaming/BUCKET_NAMEFor example:
http://couchbase1:8091/pools/default/bucketsStreaming/defaultThe following is an example response from that URL, in JSON:
{
    "name" : "default",
    "bucketType" : "couchbase",
...
    "vBucketServerMap" : {
        "hashAlgorithm" : "CRC",
        "numReplicas" : 1,
        "serverList" : ["10.1.2.14:11210"],
        "vBucketMap" : [[0,-1],[0,-1],[0,-1],[0,-1],[0,-1] : ]
   }
}
The REST/JSON URLs might be under HTTP Basic Auth authentication control, so the client application may also have to provide (optional) user/password information to the your client library so that the proper HTTP/REST request can be made.
The REST/JSON URLs are ‘streaming’, in that the Couchbase Server does not close the HTTP REST connection after responding with one vBucket map. Instead, Couchbase Server keeps the connection open and continues to stream vBucket maps to your client library when there are cluster changes, for instance new server nodes are added, removed, or when vBuckets are reassigned to different servers. In the Couchbase Server streaming response, new vBucket-to-server map JSON messages are delimited by four newlines (“\n\n\n\n”) characters.
The above section describes what we call named-bucket REST endpoints. That is, each named bucket on a specified port has a streaming REST endpoint in the form:
http://HOST:PORT/pools/default/bucketsStreaming/BUCKET_NAMEThere is another kind of REST endpoint which describes all SASL-authenticated buckets. This SASL-authenticated endpoint has the form of:
http://HOST:PORT/pools/default/saslBucketsStreamingSample output:
{"buckets":[
    {"name":"default",
            "nodeLocator":"vbucket",
            "saslPassword":"",
            "nodes":[
             {"clusterMembership":"active","status":"healthy","hostname":"10.1.4.11:8091",
             "version":"1.6.1rc1","os":"x86_64-unknown-linux-gnu",
             "ports":{"proxy":11211,"direct":11210}},
             {"clusterMembership":"active","status":"healthy","hostname":"10.1.4.12:8091",
             "version":"1.6.1pre_21_g5aa2027","os":"x86_64-unknown-linux-gnu",
             "ports":{"proxy":11211,"direct":11210}}],
            "vBucketServerMap":{
            "hashAlgorithm":"CRC","numReplicas":1,
        "serverList":["10.1.4.11:11210","10.1.4.12:11210"],
        "vBucketMap":[[0,-1],[1,-1],...,[0,-1],[0,-1]]}}

 ]
        }
One main difference between the SASL-based bucket response versus the per-bucket response is that the SASL-based response can describe more than one bucket in a cluster. In the SASL REST/JSON response, these multiple buckets would be found in the JSON response under the “buckets” array.
Parsing the JSON
Once your client library has received a complete vBucket-to-server map message, it should use its favorite JSON parser to process the map into more useful data structures. An implementation of this kind of JSON parsing in C exists as a helper library in libvbucket, or for Java, jvbucket.
The
libvbucketandjvbuckethelper libraries don’t do any connection creation, socket management, protocol serialization, etc. That’s the job of your higher-level library. These helper libraries instead just know how to parse a JSON vBucket-to-server map and provide an API to access the map information.Handling vBucketMap Information
The
vBucketMapvalue within the returned JSON describes the vBucket organization. For example:"serverList":["10.1.4.11:11210","10.1.4.12:11210"], "vBucketMap":[[0,1],[1,0],[1,0],[1,0],:,[0,1],[0,1]]The vBucketMap is zero-based indexed by vBucketId. So, if you have a vBucket whose vBucketId is 4, you’d look up vBucketMap[4]. The entries in the vBucketMap are arrays of integers, where each integer is a zero-based index into the serverList array. The 0th entry in this array describes the primary server for a vBucket. Here’s how you read this stuff, based on the above config:
The vBucket with vBucketId of 0 has a configuration of
vBucketMap[0], or[0, 1]. So vBucket 0’s primary server is atserverList[0], or10.1.4.11:11210.While vBucket 0’s first replica server is at
serverList[1], which is10.1.4.12:11210.The vBucket with vBucketId of 1 has a configuration of
vBucketMap[1], or[1, 0]. So vBucket 1’s primary server is atserverList[1], or10.1.4.12:11210. And vBucket 1’s first replica is atserverList[0], or10.1.4.11:11210.This structure and information repeats for every configured vBucket.
If you see a -1 value, it means that there is no server yet at that position. That is, you might see:
"vBucketMap":[[0,-1],[0,-1],[0,-1],[0,-1],:]Sometimes early before the system has been completely configured, you might see variations of:
"serverList":[], "vBucketMap":[]Encoding the vBucketId
As the user’s application makes item data API invocations on your client library (mc.get(“some_key”), mc.delete(“some_key”), your client library will hash the key (“some_key”) into a vBucketId. Your client library must also encode a binary request message (following
memcachedbinary protocol), but also also needs to include the vBucketId as part of that binary request message.Note
Python-aware readers might look at this implementation for an example.
Each couchbase server will double-check the vBucketId as it processes requests, and would return NOT_MY_VBUCKET error responses if your client library provided the wrong vBucketId to the wrong couchbase server. This mismatch is expected in the normal course of the lifetime of a cluster – especially when the cluster is changing configuration, such as during a Rebalance.
Handling Rebalances in Your Client Library
A major operation in a cluster of Couchbase servers is rebalancing. A Couchbase system administrator may choose to initiate a rebalance because new servers might have been added, old servers need to be decommissioned and need to be removed, etc. An underlying part of rebalancing is the controlled migration of vBuckets (and the items in those migrating vBuckets) from one Couchbase server to another.
There is a certain amount of time, given the distributed nature of couchbase servers and clients, where vBuckets ownership may have changed and migrated from one server to another server, but your client library has not been informed. So, your client library could be trying to talk to the ‘wrong’ or outdated server for a given item, since your client library is operating with an out-of-date vBucket-to-server map.
Below is a walk-through of this situation in more detail and how to handle this case:
Before the Rebalance starts, any existing, connected clients should be operating with the cluster’s pre-rebalance vBucket-to-server map.
As soon as the rebalance starts, Couchbase will “broadcast” (via the streaming REST/JSON channels) a slightly updated vBucket-to-server map message. The assignment of vBuckets to servers does not change at this point at the start of the rebalance, but the serverList of all the servers in the Couchbase cluster does change. That is, vBuckets have not yet moved (or are just starting to move), but now your client library knows the addresses of any new couchbase servers that are now part of the cluster. Knowing all the servers in the cluster (including all the newly added servers) is important, as you will soon see.
At this point, the Couchbase cluster will be busy migrating vBuckets from one server to another.
Concurrently, your client library will be trying to do item data operations (Get/Set/Delete’s) using its pre-Rebalance vBucket-to-server map. However, some vBuckets might have been migrated to a new server already. In this case, the server your client library was trying to use will return a NOT_MY_VBUCKET error response.
Your client library should handle that NOT_MY_VBUCKET error response by retrying the request against another server in the cluster. The retry, of course, might fail with another NOT_MY_VBUCKET error response, in which your client library should keep probing against another server in the cluster.
Eventually, one server will respond with success, and your client library has then independently discovered the new, correct owner of that vBucketId. Your client library should record that knowledge in its vBucket-server-map(s) for use in future operations time.
An implementation of this can be seen in the libvBucket API
vbucket_found_incorrect_master().The following shows a swim-lane diagram of how moxi interacts with libvBucket during NOT_MY_VBUCKET errors libvbucket_notmyvbucket.pdf.
At the end of the Rebalance, the couchbase cluster will notify streaming REST/JSON clients, finally, with a new vBucket-to-server map. This can be handled by your client library like any other vBucket-to-server map update message. However, in the meantime, your client library didn’t require granular map updates during the Rebalancing, but found the correct vBucket owners on its own.
Fast Forward Map
A planned, forthcoming improvement to the above NOT_MY_VBUCKET handling approach is that Couchbase will soon send an optional second map during the start of the Rebalance. This second map, called a “fast forward map”, provides the final vBucket-to-server map that would represent the cluster at the end of the Rebalance. A client library can use the optional fast forward map during NOT_MY_VBUCKET errors to avoid linear probing of all servers and can instead just jump straight to talking with the eventual vBucket owner.
Please see the implementation in libvBucket that handles a fast-forward-map.
The linear probing, however, should be retained by client library implementations as a good fallback, just-in-case error handling codepath.
Redundancy & Availability
Client library authors should enable their user applications to specify multiple URLs into the Couchbase cluster for redundancy. Ideally, the user application would specify an odd number of URLs, and the client library should compare responses from every REST/JSON URL until is sees a majority of equivalent cluster configuration responses. With an even number of URLs which provide conflicting cluster configurations (such as when there’s only two couchbase servers in the cluster and there’s a split-brain issue), the client library should provide an error to the user application rather than attempting to access items from wrong nodes (nodes that have been Failover'ed out of the cluster).
The libvBucket C library has an API for comparing two configurations to support these kinds of comparisons. See the vbucket_compare() function.
As an advanced option, the client library should keep multiple REST/JSON streams open and do continual “majority vote” comparisons between streamed configurations when there are re-configuration events.
As an advanced option, the client library should “learn” about multiple cluster nodes from its REST/JSON responses. For example, the user may have specified just one URL into a multi-node cluster. The REST/JSON response from that one node will list all other nodes, which the client library can optionally, separately contact. This allows the client library to proceed even if the first URL/node fails (as long as the client library continues running).
Providing Observe Functions
As of Couchbase Server 2.0, the underlying binary protocol provides the ability to observe items. This means an application can determine whether a document has been persisted to disk, or exists on a replica node. This provides developers assurance that a document will survive node failure. In addition, since the new views functionality of Couchbase Server will only index a document and include it in a view once the document is persisted, an observe function provides assurance that a document will or will not be in a view.
Before you provide an observe-function, you need to understand how to retrieve cluster topology for your SDK. In other words, your SDK needs to be able to determine if a key is on a master and/or replica nodes. The observe-function that you provide in your SDK will need to be sent from your SDK to an individual node where the key exists; therefore being able to retrieve cluster topology is critical to implement an observe. Your SDK must also be able to be ‘cluster-aware’. This means that your SDK should be able to get updated cluster topology after node failure, rebalance, or node addition. For more information about getting cluster topology from an SDK, see Getting Cluster Topology
To provide an observe function in your SDK, you send the following binary request from an SDK:
Byte/     0       |       1       |       2       |       3       |
     /              |               |               |               |
    |0 1 2 3 4 5 6 7|0 1 2 3 4 5 6 7|0 1 2 3 4 5 6 7|0 1 2 3 4 5 6 7|
    +---------------+---------------+---------------+---------------+
   0| 0x80          | 0x92          | 0x00          | 0x00          |
    +---------------+---------------+---------------+---------------+
   4| 0x00          | 0x00          | 0x00          | 0x00          |
    +---------------+---------------+---------------+---------------+
   8| 0x00          | 0x00          | 0x00          | 0x14          |
    +---------------+---------------+---------------+---------------+
  12| 0xde          | 0xad          | 0xbe          | 0xef          |
    +---------------+---------------+---------------+---------------+
  16| 0x00          | 0x00          | 0x00          | 0x00          |
    +---------------+---------------+---------------+---------------+
  20| 0x00          | 0x00          | 0x00          | 0x00          |
    +---------------+---------------+---------------+---------------+
  24| 0x00          | 0x04          | 0x00          | 0x05          |
    +---------------+---------------+---------------+---------------+
  28| 0x68 ('h')    | 0x65 ('e')    | 0x6c ('l')    | 0x6c ('l')    |
    +---------------+---------------+---------------+---------------+
  32| 0x6f ('o')    | 0x00          | 0x05          | 0x00          |
    +---------------+---------------+---------------+---------------+
  36| 0x05          | 0x77 ('w')    | 0x6f ('o')    | 0x72 ('r')    |
    +---------------+---------------+---------------+---------------+
  40| 0x6c ('l')    | 0x64 ('d')    |
    +---------------+---------------+
observe command
Field        (offset) (value)
Magic        (0)    : 0x80
Opcode       (1)    : 0x92
Key length   (2,3)  : 0x0000
Extra length (4)    : 0x00
Data type    (5)    : 0x00
Vbucket      (6,7)  : 0x0000
Total body   (8-11) : 0x00000014
Opaque       (12-15): 0xdeadbeef
CAS          (16-23): 0x0000000000000000
Key #0
    vbucket  (24-25): 0x0004
    keylen   (26-27): 0x0005
             (28-32): "hello"
Key #1
    vbucket  (33-34): 0x0005
    keylen   (35-36): 0x0005
             (37-41): "world"
In this type of binary request, all the information that follows the
CASvalue is considered payload. All information up to and including theCASvalue is considered header data. The format of this request is similar to any other Couchbase Server read/write request, but there are differences in the header and payload. Here we specify the key that we want to observe as payload, beginning withKey #0. In this example, we provide two keys that we want to observe,helloandworld. TheOpcode : 0x92indicates to Couchbase Server that this is an observe request.Your SDK should build a binary request packet once for all the keys that will be observed. After your SDK sends the request to all master and replica nodes containing the key, a node will send back one response with all keys that exist on that node.
When you make a binary request, you are providing the functional equivalent of the following Couchbase Server
STATrequests which are used in the telnet protocol:STAT key_is_dirty: If Couchbase Server responds with a value of 0, this means a key is persisted; ifkey_is_dirtyhas the value 1, the key is not yet persisted.STAT key_cas: Couchbase Server provides the current CAS value for a key as a response. This type of information is helpful to use in your SDK to determine if a key has been updated before you perform an observe.
You will determine how often your SDK will poll Couchbase Server as part of an observe request. Keep in mind that you should take into account your expected server workload. You will also need to determine a standard timeout for the observe function you provide; as an option you can provide the developer the ability to set a timeout as a parameter. The following statistics are useful in determining how often you should poll:
Persist Stat: check this server statistic within your SDK to determine how many milliseconds it takes for a key to be persisted.Repl Stat: check this server statistic to determine how many milliseconds it takes for a key to be placed on a replica node.
When Couchbase Server responds to an observe request, it will be in the following binary format:
Byte/     0       |       1       |       2       |       3       |
     /              |               |               |               |
    |0 1 2 3 4 5 6 7|0 1 2 3 4 5 6 7|0 1 2 3 4 5 6 7|0 1 2 3 4 5 6 7|
    +---------------+---------------+---------------+---------------+
   0| 0x81          | 0x92          | 0x00          | 0x00          |
    +---------------+---------------+---------------+---------------+
   4| 0x00          | 0x00          | 0x00          | 0x00          |
    +---------------+---------------+---------------+---------------+
   8| 0x00          | 0x00          | 0x00          | 0x26          |
    +---------------+---------------+---------------+---------------+
  12| 0xde          | 0xad          | 0xbe          | 0xef          |
    +---------------+---------------+---------------+---------------+
  16| 0x00          | 0x00          | 0x03          | 0xe8          |
    +---------------+---------------+---------------+---------------+
  20| 0x00          | 0x00          | 0x00          | 0x64          |
    +---------------+---------------+---------------+---------------+
  24| 0x00          | 0x04          | 0x00          | 0x05          |
    +---------------+---------------+---------------+---------------+
  28| 0x68 ('h')    | 0x65 ('e')    | 0x6c ('l')    | 0x6c ('l')    |
    +---------------+---------------+---------------+---------------+
  32| 0x6f ('o')    | 0x01          | 0x00          | 0x00          |
    +---------------+---------------+---------------+---------------+
  36| 0x00          | 0x00          | 0x00          | 0x00          |
    +---------------+---------------+---------------+---------------+
  40| 0x00          | 0x0a          | 0x00          | 0x05          |
    +---------------+---------------+---------------+---------------+
  44| 0x00          | 0x05          | 0x77 ('w')    | 0x6f ('o')    |
    +---------------+---------------+---------------+---------------+
  48| 0x72 ('r')    | 0x6c ('l')    | 0x64 ('d')    | 0x00          |
    +---------------+---------------+---------------+---------------+
  52| 0xde          | 0xad          | 0xbe          | 0xef          |
    +---------------+---------------+---------------+---------------+
  56| 0xde          | 0xad          | 0xca          | 0xfe          |
    +---------------+---------------+---------------+---------------+
observe response
Field        (offset) (value)
Magic        (0)    : 0x81
Opcode       (1)    : 0x92
Key length   (2,3)  : 0x0000
Extra length (4)    : 0x00
Data type    (5)    : 0x00
Status       (6,7)  : 0x0000
Total body   (8-11) : 0x00000026
Opaque       (12-15): 0xdeadbeef
Persist Stat (16-19): 0x000003e8 (msec time)
Repl Stat    (20-23): 0x00000064 (msec time)
Key #0
    vbucket  (24-25): 0x0004
    keylen   (26-27): 0x0005
             (28-32): "hello"
    keystate (33)   : 0x01 (persisted)
    cas      (34-41): 000000000000000a
Key #1
    vbucket  (42-43): 0x0005
    keylen   (44-45): 0x0005
             (46-50): "world"
    keystate (51)   : 0x00 (not persisted)
    cas      (52-59): deadbeefdeadcafe
In the Couchbase Server response,
keystatewill indicate whether a key is persisted or not. The following are possible values forkeystate:0x00: Found, not persisted. Indicates key is in RAM, but not persisted to disk.0x01: Found, persisted. Indicates key is found in RAM, and is persisted to disk0x80: Not found. Indicates the key is persisted, but not found in RAM. In this case, a key is not available in any view/index. Couchbase Server will return thiskeystatefor any item that is not stored in the server. It indicates you will not expect to have the item in a view/index.0x81: Logically deleted. Indicates an item is in RAM, but is not yet deleted from disk.
It is important that you understand the difference between ‘not found’ and ‘logically deleted.’ The context in which your SDK receives this message is important. If an SDK performs a write for a key and the key is not found, then the responses ‘not found’ and ‘logically deleted’ indicate the same state of a key. After an SDK performs a document write, the first thing the SDK needs to determine is whether or not the item has been stored on the right node; in this scenario, the ‘not found’ and ‘logically deleted’ response both mean that the item is not yet stored on the appropriate node.
If the SDK performs a delete on a key, then the observe responses ‘not found’ and ‘logically deleted’ have two different meanings about a key. If Couchbase Server returns ‘not found’ for a delete operation, this means that the delete has been persisted on that node. If you receive a ‘logically deleted’ response then it means that the item has been removed from Couchbase Server RAM but the item is not yet deleted from disk.
As a final note, should you choose to provide an observe-function as an asynchronous method, you need to provide an ‘observe-set’ as part of your SDK. An observe-set is a table that stores all the ongoing observe requests sent from the SDK. When Couchbase Server fulfills an observe request by providing all required status updates for a key, your SDK should remove an observe request from the observe-set. In the SDK you should naturally also provide a function that retrieves any asynchronous observe results that are received from Couchbase Server and stored in SDK runtime memory.
Replica Read
As of Couchbase Server 2.1.0, we have a binary protocol to retrieve replicated data for a given key. The command is similar to the existing binary get command, however it returns data from a vBucket that is in a replica state as opposed to an active state.
In case of node failure you can have an application retry the server and wait until replicated data is available on another node. Couchbase Server takes 30 seconds to detect a node has failed, automatically failover the node, and then elevate replicated data to an active state on another node. If you do not have automatic failover enabled, it may take even longer for human intervention and manual failover. Although clients can wait and retry a read, you may have a scenario where you cannot wait 30 seconds to detect node failure, perform failover and activate replicated data. For instance, if you have an SLA that requires you to get data within 30 seconds of a request or less, you may need replica read functionality. In this case you can use replica read at the binary protocol level or as it is available in Couchbase SDKs. For more information about node failure and failover, see Failover nodes in the Couchbase Server Manual.
If you create your own Couchbase client, you can also create a wrapper on this protocol to provide replica reads.
If you use replica read, it will introduce the possibility that a client gets inconsistent data from the cluster; for this reason we generally recommend you have your application logic handle shorts periods of unavailability. For example if a user cannot get their user profile within 30 seconds, you can handle it with an error message and request that they try later. Replica read will get replicated data from the functioning node; but this does not ensure that the document is the most current document. For instance, if you update a document then immediately perform replica read, the data might not yet be replicated to the other node and you will get an older version back. If it is very important that you always have the most current version of a document, you may not satisfy this with a replica read. One thing you can do to help mitigate this problem is to keep the CAS value for an item when you set or update it and compare this with the CAS value returned by replica read. For more information, see Check and Set (CAS).
The request is identical to a get request with the exception of the Opcode of 0x83:
Field (offset) (value)
  Magic (0) : 0x80
  Opcode (1) : 0x83
  Key length (2,3) : 0x0005
  Extra length (4) : 0x00
  Data type (5) : 0x00
  VBucket (6,7) : 0x0000
  Total body (8-11) : 0x00000005
  Opaque (12-15): 0x00000000
  CAS (16-23): 0x0000000000000000
  Extras : None
  Key (24-29): The textual string: "Hello"
  Value : None
The response is also identical to a get response except for the Opcode of 0x83:
Field (offset) (value)
  Magic (0) : 0x81
  Opcode (1) : 0x83
  Key length (2,3) : 0x0000
  Extra length (4) : 0x04
  Data type (5) : 0x00
  Status (6,7) :0x0000
  Total body (8-11) : 0x00000009
  Opaque (12-15): 0x00000000
  CAS (16-23): 0x0000000000000001
  Key (24-29): The textual string: "Hello"
  Value : The textual string: "World"
Possible errors from the server include the following:
ENGINE_NOT_MY_VBUCKET = 0x0c
ENGINE_EWOULDBLOCK = 0x07
You will get the
ENGINE_NOT_MY_VBUCKETmessage if the server cannot find the vBucket with this key. You may also get this message if the vBucket with this key is not in replica state. This means you will get this error if the server has already performed automatic failover and has already elevated the replicated data into an active state when it got the request. In this case, the key is available as a get operation and not as a replica read.Couchbase Server will return
ENGINE_EWOULDBLOCKif the vBucket with replicated data is still undergoing rebalance. In this case you may want to provide logic in your client to retry as a get operation once the rebalance completes.Couchbase Protocol Extensions
In addition to the protocol commands described previously, Couchbase Server and client SDK’s support the following command extensions, when compared to the existing memchaced protocol:
CMD_STOP_PERSISTENCECMD_START_PERSISTENCECMD_SET_FLUSH_PARAMCMD_SET_VBUCKETCMD_GET_VBUCKETCMD_DEL_VBUCKETCMD_START_REPLICATIONCMD_STOP_REPLICATIONCMD_SET_TAP_PARAMCMD_EVICT_KEY