Getting started
A newer version of this software is available
You are viewing the documentation for an older version of this software. To find the documentation for the current version, visit the Couchbase documentation home page.
To start using Couchbase Server, follow these steps:
Make sure your machine meets the system requirements. See Preparing to install.
-
Install Couchbase Server. To install Couchbase Server on your machine, download the appropriate package for your chosen platform from http://www.couchbase.com/downloads. For each platform, follow the corresponding platform-specific instructions.
If you are installing Couchbase Server on to a machine that has previously had Couchbase Server installed and you do not want to perform an upgrade installation, remove Couchbase Server and any associated data from your machine before you start the installation. For more information on uninstalling Couchbase Server, see Uninstalling Couchbase Server.
To perform an upgrade installation while retaining your existing dataset, see Upgrading.
Test the installation by connecting and storing some data using the native Memcached protocol. See Testing Couchbase Server.
Setup the new Couchbase Server system by completing the web-based setup instructions. See Initial Server Setup.
Preparing to install
Warning
Mixed deployments, such as a cluster with both Linux and Windows server nodes are not supported. This incompatibility is due to differences in the number of shards between platforms. Operating systems cannot be mixed within the same cluster and when XDCR is configured between clusters, operating systems cannot be mixed between clusters.
Implement the same operating system on all machines within a cluster.
If XDCR is used, implement the same operating system on the other clusters.
Your system should meet the following system requirements.
Supported platforms
Couchbase Server provides platform support for Windows 2012 and separate packages for Ubuntu 12.04 and CentOS 6.
| Platform | Version | 32 / 64 bit | Supported | Recommended Version |
|---|---|---|---|---|
| Red Hat Enterprise Linux | 5 | 32 and 64 bit | Developer and Production | RHEL 5.8 |
| Red Hat Enterprise Linux | 6 | 32 and 64 bit | Developer and Production | RHEL 6.3 |
| CentOS | 5 | 32 and 64 bit | Developer and Production | CentOS 5.8 |
| CentOS | 6 | 32 and 64 bit | Developer and Production | CentOS 6.3 |
| Amazon Linux | 2011.09 | 32 and 64 bit | Developer and Production | |
| Ubuntu Linux | 10.04 | 32 and 64 bit | Developer and Production | |
| Ubuntu Linux | 12.04 | 32 and 64 bit | Developer and Production | Ubuntu 12.04 |
| Windows 2008 | R2 with SP1 | 64 bit | Developer and Production | Windows 2008 |
| Windows 2012 | 64 bit | Developer and Production | ||
| Windows 7 | 32 and 64 bit | Developer only | ||
| Windows 8 | 32 and 64 bit | Developer only | ||
| Mac OS | 10.7 | 64 bit | Developer only | |
| Mac OS | 10.8 | 64 bit | Developer only | Mac OS 10.8 |
Couchbase clusters with mixed platforms are not supported. Specifically,
Couchbase Server on Mac OS X uses 64 vBuckets as opposed to the 1024 vBuckets used
by other platforms. Due to this difference, if you need to move data between a
Mac OS X cluster and a cluster hosted on another platform use cbbackup and
cbrestore. For more information, see Backup and Restore Between Mac OS X and
Other Platforms.
For other platform-specific installation steps and dependencies, see the instructions for your platform under Installing Couchbase Server.
Resource requirements
The following hardware requirements are recommended for installation:
Quad-core for key-value store, 64-bit CPU running at 3GHz
Six cores if you use XDCR and views.
16GB RAM (physical)
Block-based storage device (hard disk, SSD, EBS, iSCSI). Network filesystems (e.g. CIFS, NFS) are not supported.
A minimum specification machine should have the following characteristics:
Dual-core CPU running at 2GHz for key-value store
4GB RAM (physical)
Note
For development and testing purposes a reduced CPU and RAM than the minimum specified can be used. This can be as low as 1GB of free RAM beyond operating system requirements and a single CPU core. However, you should not use a configuration lower than that specified in production. Performance on machines lower than the minimum specification will be significantly lower and should not be used as an indication of the performance on a production machine.
View performance on machines with less than 2 CPU cores will be significantly reduced.
You must have enough memory to run your operating system and the memory reserved for use by Couchbase Server. For example, if you want to dedicate 8GB of RAM to Couchbase Server you must have enough RAM to host your operating system. If you are running additional applications and servers, you will need additional RAM. For smaller systems, such as those with less than 16GB you should allocate at least 40% of RAM to your operating system.
You must have the following amount of storage available:
1GB for application logging
At least twice the disk space to match your physical RAM for persistence of information
For information and recommendations on server and cluster sizing, see Sizing Guidelines.
Supported web browsers
The Couchbase Web Console runs on the following browsers, with JavaScript support enabled:
-
Mozilla Firefox 3.6 or higher
To enable JavaScript, select the
Enable JavaScriptoption within theContentpanel of the application preferences. -
Safari 5 or higher
To enable JavaScript, use the checkbox on the security tab of the application preferences.
-
Google Chrome 11 or higher
To enable JavaScript, use the
Allow all sites to run JavaScript (recommended)option within theContentbutton of theUnder the Hoodsection of the application preferences. -
Internet Explorer 8 or higher
To enable JavaScript, by enabling
Active Scriptingwithin theCustom Level, section of theSecuritysection of theInternet Optionsitem of theToolsmenu.
Network ports
Couchbase Server uses a number of different network ports for communication between the different components of the server, and for communicating with clients that accessing the data stored in the Couchbase cluster. The ports listed must be available on the host for Couchbase Server to run and operate correctly. Couchbase Server will configure these ports automatically, but you must ensure that your firewall or IP tables configuration allow communication on the specified ports for each usage type. On Linux the installer will notify you that you need to open these ports.
For information about using user-defined ports, see Using user-defined ports
The following table lists the ports used for different types of communication with Couchbase Server, as follows:
| Port | Description | Node to Node | Node to Client | Cluster Administration | XDCR (version 1) | XDCR (version 2) |
|---|---|---|---|---|---|---|
| 8091 | Web Administration Port | Yes | Yes | Yes | Yes | Yes |
| 8092 | Couchbase API Port | Yes | Yes | No | Yes | Yes |
| 11209 | Internal Bucket Port | Yes | No | No | No | No |
| 11210 | Internal/External Bucket Port | Yes | Yes | No | No | Yes |
| 11211 | Client interface (proxy) | No | Yes | No | No | No |
| 11214 | Incoming SSL Proxy | No | No | No | Yes | Yes |
| 11215 | Internal Outgoing SSL Proxy | No | No | No | Yes | Yes |
| 18091 | Internal REST HTTPS for SSL | No | No | No | Yes | Yes |
| 18092 | Internal CAPI HTTPS for SSL | No | No | No | Yes | Yes |
| 4369 | Erlang Port Mapper ( epmd ) |
Yes | No | No | No | No |
| 21100 to 21199 (inclusive) | Node data exchange | Yes | No | No | No | No |
- Port 8091
- Used by the Web Console from outside the second level firewall (for REST/HTTP traffic).
- Port 8092
- Used to access views, run queries, and update design documents.
- Port 11210
- Used by smart client libraries or client-side Moxi to directly connect to the data nodes.
- Port 11211
- Used by pre-existing Couchbase and memcached (non-smart) client libraries that are outside the second level firewall to work.
- Ports 11214, 11215, 18091, and 18092
- Used for SSL XDCR data encryptions.
- All other Ports
- Used for other Couchbase Server communications.
- Node to node
- Where noted, these ports are used by Couchbase Server for communication between all nodes within the cluster. You must have these ports open on all to enable nodes to communicate with each other.
- Node to client
- Where noted, these ports should be open between each node within the cluster and any client nodes accessing data within the cluster.
- Cluster administration
- Where noted, these ports should be open and accessible to allow administration, whether using the REST API, command-line clients, and Web browser.
- XDCR
- These ports are used for XDCR communication between all nodes in both the source and destination clusters.
Note
Port 11213 is an internal ports used on the local host for memcached and compaction. The node is not used for communication between nodes in a cluster. For firewall purposes, you do not need to take port 11213 into consideration. However, if a service is listening on this port, Couchbase Server does not start correctly.
Red Hat Linux installation
Before you install, make sure you check the supported platforms, see Supported Platforms. The Red Hat installation uses the RPM package. Installation is supported on Red Hat and Red Hat-based operating systems such as CentOS.
Installing on Red Hat Linux
-
For Red Hat Enterprise Linux version 6.0, Couchbase Server RPM performs dependency checks for OpenSSL using
pkg-config. Therefore you need to check that this pkg-config is installed and if you do not have it, install it:root-> sudo yum install -y pkgconfigUpon successful install you will see output as follows:
Loaded plugins …. Installed: pkgconfig.x86_64 1:0.21-2.el5 Complete! -
For Red Hat Enterprise Linux version 6.0 and above, you need to install a specific OpenSSL dependency by running:
Some users will not be able to installroot-> yum install openssl098eopenssl098ewith this command without having administrative privileges. If you experience this issue, put the contents of thelib64directory intoopt/couchbase/lib:Download `openssl098e-0.9.8e-17.el6.centos.2.x86_64.rpm'.
Go to the directory where you extracted Couchbase Server:
cd opt/couchbase.-
Extract the openssl098e RPM:
 rpm2cpio
 openssl098e-0.9.8e-17.el6.centos.2.x86_64.rpm | cpio --extract
 --make-directories --no-absolute-filenames
Move the extracted files to the
/libdirectory for Couchbase Server:mv usr/lib64/* lib/
-
To install Couchbase Server, use the
rpmcommand-line tool with the RPM package that you downloaded. You must be logged in as root (Superuser) to complete the installation:root-> rpm –install couchbase-server version.rpmWhere
versionis the version number of the downloaded package.Once the
rpmcommand completes, Couchbase Server starts automatically, and is configured to automatically start during boot under the 2, 3, 4, and 5 runlevels. Refer to the Red Hat RPM documentation for more information about installing packages using RPM.After installation finishes, the installation process will display a message similar to that below:
Minimum RAM required : 4 GB System RAM configured : 8174464 KBMinimum number of processors required : 4 cores Number of processors on the system : 4 cores
Starting couchbase-server[ OK ]
You have successfully installed Couchbase Server. Please browse to http://host_name:8091/ to configure your server. Please refer to http://couchbase.com for additional resources.
Please note that you have to update your firewall configuration to allow connections to the following ports: 11211, 11210, 11209, 4369, 8091, 8092 and from 21100 to 21299.
By using this software you agree to the End User License Agreement. See /opt/couchbase/LICENSE.txt.
Once installed, you can use the Red Hat chkconfig command to manage the
Couchbase Server service, including checking the current status and creating the
links to enable and disable automatic start-up. Refer to the Red Hat
documentation
for instructions.
To do the initial setup for Couchbase, open a web browser and access the Couchbase Web Console. See Initial Server Setup.
Installing on CentOS/RHEL as non-root, non-sudo
This installation is for development purposes only. There may be cases when you want to install the server as a non-root, non-sudo user. If you perform a non-sudo, non-root installation you will be still be able to run Couchbase Server and all Couchbase command-line tools. To do so on CentOS/Red Hat:
-
After you download the Couchbase RPM, go to the directory where it is located and extract it:
rpm2cpio couchbase-server-community_x86_64_2.0.0-1767-rel.rpm | cpio --extract --make-directories \
--no-absolute-filenames
In the directory where you extracted the files, you will see
optandetcsubdirectories.There may be a case where you need to separately provide openssl098e. If you do, put the contents of this library into
opt/couchbase/lib:Download `openssl098e-0.9.8e-17.el6.centos.2.x86_64.rpm'.
Go to the directory where you extracted Couchbase Server:
cd opt/couchbase.-
Extract the openssl098e RPM:
 rpm2cpio
 openssl098e-0.9.8e-17.el6.centos.2.x86_64.rpm | cpio --extract
 --make-directories --no-absolute-filenames
Move the extracted files to the
/libdirectory for Couchbase Server:mv usr/lib64/* lib/
-
After you extract the Couchbase Server install files, go to the subdirectory:
cd opt/couchbase -
Run this password-related script:
./bin/install/reloc.sh `pwd`This enables you to continue the install as a non-root, non-sudo user.
-
To run the server:
./bin/couchbase-server -- -noinput -detached -
To stop the server:
./bin/couchbase-server -k
For general instructions on server start-up and shutdown as a sudo or root user, see Server Startup and Shutdown.
Installing multiple instances on a machine
Installing and running multiple Couchbase instances on a physical machine is possible for the Linux operating system. However, this implementation in recommended for development purposes only.
Requirements
Ensure that a minimum of 4GB RAM and 8 core CPU are available for each Couchbase instance. When installing multiple instances of Couchbase on a physical machine, install as one of the following:
- sudo user
- non-root, non-sudo user
For information about non-root, non-sudo user installation, see Installing on CentOS/RHEL as non-root, non-sudo.
Note
Refer to the reserved Couchbase Server Network ports and User-defined ports before creating user-defined ports.
Recommendations
Install each instance of a cluster on a different physical machine to ensure data recovery if a failure occurs.
Note
The number of Couchbase servers that can be installed on a physical machine depends on the RAM and CPU available.
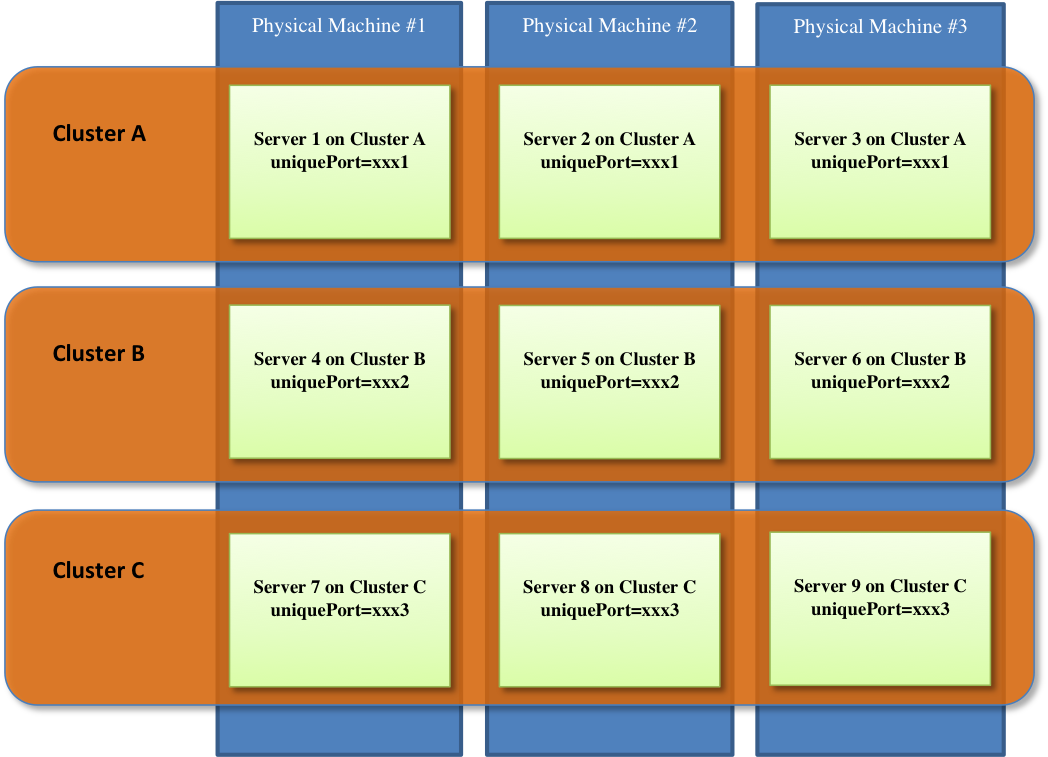
The following graphic shows a cluster configuration with multiple Couchbase instances on a physical machine. In addition, by having three (3) Couchbase server in a cluster and each server installed on different physical machines, the configuration reduces the risk of data loss from a hardware failure.
Setting up multiple instances
To set up multiple instances running on a physical machine:
- Install Couchbase Server as a sudo user or as a non-root, non-sudo user. For more information about installing as non-root, non-sudo, see Installing on CentOS/RHEL as non-root, non-sudo.
- Create user-defined ports in the /opt/couchbase/etc/couchbase/static_config file.
- In the /etc/security/limits.conf file, ensure that the hard and soft limits for the
nofileparameter are set to a value greater than 10240. - Change the short_name parameter that identifies the instance (default: ns_1), to a different short_name in the /opt/couchbase/etc/couchbase/static_config file.
- The short_name value must different for each instance that resides on the same physical server.
- Change the two occurrences short_name in the /opt/couchbase/bin/couchbase-server file. For example, use the
sedutility.sed -i ’s/ns_1/ns_inst1/g' bin/couchbase-server
- Start the Couchbase instance.
- Repeat the steps to install other instances.
Important
While creating the cluster make sure the perServer RAM quota is calculated keeping in mind the number of instances planned to be installed on the machine.
When configuring the instance for the cluster, Couchbase provides a default value for the perServer RAM quota. This default value is based on the total RAM quota available on the physical machine. Modify this value.
Troubleshooting
If any bucket created on the nodes appear to be in pending state or if rebalance fails with not_all_nodes_are_ready_yet, there could be a mismatch of the short_name value in the following files:
/opt/couchbase/bin/couchbase-server
/opt/couchbase/etc/couchbase/static_configLimitations
- Cbrecovery is unavailable on customized ports
- Cbworkloadgen is unavailable
- Offline upgrade is unavailable
- If a bucket is created on a dedicated port, some of the operations results in the error, “could not listen on port xxx”, even though the operation still succeeds. This error is logged regardless of the port that is used.
Ubuntu Linux installation
Before you install, make sure you check the supported platforms, see Supported Platforms.
Installing on Ubuntu
To install:
-
For Ubuntu version 12.04, you need to install a specific OpenSSL dependency by running:
root-> apt-get install libssl0.9.8 -
The Ubuntu Couchbase installation uses the DEB package. To install, use the
dpkgcommand-line tool using the DEB file that you downloaded. The following example usessudowhich will require root-access to allow installation:> dpkg -i couchbase-server version.debWhere
versionis the version number of the downloaded package.Once the
dpkgcommand has been executed, the Couchbase server starts automatically, and is configured to automatically start during boot under the 2, 3, 4, and 5 runlevels. Refer to the Ubuntu documentation for more information about installing packages using the Debian package manager.After installation has completed, the installation process will display a message similar to that below:
Selecting previously deselected package couchbase-server. (Reading database … 73755 files and directories currently installed.) Unpacking couchbase-server (from couchbase-server_x86_64_2.1.0-xxx-rel.deb) … libssl0.9.8 is installed. Continue installing Minimum RAM required : 4 GB System RAM configured : 4058708 KBMinimum number of processors required : 4 cores Number of processors on the system : 4 cores Setting up couchbase-server (2.1) …
* Started couchbase-serverYou have successfully installed Couchbase Server. Please browse to http://slv-0501:8091/ to configure your server. Please refer to http://couchbase.com for additional resources.
Please note that you have to update your firewall configuration to allow connections to the following ports: 11211, 11210, 11209, 4369, 8091, 8092 and from 21100 to 21299.
By using this software you agree to the End User License Agreement. See /opt/couchbase/LICENSE.txt.
Processing triggers for ureadahead … ureadahead will be reprofiled on next reboot
After successful installation, use the service command to manage the
Couchbase Server service, including checking the current status. Refer to the
Ubuntu documentation for instructions. To provide initial setup for Couchbase,
open a web browser and access the web administration interface. See Initial
Server Setup.
Installing on Ubuntu as non-root, non-sudo
This installation is for development purposes only. There may be cases when you want to install the server as a non-root, non-sudo user. If you perform a non-sudo, non-root installation you will be still be able to run Couchbase Server and all Couchbase command-line tools. To do so on Ubuntu:
-
After you download the Couchbase DEB package, go to the directory where it is located and extract it:
> dpkg-deb -x couchbase-server-community_x86_64_2.0.0-1767-rel.deb $HOMEIn the directory where you extracted the files, you will see
optandetcsubdirectories. -
After you extract the Couchbase Server install files, go to the subdirectory:
cd opt/couchbase -
Run this password-related script:
./bin/install/reloc.shpwdThis enables you to continue the install as a non-root, non-sudo user.
-
To run the server:
./bin/couchbase-server – -noinput -detached -
To stop the server:
./bin/couchbase-server -k
For general instructions on server start-up and shutdown as a sudo or root user, see Server Startup and Shutdown.
Microsoft Windows installation
Before installing, check the supported platforms, see Supported Platforms. To install on Windows, download the Windows installer package. This is supplied as a Windows executable. You can install the package either using the wizard, or by doing an unattended installation process. In either case make sure that you have no anti-virus software running on the machine before you start the installation process. You also need administrator privileges on the machine where you install it.
Port exhaustion on Windows
The TCP/IP port allocation on Windows by default includes a restricted number of ports available for client communication. For more information on this issue, including information on how to adjust the configuration and increase the available ports, see MSDN: Avoiding TCP/IP Port Exhaustion
Warning
Couchbase Server uses the Microsoft C++ redistributable package, which automatically downloads during installation. However, if another application on your machine is already using the package, your installation process may fail. To ensure that your installation process completes successfully, shut down all other running applications during installation.
For Windows 2008, you must upgrade your Windows Server 2008 R2 installation with Service Pack 1 installed before running Couchbase Server. You can obtain Service Pack 1 from Microsoft TechNet
The standard Microsoft Server installation does not provide an adequate number of ephemeral ports for Couchbase clusters. Without the correct number of open ephemeral ports, you may experience errors during rebalance, timeouts on clients, and failed backups. The Couchbase Server installer will check for your current port setting and adjust it if needed. See Microsoft KB-196271
Installation wizard
-
Double click on the downloaded executable file.
The installer for windows will detect if any redistributable packages included with Couchbase need to be installed or not. If these packaged are not already on your system, the install will automatically install them along with Couchbase Server.
-
Follow the install wizard to complete the installation.
You will be prompted with the
Installation Locationscreen. You can change the location where the Couchbase Server application is located. Note that this does not configure the location of where the persistent data will be stored, only the location of the server itself.The installer copies necessary files to the system. During the installation process, the installer will also check to ensure that the default administration port is not already in use by another application. If the default port is unavailable, the installer will prompt for a different port to be used for administration of the Couchbase server. The installer asks you to set up sufficient ports available for the node. By default Microsoft Server will not have an adequate number of ephemeral ports, see Microsoft Knowledge Base Article 196271
-
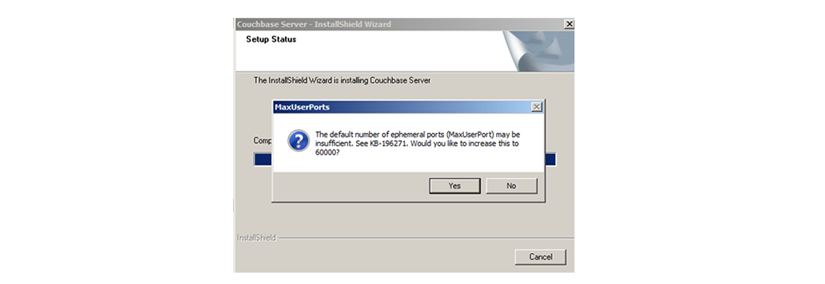
Click Yes.
Without a sufficient number of ephemeral ports, a Couchbase cluster fails during rebalance and backup; other operations such as client requests will timeout. If you already changed this setting you can click no. The installer will display this panel to confirm the update:

Restart the server for the port changes to be applied.
Important
If the Windows installer hangs on the Computing Space Requirements screen, there is an issue with your setup or installation environment, for example, other running applications.
Workaround:
- Stop any other running browers and applications when you started installing Couchbase.
- Kill the installation process and uninstall the failed setup.
- Delete or rename the temp location under C:\Users\[logonuser]\AppData\Temp
- Reboot and try again.
After installation you should follow the server setup instructions. See Initial Server Setup.
Unattended installation
To use the unattended installation process, you first record your installation settings in wizard installation. These settings are saved to a file. You can use this file to silently install other nodes of the same version.
To record your install options, open a Command Terminal or Power and start the
installation executable with the /r command-line option:
> couchbase_server_version.exe /r /f1your_file_name.iss
You will be prompted with installation options, and the wizard will complete the
server install. We recommend you accept an increase in MaxUserPort. A file
with your options will be recorded at C:\Windows\your_file_name.iss.
To perform an installation using this recorded setup file, copy the
your_file_name.iss file into the same directory as the installer executable.
Run the installer from the command-line using the /s option:
> couchbase_server_version.exe /s -f1your_file_name.iss
You can repeat this process on multiple machines by copying the install package
and the your_file_name.iss file to the same directory on each machine.
Mac OS X installation
Before you install, make sure you check the supported platforms, see Supported
Platforms. Couchbase Server on Mac
OS X is for development purposes only. The Mac OS X installation uses a Zip file
which contains a standalone application that can be copied to the Applications
folder or to any other location you choose. The installation location is not the
same as the location of the Couchbase data files.
Please use the default archive file handler in Mac OS X, Archive Utility, when you unpack the Couchbase Server distribution. It is more difficult to diagnose non-functioning or damaged installations after extraction by other third party archive extraction tools.
Warning
Due to limitations within the Mac OS X operating system, the Mac OS X implementation is incompatible with other operating systems. It is not possible either to mix operating systems within the same cluster, or configure XDCR between a Mac OS X and Windows or Linux cluster. If you need to move data between a Mac OS X cluster and a cluster hosted on another platform, use `cbbackup` and `cbrestore`. For more information, see [Backup and Restore Between Mac OS X and Other Platforms](../cb-admin/#couchbase-backup-restore-mac).
Installing on Mac OS X
To install:
Delete any previous installs of Couchbase Server at the command line or by dragging the icon to the Trash can.
-
Remove remaining files from previous installations:
> rm -rf ~/Library/Application\ Support/Couchbase
> rm -rf ~/Library/Application\ Support/Membase
Download the Mac OS X zip file.
Double-click the downloaded Zip installation file to extract the server. This creates a single folder, the
Couchbase Server.appapplication.Drag and Drop
Couchbase Server.appto your chosen installation folder, such as the systemApplicationsfolder.
After the installation completes, you can double-click on Couchbase Server.app to
start it. The Couchbase Server icon appears in the menu bar on the right-hand
side. If you have not yet configured your server, then the Couchbase Web Console
opens and you should to complete the Couchbase Server setup process. See
Initial Server Setup for more details.
The Couchbase application runs as a background application. If you click on the icon in the menu bar you see a list of operations that can be performed.
The command line tools are included in the Couchbase Server application
directory. You can access them in Terminal by using the full path of the
Couchbase Server installation. By default, this is
/Applications/Couchbase Server.app/Contents/Resources/couchbase-core/bin/.
Installing on Mac OS X as non-root, non-sudo
This installation is for development purposes only. There may be cases when you want to install the server as a non-root, non-sudo user. If you perform a non-sudo, non-root installation you will be still be able to run Couchbase Server and all Couchbase command-line tools. To do so on Mac OS X:
-
After you download Couchbase Server, open Terminal and go to the Downloads directory:
cd ~/Downloads/ -
Unzip the package containing Couchbase Server:
open couchbase-server-enterprise_x86_64_2.1.0.zip -
Move Couchbase App to your
/Applicationsfolder:mv couchbase-server-enterprise_x86_64_2.1.0/Couchbase\ Server.app /Applications/ -
Start the server from Terminal:
open /Applications/Couchbase\ Server.appThis will enable you to use Couchbase Server as a non-sudo, non-root user.
To stop the server, Click on the Couchbase icon in the menu bar and select Quit Couchbase Server.
For general instructions on server start-up and shutdown as a sudo or root user, see Server Startup and Shutdown.
Testing Couchbase Server
Testing the connection to the Couchbase Server can be performed in a number of
different ways. Connecting to the node using the web client to connect to the
admin console should provide basic confirmation that your node is available.
Using the couchbase-cli command to query your Couchbase Server node will
confirm that the node is available.
Note
The Couchbase Server web console uses the same port number as clients use when communicated with the server. If you can connect to the Couchbase Server web console, administration and database clients should be able to connect to the core cluster port and perform operations. The Web Console will also warn if the console loses connectivity to the node.
To verify your installation works for clients, you can use either the
cbworkloadgen command, or telnet. The cbworkloadgen command uses the
Python Client SDK to communicate with the cluster, checking both the cluster
administration port and data update ports. For more information, see Testing
with cbworkloadgen.
Using telnet only checks the Memcached compatibility ports and the memcached
text-only protocol. For more information, see Testing with Telnet.
Testing with cbworkloadgen
The cbworkloadgen is a basic tool that can be used to check the availability
and connectivity of a Couchbase Server cluster. The tool executes a number of
different operations to provide basic testing functionality for your server.
Note
`cbworkloadgen` provides basic testing functionality. It does not provide performance or workload testing.
To test a Couchbase Server installation using cbworkloadgen, execute the
command supplying the IP address of the running node:
> cbworkloadgen -n localhost:8091
Thread 0 - average set time : 0.0257480939229 seconds , min : 0.00325512886047 seconds , max : 0.0705931186676 seconds , operation timeouts 0
The progress and activity of the tool can also be monitored within the web console.
For a longer test you can increase the number of iterations:
> cbworkloadgen -n localhost:8091 --items=100000
Testing with telnet
You can test your Couchbase Server installation by using Telnet to connect to the server and using the Memcached text protocol. This is the simplest method for determining if Couchbase Server is running.
Note
You will not need to use the Telnet method for communicating with your server within your application. Instead, use one of the Couchbase SDKs.
You will need to have telnet installed on your server to connect to Couchbase
Server using this method. Telnet is supplied as standard on most platforms, or
may be available as a separate package that should be easily installable via
your operating systems standard package manager.
Connect to the server:
Note
The following example connects to the legacy memcached protocol using moxi.
> telnet localhost1 11211
Trying 127.0.0.1...
Connected to localhost.localdomain (127.0.0.1).
Escape character is '^]'.
Make sure it’s responding (stats is a great way to check basic health):
stats
STAT delete_misses 0
STAT ep_io_num_write 0
STAT rejected_conns 0
...
STAT time 1286678223
...
STAT curr_items_tot 0
...
STAT threads 4
STAT pid 23871
...
END
Put a key in:
set test_key 0 0 1
a
STORED
Retrieve the key:
get test_key
VALUE test_key 0 1
a
END
Disconnect:
quit
Connection closed by foreign host.
>
All of the Memcached protocols commands will work through Telnet.
Initial server setup
Recommendation
Couchbase recommends that you clear your browser cache before doing the setup process. You can find notes and tips on how to do this on different browsers and platforms on [wikihow.com](http://www.wikihow.com/Clear-Your-Browser's-Cache).
On all platforms you can access the web console by connecting to the embedded
web server on port 8091. For example, if your server can be identified on your
network as servera, you can access the web console by opening
http://servera:8091/. You can also use an IP address or, if you are on the
same machine, http://localhost:8091. If you set up Couchbase Server on another
port other than 8091, go to that port.
Open Couchbase Web Console.
-
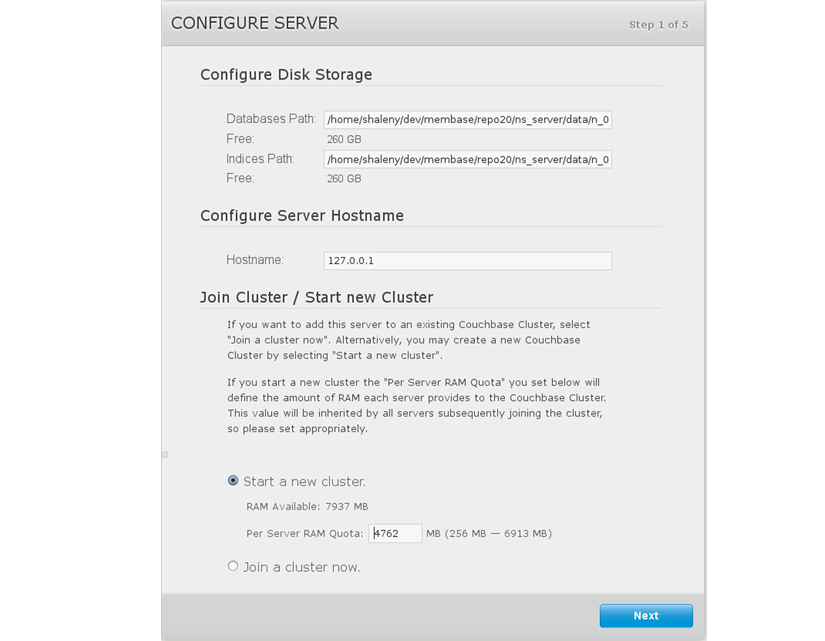
Set the disk storage and cluster configuration.
The
Configure Disk Storageoption specifies the location of the persistent storage used by Couchbase Server. The setting affects only this node and sets the directory where all the data will be stored on disk. This will also set where the indices created by views will be stored. If you are not indexing data with views you can accept the default setting. For the best performance, you may want to configure different disks for the server, for storing your document and for index data. For more information on best practices and disk storage, see Disk Throughput and Sizing.The
Configure Server Memorysection sets the amount of physical RAM that will be allocated by Couchbase Server for storage. For more information and guidelines, see RAM Sizing.If you are creating a new cluster, this is the amount of memory that will be allocated on each node within your Couchbase cluster. The memory for each node in a cluster must be the same amount. You must specify a value that can be supported by all the nodes in your cluster as this setting will apply to the entire cluster.
The default value is 60% of your total free RAM. This figure is designed to allow RAM capacity for use by the operating system caching layer when accessing and using views.
-
Provide a node IP or hostname under Configure Server Hostname. For more details about using hostnames see Using Hostnames with Couchbase Server.
Provide the IP Address or hostname of an existing node, and administrative credentials for that existing cluster.
To join an existing cluster, Check Join a cluster now.
-
Click Next.
The Sample Buckets panel appears where you can select the sample data buckets you want to load.
-
Click the names of sample buckets to load Couchbase Server. These data sets demonstrate Couchbase Server and help you understand and develop views. If you decide to install sample data, the installer creates one Couchbase bucket for each set of sample data you choose.
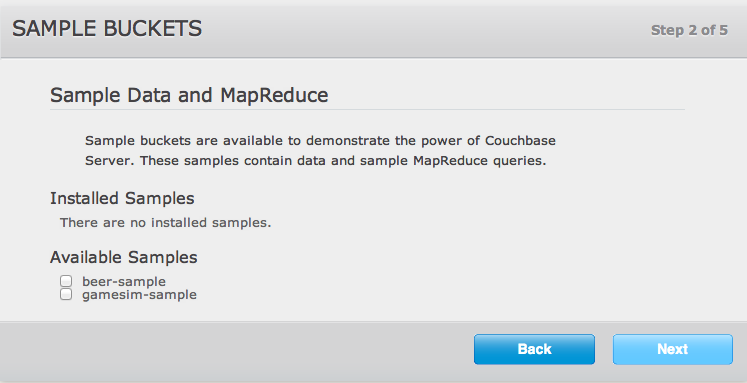
For more information on the contents of the sample buckets, see Couchbase Sample Buckets. After you create sample data buckets a Create Bucket panel appears where you create new data buckets
-
Set up a test bucket for Couchbase Server. You can change all bucket settings later except for the bucket name.
Enter ‘default’ as the bucket name and accept all other defaults in this panel. For more information about creating buckets, see Creating and Editing Data Buckets.
Couchbase Server will create a new data bucket named ‘default.’ You can use this test bucket to learn more about Couchbase and can use it in a test environment.
-
Select
Update Notifications.Couchbase Web Console communicates with Couchbase nodes and confirms the version numbers of each node. As long as you have internet access, this information will be sent anonymously to Couchbase corporate.. Couchbase corporate only uses this information to provide you with updates and information that will help us improve Couchbase Server and related products.
When you provide an email address we will add it to the Couchbase community mailing list for news and update information about Couchbase and related products. You can unsubscribe from the mailing list at any time using the unsubscribe link provided in each newsletter. Web Console communicates the following information:
The current version. When a new version of Couchbase Server exists, you get information on where you can download the new version.
Information about the size and configuration of your Couchbase cluster to Couchbase corporate. This information helps us prioritize our development efforts.
Enter a username and password. Your username must have no more than 24 characters, and your password must have 6 to 24 characters. You use these credentials each time you add a new server into the cluster. These are the same credentials you use for Couchbase REST API. See the Couchbase REST API.
Once you finish this setup, you see Couchbase Web Console with the Cluster Overview page:
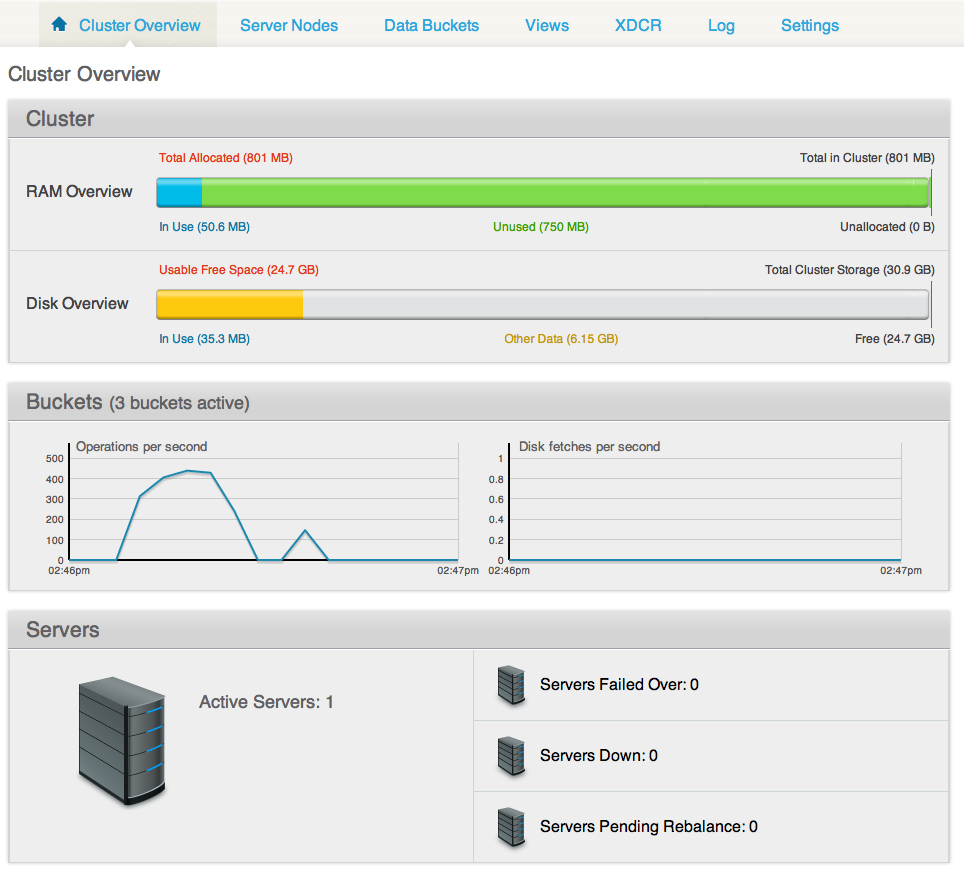
Your server is now running and ready to use. After you install your server and finish initial setup you can also optionally configure other settings, such as the port, RAM, using any of the following methods:
- Using command-line tools
-
Using the REST API
The command line tools provided with your Couchbase Server installation includes
couchbase-cli. This tool provides access to the core functionality of the Couchbase Server by providing a wrapper to the REST API. For information about CLI, see couchbase-cli tool.Couchbase Server can be configured and controlled using a REST API. In fact, the REST API is the basis for both the command-line tools and Web interface to Couchbase Server.
For more information on using the REST API see, the Couchbase REST API.
Using user-defined ports
This section describes how to install and run Couchbase server with user-defined ports rather than with the default 8091 port.
To run Couchbase server on user-defined ports, ensure that the minimum RAM and CPU are available for the Couchbase instance. See Red Hat Linux installation.
Note
Refer to the reserved Couchbase Server Network ports before creating user-defined ports.
Setting up Couchbase with user-defined ports
- Install Couchbase.
- If Couchbase is already installed and running, stop the Couchbase server.
- Add the new user-defined ports to the /opt/couchbase/etc/couchbase/static_config file.
- The /opt/couchbase/etc/couchbase/static_config file is where Couchbase picks up the configuration parameters from.
- If port numbers are not specified, default ports are used.
- To override some or all default ports, append the user-defined ports to the file.
- (Optional) CAPI port (default 8092) can be edited in the /opt/couchbase/etc/couchdb/default.d/capi.ini file by replacing 8092 with the new port name.
- If the Couchbase server was previously configured, delete the opt/couchbase/var/lib/couchbase/config/config.dat file to remove the old configuration.
- Start the Couchbase server
The following are the user-defined ports to add, replace, or append to the /opt/couchbase/etc/couchbase/static_config file.
{rest_port, 9000}.
{mccouch_port, 8999}.
{memcached_port, 12000}.
{memcached_dedicated_port, 11999}.
{moxi_port, 12001}.
{short_name, "ns_1"}.
{ssl_rest_port,11000}.
{ssl_capi_port,11001}.
{ssl_proxy_downstream_port,11002}.
{ssl_proxy_upstream_port,11003}.
Note
If the newly configured ports overlap with ports used by other running applications, Couchbase fails to start. If the newly configured ports overlap with ports used by Couchbase buckets, erlang crash notifications display in the log file.
Using hostnames
When you first install Couchbase Server you can access using a default IP address. There may be cases where you want to provide a hostname for each instance of a server. Each hostname you provide should be a valid one and will ultimately resolve to a valid IP Address. This section describes how you provide hostnames on Windows and Linux for the different versions of Couchbase Server. If you restart a node, it will use the hostname once again. If you failover or remove a node from a cluster, the node needs to be configured with the hostname once again.
Couchbase 2.1+ Linux and Windows
There are several ways you can provide hostnames for Couchbase 2.1+. You can provide a hostname when you install a Couchbase Server on a machine, when you add the node to an existing cluster for online upgrade, or via a REST API call. Couchbase Server stores this in a config file on disk. For earlier versions of Couchbase Server you must follow a manual process where you edit config files for each node which we describe below.
- On Initial Setup In the first screen that appears when you first log into Couchbase Server, you can provide either a hostname or IP address under Configure Server Hostname. Any hostname you provide will survive node restart:
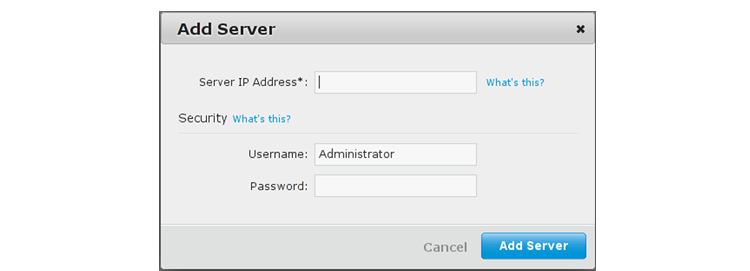
- While Adding a Node If you add a new 2.1+ node to an existing 2.0.1 or older Couchbase cluster you should first setup the hostname for the 2.1+ node in the setup wizard. If you add a new 2.1+ node to a 2.1 cluster you can provide either a hostname or IP address under Add Server. You provide it in the Server IP Address field:
-
Providing Hostnames via REST API The third way you can provide a node a hostname is to do a REST request at the
endpoint
http://127.0.0.1:8091/node/controller/rename. If you use this method, you should provide the hostname before you add a node to a cluster. If you provide a hostname for a node that is already part of a Couchbase cluster; the server will reject the request and returnerror 400 reason: unknown ["Renaming is disallowed for nodes that are already part of a cluster"].:
curl -v -X POST -u Administrator:asdasd \
http://127.0.0.1:8091/node/controller/rename -d hostname=shz.localdomain
Where you provide the IP address and port for the node and administrative
credentials for the cluster. The value you provide for hostname should be a
valid hostname for the node. Possible errors that may occur when you do this
request:
Could not resolve the hostname. The hostname you provide as a parameter does not resolve to a IP address.
Could not listen. The hostname resolves to an IP address, but no network connection exists for the address.
Could not rename the node because name was fixed at server start-up.
Could not save address after rename.
Requested name hostname is not allowed. Invalid hostname provided.
Renaming is disallowed for nodes that are already part of a cluster.
Hostnames when upgrading to 2.1
If you perform an offline upgrade from Couchbase 1.8.1+ to 2.1 (Linux and Windows)and you have a configured hostname using the instructions from Handling Changes in IP Addresses, a 2.1 server will use this configuration.
If you perform an online upgrade from 1.8.1+ to 2.1, you should add the hostname when you create the new 2.1 node. For more information about upgrading between versions, see Upgrading to Couchbase Server 2.1
Hostnames and the Cloud (such as EC2, Azure, etc). For more information about handling IP addresses and hostnames, see Handling Changes in IP Addresses.
Hostnames for Couchbase Server 2.0.1 and earlier
For 2.0.1 please follow the same steps for 2.0 and earlier. The one difference between versions is the name and location of the file you change.
Warning
This operation on both Linux and Windows is data destructive. This process reinitializes the node and removes all data on the node. Couchbase recommend that all node data be backed up before performing this operation, see [cbbackup tool](../cb-cli/#couchbase-admin-cmdline-cbbackup).
Hostnames for Linux 2.0.1 and earlier
Install Couchbase Server.
-
Execute:
sudo /etc/init.d/couchbase-server stop -
For 2.0, edit the
start()function in the script located at/opt/couchbase/bin/couchbase-server. You do not need to edit this file for 2.0.1.Under the line that reads:
-run ns_bootstrap – \Add a new line that reads:
-name ns_1@hostname \Where
hostnameis either a DNS name or an IP address that you want this server to identify the node (the ‘ns_1@’ prefix is mandatory). For example:… -run ns_bootstrap – \ -name ns_1@couchbase1.company.com \ -ns_server config_path ""/opt/couchbase/etc/couchbase/static_config"" \ … -
Edit the IP address configuration file.
For Linux 2.0 this is
/opt/couchbase/var/lib/couchbase/ip. This file contains the identified IP address of the node once it is part of a cluster. Open the file, and add a single line containing thehostname, as configured in the previous step.For Linux 2.0.1. You update the ip_start file with the hostname. The file is at this location: /opt/couchbase/var/lib/couchbase/ip_start.
-
Delete the files under:
/opt/couchbase/var/lib/couchbase/data/*/opt/couchbase/var/lib/couchbase/mnesia/*/opt/couchbase/var/lib/couchbase/config/config.dat
-
Execute:
sudo /etc/init.d/couchbase-server start You can see the correctly identified node as the hostname under the Manage Servers page. You will again see the setup wizard since the configuration was cleared out; but after completing the wizard the node will be properly identified.
Hostnames for Windows 2.0.1 and earlier
Install Couchbase Server.
-
Stop the service by running:
> C:\Program Files\Couchbase\Server\bin\service_stop.bat -
Unregister the service by running:
> C:\Program Files\Couchbase\Server\bin\service_unregister.bat -
For 2.0, edit the script located at
C:\Program Files\Couchbase\Server\bin\service_register.bat. You do not need this step for 2.0.1.On the 7th line it says:
set NS_NAME=ns_1@%IP_ADDR%Replace
%IP_ADDR%with the hostname/IP address that you want to use.
-
Edit the IP address configuration file.
For Windows 2.0 edit
C:\Program Files\Couchbase\Server\var\lib\couchbase\ip. This file contains the identified IP address of the node once it is part of a cluster. Open the file, and add a single line containing thehostname, as configured in the previous step.For Windows 2.0.1. Provide the hostname in
C:\Program
Files\Couchbase\Server\var\lib\couchbase\ip_start.
Register the service by running the modified script:
C:\Program Files\Couchbase\Server\bin\service_register.batDelete the files located under:
C:\Program Files\Couchbase\Server\var\lib\couchbase\mnesia.-
Start the service by running:
> C:\Program Files\Couchbase\Server\bin\service_start.bat See the node correctly identifying itself as the hostname in the GUI under the Manage Servers page. Note you will be taken back to the setup wizard since the configuration was cleared out, but after completing the wizard the node will be named properly.
Upgrading
The following are the officially supported upgrade paths for Couchbase Server for both online upgrades or offline upgrades:
- Couchbase 1.8.1 to Couchbase 2.0 or higher
- Couchbase 2.0.x to Couchbase 2.1 or higher
- Couchbase 2.1.x to Couchbase 2.2 or higher
- Couchbase 2.2 to Couchbase 2.5 or higher
Important
If you plan to upgrade from 1.8.0 to 2.0 or higher, ensure that there is enough disk space available for both your original Couchbase Server 1.8 data files and the new format for the new Couchbase Server files. Provide approximately three (3) times the disk space for functionality such as indexing and compaction.
You cannot perform a direct upgrade from Couchbase Server 1.8.0 to a higher release of Couchbase Server. You must first upgrade from Couchbase Server 1.8 or earlier to Couchbase Server 1.8.1 to provide data compatibility with a higher release of Couchbase Server. After performing this initial upgrade, upgrade to a higher release of Couchbase Server.
You can perform a cluster upgrade in two ways:
- Online upgrades
- Offline upgrades
Online upgrades
You can upgrade your cluster without taking your cluster down and so your application keeps running during the upgrade process. There are two ways you can perform this process: as a standard online upgrade, or as a swap rebalance. We highly recommend using a swap rebalance for online upgrade so that cluster capacity is always maintained. The standard online upgrade should only be used if swap rebalance is not possible.
Using the standard online upgrade, you take down one or two nodes from a cluster, and rebalance so that remaining nodes handle incoming requests. This is an approach you use if you have enough remaining cluster capacity to handle the nodes you remove and upgrade. You will need to perform rebalance twice for every node you upgrade: the first time to move data onto remaining nodes, and a second time to move data onto the new nodes. For more information about a standard online upgrade, see Standard online upgrades.
Standard online upgrades may take a while because each node must be taken out of the cluster, upgraded to a current version, brought back into the cluster, and then rebalanced. However since you can upgrade the cluster without taking the cluster down, you may prefer this upgrade method. For instructions on online upgrades, see Standard online upgrades.
For swap rebalance, you add a node to the cluster then perform a swap rebalance to shift data from an old node to a new node. You might prefer this approach if you do not have enough cluster capacity to handle data when you remove an old node. This upgrade process is also much quicker than performing a standard online upgrade because you only need to rebalance each upgraded node once. For more information on swap rebalance, see Swap rebalance.
Offline upgrades
This type of upgrade must be well-planned and scheduled. For offline upgrades, you shut down your application first so that no more incoming data arrives. Then you verify the disk write queue is 0 then shut down each node. This way you know that Couchbase Server has stored all items onto disk from during shutdown. You then perform an install of the latest version of Couchbase onto the machine. The installer will automatically detect the files from the older install and convert them to the correct format, if needed.
Offline upgrades can take less time than online upgrades because you can upgrade every node in the cluster at once. The cluster must be shut down for the upgrade to take place. Both the cluster and all the applications built on it will not be available during this time. For full instructions on performing an offline upgrade, see Offline upgrade process.
| Feature | Online Upgrades | Offline Upgrades |
|---|---|---|
| Applications Remain Available | Yes | No |
| Cluster Stays in Operation | Yes | No |
| Cluster must be Shutdown | No | Yes |
| Time Required | Requires Rebalance, Upgrade, Rebalance per Node | All nodes in Cluster Upgraded at Once |
Recommendation
Before performing an upgrade, whether it is online or offline, backup your data, see Backup and restore.
Online upgrade with swap rebalance
You can perform a swap rebalance to upgrade your nodes to Couchbase Server, without reducing the performance of your cluster. This is the preferred method for performing an online upgrade of your cluster because cluster capacity is always maintained throughout the upgrade. If you are unable to perform an upgrade via swap rebalance, perform a standard online upgrade, see Standard online upgrades. For general information on swap rebalance, see Swap rebalance.
You will need at least one extra node to perform a swap rebalance.
Install Couchbase Server on one extra machine that is not yet in the cluster. For install instructions, see Installing Couchbase Server.
Create a backup of your cluster data using
cbbackup. See cbbackup tool.Open Couchbase Web Console at an existing node in the cluster.
-
Go to
Manage->Server Nodes. In the Server panel you can view and managing servers in the cluster:
-
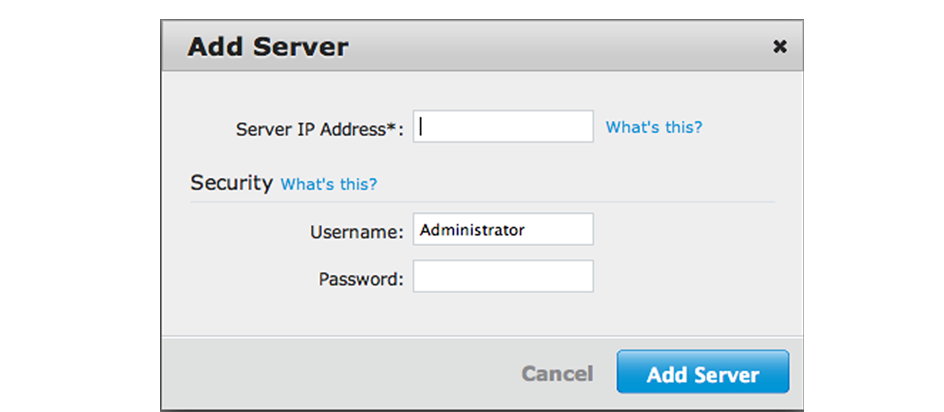
Click Add Server. A panel appears where you can provide credentials and either a host name or IP address for the new node: At this point you can provide a hostname for the node you add. For more information, see.
Remove one of your existing old nodes from the cluster. Under Server Nodes | Server panel, Click Remove Server for the node you want to remove. This will flag this server for removal.
-
In the Server panel, click Rebalance.
The rebalance automatically takes all data from the node flagged for removal and move it to your new node.
Repeat these steps for all the remaining old nodes in the cluster. You can add and remove multiple nodes from a cluster, however you should always add the same number of nodes from the cluster as you remove. For instance if you add one node, remove one node and if you add two nodes, you can remove two.
Until all nodes in a cluster are upgraded from 1.8.1 or earlier, features in the new Couchbase Server release are disabled. This means views or XDCR do not function until all nodes in your cluster are migrated. After all nodes are upgraded, the features are enabled.
For general information on swap rebalance, see Swap rebalance.
Standard online upgrades
This is also known as a standard online upgrade process and it can take place without taking down the cluster or your application. This means that the cluster and applications can continue running while you upgrade the individual nodes in a cluster to the latest Couchbase version. You should only use this online upgrade method if you are not able to perform online upgrade via swap rebalance, see Online upgrade with swap rebalance.
Best practice
Always add the same number of nodes to a cluster as the number that were removed and then perform rebalance. While it is technically possible, avoid removing a node, rebalancing, and then adding back nodes into the cluster. This reduces cluster capacity until the new node is added back into the cluster, which could lead to data being ejected to disk.
For information on upgrading from Couchbase Server 1.8 to a higher release of Couchbase Server, see Upgrade from 1.8.1 notes. Couchbase Server 1.8 cannot be upgraded directly to 2.0 or higher, instead, first upgrade to Couchbase Server 1.8.1 for data compatibility and then upgrade to a higher release.
To perform an standard, online upgrade of your cluster:
Create a backup of your cluster data using
cbbackup. See cbbackup tool.Choose a node to remove from the cluster and upgrade. You can upgrade one node at a time, or if you have enough cluster capacity, two nodes at a time. We do not recommend that you remove more than two nodes at a time for this upgrade.
-
In Couchbase Web Console under
Manage->Server Nodesscreen, clickRemove Server. This marks the server for removal from the cluster, but does not actually remove it.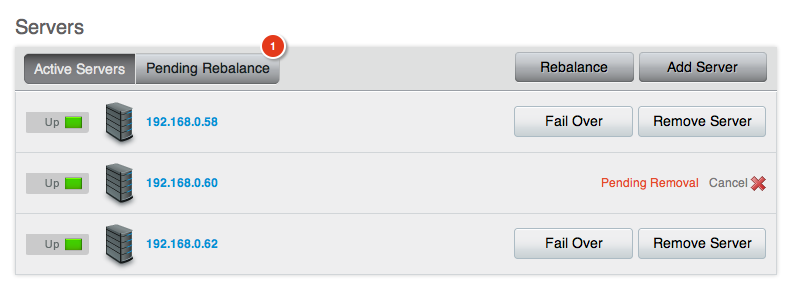
-
The
Pending Rebalanceshows servers that require a rebalance. Click theRebalancebutton next to the node you will remove.
This moves data from the node to remaining nodes in cluster. Once rebalancing has been completed, the
Server Nodesdisplay should display only the remaining, active nodes in your cluster.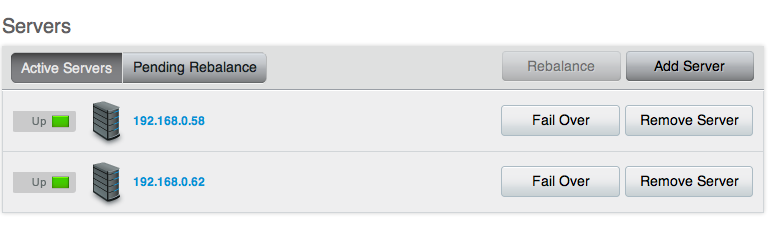
-
Perform an individual node upgrade to the latest version of Couchbase Server. See Upgrading individual nodes.
Couchbase Server starts automatically after the upgrade. You now need to add the node back to the cluster.
Open Web Console for an existing node in the cluster.
Go to
Manage->Server Nodes.-
Click the
Add Serverbutton. You will see a prompt to add a node to the cluster.After the new node is added, the Pending Rebalance count indicates that servers need to be rebalanced into the cluster.
Click
Rebalanceto rebalance the cluster and bring the new node into an active state.
Repeat these steps for each node in the cluster in order to upgrade the entire cluster to a new version.
Offline upgrade process
The offline upgrade process requires that all the applications and the entire Couchbase Server cluster be shutdown. After shutting down applications and nodes, perform the upgrade the software on each machine, and bring your cluster and application back up again.
Note
If you are upgrading from Couchbase Server 1.8 to Couchbase Server 2.0 or higher, there are more steps for the upgrade because you must first upgrade to Couchbase 1.8.1 for data compatibility. For more information, see Upgrade from 1.8.1 notes
Best practice
Check that the disk write queue is completely drained to ensure all data has been persisted to disk and will be available after the upgrade. Couchbase recommends that you turn off your application and allow the queue to drain before upgrading. Couchbase also recommends all data be backed up before upgrading. For more information, see Disk Write Queue.
To perform an offline upgrade:
Under Settings | Auto-Failover, disable auto-failover for all nodes in the cluster. If you leave this enabled, the first node that you shut down will be auto-failed-over. For instructions, see Enabling Auto-Failover Settings.
-
Shut down your application, so that no more requests go to Couchbase Cluster.
You can monitor the activity of your cluster by using Couchbase Web Console. The cluster needs to finish writing all information to disk. This will ensure that when you restart your cluster, all of your data can be brought back into the caching layer from disk. You can do this by monitoring the Disk Write Queue for every bucket in your cluster. The disk write queue should reach zero; this means no data remains to be written to disk.
Open Web Console at a node in your cluster.
-
Click Data Buckets | your_bucket. In the Summary section, check that
disk
write queue
reads 0. If you have more than one data bucket for your cluster, repeat this step to check each bucket has a disk write queue of 0.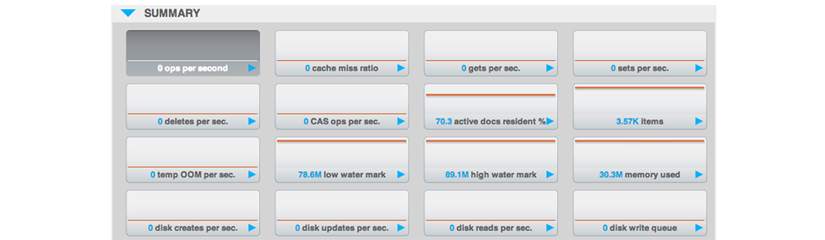
Create a backup of your cluster data using
cbbackup. See cbbackup tool.Shutdown Couchbase Server on each machine in your cluster. For instructions, see Server Startup and Shutdown
-
After you shutdown your nodes, perform a standard node upgrade to the new version of Couchbase Server. See Upgrading individual nodes for instructions.
Couchbase Server starts automatically on each node after you perform the node upgrade.
As the cluster warms up, you can monitor the status of the warmup process to determine when you can switch on your application. See Monitoring startup (warmup).
Once the cluster finishes warmup, you can re-enable your application on the upgraded cluster.
Upgrading individual nodes
Whether you are performing an online or offline upgrade, the steps for upgrading an individual nodes in a cluster remain the same:
Download Couchbase Server
Backup data for that node. To backup an existing Couchbase Server installation, use
cbbackup. See Backing up using cbbackup.-
Backup the node-specific configuration files. While the upgrade script perform a backup of the configuration and data files, as a best practice you should make your own backup of these files:
Platform Location Linux /opt/couchbase/var/lib/couchbase/config/config.datWindows C:\Program Files\Couchbase\Server\Config\var\lib\couchbase\config\config.dat Stop Couchbase Server. For instructions, see Server Startup and Shutdown.
Check your hostname configurations. If you have deployed Couchbase Server in a cloud service, or you are using hostnames rather than IP addresses, you must ensure that the hostname has been configured correctly before performing the upgrade. See Using hostnames with Couchbase Server
Check for required components and if needed, install them. This ensures that Couchbase Server upgrades and migrates your existing data files. See Upgrade from 1.8.1 notes.
Perform the installation upgrade for your platform:
RHEL/CentOS
You can perform an upgrade install using the RPM package — this will keep the data and existing configuration.
root-> rpm -U couchbase-server-architecture___meta_current_version__.rpm
Ubuntu/Debian Linux
You can perform a package upgrade by installing the updated .pkg package:
> sudo dpkg -i couchbase-server-architecture___meta_current_release.deb
Windows
The Install Wizard will upgrade your server installation using the same
installation location. For example, if you have installed Couchbase Server in
the default location, C:\Program Files\Couchbase\Server, the Couchbase Server installer will put the latest version at the same location.
Upgrade to 2.5 notes
This section covers upgrade behavior and important steps.
Before upgrading to 2.5
If buckets are using any of the following reserved ports, change the port for the bucket. Otherwise, XDCR data encryption is unavailable. (This applies to both offline and online upgrades.)
Important
Ensure that the Secure Socket Layer (SSL) reserved ports are available prior to using XDCR data encryption.
With XDCR data encryption, the following ports are reserved:
| Port | Description |
|---|---|
| 11214 | Incoming SSL Proxy |
| 11215 | Internal Outgoing SSL Proxy |
| 18091 | Internal REST HTTPS for SSL |
| 18092 | Internal CAPI HTTPS for SSL |
During a 2.5 upgrade
If Couchbase Server 2.5 has more than two (2) replicas, the first swap rebalance takes additional time. This behavior is expected.
Upgrade from 1.8.1 notes
You can upgrade from Couchbase Server 1.8.1 to a higher release of Couchbase Server using either the online or offline upgrade method.
Use Online Upgrades from Couchbase Server 1.8.1
We recommend the online upgrade method when upgrading from 1.8.1 to a higher release of Couchbase Server. The process is quicker and can take place while clusters and applications are up and running. When upgrading from Couchbase Server 1.8.1 to a higher release of Couchbase Server, the data files are updated to use the new Couchstore data format instead of the SQLite format used in 1.8.1 and earlier. This increases the upgrade time, and requires additional disk space to support the migration.
Be aware that if you perform a scripted online upgrade from 1.8.1 to a higher release of Couchbase Server, expect a 10 second delay from adding a node to the cluster and rebalancing. If a rebalance request occurs too soon after adding a node, the rebalance may fail.
Linux upgrade from 1.8.1 notes
When you upgrade from Couchbase Server 1.8 to a higher release of Couchbase Server on Linux,
be aware of the OpenSSL requirement. OpenSSL is a required
component and an error message occurs during upgrade if it is not
installed. To install it Red Hat-based systems, use yum :
root-> yum install openssl098e
On Debian-based systems, use apt-get to install the required OpenSSL package:
> sudo apt-get install libssl0.9.8
Windows upgrade from 1.8.1 notes
If you have configured your Couchbase Server nodes to use hostnames, rather than IP addresses, to identify themselves within the cluster, ensure that the IP and hostname configuration is correct both before the upgrade and after upgrading the software. See Hostnames for Couchbase Server 2.0.1 and Earlier.
Mac OS X upgrade from 1.8.1 notes
There is currently no officially supported upgrade installer for Mac OS X. If you
want to migrate from 1.8.1 to a higher release of Couchbase Server on OS X, backup your data
files with cbbackup, install the latest version, then restore your data with
cbrestore. For more information, see cbbackup
tool and cbrestore
tool.
Upgrade from 1.8 and earlier notes
If you run Couchbase Server 1.8 or earlier, including Membase 1.7.2 and earlier, upgrade to Couchbase Server 1.8.1 first. The intermediate upgrade to Couchbase Server 1.8.1 allows the data files to be converted into the new Couchbase Server compatible formats. This conversion is only available when upgrading from 1.8.1 to a higher release of Couchbase Server.
To perform an offline upgrade, you use the standard installation system such as
dpkg, rpm or Windows Setup Installer to upgrade the software on each
machine. Each installer will perform the following operations:
* Shutdown Couchbase Server 1.8. Do not uninstall the server.

* Run the installer. The installer will detect any prerequisite software or
  components. An error is raised if the pre-requisites are missing. If you install
  additional required components such as OpenSSL during the upgrade, you must
  manually restart Couchbase after you install the components.
The installer copies 1.8.1-compatible data and configuration files to a backup location.
The cbupgrade program automatically starts. This will non-destructively
convert data from the 1.8.1 database file format (SQLite) to the newer database file
format (couchstore). The 1.8 database files are left “as-is”, and new
database files are created. There must be enough disk space to handle this
conversion operation (e.g., 3x more disk space).
Note
The data migration process from the old file format to the new file format may take some time. You should wait for the process to finish before starting Couchbase Server.
Once the upgrade process finishes, Couchbase Server starts automatically. Repeat this process on all nodes within your cluster.
Upgrading from Community Edition to Enterprise Edition
Use the same Couchbase Server version number when upgrading to the Enterprise Edition. Version differences may result in a failed upgrade. To upgrade from Couchbase Server Community Edition to Couchbase Server Enterprise Edition, one of the following methods:
- Perform an online upgrade
- Perform an offline upgrade
Online upgrade to Enterprise Edition
Here you remove one node from the cluster and rebalance. On the nodes you have taken out of the cluster, uninstall Couchbase Server Community Edition package, and install Couchbase Server Enterprise Edition. You can then add the new nodes back into the cluster and rebalance. Repeat this process until the entire cluster is using the Enterprise Edition.
For more information on performing online upgrades, see Standard online upgrades.
Offline upgrade to Enterprise Edition
Shutdown the entire cluster, and uninstall Couchbase Server Community Edition from each machine. Then install Couchbase Server Enterprise Edition. The data files will be retained, and the cluster can be restarted.
For more information on performing offline upgrades, see Offline upgrade process.
Migrating
Couchbase Server is based on components from both Membase Server and CouchDB. If you are a user of these database systems, or are migrating from these to Couchbase Server, the following information may help in translating your understanding of the main concepts and terms.
Migrating for Membase users
For an existing Membase user the primary methods for creating, adding, manipulating and retrieving data remain the same. In addition, the background operational elements of your Couchbase Server deployment will not differ from the basic running of a Membase cluster.
Term and concept differences
The following terms are new, or updated, in Couchbase Server:
* `Views`, and the associated terms of the `map` and `reduce` functions used to
  define views. Views provide an alternative method for accessing and querying
  information stored in key/value pairs within Couchbase Server. Views allow you
  to query and retrieve information based on the values of the contents of a
  key/value pair, providing the information has been stored in JSON format.

* *JSON (JavaScript Object Notation)*, a data representation format that is
  required to store the information in a format that can be parsed by the View
  system is new.

* *Membase Server* is now *Couchbase Server*.

* *Membase Buckets* are now *Couchbase Buckets*.
Consistent functionality
The core functionality of Membase, including the methods for basic creation, updating and retrieval of information all remain identical within Couchbase Server. You can continue to use the same client protocols for setting and retrieving information.
The administration, deployment, and core of the web console and administration interfaces are also identical. There are updates and improvements to support additional functionality which is included in existing tools. These include View-related statistics, and an update to the Web Administration Console for building and defining views.
Changed functionality
The main difference of Couchbase Server is that in addition to the key/value data store nature of the database, you can also use Views to convert the information from individual objects in your database into lists or tables of records and information. Through the view system, you can also query data from the database based on the value (or fragment of a value) of the information that you have stored in the database against a key.
This fundamental differences means that applications no longer need to manually manage the concept of lists or sets of data by using other keys as a lookup or compounding values.
Operational and deployment differences
The main components of the operation and deployment of your Couchbase Server remain the same as with Membase Server. You can add new nodes, failover, rebalance and otherwise manage your nodes as normal.
However, the introduction of Views means that you will need to monitor and control the design documents and views that are created alongside your bucket configurations. Indexes are generated for each design document (i.e. multiple views), and for optimum reliability you may want to backup the generated index information to reduce the time to bring up a node in the event of a failure, as building a view from raw data on large datasets may take a significant amount of time.
In addition, you will need to understand how to recreate and rebuild View data, and how to compact and clean-up view information to help reduce disk space consumption and response times.
Client and application ahanges
Clients can continue to communicate with Couchbase Server using the existing memcached protocol interface for the basic create, retrieve, update and delete operations for key/value pairs. However, to access the View functionality you must use a client library that supports the view API (which uses HTTP REST).
To build Views that can output and query your stored data, your objects must be stored in the database using the JSON format. This may mean that if you have been using the native serialization of your client library to convert a language specific object so that it can be stored into Membase Server, you will now need to structure your data and use a native to JSON serialization solution, or reformat your data so that it can be formatted as JSON.
Migrating for CouchDB users
Although Couchbase Server incorporates the view engine functionality built into CouchDB, the bulk of the rest of the functionality is supported through the components and systems of Membase Server.
This change introduces a number of significant differences for CouchDB users that want to use Couchbase Server, particularly when migrating existing applications. However, you also gain the scalability and performance advantages of the Membase Server components.
Term and concept differences
Within CouchDB information is stored into the database using the concept of a document ID (either explicit or automatically generated), against which the document (JSON) is stored. Within Couchbase, there is no document ID, instead information is stored in the form of a key/value pair, where the key is equivalent to the document ID, and the value is equivalent to the document. The format of the data is the same.
Almost all of the HTTP REST API that makes up the interface for communicating with CouchDB does not exist within Couchbase Server. The basic document operations for creating, retrieving, updating and deleting information are entirely supported by the memcached protocol.
Also, beyond views, many of the other operations are unsupported at the client level within CouchDB. For example, you cannot create a new database as a client, store attachments, or perform administration-style functions, such as view compaction.
Couchbase Server does not support the notion of databases, instead information is stored within logical containers called Buckets. These are logically equivalent and can be used to compartmentalize information according to projects or needs. With Buckets you get the additional capability to determine the number of replicas of the information, and the port and authentication required to access the information.
Consistent functionality
The operation and interface for querying and creating view definitions in Couchbase Server is mostly identical. Views are still based on the combination of a map/reduce function, and you should be able to port your map/reduce definitions to Couchbase Server without any issues. The main difference is that the view does not output the document ID, but, as previously noted, outputs the key against which the key/value was stored into the database.
Querying views is also the same, and you use the same arguments to the query, such as a start and end docids, returned row counts and query value specification, including the requirement to express your key in the form of a JSON value if you are using compound (array or hash) types in your view key specification. Stale views are also supported, and just as with CouchDB, accessing a stale view prevents Couchbase Server from updating the index.
Changed functionality
There are many changes in the functionality and operation of Couchbase Server than CouchDB, including:
* Basic data storage operations must use the memcached API.

* Explicit replication is unsupported. Replication between nodes within a cluster
  is automatically configured and enabled and is used to help distribute
  information around the cluster.

* You cannot replicate between a CouchDB database and Couchbase Server.

* Explicit attachments are unsupported, but you can store additional files as new
  key/value pairs into the database.

* CouchApps are unsupported.

* Update handlers, document validation functions, and filters are not supported.

* Futon does not exist, instead there is an entire Web Administration Console
  built into Couchbase Server that provides cluster configuration, monitoring and
  view/document update functionality.
Operational and deployment differences
From a practical level the major difference between CouchDB and Couchbase Server is that options for clustering and distribution of information are significantly different. With CouchDB you would need to handle the replication of information between multiple nodes and then use a proxy service to distribute the load from clients over multiple machines.
With Couchbase Server, the distribution of information is automatic within the cluster, and any Couchbase Server client library will automatically handle and redirect queries to the server that holds the information as it is distributed around the cluster. This process is automatic.
Client and application changes
As your CouchDB based application already uses JSON for the document information, and a document ID to identify each document, the bulk of your application logic and view support remain identical. However, the HTTP REST API for basic CRUD operations must be updated to use the memcached protocol.
Additionally, because CouchApps are unsupported you will need to develop a client side application to support any application logic.
Uninstalling
If you want to uninstall Couchbase Server from your system you must choose the method appropriate for your operating system.
Before removing Couchbase Server from your system, you should do the following:
Shutdown your Couchbase Server. For more information on the methods of shutting down your server for your platform, see Server Startup and Shutdown.
If your machine is part of an active cluster, you should rebalance your cluster to take the node out of your configuration. See Rebalancing.
Update your clients to point to an available node within your Couchbase Server cluster.
Uninstalling on Red Hat Linux
To uninstall the software on a Red Hat Linux system, run the following command:
> sudo rpm -e couchbase-server
Refer to the Red Hat RPM documentation for more information about uninstalling packages using RPM.
You may need to delete the data files associated with your installation. The
default installation location is /opt. If you selected an alternative location
for your data files, you will need to separately delete each data directory from
your system.
Uninstalling on Debian/Ubuntu Linux
To uninstall the software on a Ubuntu Linux system, run the following command:
> sudo dpkg -r couchbase-server
Refer to the Ubuntu documentation for more information about uninstalling
packages using dpkg.
You may need to delete the data files associated with your installation. The
default installation location is /opt. If you selected an alternative location
for your data files, you will need to separately delete each data directory from
your system.
Uninstalling on Windows
To uninstall the software on a Windows system you must have Administrator or Power User privileges to uninstall Couchbase.
To remove, choose Start > Settings > Control Panel, choose Add or Remove
Programs, and remove the Couchbase Server software.
Uninstalling on Mac OS X
To uninstall on Mac OS X:
Open the
Applicationsfolder, and then drag theCouchbase Serverapplication to the trash. You may be asked to provide administrator credentials to complete the deletion.To remove the application data, you will need to delete the
Couchbasefolder from the~/Library/Application Supportfolder for the user that ran Couchbase Server.