Introduction to Couchbase Server
A newer version of this software is available
You are viewing the documentation for an older version of this software. To find the documentation for the current version, visit the Couchbase documentation home page.
Couchbase Server is a distributed, document (“NoSQL”) database management system, designed to store the information for web applications. Couchbase Server provides a managed in-memory caching tier, so that it supports very fast create, store, update and retrieval operations.
These features are designed to support web application development where the high-performance characteristics are required to support low-latency and high throughput applications. Couchbase Server achieves this on a single server and provides support for the load to be increased almost linearly by making use of the clustered functionality built into Couchbase Server.
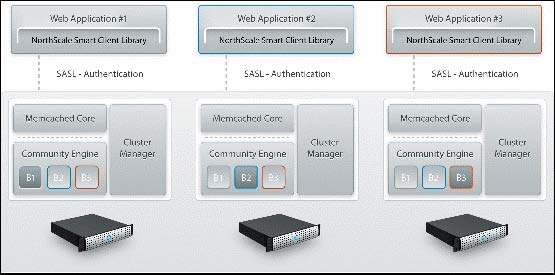
The cluster component distributes data over multiple servers to share the data and I/O load, while incorporating intelligence into the server and client access libraries that enable clients to quickly access the right node within the cluster for the information required. This intelligent distribution allows Couchbase Server to provide excellent scalability that can be extended simply by adding more servers as your load and application requirements increase.
For a more in-depth description of Couchbase Server, see the following sections:
The guiding principles and design goals of Couchbase Server are covered in Couchbase Server Basics.
Couchbase Server is part of the NoSQL database movement. For background information on what NoSQL is, and how this maps to Couchbase Server functionality, see Couchbase Server and NoSQL.
Information on the different components and systems in Couchbase Server, and how these map to the concepts and architecture required to understand the fundamentals of how it works are provided in Architecture and Concepts.
Couchbase Server Basics
Couchbase Server is a database platform that combines the principles and components of Membase Server and Apache CouchDB. From Membase Server, Couchbase Server builds on the high performance, memory-based, document storage interface, and incorporates the core principles of being Simple, Fast, and Elastic.
-
Simple
Couchbase Server is easy to install and manage, and through the document nature and memcached protocol interface, an easy to use database system. Because the database uses the document structure you do not need to create or manage the databases, tables and schemas. The simplified structure also means that the information can be distributed across nodes in a Couchbase Cluster automatically, without having to worry about normalizing or sharding your data to scale out performance.
-
Fast
Couchbase Server is fast, primarily because of the in-memory nature of the database. Furthermore, Couchbase Server provides quasi-deterministic latency and throughput, meaning that you can predict and rely on the speed and performance of your database without having to prepare and cope for spikes in load and problems.
-
Elastic
Couchbase Server was built from the core with the ability to expand and distribute the load across multiple servers. This is achieved through a combination of intelligence built into the server for distributing the stored data, and complimentary intelligence for clients accessing the data to be directed to the right machine. Data is automatically redistributed across the cluster, and changing the capacity of the cluster is a case of adding or removing nodes and rebalancing the cluster.
In tandem with the elastic nature of Couchbase Server, a Couchbase Cluster also takes advantage of the clustered architecture to support high availability. All nodes in a cluster are identical, and the cluster automatically creates replicas of information across the cluster. If a node fails, the stored data will be available on another node in the cluster.
-
memcached Compatibility
memcached is an memory-based caching application that uses the notion of a document store to save important data that are required by applications directly in RAM. Because the information is stored entirely in RAM, the latency for storing and retrieving information is very low. As a caching solution, memcached is used by a wide range of companies, including Google, Facebook, YouTube, Twitter and Wikipedia to help speed up their web-application performance by acting as a storage location for objects retrieved at comparative expense from a traditional SQL database.
Couchbase Server supports the same client protocol used by memcached for creating, retrieving, updating and deleting information in the database. This enables Couchbase Server to be a drop-in replacement for memcached, and this means that applications already employing memcached can take advantage of the other functionality within Couchbase Server, such as clustered and elastic distribution.
Couchbase Server and NoSQL
NoSQL is a somewhat unfortunate term that has been widely used to describe a class of database management systems that don’t employ a relational data model. The terminology keys off the SQL query language - a hallmark of relational database management systems. Unfortunately the query language is not the real differentiator; in fact, it is not necessarily a differentiator at all. Some NoSQL database management systems do, in fact, support the SQL query language! The fundamental difference in these systems lies not in the query language, but in the non-relational data model they employ. While non-relational database would be a more technically accurate term, it would also be more broad than the term NoSQL intends. It is interesting to note that a backronym has emerged in which NoSQL is proposed to stand for Not Only SQL. While more accurate, it is even less descriptive.
NoSQL databases are characterized by their ability to store data without first requiring one to define a database schema. In Couchbase Server, data is stored as a distributed, associative array of document IDs and contents, where the value is a blob of opaque binary data that doesn’t conform to a rigid, pre-defined schema from the perspective of the database management system itself. Additionally, and largely enabled by their schema-less nature, these systems tend to support a scale out approach to growth, increasing data and I/O capacity by adding more servers to a cluster; and without requiring any change to application software. In contrast, relational database management systems scale up by adding more capacity (CPU, Memory and Disk) to a single server to accommodate growth.
Relational databases store information in relations which must be defined, or modified, before data can be stored. A relation is simply a table of rows, where each row (also known as a tuple) in a given relation has a fixed set of attributes (columns). These columns are consistent across each row in a relation. Relations (tables) can be further connected through cross-table references. One table, CITIZENS for example, could hold rows of all individual citizens residing in a town. Another table, PARENTS, could have rows consisting of PARENT, CHILD and RELATIONSHIP fields. The first two fields could be references to rows in the CITIZENS table while the third field describes the parental relationship between the persons in the first two fields (father, mother).
Architecture and Concepts
In order to understand the structure and layout of Couchbase Server, you first need to understand the different components and systems that make up both an individual Couchbase Server instance, and the components and systems that work together to make up the Couchbase Cluster as a whole.
The following section provides key information and concepts that you need to understand the fast and elastic nature of the Couchbase Server database, and how some of the components work together to support a highly available and high performance database.
Nodes and Clusters
Couchbase Server can be used either in a standalone configuration, or in a cluster configuration where multiple Couchbase Servers are connected together to provide a single, distributed, data store.
In this description:
-
Couchbase Server or Node
A single instance of the Couchbase Server software running on a machine, whether a physical machine, virtual machine, EC2 instance or other environment.
All instances of Couchbase Server are identical, provide the same functionality, interfaces and systems, and consist of the same components.
-
Cluster
A cluster is a collection of one or more instances of Couchbase Server that are configured as a logical cluster. All nodes within the cluster are identical and provide the same functionality. Each node is capable of managing the cluster and each node can provide aggregate statistics and operational information about the cluster. User data is stored across the entire cluster through the vBucket system.
Clusters operate in a completely horizontal fashion. To increase the size of a cluster, you add another node. There are no parent/child relationships or hierarchical structures involved. This means that Couchbase Server scales linearly, both in terms of increasing the storage capacity and the performance and scalability.
Cluster Manager
Every node within a Couchbase Cluster includes the Cluster Manager component. The Cluster Manager is responsible for the following within a cluster:
Cluster management
Node administration
Node monitoring
Statistics gathering and aggregation
Run-time logging
Multi-tenancy
Security for administrative and client access
Client proxy service to redirect requests
Access to the Cluster Manager is provided through the administration interface (see Administration Tools ) on a dedicated network port, and through dedicated network ports for client access. Additional ports are configured for inter-node communication.
Memory Quotas
Couchbase Server manages the memory used across different components of the system:
-
Managing Disk and Memory for Nodes in the Cluster
Couchbase Server automatically manages storing the working set between disk and memory resources for nodes in a cluster. This allows an installation to have a working set that is larger than the available RAM in the nodes participating in the cluster. To keep throughput high and latency low, Couchbase Server will always keep metadata about all items in memory.
When configuring a Couchbase Server, a memory quota is set. Couchbase Server will automatically migrate items from memory to disk when the configured memory quota is reached. If those items are later accessed, they will be moved back into system memory. For efficiency purposes, these operations are performed on a regular basis in the background.
At the moment, there is no ability define a quota for the on-disk persistent storage. It is up to the administrator to appropriately monitor the disk utilization and take action (either deleting data from Couchbase or adding capacity by upgrading the nodes themselves or adding more nodes).
Couchbase Server monitors and reports on statistics for managing disk and memory. As with any multi-tier cache, if the working set of data is greater than the available amount of the bucket RAM quota (the first level of caching), performance will drop due to disk access latencies being higher and disk throughput being lower than RAM latencies and throughput. Acceptable performance of the system is application dependent. Statistics should be monitored in case tuning adjustments are required.
-
Server Quotas
Each server node has a memory quota that defines the amount of system memory that is available to that server node on the host system. The first node in a cluster sets a memory quota that is subsequently inherited by all servers joining the cluster. The maximum memory quota set on the first server node must be less than or equal to 80% of the total physical RAM on that node. A server cannot join a cluster if it has less physical RAM than 1.25x the RAM quota (the same maximum allocation of 80% of physical RAM to the cluster). If a server that was a standalone cluster joins another cluster, the memory quota is inherited from the cluster to which the node is added.
Server nodes do not have disk quotas. System administrators are responsible for monitoring free disk space on individual server nodes. Each server node in a cluster has its own storage path - the location on disk where data will be stored. Storage paths do not need to be uniform across all server nodes in a cluster. If a server that was a standalone cluster joins another cluster, the storage path for that server remains unchanged.
-
Bucket Quotas
Memory quota allocation is also controlled on a bucket-by-bucket basis. A fixed amount of memory per node is allocated for use by a bucket. Adding or removing nodes will change the size of the bucket.
For more information about creating and changing these node memory quota and bucket quota, see Initializing Nodes and Creating and Editing Data Buckets.
Buckets
Couchbase Server provides data management services using named buckets. These are isolated virtual containers for data. A bucket is a logical grouping of physical resources within a cluster of Couchbase Servers. They can be used by multiple client applications across a cluster. Buckets provide a secure mechanism for organizing, managing, and analyzing data storage resources.
Couchbase Server provides the two core types of buckets that can be created and managed. Couchbase Server collects and reports on run-time statistics by bucket type.
| Bucket Type | Description |
|---|---|
| Couchbase | Provides highly-available and dynamically reconfigurable distributed data storage, providing persistence and replication services. Couchbase buckets are 100% protocol compatible with, and built in the spirit of, the memcached open source distributed document cache. |
| Memcached | Provides a directly-addressed, distributed (scale-out), in-memory, document cache. Memcached buckets are designed to be used alongside relational database technology – caching frequently-used data, thereby reducing the number of queries a database server must perform for web servers delivering a web application. |
The different bucket types support different capabilities. Couchbase-type buckets provide a highly-available and dynamically reconfigurable distributed data store. Couchbase-type buckets survive node failures and allow cluster reconfiguration while continuing to service requests. Couchbase-type buckets provide the following core capabilities.
| Capability | Description |
|---|---|
| Caching | Couchbase buckets operate through RAM. Data is kept in RAM and persisted down to disk. Data will be cached in RAM until the configured RAM is exhausted, when data is ejected from RAM. If requested data is not currently in the RAM cache, it will be loaded automatically from disk. |
| Persistence | Data objects can be persisted asynchronously to hard-disk resources from memory to provide protection from server restarts or minor failures. Persistence properties are set at the bucket level. |
| Replication | A configurable number of replica servers can receive copies of all data objects in the Couchbase-type bucket. If the host machine fails, a replica server can be promoted to be the host server, providing high avilability cluster operations via failover. Replication is configured at the bucket level. |
| Rebalancing | Rebalancing enables load distribution across resources and dynamic addition or removal of buckets and servers in the cluster. |
For more information on the bucket types, their configuration and accessibility, see Buckets.
Couchbase Server leverages the memcached storage engine interface and the Couchbase Bucket Engine to enable isolated buckets that support multi-tenancy.
Smart clients discover changes in the cluster using the Couchbase Management REST API. Buckets can be used to isolate individual applications to provide multi-tenancy, or to isolate data types in the cache to enhance performance and visibility. Couchbase Server allows you to configure different ports to access different buckets, and gives you the option to access isolated buckets using either the binary protocol with SASL authentication, or the ASCII protocol with no authentication
Couchbase Server allows you to use and mix different types of buckets (Couchbase and Memcached) as appropriate in your environment. Buckets of different types still share the same resource pool and cluster resources. Quotas for RAM and disk usage are configurable per bucket so that resource usage can be managed across the cluster. Quotas can be modified on a running cluster so that administrators can reallocate resources as usage patterns or priorities change over time.
vBuckets
A vBucket is defined as the owner of a subset of the key space of a Couchbase cluster. These vBuckets are used to allow information to be distributed effectively across the cluster. The vBucket system is used both for distributing data, and for supporting replicas (copies of bucket data) on more than one node.
Clients access the information stored in a bucket by communicating directly with the node response for the corresponding vBucket. This direct access enables clients to communicate with the node storing the data, rather than using a proxy or redistribution architecture. The result is abstracting the physical toplogy from the logical partitioning of data. This architecture is what gives Coucbase Server the elasticity.
This architecture differs from the method used by memcached, which uses
client-side key hashes to determine the server from a defined list. This
requires active management of the list of servers, and specific hashing
algorithms such as Ketama to cope with changes to the topology. The structure is
also more flexible and able to cope with changes than the typical sharding
arrangement used in an RDBMS environment.
vBuckets are not a user-accessible component, but they are a critical component of Couchbase Server and are vital to the availability support and the elastic nature.
Every document ID belongs to a vBucket. A mapping function is used to calculate the vBucket in which a given document belongs. In Couchbase Server, that mapping function is a hashing function that takes a document ID as input and outputs a vBucket identifier. Once the vBucket identifier has been computed, a table is consulted to lookup the server that “hosts” that vBucket. The table contains one row per vBucket, pairing the vBucket to its hosting server. A server appearing in this table can be (and usually is) responsible for multiple vBuckets.
Data in RAM
The architecture of Couchbase Server includes a built-in caching layer. This approach allows for very fast response times, since the data is initially written to RAM by the client, and can be returned from RAM to the client when the data is requested.
The effect of this design to provide an extensive built-in caching layer which acts as a central part of the operation of the system. The client interface works through the RAM-based data store, with information stored by the clients written into RAM and data retrieved by the clients returned from RAM, or loaded from disk into RAM before being returned to the client.
This process of storing and retrieving stored data through the RAM interface ensures the best performance. For the highest performance, you should allocate the maximum amount of RAM on each of your nodes. The aggregated RAM is used across the cluster.
This is different in design to other database systems where the information is written to the database and either a separate caching layer is employed, or the caching provided by the operating system is used to kept regularly used information in memory and accessible.
Ejection
Ejection is a mechanism used with Couchbase buckets, and is the process of removing data from RAM to provide room for the active and more frequently used information and is a key part of the caching mechanism. Ejection is automatic and operates in conjunction with the disk persistence system to ensure that data in RAM has been persisted to disk and can be safely ejected from the system.
The system ensures that the data stored in RAM will already have been written to disk, so that it can be loaded back into RAM if the data is requested by a client. Ejection is a key part of keeping the frequently used information in RAM and ensuring there is space within the Couchbase RAM allocation to load that data back into RAM when the information is requested by a client.
For Couchbase buckets, data is never deleted from the system unless a client explicitly deletes the document from the database or theexpiration value for the document is reached. Instead, the ejection mechanism removes it from RAM, keeping a copy of that information on disk.
Expiration
Each document stored in the database has an optional expiration value (TTL, time to live). The default is for there to be no expiration, i.e. the information will be stored indefinitely. The expiration can be used for data that naturally has a limited life that you want to be automatically deleted from the entire database.
The expiration value is user-specified on a document basis at the point when the data is stored. The expiration can also be updated when the data is updated, or explicitly changed through the Couchbase protocol. The expiration time can either be specified as a relative time (for example, in 60 seconds), or absolute time (31st December 2012, 12:00pm).
Typical uses for an expiration value include web session data, where you want the actively stored information to be removed from the system if the user activity has stopped and not been explicitly deleted. The data will time out and be removed from the system, freeing up RAM and disk for more active data.
Eviction
Eviction is the process of removing information entirely from memory for
memcached buckets. The memcached system uses a least recently used (LRU)
algorithm to remove data from the system entirely when it is no longer used.
Within a memcached bucket, LRU data is removed to make way for new data, with
the information being deleted, since there is no persistence for memcached
buckets.
Disk Storage
For performance, Couchbase Server prefers to store and provide information to clients using RAM. However, this is not always possible or desirable in an application. Instead, what is required is the ‘working set’ of information stored in RAM and immediately available for supporting low-latency responses.
Couchbase Server stores data on disk, in addition to keeping as much data as possible in RAM as part of the caching layer used to improve performance. Disk persistence allows for easier backup/restore operations, and allows datasets to grow larger than the built-in caching layer.
Couchbase automatically moves data between RAM and disk (asynchronously in the background) in order to keep regularly used information in memory, and less frequently used data on disk. Couchbase constantly monitors the information accessed by clients, keeping the active data within the caching layer.
The process of removing data from the caching to make way for the actively used
information is called ejection, and is controlled automatically through
thresholds set on each configured bucket in your Couchbase Server Cluster.
The use of disk storage presents an issue in that a client request for an
individual document ID must know whether the information exists or not.
Couchbase Server achieves this using metadata structures. The metadata holds
information about each document stored in the database and this information is
held in RAM. This means that the server can always return a ‘document ID not
found’ response for an invalid document ID, while returning the data for an item
either in RAM (in which case it is returned immediately), or after the item has
been read from disk (after a delay, or until a timeout has been reached).
The process of moving information to disk is asynchronous. Data is ejected to disk from memory in the background while the server continues to service active requests. During sequences of high writes to the database, clients will be notified that the server is temporarily out of memory until enough items have been ejected from memory to disk.
Similarly, when the server identifies an item that needs to be loaded from disk because it is not in active memory, the process is handled by a background process that processes the load queue and reads the information back from disk and into memory. The client is made to wait until the data has been loaded back into memory before the information is returned.
The asynchronous nature and use of queues in this way enables reads and writes to be handled at a very fast rate, while removing the typical load and performance spikes that would otherwise cause a traditional RDBMS to produce erratic performance.
Warmup
When Couchbase Server is re-started, or when it is started after a restore from backup, the server goes through a warm-up process. The warm-up loads data from disk into RAM, making the data available to clients.
The warmup process must complete before clients can be serviced. Depending on the size and configuration of your system, and the amount of data that you have stored, the warmup may take some time to load all of the stored data into memory.
Rebalancing
The way data is stored within Couchbase Server is through the distribution
offered by the vBucket structure. If you want to expand or shrink your Couchbase
Server cluster then the information stored in the vBuckets needs to be
redistributed between the available nodes, with the corresponding vBucket map
updated to reflect the new structure. This process is called rebalancing.
Rebalancing is an deliberate process that you need to initiate manually when the structure of your cluster changes. The rebalance process changes the allocation of the vBuckets used to store the information and then physically moves the data between the nodes to match the new structure.
The rebalancing process can take place while the cluster is running and servicing requests. Clients using the cluster read and write to the existing structure with the data being moved in the background between nodes. Once the moving process has been completed, the vBucket map is updated and communicated to the smart clients and the proxy service (Moxi).
The result is that the distribution of data across the cluster has been rebalanced, or smoothed out, so that the data is evenly distributed across the database, taking into account the data and replicas of the data required to support the system.
Replicas and Replication
In addition to distributing information across the cluster for the purposes of even data distribution and performance, Couchbase Server also includes the ability to create additional replicas of the data. These replicas work in tandem with the vBucket structure, with replicas of individual vBuckets distributed data around the cluster. Distribution of replicas is handled in the same way as the core data, with portions of the data distributed around the cluster to prevent a single point of failure.
The replication of this data around this cluster is entirely peer-to-peer based, with the information being exchanged directly between nodes in the cluster. There is no topology, hierarchy or master/slave relationship. When the data is written to a node within the cluster, the data is stored directly in the vBucket and then distributed to one or more replica vBuckets simultaneously using the TAP system.
In the event of a failure of one of the nodes in the system, the replica vBuckets are enabled in place of the vBuckets that were failed in the bad node. The process is near-instantaneous. Because the replicas are populated at the same time as the original data, there is no need for the data to be copied over; the replica vBuckets are there waiting to be enabled with the data already within them. The replica buckets are enabled and the vBucket structure updated so that clients now communicate with the updated vBucket structure.
Replicas are configured on each bucket. You can configure different buckets to contain different numbers of replicas according to the required safety level for your data. Replicas are only enabled once the number of nodes within your cluster support the required number of replicas. For example, if you configure three replicas on a bucket, the replicas will only be enabled once you have four nodes.
The number of replicas for a bucket cannot be changed after the bucket has been created.
Failover
Information is distributed around a cluster using a series of replicas. For
Couchbase buckets you can configure the number of replicas (complete copies of
the data stored in the bucket) that should be kept within the Couchbase Server
Cluster.
In the event of a failure in a server (either due to transient failure, or for
administrative purposes), you can use a technique called failover to indicate
that a node within the Couchbase Cluster is no longer available, and that the
replica vBuckets for the server are enabled.
The failover process contacts each server that was acting as a replica and updates the internal table that maps client requests for documents to an available server.
Failover can be performed manually, or you can use the built-in automatic failover that reacts after a preset time when a node within the cluster becomes unavailable.
For more information, see Node Failover.
TAP
The TAP protocol is an internal part of the Couchbase Server system and is used in a number of different areas to exchange data throughout the system. TAP provides a stream of data of the changes that are occurring within the system.
TAP is used during replication, to copy data between vBuckets used for replicas. It is also used during the rebalance procedure to move data between vBuckets and redestribute the information across the system.
Client Interface
Within Couchbase Server, the techniques and systems used to get information into and out of the database differ according to the level and volume of data that you want to access. The different methods can be identified according to the base operations of Create, Retrieve, Update and Delete:
-
Create
Information is stored into the database using the memcached protocol interface to store a document against a specified document ID. Bulk operations for setting the value of a large number of documents at the same time are available, and these are more efficient than multiple smaller requests.
The value stored can be any binary value, including structured and unstructured strings, serialized objects (from the native client language), native binary data (for example, images or audio).
-
Retrieve
To retrieve, you must know the document ID used to store a particular value, then you can use the memcached protocol (or an appropriate memcached compatible client-library) to retrieve the value stored against a specific document ID. You can also perform bulk operations
-
Update
To update information in the database, you must use the memcached protocol interface. The memcached protocol includes functions to directly update the entire contents, and also to perform simple operations, such as appending information to the existing record, or incrementing and decrementing integer values.
-
Delete
To delete information from Couchbase Server you need to use the memcached protocol which includes an explicit delete command to remove a document from the server.
However, Couchbase Server also allows information to be stored in the database with an expiry value. The expiry value states when a document should be automatically deleted from the entire database, and can either be specified as a relative time (for example, in 60 seconds), or absolute time (31st December 2012, 12:00pm).
The methods of creating, updating and retrieving information are critical to the way you work with storing data in Couchbase Server.
Administration Tools
Couchbase Server was designed to be as easy to use as possible, and does not require constant attention. Administration is however offered in a number of different tools and systems. For a list of the most common administration tasks, see Administration Tasks.
Couchbase Server includes three solutions for managing and monitoring your Couchbase Server and cluster:
-
Web Administration Console
Couchbase Server includes a built-in web-administration console that provides a complete interface for configuring, managing, and monitoring your Couchbase Server installation.
For more information, see Web Console for Administration.
-
Administration REST API
In addition to the Web Administration console, Couchbase Server incorporates a management interface exposed through the standard HTTP REST protocol. This REST interface can be called from your own custom management and administration scripts to support different operations.
Full details are provided in REST API for Administration
-
Command Line Interface
Couchbase Server includes a suite of command-line tools that provide information and control over your Couchbase Server and cluster installation. These can be used in combination with your own scripts and management procedures to provide additional functionality, such as automated failover, backups and other procedures. The command-line tools make use of the REST API.
For information on the command-line tools available, see Command-line Interface for Administration.
Statistics and Monitoring
In order to understand what your cluster is doing and how it is performing, Couchbase Server incorporates a complete set of statistical and monitoring information. The statistics are provided through all of the administration interfaces. Within the Web Administration Console, a complete suite of statistics are provided, including built-in real-time graphing and performance data.
The statistics are divided into a number of groups, allowing you to identify different states and performance information within your cluster:
-
By Node
Node statistics show CPU, RAM and I/O numbers on each of the servers and across your cluster as a whole. This information can be used to help identify performance and loading issues on a single server.
-
By vBucket
The vBucket statistics show the usage and performance numbers for the vBuckets used to store information in the cluster. These numbers are useful to determine whether you need to reconfigure your buckets or add servers to improve performance.
-
By Disk Queues
These statistics monitor the queues used to read and write information to disk and between replicas. This information can be helpful in determining whether you should expand your cluster to reduce disk load.
-
By TAP Queues
The TAP interface is used to monitor changes and updates to the database. TAP is used internally by Couchbase to provide replication between Couchbase nodes, but can also be used by clients for change notifications.
In nearly all cases the statistics can be viewed both on a whole of cluster basis, so that you can monitor the overall RAM or disk usage for a given bucket, or an individual server basis so that you can identify issues within a single machine.
Getting Started
To start using Couchbase Server, you need to follow these steps:
Prepare your target system by ensuring that you meet the system requirements. See Preparation.
Install Couchbase Server using one of the available binary distributions. See Installing Couchbase Server.
For more information on Upgrading Couchbase Server from a previous version, see Upgrading to Couchbase Server 1.8.
Test the installation by connecting to the Couchbase Server and storing some data using the native Memcached protocol. See Testing Couchbase Server.
Setup the new Couchbase Server system by completing the web-based setup instructions. See Setting up Couchbase Server.
Preparation
Heterogeneous or mixed deployments (deployments with both Linux and Windows server nodes) are not supported at this time. It is recommended that when deploying to multiple systems, that system be running the same operating system.
When running Couchbase Server your system should meet or exceed the following system requirements.
Supported Platforms
The following operating systems are supported:
RedHat Enterprise Linux 5.2 (Deprecated). Requires additional third-party libraries and packages.
RedHat Enterprise Linux 5.4 (32-bit and 64-bit)
Ubuntu Linux 10.04 (32-bit and 64-bit)
Ubuntu Linux 11.10 (32-bit and 64-bit) Developer Only
Windows Server 2008 R2 (32-bit and 64-bit)
Mac OS X 10.5 or higher (minimum), 10.6 or higher preferred (64-bit only) Developer Only
Use of SELinux
Couchbase Server does not currently operate when SELinux is enabled. You should disable SELinux on each node in the cluster to prevent problems with the operation of Couchbase Server. For more information on disable SELinux, see How to Disable SELinux.
Hardware Requirements
The following hardware requirements are recommended for installation:
Quad-core, 64-bit CPU running at 3GHz
16GB RAM (physical)
Block-based storage device (hard disk, SSD, EBS, iSCSI). Network filesystems (e.g. CIFS, NFS) are not supported.
A minimum specification machine should have the following characteristics:
Dual-core CPU running at 2GHz
4GB RAM (physical)
For development and testing purposes a reduced CPU and RAM configuration than the minimum specified can be used. This can be as low as 256MB of free RAM (beyond operating system requirements) and a single CPU core.
However, you should not use a configuration lower than that specified above in production. Performance on machines lower than the above specification will be significantly lower and should not be used as an indication of the performance on a production machine.
You must have enough memory to run your operating system and the memory reserved for use by Couchbase Server. For example, if you want to dedicate 8GB of RAM to Couchbase Server you must have at least an additional 128MB of RAM to host your operating system. If you are running additional applications and servers, you will need additional RAM.
Storage Requirements
For running Couchbase Server you must have the following storage available:
100MB for application logging
Disk space to match your physical RAM requirements for persistence of information
Web Browser (for administration)
The Couchbase Server administration interface is supported using the following Web browsers, with Javascript support enabled:
-
Mozilla Firefox 3.6 or higher
To enable JavaScript, select the
Enable JavaScriptoption within theContentpanel of the application preferences. -
Safari 5 or higher
To enable JavaScript, use the checkbox on the security tab of the application preferences.
-
Google Chrome 11 or higher
To enable JavaScript, use the
Allow all sites to run JavaScript (recommended)option within theContentbutton of theUnder the Hoodsection of the application preferences. -
Internet Explorer 8 or higher
To enable JavaScript, by enabling
Active Scriptingwithin theCustom Level, section of theSecuritysection of theInternet Optionsitem of theToolsmenu.
Network Ports
Couchbase Server uses a number of different network ports for communication between the different components of the server, and for communicating with clients that accessing the data stored in the Couchbase cluster. The ports listed must be available on the host for Couchbase Server to run and operate correctly.
Couchbase Server will configure these ports automatically, but you must ensure that your firewall or IP tables configuration allow communication on the specified ports for each usage type.
The following table lists the ports used for different types of communication with Couchbase Server, as follows:
-
Node to Node
Where noted, these ports are used by Couchbase Server for communication between all nodes within the cluster. You must have these ports open on all to enable nodes to communicate with each other.
-
Node to Client
Where noted, these ports should be open between each node within the cluster and any client nodes accessing data within the cluster.
-
Cluster Administration
Where noted, these ports should be open and accessible to allow administration, whether using the REST API, command-line clients, and Web browser.
| Port | Purpose | Node to Node | Node to Client | Cluster Administration |
|---|---|---|---|---|
| 8091 | Web Administration Port | Yes | Yes | Yes |
| 11209 | Internal Cluster Port | Yes | No | No |
| 11210 | Internal Cluster Port | Yes | Yes | No |
| 4369 | Erlang Port Mapper ( epmd ) |
Yes | No | No |
| 21100 to 21199 (inclusive) | Node data exchange | Yes | No | No |
Installing Couchbase Server
To install Couchbase Server on your machine you must download the appropriate package for your chosen platform from http://www.couchbase.com/downloads. For each platform, follow the corresponding platform-specific instructions.
Red Hat Linux Installation
The RedHat installation uses the RPM package. Installation is supported on RedHat and RedHat based operating systems such as CentOS.
To install, use the rpm command-line tool with the RPM package that you
downloaded. You must be logged in as root (Superuser) to complete the
installation:
root-shell> rpm --install couchbase-server version.rpm
Where version is the version number of the downloaded package.
Once the rpm command has been executed, the Couchbase Server starts
automatically, and is configured to automatically start during boot under the 2,
3, 4, and 5 runlevels. Refer to the RedHat RPM documentation for more
information about installing packages using RPM.
Once installation has completed, the installation process will display a message similar to that below:
Starting Couchbase server: [ OK ]

You have successfully installed Couchbase Server.
Please browse to http://hostname:8091/ to configure your server.
Please refer to http://couchbase.com/support for
additional resources.

Please note that you have to update your firewall configuration to
allow connections to the following ports: 11211, 11210, 4369, 8091
and from 21100 to 21199.

By using this software you agree to the End User License Agreement.
See /opt/couchbase/LICENSE.txt.
Once installed, you can use the RedHat chkconfig command to manage the
Couchbase Server service, including checking the current status and creating the
links to enable and disable automatic startup. Refer to the RedHat documentation
for instructions.
To continue installation you must open a web browser and access the web administration interface. See Setting up Couchbase Server.
Ubuntu Linux Installation
The Ubuntu installation uses the DEB package.
To install, use the dpkg command-line tool using the DEB file that you
downloaded. The following example uses sudo which will require root-access to
allow installation:
shell> dpkg -i couchbase-server version.deb
Where version is the version number of the downloaded package.
Once the dpkg command has been executed, the Couchbase Server starts
automatically, and is configured to automatically start during boot under the 2,
3, 4, and 5 runlevels. Refer to the Ubuntu documentation for more information
about installing packages using the Debian package manager.
Once installation has completed, the installation process will display a message similar to that below:
Selecting previously deselected package couchbase-server.
(Reading database ... 218698 files and directories currently installed.)
Unpacking couchbase-server (from couchbase-server-community_x86_64_beta.deb) ...
Setting up couchbase-server (2-0~basestar) ...
 * Started Couchbase server

You have successfully installed Couchbase Server.
Please browse to http://tellurium-internal:8091/ to configure your server.
Please refer to http://couchbase.com for additional resources.

Please note that you have to update your firewall configuration to
allow connections to the following ports: 11211, 11210, 4369, 8091
and from 21100 to 21199.

By using this software you agree to the End User License Agreement.
See /opt/couchbase/LICENSE.txt.
Once installed, you can use the service command to manage the Couchbase Server
service, including checking the current status. Refer to the Ubuntu
documentation for instructions.
To continue installation you must open a web browser and access the web administration interface. See Setting up Couchbase Server.
Microsoft Windows Installation
To install on Windows you must download the Windows installer package. This is supplied as an Windows executable. You can install the package either using the GUI installation process, or by using the unattended installation process.
GUI Installation
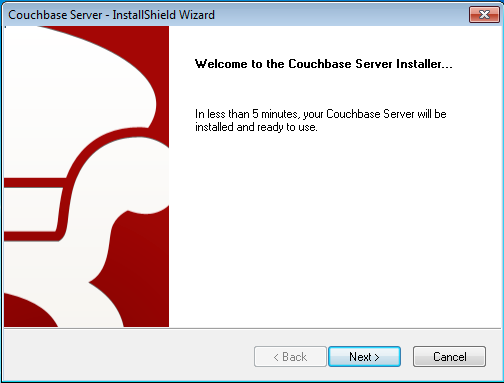
To use the GUI installer, double click on the downloaded executable file.
The installer will launch and prepare for installation. You can cancel this process at any time. Once completed, you will be provided with the welcome screen.
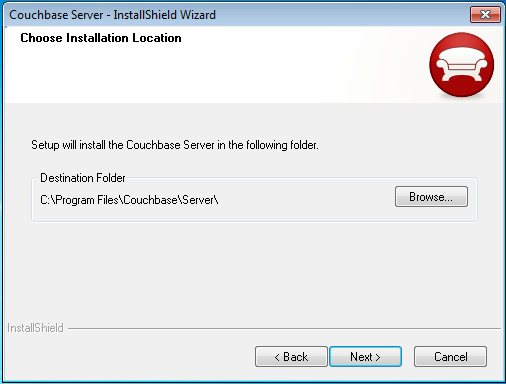
Click Next to start the installation. You will be prompted with the
Installation Location screen. You can change the location where the Couchbase
Server application is located. Note that this does not configure the location of
where the persistent data will be stored, only the location of the application
itself. To select the install location, click the Browse button to select the
folder. Click Next to continue the installation.
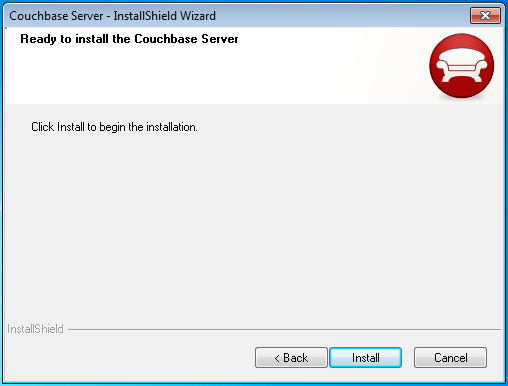
Configuration has now been completed. You will be prompted to confirm that you
want to continue installation. Click Next to confirm the installation and
start the installation process.
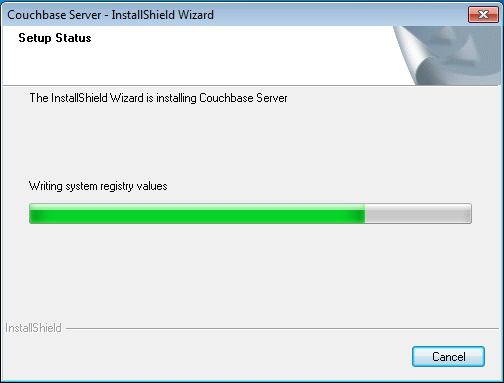
The install will copy over the necessary files to the system. During the installation process, the installer will also check to ensure that the default administration port is not already in use by another application. If the default port is unavailable, the installer will prompt for a different port to be used for administration of the Couchbase Server.
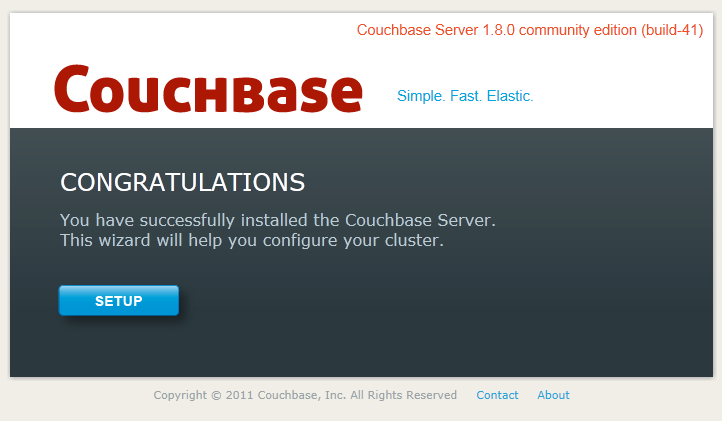
Once the installation process has been completed, you will be prompted with the
completion screen. This indicates that the installation has been completed and
your Couchbase Server is ready to be setup and configured. When you click
Finish, the installer will quit and automatically open a web browser with the
Couchbase Server setup window.
To continue installation you should follow the server setup instructions. See Setting up Couchbase Server.
Unattended Installation
The unattended installation process works by first recording your required installation settings using the GUI installation process outlined above which are saved to a file. You can then use the file created to act as the option input to future installations.
To record your installation options, open a Command Terminal or Powershell and
start the installation executable with the /r command-line option:
C:\Downloads> couchbase_server_version.exe /r
You will be prompted with the installation choices as outlined above, but the
installation process will not actually be completed. Instead, a file with your
option choices will be recorded in the file C:\Windows\setup.iss.
To perform an installation using a previously recorded setup file, copy the
setup.iss file into the same directory as the installer executable. Run the
installer from the command-line, this time using the /s option.
C:\Downloads> couchbase_server_version.exe /s
You can repeat this process on multiple machines by copying the executable
package and the setup.iss file to each machine.
Mac OS X Installation
The Mac OS X installation uses a Zip file which contains a standalone
application that can be copied to the Applications folder or to any other
location you choose. The installation location does not affect the location of
the Couchbase data files.
To install:
Download the Mac OS X Zip file.
Double-click the downloaded Zip installation file to extract the contents. This will create a single file, the
Couchbase.appapplication.Drag and Drop the
Couchbase.appto your chosen installation folder, such as the systemApplicationsfolder.
Once the application has been copied to your chosen location, you can double-click on the application to start it. The application itself has no user interface. Instead, the Couchbase application icon will appear in the menubar on the right-hand side. If there is no active configuration for Couchbase, then the Couchbase Web Console will be opened and you will be asked to complete the Couchbase Server setup process. See Setting up Couchbase Server for more details.
The Couchbase application runs as a background application. Clicking on the menubar gives you a list of operations that can be performed. For more information, see Startup and Shutdown on Mac OS X.
The command line tools are included within the Couchbase Server application
directory. You can access them within Terminal by using the full location of the
Couchbase Server installation. By default, this is /Applications/Couchbase
Server.app/Contents//Resources/couchbase-core/bin/.
Upgrading to Couchbase Server 1.8
Couchbase Server supports upgrades from the previous major release version (Membase Server 1.7) to any minor release within Couchbase Server 1.8, or between minor releases within Couchbase Server 1.8.
Upgrades using either the online or offline method are supported only when upgrading from Membase Server 1.7 to Couchbase Server 1.8. For cluster upgrades older than Membase Server 1.7, you must upgrade to Membase Server 1.7.2 first.
For information on upgrading to Membase 1.7.x, see .
A known issue exists when performing a rolling upgrade from Membase Server 1.7.1 to Couchbase Server 1.8. The problem manifests itself as the rebalance process failing to complete effectively. You should perform an offline (in-place) upgrade. See Offline (in-place) Upgrade Process, for more information.
The upgrade process for a cluster can be performed in two ways:
-
Online (rolling) Upgrades
Online upgrades enable you to upgrade your cluster without taking your cluster down, allowing your application to continue running. Using the Online upgrade method, individual nodes are removed from the cluster (using rebalancing), upgraded, and then brought back into action within the cluster.
Online upgrades natually take a long time, as each node must be taken out of the cluster, upgraded, and then brought back in. However, because the cluster can be upgraded without taking either the cluster or associated applications down, it can be a more effective method of upgrading.
For full instructions on performing an online upgrade, see Online (rolling) Upgrade Process.
Starting with Couchbase Server 1.8.1, you can also make use of the swap rebalance functionality to perform an online upgrade with reduced performance impact on your cluster. For more information, see Upgrading to Couchbase Server 1.8.1 Using Swap Rebalance.
-
Offline (in-place) Upgrades
Offline upgrades involve taking your application and Couchbase Server cluster offline, upgrading every node within the cluster while the cluster is down, and then restarting the upgraded cluster.
Offline upgrades can be quicker because the upgrade process can take place simultaneously on every node in the cluster. The cluster, though, must be shut down for the upgrade to take place. This disables both the cluster and all the applications that rely on it.
For full instructions on performing an offline upgrade, see Offline (in-place) Upgrade Process.
| Feature | Online Upgrades | Offline Upgrades |
|---|---|---|
| Applications Remain Available | ✓ | ✗ |
| Cluster Stays in Operation | ✓ | ✗ |
| Cluster must be Shutdown | ✗ | ✓ |
| Time Required | Requires Rebalance, Upgrade, Rebalance per Node | Entire Cluster is Upgraded at Once |
Before beginning any upgrade, a backup should be taken as a best practice, see Backup and Restore with Couchbase.
For information on backing up Membase 1.7.x, see .
Online (rolling) Upgrade Process
Within an online or rolling upgrade, the upgrade process can take place without taking down the cluster or the associated application. This means that the cluster and applications can continue to function while you upgrade the individual nodes within the cluster.
The online upgrade process makes use of the auto-sharding and rebalancing functionality within Couchbase Server to enable one or more nodes within the cluster to be temporarily removed from the cluster, upgraded, and then re-enabled within the cluster again.
To perform an online upgrade of your cluster:
-
Depending on the size and activity of your cluster, choose one or more nodes to be temporarily removed from the cluster and upgraded. You can upgrade one node at a time, or if you have capacity, multiple nodes by taking them out of the cluster at the same time.
If necessary, you can add new nodes to your cluster to maintain performance while your existing nodes are upgraded.
-
On the
Manage->Server Nodesscreen, click theRemove Server. This marks the server for removal from the cluster, but does not actually remove it.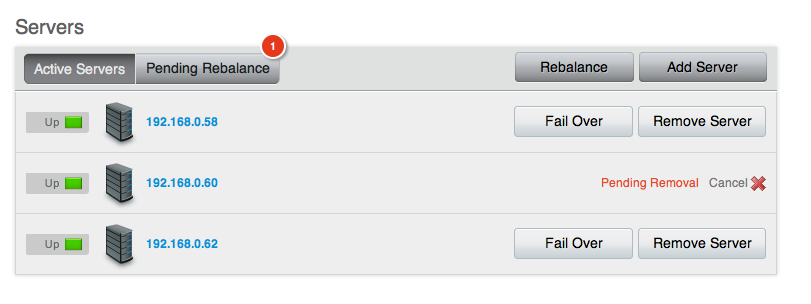
-
The
Pending Rebalancewill show the number of servers that require a rebalance to remove them from the cluster. Click theRebalancebutton.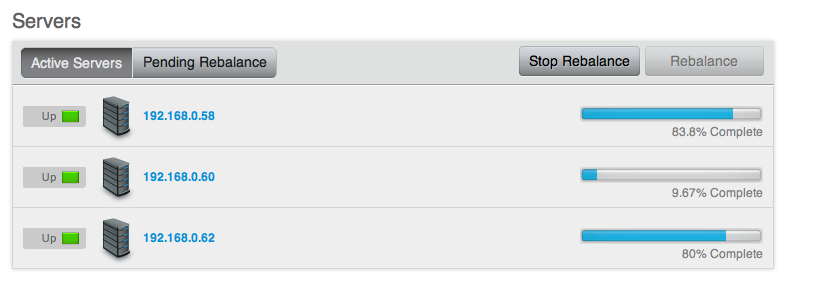
This will start the rebalance process. Once rebalancing has been completed, the
Server Nodesdisplay should display only the remaining (active) nodes in your cluster.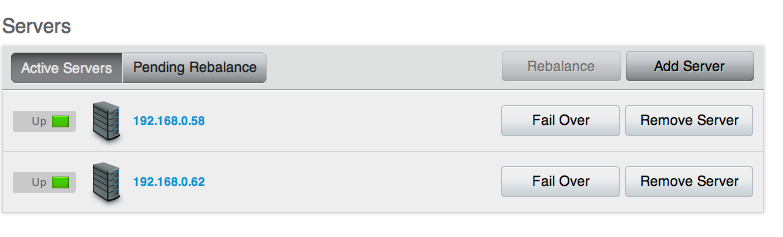
On the node to be upgraded, stop the Couchbase Server process. For guidance on specific platforms, see Startup and Shutdown of Couchbase Server.
With Couchbase Server shutdown on the node, you can perform a standard node upgrade to the new version of Couchbase Server. See Node Upgrade Process for details.
Couchbase Server should be started automatically after the upgrade. If not, restart the Couchbase Server process, using the methods described in Startup and Shutdown of Couchbase Server.
-
With the node upgraded, you need to add the node back to the cluster.
On an existing node within the running cluster, navigate to the
Manage-gt;Server Nodespage. Click theAdd Serverbutton. You will be prompted to enter the IP address and username/password of the server to add back to the cluster.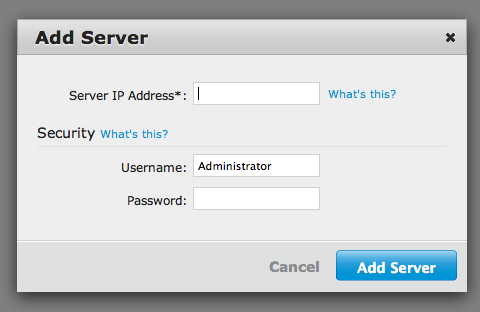
The
Pending Rebalancecount will indicate that servers need to be rebalanced into the cluster. ClickRebalanceto rebalance the cluster, and bring the node back into production.
You will need to repeate the above sequence for each node within the cluster in order to upgrade the entire cluster to the new version.
Upgrading to Couchbase Server 1.8.1 Using Swap Rebalance
Couchbase Server 1.8.1
Swap rebalance functionality is available in Couchbase Server 1.8.1.
You can make use of the Swap Rebalance feature to easily and simply upgrade your servers to Couchbase Server 1.8.1, without reducing the performance of your cluster. For background information on the improvements with swap rebalance, see Swap Rebalance.
You must apply a patch to enable the swap rebalance functionality during upgrade. See step 3 below.
You will need one spare node to start the upgrade process.
Install Couchbase Server 1.8.1 on one spare node.
-
Add the new node with Couchbase Server 1.8.1 to the cluster.
For swap rebalance to take effect, the number of nodes being removed and added to the cluster must be identical. Do not rebalance the cluster until the new Couchbase Server 1.8.1 node has become orchestrator of the new cluster.
You must wait for the new node to be identified within the cluster and identify itself itself as the orchestrator node. This will ensure that the node will manage the rebalance operation and perform a swap rebalance operation. You can check for this by opening the
Logportion of the Web UI for the following sequence of messages attributed to the new node:Node ns_1@10.3.2.147 joined cluster Haven’t heard from a higher priority node or a master, so I’m taking over. Current master is older and I’ll try to takeover (repeated 1 times)Once the new node has been assigned as the orchestrator, all rebalances performed will be swap rebalances, assuming they meet the swap rebalance criteria.
-
Download the patch from http://packages.couchbase.com/releases/1.8.1/MB-5895.erl. This patch must be applied only for the first rebalance to enable swap rebalance during the upgrade process.
You must apply the patch to the newley added Couchbase Server 1.8.1 node. To apply the patch:
-
For Linux :
Execute the following command on the new Couchbase Server 1.8.1 node:
shell> /opt/couchbase/bin/curl -v –user Administrator:password -X POST  \
     -d @MB-5895.erl http://localhost:8091/diag/eval
The output should be similar to the following, showing the connection opened without an explicit server response:
<pre><code class="no-highlight">* About to connect() to localhost port 8091 (#0) * Trying 127.0.0.1... connected * Connected to localhost (127.0.0.1) port 8091 (#0) * Server auth using Basic with user 'Administrator' > POST /diag/eval HTTP/1.1 > Authorization: Basic QWRtaW5pc3RyYXRvcjpUYW1zaW4= > User-Agent: curl/7.21.4-DEV (i686-pc-linux-gnu) libcurl/7.21.4-DEV zlib/1.2.3.4 > Host: localhost:8091 > Accept: */* > Content-Length: 1797 > Content-Type: application/x-www-form-urlencoded > Expect: 100-continue > < HTTP/1.1 100 Continue < HTTP/1.1 200 OK < Server: MochiWeb/1.0 (Any of you quaids got a smint?) < Date: Tue, 17 Jul 2012 15:29:17 GMT < Content-Length: 2 < * Connection #0 to host localhost left intact * Closing connection #0If the command fails for any reason, please verify the command and resubmit.
-
For Windows :
Open a command prompt and execute the following command on the new Couchbase Server 1.8.1 node using the following command:
shell> C:\Program Files\Couchbase\Server\bin>curl -v –user Administrator:password -X POST \
      -d @MB-5895.erl http://localhost:8091/diag/eval
The output should be similar to the following, showing the connection opened and no explicit error response from the server:
* timeout on name lookup is not supported- About to connect() to localhost port 8091 (#0)
- Trying 127.0.0.1… connected
- Connected to localhost (127.0.0.1) port 8091 (#0)
- Server auth using Basic with user ‘Administrator’ > POST /diag/eval HTTP/1.1 > Authorization: Basic QWRtaW5pc3RyYXRvcjpUYW1zaW4= > User-Agent: curl/7.21.4-DEV (i686-pc-linux-gnu) libcurl/7.21.4-DEV zlib/1.2.3.4 > Host: localhost:8091 > Accept: / > Content-Length: 1405 > Content-Type: application/x-www-form-urlencoded > Expect: 100-continue > < HTTP/1.1 100 Continue < HTTP/1.1 200 OK < Server: MochiWeb/1.0 (Any of you quaids got a smint?) < Date: Tue, 17 Jul 2012 15:29:17 GMT < Content-Length: 2 <
- Connection #0 to host localhost left intact
- Closing connection #0
If the command fails for any reason, please verify the command and resubmit.
-
-
Mark one of your existing Couchbase 1.8.0 nodes for removal from the cluster.
-
Perform a rebalance operation.
The rebalance will operate as a swap rebalance and move the data directly from the Couchbase 1.8.0 node to the new Couchbase 1.8.1 node.
You can monitor the progress by viewing the
Active vBucketsstatistics. This should show the number of active vBuckets in the 1.8.0 node being removed as reducing, and the number of active vBuckets in the new 1.8.1 node increasing.You can monitor this through the UI by selecting the
vBucketsstatistic in theMonitoringsection of the Administration Web Console.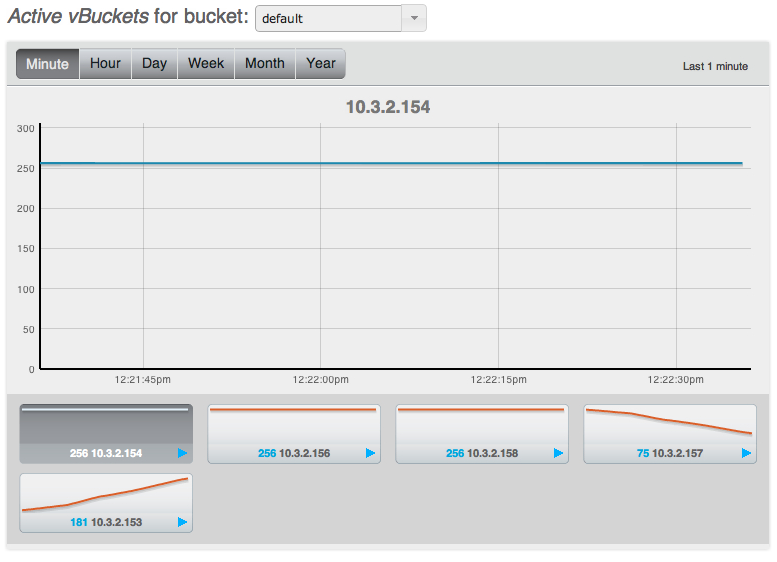
Repeat steps 1-5 (add/remove and swap rebalance operation), but without the patch upload for all the remaining Couchbase Server 1.8.0 nodes within the cluster so that each node is upgraded to Couchbase Server 1.8.1.
With a Couchbase Server 1.8.1 node in the cluster, you can perform a swap rebalance with multiple nodes, as long as the number of nodes being swapped out, and the number being swapped in are identical. For example, if you have four nodes in your cluster, after the initial rebalance, you can add three new nodes, and remove your existing three 1.8.0 nodes in one rebalance operation.
For more information on swap rebalance, see Swap Rebalance.
Once complete, your entire cluster should now be running Couchbase Server 1.8.1.
Offline (in-place) Upgrade Process
The offline (or in-place) upgrade process requires you to shutdown all the applications using the cluster, and the entire Membase Server or Couchbase Server cluster. With the cluster switched off, you can then perform the upgrade process on each of the nodes, and bring your cluster and application back up again.
It’s important to ensure that your disk write queue ( Disk Write Queue ) has been completely drained before shutting down the cluster service. This will ensure that all data has been persisted to disk and will be available after the upgrade. It is a best practice to turn off the application and allow the queue to drain prior to beginning the upgrade.
To upgrade an existing cluster using the offline method:
Turn off your application, so that no requests are going to your Membase Cluster. You can monitor the activity of your cluster by using the Administration Web Console.
With the application switched off, the cluster now needs to complete writing the information stored out to disk. This will ensure that when you cluster is restarted, all of your data remains available. You can do this by monitoring the Disk Write Queue within the Web Console. The disk write queue should reach zero (i.e. no data remaining to be written to disk).
-
On each node within the cluster:
-
Shutdown the Membase Server or Couchbase Server process.
On the node to be upgraded, stop the Couchbase Server process. For guidance on specific platforms, see Startup and Shutdown of Couchbase Server.
With Couchbase Server shutdown on the node, you can perform a standard node upgrade to the new version of Couchbase Server. See Node Upgrade Process for details.
Couchbase Server should be started automatically on each node as you perform the upgrade.
-
As the cluster is warming up again, you can monitor the status of the warmup process to determine when you can switch on your application. See Monitoring startup (warmup).
Once the cluster has been started up again, you can re-enable your application on the upgraded cluster.
Node Upgrade Process
Whether you are performing an online or offline upgrade, the steps for upgrading an individual node, including the shutdown, installation, and startup process remains the same.
Download
couchbase-server-edition_and_arch_version.Backup the node data. To backup an existing Couchbase Server installation, use
cbbackup. See Backing Up.-
Backup the node specific configuration files. While the upgrade script will perform a backup of the configuration and data files, it is our recommended best practice to take your own backup of the files located at:
Platform Location Linux /opt/couchbase/var/lib/couchbase/config/config.datWindows C:\Program Files\Couchbase\Server\Config\var\lib\couchbase\config\config.dat -
Linux Upgrade Process from Couchbase Server 1.8.x
Red Hat/CentOS Linux
You can perform an upgrade install using the RPM package — this will keep the data and existing configuration.
root-shell> rpm -U couchbase-server-architecture_meta_current_version.rpmUbuntu/Debian Linux
You can perform a package upgrade by installing the updated
.pkgpackage:shell> sudo dpkg -i couchbase-server-architecture___meta_current_release.debWindows Upgrade Process
If you are upgrading from Membase Server 1.7.2 or Couchbase Server 1.8.0 to Couchbase Server 1.8.1 you must perform additional steps. See Upgrading from Membase Server 1.7.2 and Couchbase Server 1.8.0 to Couchbase Server 1.8.1 (Windows only).
The Couchbase Server Windows installer will upgrade your server installation using the same installation location. For example, if you have installed Couchbase Server in the default location,
C:\Program Files\Couchbase\Server, the Couchbase Server installer will copy new 1.8.1 files to the same location.
The TCP/IP port allocation on Windows by default includes a restricted number of ports available for client communication. For more information on this issue, including information on how to adjust the configuration and increase the available ports, see MSDN: Avoiding TCP/IP Port Exhaustion.
Upgrading from Membase Server 1.7.2 and Couchbase Server 1.8.0 to Couchbase Server 1.8.1 (Windows only)
Due to a change in the packaging for Couchbase Server 1.8.1 on Windows you need to run the package installation twice in order to register the package and upgrade correctly. The correct steps are:
Download Windows installed package for Couchbase Server 1.8.1.
Backup the node before running the upgrade process. If you are backing up an existing Membase Server 1.7.x installation, see Membase Server 1.7 Backup. For Couchbase Server 1.8.0, see Backing Up.
If you are upgradeding from Membase Server 1.7.2, stop Membase Server. For Couchbase Server 1.8.0, stop Couchbase Server. For more information, see Startup and Shutdown on Windows. Wait until the server process has stopped completely before continuing.
Double-click on the downloaded package installer for Couchbase Server 1.8.1. The initial execution will update the registry information in preparation for the full upgrade.
Double-click on the downloaded package installer for Couchbase Server 1.8.1. This second installation will take you through the full installation process, upgrading your existing installation for the new version. Follow the on-screen instructions to perform the upgrade.
Once the process has completed, you can start Couchbase Server 1.8.1 and re-add and rebalance your node into your cluster.
Upgrading from Membase Server 1.7
If you are upgrading from Membase Server 1.7 you should take a backup and copy your configuration files, before uninstalling the existing Membase Server product. This will keep the data files in place where they will be upgraded during the installation and startup of Couchbase Server 1.8.
Step-by-step instructions are probided below:
Download
couchbase-server-edition_and_arch_version.Backup the node data. Use
mbbackupif you are upgrading from Membase Server 1.7.x (see Backup and Restore in Membase Server 1.7.x ). If you are upgrading Couchbase Server, usecbbackup. See Backing Up.-
Backup the node specific configuration files. While the upgrade script will perform a backup of the configuration and data files, it is our recommended best practice to take your own backup of the files located at:
Version Platform Location Membase Server 1.7.x Linux /opt/membase/var/lib/membase/config/config.datMembase Server 1.7.x Windows C:\Program Files\Membase\Server\Config\var\lib\membase\config.datIf you have multiple version subdirectories in your
/etc/opt/membasedirectory, you must first cleanup the directory so only the last, most recent version remains. -
Linux Upgrade Process from Membase Server 1.7.x
Linux package managers will prevent the
couchbase-serverpackage from being installed when there’s already amembase-serverpackage installed.Red Hat/CentOS Linux
-
Uninstall the existing
membase-serverpackage — this will keep the user’s db data and copies of their configuration.root-shell> rpm -e membase-server -
. Install Couchbase Server 1.8 with special environment variable flags, which force an upgrade. The special env var is
INSTALL_UPGRADE_CONFIG_DIR.root-shell> INSTALL_UPGRADE_CONFIG_DIR=/opt/membase/var/lib/membase/config \ rpm -i \ couchbase-server-architecture_1.8.1.rpm
Ubuntu/Debian Linux
-
. Uninstall the existing
membase-serverpackage — this will keep the user’s db data and copies of their configuration.shell> sudo dpkg -r membase-server -
. Install Couchbase Server 1.8 with special environment variable flags, which forces an upgrade. The special env var is
INSTALL_UPGRADE_CONFIG_DIRshell> sudo INSTALL_UPGRADE_CONFIG_DIR=/opt/membase/var/lib/membase/config \ dpkg -i \ couchbase-server-architecture_1.8.1.deb
-
-
Windows Upgrade Process
The Couchbase Server Windows installer will upgrade your current Membase Server installation to Couchbase Server, using the same installation location. If you have installed Membase Server in the default location,
C:\Program
Files\Membase\Server
, the Couchbase Server installer will copy the new files to the same location. Once the upgrade process is completed you will see theicon on the Desktop and underStart->Programsreplacing Membase Server.
After every node has been upgraded and restarted, and you can monitor its progress of “warming up”. For more details, see Monitoring startup (warmup). Turn your application back on.
Manually Controlled Upgrade Options
This section is not applicable to Windows.
By using environment variable flags during installation you may optionally take more control of the upgrade process and results. The available environment variables are:
-
INSTALL_UPGRADE_CONFIG_DIRThis variable sets the value of the directory of the previous versions config directory. When this environment variable is defined, the rpm/dpkg scripts will upgrade configuration files and data records from Membase Server 1.7 to Couchbase Server 1.8.
The data directory defined and used by your Membase Server 1.7 installation will continue to be used by your upgraded Couchbase Server 1.8.1 instance. For example, if you had mounted/mapped special filesystems for use while running Membase Server 1.7, those paths will continue to be used after upgrading to Couchbase Server 1.8.1.
-
INSTALL_DONT_START_SERVERWhen set to ‘1’, the
rpm/dpkgscripts will not automatically start the Couchbase Server as its last step. -
INSTALL_DONT_AUTO_UPGRADEWhen set to ‘1’, the
rpm/dpkgscripts will not automatically invoke thecbupgradescript that’s included in Couchbase Server 1.8.1, allowing you to manually invokecbupgradelater. This may be useful in case you need to perform more debugging. This should be used with theINSTALL_DONT_START_SERVER=1andINSTALL_UPGRADE_CONFIG_DIR= PATHenvironment variables.
Example flag usage for RedHat / CentOS:
INSTALL_DONT_START_SERVER=1 INSTALL_DONT_AUTO_UPGRADE=1 \
    INSTALL_UPGRADE_CONFIG_DIR=/opt/membase/var/lib/membase/config \
    rpm -i couchbase-server-community_x86_64_1.8.1.rpm
For Ubuntu
INSTALL_DONT_START_SERVER=1 INSTALL_DONT_AUTO_UPGRADE=1 \
    INSTALL_UPGRADE_CONFIG_DIR=/opt/membase/var/lib/membase/config \
    dpkg -i couchbase-server-community_x86_64_1.8.1.deb
Example output when using flags, first uninstalling the existing Membase Server 1.7.x:
[root@localhost ~]# rpm -e membase-server
Stopping membase-server[ OK ]
warning: /opt/membase/var/lib/membase/config/config.dat saved as /opt/membase/var
/lib/membase/config/config.dat.rpmsave
[root@localhost ~]# INSTALL_DONT_START_SERVER=1 INSTALL_DONT_AUTO_UPGRADE=1
INSTALL_UPGRADE_CONFIG_DIR=/opt/membase/var/lib/membase/config rpm -i
couchbase-server-community_x86_64_1.8.1r-55-g80f24f2.rpm
Upgrading couchbase-server ...
/opt/couchbase/bin/cbupgrade -c /opt/membase/var/lib/membase/config -a yes
Skipping cbupgrade due to INSTALL_DONT_AUTO_UPGRADE ...
Skipping server start due to INSTALL_DONT_START_SERVER ...
You have successfully installed Couchbase Server.
Please browse to http://localhost.localdomain:8091/ to configure your server.
Please refer to http://couchbase.com for additional resources.
Please note that you have to update your firewall configuration to
allow connections to the following ports: 11211, 11210, 4369, 8091
and from 21100 to 21299.
By using this software you agree to the End User License Agreement.
See /opt/couchbase/LICENSE.txt.
[root@localhost ~]#
After using the INSTALL_DONT_AUTO_UPGRADE option, you can use the
/opt/couchbase/bin/cbupgrade program later to fully control the upgrade steps.
It’s command-line options include:
[root@localhost ~]# /opt/couchbase/bin/cbupgrade -h
Usage: cbupgrade [-c path/to/previous/config/dir] [-a AUTO] [-d FILENAME] [-n] [-s FACTOR]
-c <path/to/previous/config/dir>
-- example: -c /etc/opt/membase/1.6.5.3.1
-a <yes|no>
-- automatic or non-interactive mode; default is 'no';
'yes' to force automatic 'yes' answers to all questions
-d <dbdir_output_file>
-- retrieve db directory from config file and exit
-n -- dry-run; don't actually change anything
-s <free_disk_space_needed_factor>
-- free disk space needed, as a factor of current bucket usage
-- default value is 2.0
-- example: -s 1.0
The cbupgrade program can be run using the -n flag, which tells cbupgrade
to not modify any files, but just describe the changes it would make. For
example:
[root@localhost ~]# /opt/couchbase/bin/cbupgrade -c /opt/membase/var/lib/membase/config -nDry-run
mode: no actual upgrade changes will be made.
Upgrading your Couchbase Server to 1.8.1r-55-g80f24f2.
The upgrade process might take awhile.
Analysing...
Previous config.dat file is /opt/membase/var/lib/membase/config/config.dat.rpmsave
Target node: ns_1@127.0.0.1
Membase/Couchbase should not be running.
Please use: /etc/init.d/couchbase-server stop
or: /etc/init.d/membase-server stop
Is the Membase/Couchbase server already stopped? [yes|no]
yes
Database dir: /opt/membase/var/lib/membase/data
Is that the expected database directory to upgrade? [yes|no]
yes
Buckets to upgrade: default
Are those the expected buckets to upgrade? [yes|no]
yes
Checking disk space available for buckets in directory:
/opt/membase/var/lib/membase/data
Free disk bucket space wanted: 0.0
Free disk bucket space available: 177790963712
Free disk space factor: 2.0
Ok.
Analysis complete.
Proceed with config & data upgrade steps? [yes|no]
yes
SKIPPED (dry-run): Copying /opt/membase/var/lib/membase/config/config.dat.rpmsave
SKIPPED (dry-run): cp /opt/membase/var/lib/membase/config/config.dat.rpmsave /opt/couchbase/var
/lib/couchbase/config/config.dat
Ensuring bucket data directories.
SKIPPED (dry-run): Ensuring bucket data directory: /opt/membase/var/lib/membase/data/default-data
SKIPPED (dry-run): mkdir -p /opt/membase/var/lib/membase/data/default-data
SKIPPED (dry-run): Ensuring dbdir owner/group: /opt/membase/var/lib/membase/data
SKIPPED (dry-run): chown -R couchbase:couchbase /opt/membase/var/lib/membase/data
SKIPPED (dry-run): Ensuring dbdir owner/group: /opt/membase/var/lib/membase/data
SKIPPED (dry-run): chown -R couchbase:couchbase /opt/membase/var/lib/membase/data
Upgrading buckets.
Skipping already converted bucket: /opt/membase/var/lib/membase/data/default-data
Skipping already converted bucket: /opt/membase/var/lib/membase/data/test0-data
Done.
Upgrading from Community Edition to Enterprise Edition
To upgrade between Couchbase Server Community Edition and Couchbase Server Enterprise Edition, you can use two methods:
-
Perform an online upgrade installation
Using this method, you remove one or more nodes from the cluster and rebalance. On the nodes you have taken out of the cluster, uninstall Couchbase Server Community Edition package, and install Couchbase Server Enterprise Edition. You can then add the new nodes back to the cluster and rebalance. This process can be repeated until the entire cluster is using the Enterprise Edition.
For more information on performing rolling upgrades, see Online (rolling) Upgrade Process.
-
Perform an offline upgrade
Using this method, you need to shutdown the entire cluster, and uninstall Couchbase Server Community Edition, and install Couchbase Server Enterprise Edition. The data files will be retained, and the cluster can be restarted.
For more information on performing rolling upgrades, see Offline (in-place) Upgrade Process.
You should use the same version number when performing the migration process to prevent version differences causing issues during the upgrade process.
Setting up Couchbase Server
To setup a new Couchbase Server you have a number of different solutions available. All of the solutions require you to set the username and password. You can also optionally configure other settings, such as the port, RAM configuration, and the data file location, as well as creating the first bucket by using any of the following methods:
-
Using command-line tools
The command line toolset provided with your Couchbase Server installation includes
couchbase-cli. This command provides access to the core functionality of the Couchbase Server by providing a wrapper to the REST API. Seecluster initializationfor more information. -
Using the REST API
Couchbase Server can be configured and controlled using a REST API. In fact, the REST API is the basis for both the command-line tools and Web interface to Couchbase Server.
For more information on using the REST API to provision and setup your node, see Provisioning a Node.
-
Using Web Setup
You can use the web browser setup to configure the Couchbase Server installation, including setting the memory settings, disk locations, and existing cluster configuration. You will also be asked to create a password to be used when logging in and administering your server.
The remainder of this section will provide you with information on using this method.
We recommend that you clear your browser cache before starting the setup process. You can find notes and tips on how to do this on different browsers and platforms on this page.
To start the configuration and setup process, you should open the Couchbase Web
Console. On Windows this is opened for you automatically. On all platforms you
can access the web console by connecting to the embedded web server on port
8091. For example, if your server can be identified on your network as
servera, you can access the web console by opening http://servera:8091/. You
can also use an IP address or, if you are on the same machine,
http://localhost:8091.
-
Once you have opened the web console for the first time immediately after installation you will be prompted with the screen shown below.
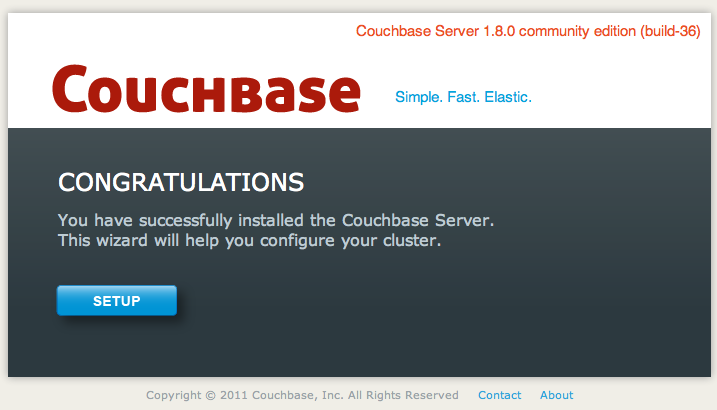
Click the
SETUPbutton to start the setup process. -
First, you must set the disk storage and cluster configuration.
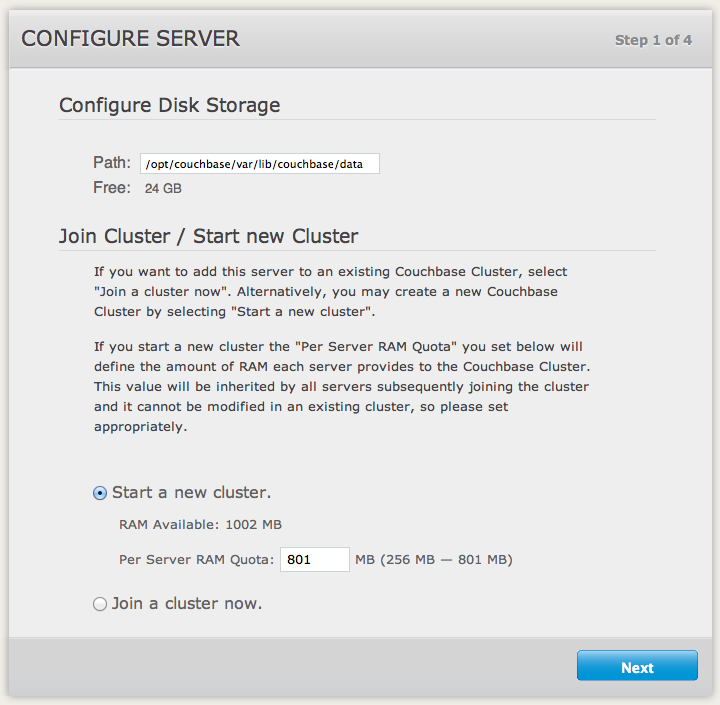
Configure Disk Storage
The
Configure Disk Storageoption specifies the location of the persistent (on-disk) storage used by Couchbase Server. The setting affects only this server and sets the directory where all the data will be stored on disk.Join Cluster/Start New Cluster
The
Configure Server Memorysection sets the amount of physical RAM that will be allocated by Couchbase Server for storage.If you are creating a new cluster, you specify the memory that will be allocated on each node within your Couchbase cluster. You must specify a value that will be supported on all the nodes in your cluster as this is a global setting.
If you want to join an existing cluster, select the radio button. This will change the display and prompt the IP address of an existing node, and the username and password of an administrator with rights to access the cluster.
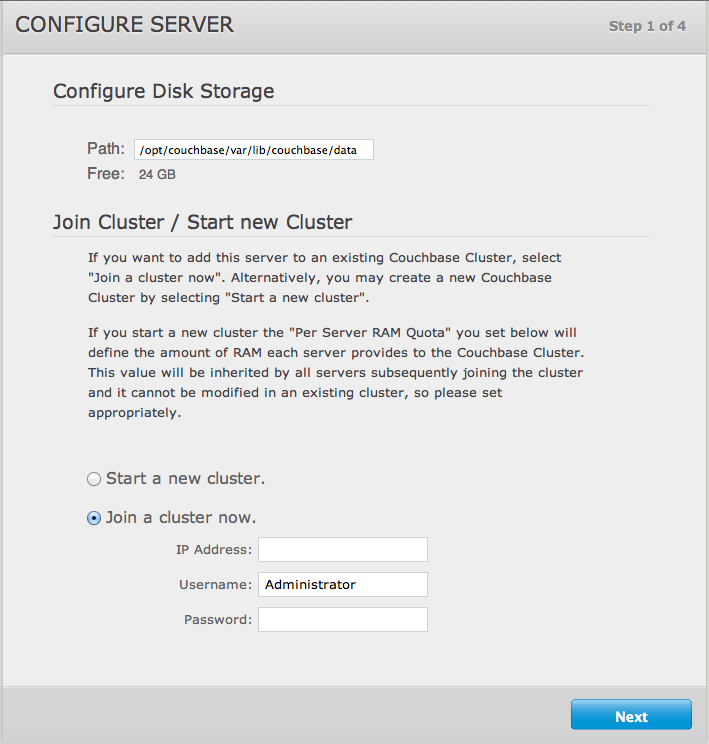
Click
Nextto continue the installation process. -
Couchbase Server stores information in buckets. You should set up a default bucket for Couchbase Server to start with. You can change and alter the bucket configuration at any time.
Default Bucket Should Only Be Used for Testing
The default bucket should not be used for storing live application data. You should create a bucket specifically for your application. The default bucket should only be used for testing.
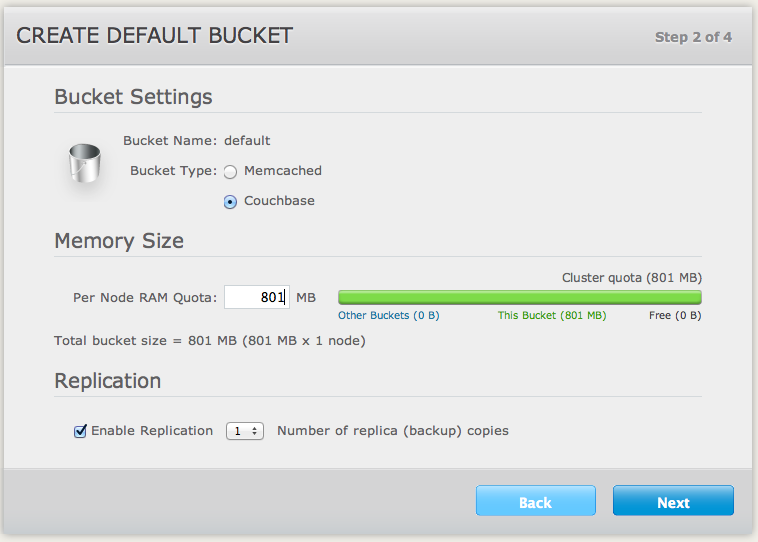
The options are:
-
Bucket Type
Specifies the type of the bucket to be created, either
MemcachedorCouchbase. See Buckets for more information.The remainder of the options differ based on your selection.
When selecting the
Couchbasebucket type:-
Memory Size
This option specifies the amount of available RAM configured on this server which should be allocated to the default bucket.
-
Replication
For Couchbase buckets you can enable replication to support multiple replicas of the default bucket across the servers within the cluster. You can configure up to three replicas. Each replica receives copies of all the documents that are managed by the bucket. If the host machine for a bucket fails, a replica can be promoted to take its place, providing continuous (high-availability) cluster operations in spite of machine failure.
You can disable replication by setting the number of replica copies to zero (0).
When selecting the
Memcachedbucket type:-
Memory Size
The bucket is configured with a per-node amount of memory. Total bucket memory will change as nodes are added/removed.
For more information, see Memory Quotas.
-
Click
Nextto continue the setup process. -
-
You can optionally enable the notification system within the Couchbase Web Console.
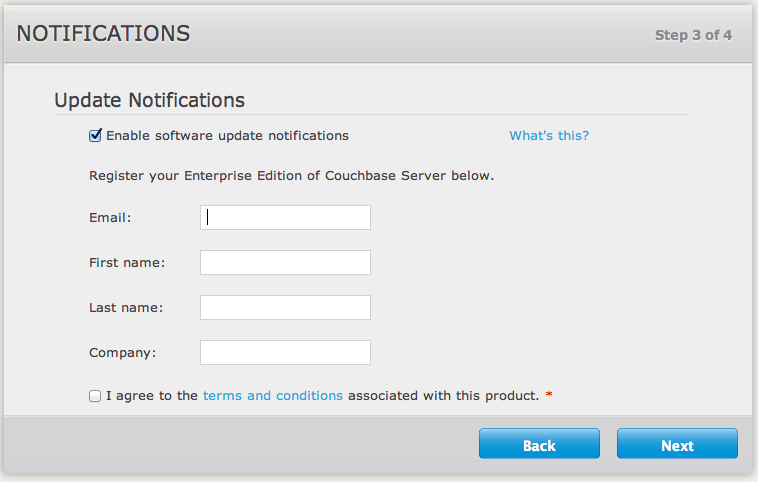
If you select the
Update Notificationsoption, the Web Console will communicate with Couchbase servers to confirm the version number of your Couchbase installation. During this process, the client submits the following information to the Couchbase Server:The current version of your Couchbase Server installation. When a new version of Couchbase Server becomes available, you will be provided with notification of the new version and information on where you can download the new version.
Basic information about the size and configuration of your Couchbase cluster. This information will be used to help us prioritize our development efforts.
The process occurs within the browser accessing the web console, not within the server itself, and no further configuration or internet access is required on the server to enable this functionality. Providing the client accessing the Couchbase Server console has internet access, the information can be communicated to the Couchbase Servers.
The update notification process provides the information anonymously, and the data cannot be tracked. The information is only used to provide you with update notifications and to provide information that will help us improve the future development process for Couchbase Server and related products.
-
Enterprise Edition
You can also register your product from within the setup process.
-
Community Edition
Supplying your email address will add you to the Couchbase community mailing list, which will provide you with news and update information about Couchbase and related products. You can unsubscribe from the mailing list at any time using the unsubscribe link provided in each email communication.
Click
Nextto continue the setup process. -
The final step in the setup process is to configure the username and password for the administrator of the server. If you create a new cluster then this information will be used to authenticate each new server into the cluster. The same credentials are also used when using the Couchbase Management REST API. Enter a username and password. The password must be at least six characters in length.
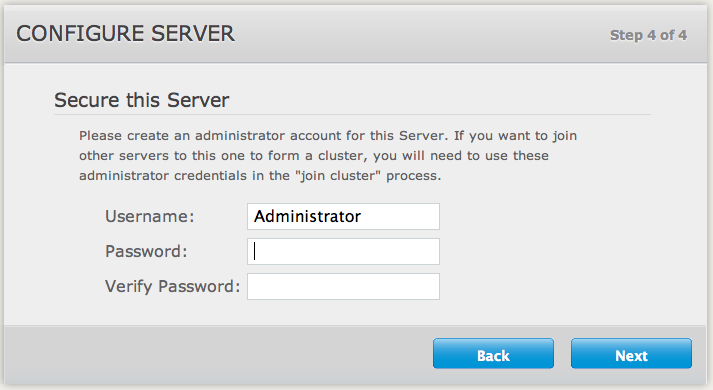
Click
Nextto complete the process.
Once the setup process has been completed, you will be presented with the Couchbase Web Console showing the Cluster Overview page.
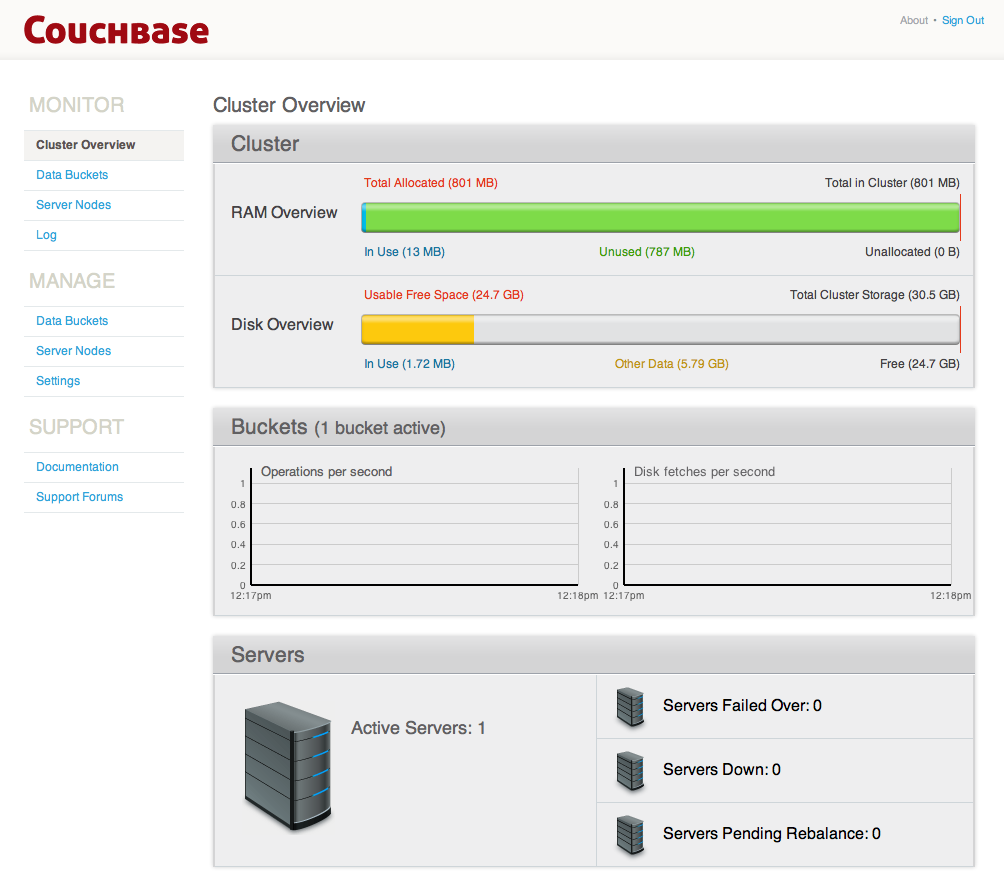
Your Couchbase Server is now running and ready to use.
Testing Couchbase Server
Testing the connection to the Couchbase Server can be performed in a number of
different ways. Connecting to the node using the web client to connect to the
admin console should provide basic confirmation that your node is available.
Using the couchbase-cli command to query your Couchbase Server node will
confirm that the node is available.
The Couchbase Server web console uses the same port number as clients use when communicated with the server. If you can connect to the Couchbase Server web console, administration and database clients should be able to connect to the core cluster port and perform operations. The Web Console will also warn if the console loses connectivity to the node.
To verify your installation works for clients, you can use either the
cbworkloadgen command, or telnet. The cbworkloadgen command uses the
Python Client SDK to communicate with the cluster, checking both the cluster
administration port and data update ports. For more information, see Testing
Couchbase Server using
cbworkloadgen.
Using telnet only checks the Memcached compatibility ports and the memcached
text-only protocol. For more information, see Testing Couchbase Server using
Telnet.
Testing Couchbase Server using cbworkloadgen
The cbworkloadgen is a basic tool that can be used to check the availability
and connectivity of a Couchbase Server cluster. The tool executes a number of
different operations to provide basic testing functionality for your server.
cbworkloadgen provides basic testing functionality. It does not provide
performance or workload testing.
To test a Couchbase Server installation using cbworkloadgen, execute the
command supplying the IP address of the running node:
shell> /opt/couchbase/bin/cbworkloadgen -n localhost:8091
Thread 0 - average set time : 0.0257480939229 seconds , min : 0.00325512886047 seconds , max : 0.0705931186676 seconds , operation timeou\
ts 0
The progress and activity of the tool can also be monitored within the web console.
For a longer test you can increase the number of iterations:
shell> /opt/couchbase/bin/cbworkloadgen -n localhost:8091 --items=100000
Testing Couchbase Server using Telnet
You can test your Couchbase Server installation by using Telnet to connect to the server and using the Memcached text protocol. This is the simplest method for determining if your Couchbase Server is running.
You will not need to use the Telnet method for communicating with your server within your application. Instead, use one of the Couchbase SDKs.
You will need to have telnet installed on your server to connect to Couchbase
Server using this method. Telnet is supplied as standard on most platforms, or
may be available as a separate package that should be easily installable via
your operating systems standard package manager.
Connect to the server:
shell> telnet localhost 11211
Trying 127.0.0.1...
Connected to localhost.localdomain (127.0.0.1).
Escape character is '^]'.
Make sure it’s responding (stats is a great way to check basic health):
stats
STAT delete_misses 0
STAT ep_io_num_write 0
STAT rejected_conns 0
...
STAT time 1286678223
...
STAT curr_items_tot 0
...
STAT threads 4
STAT pid 23871
...
END
Put a document in:
set test_key 0 0 1
a
STORED
Retrieve the document:
get test_key
VALUE test_key 0 1
a
END
Disconnect:
quit
Connection closed by foreign host.
shell>
All of the Memcached protocols commands will work through Telnet.
Next Steps
For basic instructions on using your Couchbase Server installation, see Administration Basics.
For information on deploying and building your Couchbase Server cluster, see Deployment Strategies.
-
For instructions on how to use the Couchbase Web Console to manage your Couchbase Server installation, see Web Console for Administration.
You should create buckets for each of the applications you intend to deploy.
-
If you already have an application that uses the Memcached protocol then you can start using your Couchbase Server immediately. If so, you can simply point your application to this server like you would any other memcached server. No code changes or special libraries are needed, and the application will behave exactly as it would against a standard memcached server. Without the client knowing anything about it, the data is being replicated, persisted, and the cluster can be expanded or contracted completely transparently.
If you do not already have an application, then you should investigate one of the available Couchbase client libraries to connect to your server and start storing and retrieving information. For more information, see Couchbase SDKs.
Administration Basics
This chapter covers everything on the Administration of a Couchbase Sever cluster. Administration is supported through three primary methods:
-
Couchbase Web Console
Couchbase includes a built-in web server and administration interface that provides access to the administration and statistic information for your cluster.
For more information, read Web Console for Administration.
-
Command-line Toolkit
Provided within the Couchbase package are a number of command-line tools that allow you to communicate and control your Couchbase cluster.
For more information, read Command-line Interface for Administration.
-
Couchbase REST API
Couchbase Server includes a RESTful API that enables any tool capable of communicating over HTTP to administer and monitor a Couchbase cluster.
For more information, read REST API for Administration.
Working with Couchbase data files
By default, Couchbase will store the data files under the following paths:
Linux:
/opt/couchbase/<version>/data/ns_1
Windows:
C:\Program Files\Couchbase\Server\data\ns_1
This path can be changed for each node at setup either via the Web UI setup wizard, using theREST API or using the Couchbase CLI:
Linux:
/opt/couchbase/bin/couchbase-cli node-init -c <node_IP>:8091 »
    --node-init-data-path=<new_path> -u <user> -p »
    <password>
Windows:
C:\Program Files\Couchbase\Server\bin\couchbase-cli node-init -c »
    <node_IP>:8091 --node-init-data-path=<new_path> -u »
    <user> -p <password>
Once a node or cluster has already been setup and is storing data, you can still change the path but it is not an “online” operation:
Change the path on a running node either via theREST API or using the Couchbase CLI (commands above). This change won’t take effect until the node is restarted.
Shut the service down
Copy all the data files from their original location into the new location
Start the service again andmonitor the “warmup” of the data.
Startup and Shutdown of Couchbase Server
The packaged installations of Couchbase Server include support for automatically starting and stopping Couchbase Server using the native boot and shutdown mechanisms.
For information on starting and stopping Couchbase Server, see the different platform-specific links:
Startup and Shutdown on Linux
On Linux, Couchbase Server is installed as a standalone application with support
for running as a background (daemon) process during startup through the use of a
standard control script, /etc/init.d/couchbase-server. The startup script is
automatically installed during installation from one of the Linux packaged
releases (Debian/Ubuntu or RedHat/CentOS). By default Couchbase Server is
configured to be started automatically at run levels 2, 3, 4, and 5, and
explicitly shutdown at run levels 0, 1 and 6.
To manually start Couchbase Server using the startup/shutdown script:
shell> sudo /etc/init.d/couchbase-server start
To manually stop Couchbase Server using the startup/shutdown script:
shell> sudo /etc/init.d/couchbase-server stop
Startup and Shutdown on Windows
On Windows, Couchbase Server is installed as a Windows service. You can use the
Services tab within the Windows Task Manager to start and stop Couchbase
Server.
You will need Power User or Administrator privileges, or have been separately granted the rights to manage services to start and stop Couchbase Server.
By default, the service should start automatically when the machine boots. To
manually start the service, open the Windows Task Manager and choose the
Services tab, or select the Start, choose Run and then type Services.msc
to open the Services management console.
Once open, find the CouchbaseServer service, right-click and then choose to
Start or Stop the service as appropriate. You can also alter the configuration
so that the service is not automatically started during boot.
Alternatively, you can start and stop the service from the command-line, either
by using the system net command. For example, to start Couchbase Server:
shell> net start CouchbaseServer
To stop Couchbase Server:
shell> net stop CouchbaseServer
Start and Stop scripts are also provided in the standard Couchbase Server
installation in the bin directory. To start the server using this script:
shell> C:\Program Files\Couchbase\Server\bin\service_start.bat
To stop the server using the supplied script:
shell> C:\Program Files\Couchbase\Server\bin\service_stop.bat
Startup and Shutdown on Mac OS X
On Mac OS X, Couchbase Server is supplied as a standard application. You can start Couchbase Server by double clicking on the application. Couchbase Server runs as a background application which installs a menubar item through which you can control the server.
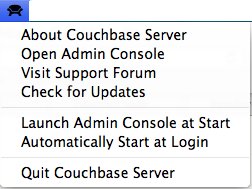
The individual menu options perform the following actions:
-
About CouchbaseOpens a standard About dialog containing the licensing and version information for the Couchbase Server installed.
-
Open Admin ConsoleOpens the Web Administration Console in your configured default browser.
-
Visit Support ForumOpens the Couchbase Server support forum within your default browser at the Couchbase website where you can ask questions to other users and Couchbase developers.
-
Check for UpdatesChecks for updated versions of Couchbase Server. This checks the currently installed version against the latest version available at Couchbase and offers to download and install the new version. If a new version is available, you will be presented with a dialog containing information about the new release.
If a new version is available, you can choose to skip the update, notify the existence of the update at a later date, or to automatically update the software to the new version.
If you choose the last option, the latest available version of Couchbase Server will be downloaded to your machine, and you will be prompted to allow the installation to take place. Installation will shut down your existing Couchbase Server process, install the update, and then restart the service once the installation has been completed.
Once the installation has been completed you will be asked whether you want to automatically update Couchbase Server in the future.
Using the update service also sends anonymous usage data to Couchbase on the current version and cluster used in your organization. This information is used to improve our service offerings.
You can also enable automated updates by selecting the
Automatically download
and install updates in the future
checkbox. -
Launch Admin Console at StartIf this menu item is checked, then the Web Console for administrating Couchbase Server will be opened whenever the Couchbase Server is started. Selecting the menu item will toggle the selection.
-
Automatically Start at LoginIf this menu item is checked, then Couchbase Server will be automatically started when the Mac OS X machine starts. Selecting the menu item will toggle the selection.
-
Quit CouchbaseSelecting this menu option will shut down your running Couchbase Server, and close the menubar interface. To restart, you must open the Couchbase Server application from the installation folder.
Best Practices
When designing and building your Couchbase Server cluster you need to give some thought to a number of different aspects of your server and cluster configuration, including the configuration and hardware of individual nodes, in addition to the overall cluster sizing and distribution configuration.
For more information on the basic design and configuration of your Couchbase Server cluster, see Cluster Design Considerations.
If you are hosting in the cloud, see Using Couchbase in the Cloud.
Cluster Design Considerations
-
RAM
Memory is one of the most important factors that determines how smoothly your cluster will operate. Couchbase is well suited for applications that want most of its active dataset in memory. This data that is actively used at any given point in time is called the
Working Set. It is very important that enough memory is allocated for the entire Working Set to live in memory.After the data has been added to memory it is persisted to disk. Although this happens in the background, you must ensure that your nodes are capable of ultimately persisting to disk the data being stored at the rate the data is written or updated within the cluster.
In addition to this persistence of data to disk, when there is not enough memory left for the new data that is written, values are ejected from memory and will only exist on disk. Accessing values from disk is much slower than accessing data in memory. As a result, if ejected data is accessed frequently, performance of the cluster suffers.
-
Number of Nodes
Once you know how much memory you will need for the cluster the next decision you will make is whether to have few large nodes or several small nodes:
With several smaller nodes you are distributing I/O across several machines, however, the probability of a node failing within the cluster as a whole is also higher.
With fewer larger nodes, in case of a node failure the impact to the application will be greater
Picking the right node size/quantity is therefore a trade off between reliability and efficiency.
-
Network Performance
Couchbase Server is not normally limited by network bandwidth or performance, but a cluster should be deployed on at least Gigabit Ethernet. This will ensure that the maximum performance is available when information is exchanged over the network between nodes and client.
Also be aware that your cluster, and clients, should be on their own network segment to ensure that other nodes on the network do not reduce the overall network performance during periods of high load.
As your cluster size increases, the overall load on your network may also increase, especially when performing rebalance operations.
-
Client Access
Using a Server-side proxy configuration is not recommended for production use. You should use either a smart client or the client-side proxy configuration unless your platform and environment do not support that deployment type.
-
Number of cores
Couchbase Server is more memory or I/O bound than CPU bound as there is very little actual processing or computation of the information. However, Couchbase is more efficient on machines that have at least two cores as this enables the in-memory, disk I/O, and management processes to share the CPU resources.
The best possible environment will be supported with nodes with at least 4 cores or more available as this will ensure spare capacity for more CPU intensive operations such as rebalancing.
-
Storage type
The disk writes of information being persisted to disk, including data being ejected and stored on disk, require that a storage type capable of handling that write level is available. The chosen storage type can have a significant impact on your overall performance.
The key performance metric in all cases is the data write rate, both at the sustained performance rate, and the maximum write rate at peak times. Different storage types have different parameters and capabilities and this will affect the overall performance on individual nodes, and across the cluster.
There are typically three different storage types available, depending on your deployment environment.
-
Hard Drives (rotating)
Traditional hard drives (i.e. rotating media) are comparatively slow, but currently have a better cost/performance/capacity combination.
Hard disks can be deployed natively or you can use RAID environment. RAID 0 provides the highest performance, while RAID 5 or 6, or the nested RAID 10 (1+0 or 0+1) can provide performance and stability.
-
Solid State Drives (SSDs)
SSDs are significantly faster than traditional hard disk environments, albeit at a significantly higher cost. Couchbase can also take advantage of the significantly higher I/O performance of SSDs and use comparatively less memory because the I/O queue buffer on SSD is smaller.
-
Virtual Hard Disk (Cloud storage)
Within cloud-based deployment environments a number of different storage solutions are available. As a general rule, most cloud and virtual machine environments have a lower overall write performance.
-
-
WAN Deployments
Couchbase is not intended to be used in WAN configurations. Couchbase requires that the latency should be very low between server nodes and between servers nodes and Couchbase clients.
Sizing Guidelines
The primary considerations when planning your Couchbase Server cluster are:
How many nodes do I need?
How large (RAM, CPU, disk space) should those nodes be?
To answer the first question, you need to take into account the following different factors:
RAM
Disk throughput and sizing
Network bandwidth
Data distribution and safety
Each of these factors can be the determining factor for sizing, although due to the in-memory nature of Couchbase Server, RAM is normally the most important factor. How you choose your primary factor will depend on the data set and information that you are storing:
If you have a very small data set that gets a very high load, you’ll need to size more off of network bandwidth than RAM.
If you have a very high write rate, you’ll need more nodes to support the disk throughput of persisting all that data (and likely more RAM to buffer the incoming writes).
Even with a very small dataset, under low load, you may still want 3 nodes for proper distribution and safety.
With Couchbase Server, you can increase the capacity of your cluster (RAM, Disk, CPU or network) by increasing the number of nodes within your cluster, since each limit will be increased linearly as the cluster size is increased.
RAM Sizing
RAM is usually the most critical sizing parameter. It’s also the one that can have the biggest impact on performance and stability.
Working Set
Before we can decide how much memory we will need for the cluster, we should understand the concept of a ‘working set’. The ‘working set’ at any point of time is the data that your application actively uses. Ideally you would want all your working set to live in memory.
Memory quota
It is very important that a Couchbase cluster is sized in accordance with the working set size and total data you expect.
The goal is to size the RAM available to Couchbase so that all your document IDs, the document ID meta data, along with the working set values fit into memory in your cluster, just below the point at which Couchbase will start evicting values to disk (the High Water Mark).
How much memory and disk space per node you will need depends on several different variables, defined below.
Calculations are per bucket
Calculations below are per bucket calculations. The calculations need to be summed up across all buckets. If all your buckets have the same configuration, you can treat your total data as a single bucket, there is no per-bucket overhead that needs to be considered.
| Variable | Description |
|---|---|
| documents_num | The total number of documents you expect in your working set |
| ID_size | The average size of document IDs |
| value_size | The average size of values |
| number_of_replicas | number of copies of the original data you want to keep |
| working_set_percentage | The percentage of your data you want in memory. |
| per_node_ram_quota | How much RAM can be assigned to Couchbase |
The following are the items that are used in calculating memory required and are assumed to be constants.
| Constant | Description |
|---|---|
| Meta data per document (metadata_per_document) | This is the space that Couchbase needs to keep metadata per document. It is 120 bytes. All the documents and their metadata need to live in memory at all times |
| SSD or Spinning | SSDs give better I/O performance. |
| headroomThe headroom is the additional overhead required by the cluster to store metadata about the information being stored. This requires approximately 25-30% more space than the raw RAM requirements for your dataset. | Typically 25% (0.25) for SSD and 30% (0.30) for spinning (traditional) hard disks as SSD are faster than spinning disks. |
| High Water Mark (high_water_mark) | By default it is set at 70% of memory allocated to the node |
This is a rough guideline to size your cluster:
| Variable | Calculation |
|---|---|
| no_of_copies | 1 + number_of_replicas
|
| total_metadataAll the documents need to live in the memory | (documents_num) * (metadata_per_document + ID_size) * (no_of_copies)
|
| total_dataset | (documents_num) * (value_size) * (no_of_copies)
|
| working_set | total_dataset * (working_set_percentage)
|
| Cluster RAM quota required | (total_metadata + working_set) * (1 + headroom) / (high_water_mark)
|
| number of nodes | Cluster RAM quota required / per_node_ram_quota
|
You will need at least the number of replicas + 1 nodes irrespective of your data size.
Example sizing calculation
| Input Variable | value |
|---|---|
| documents_num | 1,000,000 |
| ID_size | 100 |
| value_size | 10,000 |
| number_of_replicas | 1 |
| working_set_percentage | 20% |
| Constants | value |
|---|---|
| Type of Storage | SSD |
| overhead_percentage | 25% |
| metadata_per_document | 120 |
| high_water_mark | 70% |
| Variable | Calculation |
|---|---|
| no_of_copies | = 21 for original and 1 for replica |
| total_metadata | = 1,000,000 * (100 + 120) * (2) = 440,000,000 |
| total_dataset | = 1,000,000 * (10,000) * (2) = 20,000,000,000 |
| working_set | = 20,000,000,000 * (0.2) = 4,000,000,000 |
| Cluster RAM quota required | = (440,000,000 + 4,000,000,000) * (1+0.25)/(0.7) = 7,928,000,000 |
For example, if you have 8GB machines and you want to use 6 GB for Couchbase:
number of nodes =
    Cluster RAM quota required/per_node_ram_quota =
    7.9 GB/6GB = 1.3 or 2 nodes
RAM quota
You will not be able to allocate all your machine RAM to the per_node_ram_quota as there maybe other programs running on your machine.
Disk Throughput and Sizing
One of the big advantages that Couchbase provides is the decoupling of disk IO and RAM. This basic concept allows us to provide extremely high performance at very low and consistent latencies. It also makes Couchbase capable of handling very high write loads without affecting the application’s performance.
However, Couchbase still needs to be able to write data to disk and so your disks need to be capable of handling a steady stream of incoming data. It is important to analyze your application’s write load and provide enough disk throughput to match. Information is written to disk through the disk write queue. The internal statistics system monitors the number of outstanding items in the disk write queue and can give you the information you need. The peak the disk write queue load shows how many items stored in Couchbase Server would be lost in the event of a server failure.
It is up to your own internal requirements to decide how much vulnerability you are comfortable with and size the cluster accordingly so that the disk write queue level remains low across the entire cluster. Adding more nodes will provide more disk throughput.
Disk space is also required to persist data. How much disk space you should plan for is dependent on how your data grows. You will also want to store backup data on the system. A good guideline is to plan for at least 130% of the total data you expect. 100% of this is for data backup and 30% for overhead during file maintenance.
Network Bandwidth
Network bandwidth is not normally a significant factor in your calculations and preparations for cluster sizing, but network bandwidth is vital for accessing information from your cluster by clients, and for exchanging information between nodes.
In general you can calculate your network bandwidth requirements using the formula:
Bandwidth = (operations per second * item size) +
    overhead for rebalancing
Where the operations per second can be calculated using:
Operations per second = Application reads +
    (Application writes * Replica copies)
Data Safety
To ensure data safety you need to ensure there are enough nodes within the cluster to support the safety requirements for your data. This involves retaining a suitable number of nodes, and node configuration, within your cluster. There are two aspects to consider, the distribution of information across your nodes, and the number of replicas of information stored across your cluster.
Data distribution
The basic idea is that more nodes are better than less. If you only have 2 nodes, your data will be split across the two nodes half, and half. This means that half of your dataset will be “impacted” if one goes away. On the other hand, with 10 nodes, only 10% of the dataset will be “impacted” if one goes away. Even with Automatic Failover, there will still be some period of time when data is unavailable if nodes fail. This can be mitigated by having more nodes.
You also need to take into account the amount of extra load that the cluster will need to take on after a failover. Again, with only 2 nodes, each one needs to be ready to handle the entire load. With 10, each node only needs to be able to take on an extra 10th of the workload should one fail.
While 2 nodes does provide a minimal level of redundancy, it is recommend always using at least 3 nodes.
Replication
Couchbase Server allows you to configure up to 3 replicas (creating 4 copies of the dataset). In the event of a failure, you can only “failover” (either manually or automatically) as many nodes as you have replicas. For example:
In a 5 node cluster with one replica, if one node goes down, you can fail it over. If a second node goes down, you no longer have enough replica copies to fail over to and will have to go through a slower process to recover.
In a 5 node cluster with 2 replicas, if one node goes down, you can fail it over. If a second node goes down, you can fail it over as well. Should a 3rd one go down, you now no longer have replicas to fail over.
After a node goes down and is failed over, you should attempt to replace that node as soon as possible and rebalance. The rebalance is what will recreate the replica copies (if you still have enough nodes to do so).
As a rule of thumb, it is recommended that you configure:
1 replica for up to 5 nodes
1 or 2 replicas for 5 to 10 nodes
1, 2 or 3 replicas for over 10 nodes
While there many be variations to this, there are definitely diminishing returns from having more replicas in smaller clusters.
Hardware Requirements
In general, Couchbase Server has very low hardware requirements and is designed to be run on commodity or virtualized systems. However, as a rough guide to the primary concerns for your servers:
RAM: Your primary consideration as RAM is used to keep active items and is the key reason Couchbase Server has such low latency.
CPU: Couchbase Server has very low CPU requirements. The server is multi-threaded and therefore benefits from a multi-core system. Machines with at least 4 or 8 physical cores are recommended.
-
Disk: By decoupling the RAM from the IO layer, Couchbase Server can support low-performance disks better than other databases. Known working configurations include SAN, SAS, SATA, SSD, and EBS, with the following recommendations:
SSDs have been shown to provide a great performance boost both in terms of draining the write queue and also in restoring data from disk (either on cold-boot or for purposes of rebalancing).
RAID generally provides better throughput and reliability.
Striping across EBS volumes (in Amazon EC2) has been shown to increase throughput.
Network: Most configurations will work with Gigabit Ethernet interfaces. Faster solutions such as 10GBit and Inifiniband will provide spare capacity.
Considerations for Cloud environments (i.e. Amazon EC2)
Due to the unreliability and general lack of consistent IO performance in cloud environments, we highly recommend lowering the per-node RAM footprint and increasing the number of nodes. This will give better disk throughput as well as improve rebalancing since each node will have to store (and therefore transmit) less data. By distributing the data further, it will make the impact of losing a single node (which could be fairly common) even less.
Also, see the best practices for Using Couchbase in the Cloud.
Deployment Considerations
-
Restricted access to Moxi ports
Make sure that all the ports that Moxi uses are accessible only by trusted machines (including the other nodes in the cluster).
-
Restricted access to web console (port 8091)
The web console is password protected. However, it is recommended that you restrict access to port 8091, as a abuser could do potentially harmful operations (like remove a node) from the web console.
-
Node to Node communication on ports
All nodes in the cluster should be able to communicate with each other on 11210 and 8091.
-
Swap configuration
Swap should be configured on the couchbase server, to avoid the operating system killing couchbase server if the system RAM is exhausted. Having swap provides more options on how to manage such a situation.
-
Idle connection timeouts
Some firewall or proxy software will drop TCP connections which are idle for a certain amount of time (e.g., 20 minutes). If the software does not allow changing that timeout, send a command from the client periodically to keep the connection alive.
-
Use of default Bucket
Create an Application Specific Bucket
During setup, the
defaultbucket is automatically created. However, the default bucket should not be used for storing live application data. You should create a bucket specifically for your application. The default bucket should only be used for testing.
Ongoing Monitoring and Maintenance
To fully understand how your cluster is working, and whether it is working effectively, there are a number of different statistics that you should monitor to diagnose and identify problems. Some of these key statistics include:
The ‘watermark’ determines when it is necessary to start freeing up available memory. Read more about this concepthere. Some important statistics related to water marks are:
-
High WaterMark (
ep_mem_high_wat)The system will start ejecting values out of memory when this watermark is met. Ejected values need to be fetched from disk when accessed before being returned to the client.
-
Low WaterMark (
ep_mem_low_wat)The system does not do anything when this watermark is reached but this is the ‘goal’ of the system when it starts ejecting data as a result of high watermark being met.
-
Memory Used (
mem_used)The current size of memory used. If mem_used hits the RAM quota then you will get
OOM_ERROR. Themem_usedmust be less thanep_mem_high_watwhich is the mark at which data is ejected from the disk. -
Disk Write Queue Size (
ep_queue_size)The size of the queue that has data waiting to be written to the disk.
-
Cache Hits (
get_hits)The rule of thumb is that this should be at least 90% of the total requests.
-
Cache Misses (
get_misses)Ideally this should be low, and certainly lower than
get_hits. Increasing or high values mean that data that your application expects to be stored is not in memory.
You can find values for these important stats with the following command:
shell> cbstats IP:11210 all | \
    egrep "todo|ep_queue_size|_eject|mem|max_data|hits|misses"
This will output the following statistics:
ep_flusher_todo:
ep_max_data_size:
ep_mem_high_wat:
ep_mem_low_wat:
ep_num_eject_failures:
ep_num_value_ejects:
ep_queue_size:
mem_used:
get_misses:
get_hits:
Make sure that you monitor the disk space, CPU usage and swapping on all your nodes, using the standard monitoring tools.
Important UI Stats to Watch
You can add the following graphs to watch on the Couchbase console. These graphs
can be de/selected by clicking on the Configure View link at the top of the
Bucket Details on the Couchbase Web Console.
-
Disk write queuesThe value should not keep growing; the actual numbers will depend on your application and deployment.
-
Ram ejectionsThere should be no sudden spikes.
-
Vbucket errorsAn increasing value for vBucket errors is bad.
-
OOM errors per secThis should be 0.
-
Temp OOM errors per secThis should be 0.
-
Connections countThis should remain flat in a long running deployment.
Get hits per second-
Get misses per secondThis should be much lower than Get hits per second.
Vacuuming
Vacuuming reclaims disk space from sqlite by de-fragmenting the database. You should vacuum your sqlite files regularly to free any space that is empty but unusable.
Couchbase Behind a Secondary Firewall
If you are deploying Couchbase behind a secondary firewall, you should open the ports that Couchbase Server uses for communication. In particular, the following ports should be kept open: 11211, 11210, 4369, 8091 and the port range from 21100 to 21199.
The server-side Moxi port is 11211. Pre-existing Couchbase and Memcached (non-smart) client libraries that are outside the 2nd level firewall would just need port 11211 open to work.
If you want to use the web admin console from outside the 2nd level firewall, also open up port 8091 (for REST/HTTP traffic).
If you’re using smart clients or client-side Moxi from outside the 2nd level firewall, also open up port 11210 (in addition to the above port 8091), so that the smart client libraries or client-side Moxi can directly connect to the data nodes.
Server-side Couchbase nodes (aka, nodes joined into a Couchbase cluster) need all the above ports open to work: 11211, 11210, 4369 (erlang), 8091, and the port range from 21100 to 21199 (erlang).
Using Couchbase in the Cloud
For the purposes of this discussion, we will refer to “the cloud” as Amazon’s EC2 environment since that is by far the most common cloud-based environment. However, the same considerations apply to any environment that acts like EC2 (an organization’s private cloud for example). In terms of the software itself, we have done extensive testing within EC2 (and some of our largest customers have already deployed Couchbase there for production use). Because of this, we have encountered and resolved a variety of bugs only exposed by the sometimes unpredictable characteristics of this environment.
Being simply a software package, Couchbase Server is extremely easy to deploy in the cloud. From the software’s perspective, there is really no difference being installed on bare-metal or virtualized operating systems. On the other hand, the management and deployment characteristics of the cloud warrant a separate discussion on the best ways to use Couchbase.
We have written a number of RightScale templates to aid in your deployment within Amazon. You can very easily sign up for a free RightScale account to try it out. The templates handle almost all of the special configuration needed to make your experience within EC2 successful. Direct integration with RightScale also allows us to do some pretty cool things around auto-scaling and pre-packaged deployment. Check out the templates here Couchbase on RightScale
We’ve also authored a number of AMIs for use within EC2 independent of RightScale. You can find these AMI by searching for ‘couchbase’ in Amazon’s AWS Marketplace. For more information on using these AMIs, see Deployment Using Amazon EC2 AMIs.
Some considerations to take into account when deploying within the cloud are:
Local storage being ephemeral
IP addresses of a server changing from runtime to runtime
Security groups/firewall settings
Swap Space
Local Storage
Dealing with the first point is not very much different than a data center deployment. However, EC2 provides an interesting solution. Through the use of EBS storage, you can obviate the largest concern of losing your data when an instance fails. Writing Couchbase data and configuration to EBS creates a reliable medium of storage. There is direct support for using EBS within RightScale and of course you can set it up manually yourself.
Using EBS is definitely not required, but you should make sure to follow the best practices around performing backups.
Keep in mind that you will have to update the per-node disk path when configuring Couchbase to point to wherever you have mounted an external volume.
IP addresses
The second issue is a bit trickier and requires configuring Couchbase to use a DNS entry instead of an IP address. By default, Couchbase Servers use their IP address as a unique identifier. If the IP changes, an individual node will not be able to identify its own configuration and other nodes that it was clustered to will not be able to access it. In order for a node to identify itself via a DNS name rather than and IP address, the following instructions must be followed. Note that this configuration is automatically handled by the RightScale server template.
A few points to keep in mind when setting this up:
Make sure that this hostname always resolves to the IP address of the node that it is on. This can be accomplished by using a dynamic DNS service such as DNSMadeEasy which will allow you to automatically update the hostname when an underlying IP address changes.
It is best to make sure that the IP address registered with the hostname is the internal address for the node (rather than the external one provided by Amazon) so that other nodes and application machines can contact it
The below steps will completely wipe any data and configuration from the node, so it is best to start with a fresh Couchbase install. If you already have a running cluster, you can easily rebalance a node out of the cluster, make the change and then rebalance it back into the cluster. Nodes with IPs and hostnames can exist in the same cluster.
For Linux:
Install the Couchbase software
-
Execute:
sudo /etc/init.d/couchbase-server stop -
Edit the
start()function in the script located at/opt/couchbase/bin/couchbase-server-
Under the line that reads:
-run ns_bootstrap – \Add a new line that reads:
<pre><code class="no-highlight">-name ns_1@hostname \Where
hostnameis either a DNS name or an IP address that you want this server to identify the node (the ‘ns_1@’ prefix is mandatory). For example:<pre><code class="no-highlight">... -run ns_bootstrap -- \ -name ns_1@couchbase1.company.com \ -ns_server config_path "\"/opt/couchbase/etc/couchbase/static_config\"" \ ...
-
-
Delete the files under:
/opt/couchbase/var/lib/couchbase/data/*/opt/couchbase/var/lib/couchbase/mnesia/*/opt/couchbase/var/lib/couchbase/config/config.dat
-
Execute:
sudo /etc/init.d/couchbase-server start See the node correctly identifying itself as the hostname in the GUI under the Manage Servers page (you will be taken back to the setup wizard since the configuration was cleared out, but after completing the wizard the node will be named properly).
For Windows :
Install the Couchbase Server software
-
Stop the service by running:
C:\Program Files\Couchbase\Server\bin\service_stop.bat -
Unregister the service by running:
C:\Program Files\Couchbase\Server\bin\service_unregister.bat -
Edit the script located at
C:\Program Files\Couchbase\Server\bin\service_register.bat:On the 7th line it says
set NS_NAME=ns_1@%IP_ADDR%Replace
%IP_ADDR%with the hostname/IP address that you want to use.
Register the service by running the modified script
C:\Program
Files\Couchbase\Server\bin\service_register.bat
Delete the files located under
C:\Program Files\Couchbase \Server\var\lib\couchbase\mnesia.-
Start the service by running:
C:\Program Files\Couchbase\Server\bin\service_start.bat See the node correctly identifying itself as the hostname in the GUI under the Manage Servers page (you will be taken back to the setup wizard since the configuration was cleared out, but after completing the wizard the node will be named properly).
Security groups/firewall settings
It’s important to make sure you have both allowed AND restricted access to the appropriate ports in a Couchbase deployment. Nodes must be able to talk to one another on various ports and it is important to restrict external and/or internal access to only those individuals you want to have access. Unlike a typical data center deployment, cloud systems are open to the world by default and steps must be taken to restrict access.
Swap Space
Certain cloud systems by default don’t have a swap partition configured. While a system should not utilize a swap partition heavily, it is our recommended practice to have at least some amount of swap configured to avoid the kernel from killing processes.
Deployment Strategies
Below are a number of deployment strategies that you may want to employ when using Couchbase Server. Smart clients is the preferred deployment option if your language and development environment supports a smart client library. If not, use the client-side Moxi configuration for the best performance and functionality.
Deployment Using Amazon EC2 AMIs
Couchbase have created a number of different AMIs that are available within the Amazon Web Services Marketplace. You can see the full list of available AMIs using this link.
The AMIs share the following attributes:
Based on the current release version for Couchbase Server 1.8.
Use the Amazon Linux operating system
Supported on 64-bit AMI
Use the Amazon EC2 and Amazon EBS services
Configured with a single EBS volume for persistent storage
To launch an AMI you can use either the 1-Click Launch method, or the custom configuration (Launch with EC2 Console) method. The 1-Click Launcher method configures a number of settings for you automatically, including configuring the firewall port configuration. This method also pre-installs Couchbase Server for you and configures it ready to use by logging into the Couchbase Server Administration Web Console.
For the EC2 Console method, Couchbase Server will be automatically installed for you, but you must configure your security group settings for the firewall and port configuration by hand.
To create an instance using the 1-Click method:
-
Visit the AWS Marketplace and select the Couchbase Server AMI you want to use. See the AWS Marketplace using this link.
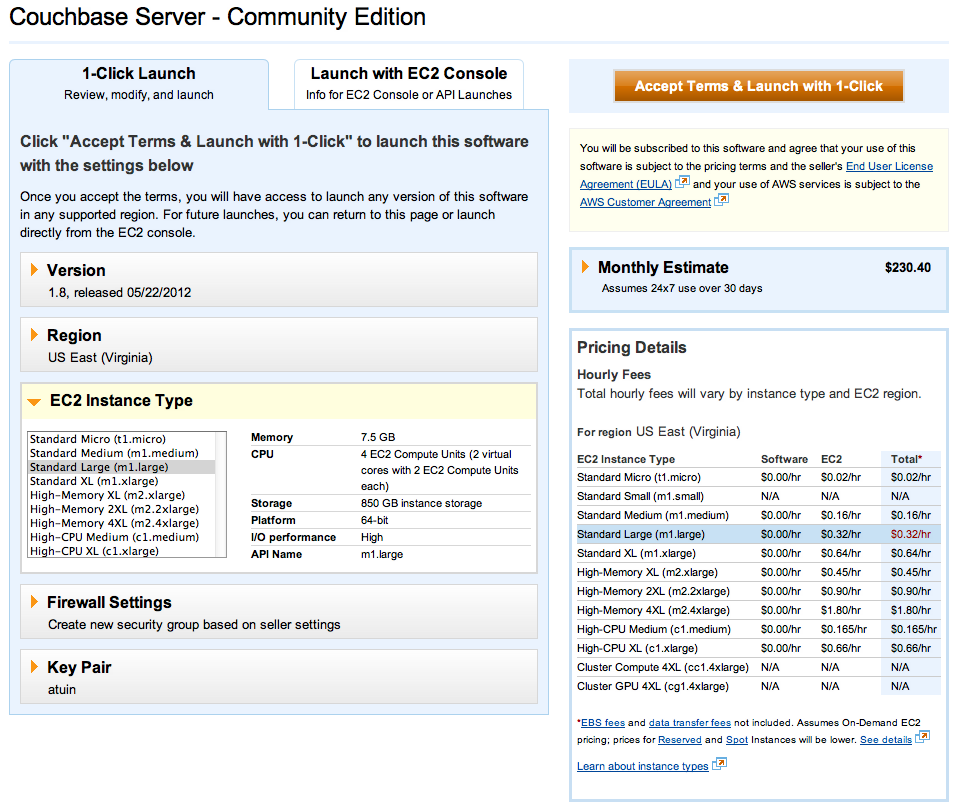
Select the Region you want to use when launching your Couchbase Server node. Note that if you are create a new multi-node cluster, all your nodes should be located within the same region.
Select the EC2 instance type you want to use for your nodes. Each node you create should be of the same type.
Select the key pair you want to use when connecting to the node over
ssh.Click
Launch with 1-Click. This will create your new instance.-
Once the instance has been created, you will be presented with the deployment details. Take a note of the Instance ID.
-
Visit the EC2 Management Console and click on the instance ID for the instance just created. In the instance detail panel, make a note of the
Public DNShostname. You will need this to login to your Couchbase Server installation.
-
To connect to your Couchbase Server installation, open a browser and connect to the instance URL on port 8091. For example,
http://ec2-107-21-64-139.compute-1.amazonaws.com:8091.You will be prompted for the user and password for the Couchbase Server web console:
User is
AdministratorPassword is your instance ID
Once you have successfully logged in, you should be presented with the Couchbase Server Administration Web Console Cluster Overview window. The server will have been automatically configured for you.
Once the instance has been started, it will operate the same as any Couchbase Server instance.
Adding more nodes to your cluster
You can add nodes to your cluster by starting additional instances and adding them to the cluster. To add each node to your cluster, follow these steps:
Start a new instance of EC2 using the same Couchbase AMI and EC2 instance type as used by your existing cluster nodes.
For each node that you want to add to the cluster, make a note of the internal IP address of each node. You can find this information by clicking on each instance within the EC2 Management Console. The internal IP is shown in the
Private IP Addresssection of the instance panel.Open the Administration Web Console for one of the servers in your existing EC2 Couchbase Server cluster.
Go to the
Manage Server Nodessection of the Web Console.Click
Add Server. Enter the internal IP address of each new instance. The username will beAdministratorand the password will be the individual instance ID.Once you have added your nodes, perform a rebalance operation to enable your nodes within the cluster. For more information, see Rebalancing (Expanding and Shrinking your Cluster).
Changing your Couchbase Server Administrator password
To change your Couchbase Server password, you must ssh to your instance using
the SSH key pair you selected during instance creation:
shell> ssh -i keypair.pem ec2-user@instance-hostname
Once you are connected, you need to use the Couchbase command line client to change the password:
remote-shell> /opt/couchbase/bin/couchbase-cli cluster-init \
    -c 127.0.0.1:8091 \
    -u Administrator -p OLD_PASSWORD \
    --cluster-init-password=NEW_PASSWORD
This will configure the Administrator password for the cluster.
For information on typical administration tasks, including failover, backup, and rebalancing, see Administration Tasks.
Using a smart (vBucket aware) Client
When using a smart client, the client library provides an interface to the cluster, and performs server selection directly via the vBucket mechanism. The clients communicate with the cluster using a custom Couchbase protocol which enables the sharing of the vBucket map, and the selection within the client of the required vBucket when obtaining and storing information.
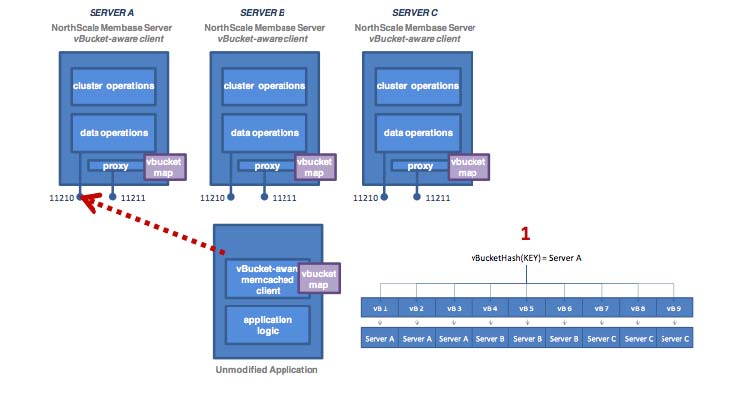
See also vBuckets for an in-depth description.
Client-Side (standalone) Proxy
If a smart client is not available for your chosen platform, the alternative
option is to deploy a standalone proxy, which provides the same functionality as
the smart client, while presenting a memcached compatible interface layer
locally. A standalone proxy deployed on a client may also be able to provide
valuable services, such as connection pooling. The diagram below shows the flow
with a standalone proxy installed on the application server.
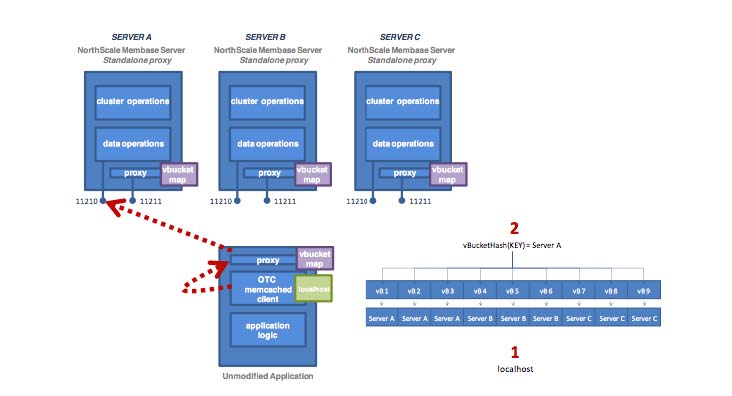
The memcached client is configured to have just one server in its server list
(localhost), so all operations are forwarded to localhost:11211 — a port
serviced by the proxy. The proxy hashes the document ID to a vBucket, looks up
the host server in the vBucket table, and then sends the operation to the
appropriate couchbase server on port 11210.
Using Server-Side (Couchbase Embedded) Proxy
Using a Server-side proxy configuration is not recommended for production use. You should use either a smart client, the client-side proxy configuration unless your platform and environment do not support that deployment type.
The server-side (embedded) proxy exists within Couchbase Server using port 11211. It supports the memcached protocol and allows an existing application to communicate with Couchbase Cluster without also installing another piece of proxy software. The downside to this approach is performance.
In this deployment option versus a typical memcached deployment, in a worse-case scenario, server mapping will happen twice (e.g. using ketama hashing to a server list on the client, then using vBucket hashing and server mapping on the proxy) with an additional round trip network hop introduced.

Administration Tasks
For general day-to-day running and configuration, Couchbase Server is self-managing. The management infrastructure and components of the Couchbase Server system are able to adapt to the different events within the cluster. There are also only a few different configuration variables, and the majority of these do not need to be modified or altered in most installations.
However, there are a number of different tasks that you will need to carry out over the lifetime of your cluster, such as backup, failover and altering the size of your cluster as your application demands change. You will also need to monitor and react to the various statistics reported by the server to ensure that your cluster is operating at the highest performance level, and to expand your cluster when you need to expand the RAM or disk I/O capabilities.
These administration tasks include:
-
Increasing or Reducing Your Cluster Size
When your cluster requires additional RAM, disk I/O or network capacity, you will need to expand the size of your cluster. If the increased load is only a temporary event, then you may later want to reduce the size of your cluster.
You can add or remove multiple nodes from your cluster at the same time. Once the new node arrangement has been configured, the process redistributing the data and bringing the nodes into the cluster is called
rebalancing. The rebalancing process moves the data around the cluster to match the new structure, and can be performed live while the cluster is still servicing application data requests.More information on increasing and reducing your cluster size and performing a rebalance operation is available in Rebalancing (Expanding and Shrinking your Cluster)
-
Handle a Failover Situation
A failover situation occurs when one of the nodes within your cluster fails, usually due to a significant hardware or network problem. Couchbase Server is designed to cope with this situation through the use of replicas which provide copies of the data around the cluster which can be activated when a node fails.
Couchbase Server provides two mechanisms for handling failover. Automated Failover allows the cluster to operate autonomously and react to failovers without human intervention. Monitored failover enables you to perform a controlled failure by manually failing over a node. There are additional considerations for each failover type, and you should read the notes to ensure that you know the best solution for your specific situation.
For more information, see Node Failover.
-
Backup and Restore Your Cluster Data
Couchbase Server automatically distributes your data across the nodes within the cluster, and supports replicas of that data. It is good practice, however, to have a backup of your bucket data in the event of a more significant failure.
More information on the available backup and restore methods are available in Backup and Restore with Couchbase.
Node Failover
The replica system within Couchbase Server enables the cluster to cope with a
failure of one or more nodes within the cluster without affecting your ability
to access the stored data. In the event of an issue on one of the nodes, you can
initiate a failover status for the node. This removes the node from the
cluster, and enables the replicas of the data stored on that node within the
other nodes in the cluster.
Because failover of a node enables the replica vBuckets for the corresponding data stored, the load on the nodes holding the replica data will increase. Once the failover has occurred, your cluster performance will have degraded, and the replicas of your data will have been reduced by one.
To address this problem, once a node has been failed over, you should perform a rebalance as soon as possible. During a rebalance after a failover:
Data is redistributed between the nodes in the cluster
Replica vBuckets are recreated and enabled
Rebalancing should therefore take place as soon as possible after a failover situation to ensure the health and performance of your cluster is maintained.
Failover should be used on a node that has become unresponsive or that cannot be reached due to a network or other issue. If you need to remove a node for administration purposes, you should use the remove and rebalance functionality. See Performing a Rebalance. This will ensure that replicas and data remain in tact.
Using failover on a live node (instead of using remove/rebalance) may introduce a small data-loss window as any data that has not yet been replicated may be lost when the failover takes place. You can still recover the data, but it will not be immediately available.
There are a number of considerations when planning, performing or responding to a failover situation:
-
Automated failover is available. This will automatically mark a node as failed over if the node has been identified as unresponsive or unavailable. However, there are deliberate limitations to the automated failover feature. For more information on choosing whether to use automated or manual (monitored) failover is available in Choosing a Failover Solution.
For information on how to enable and monitor automatic failover, see Using Automatic Failover.
Initiating a failover, whether automatically or manually requires additional operations to return the cluster back to full operational health. More information on handling a failover situation is provided in Handling a Failover Situation.
Once the issue with the failed over node has been addressed, you can add the failed node back to your cluster. The steps and considerations required for this operation are provided in Adding Back a Failed Node.
Choosing a Failover Solution
Because failover has the potential to significantly reduce the performance of your cluster, you should consider how best to handle a failover situation.
Using automated failover implies that you are happy for a node to be failed over without user-intervention and without the knowledge and identification of the issue that initiated the failover situation. It does not, however, negate the need to initiate a rebalance to return the cluster to a healthy state.
Manual failover requires constant monitoring of the cluster to identify when an issue occurs, and then triggering a manual failover and rebalance operation. Although it requires more monitoring and manual intervention, there is a possibility that your cluster and data access may have degraded significantly before the failover and rebalance are initiated.
In the following sections the two alternatives and their issues are described in more detail.
Automated failover considerations
Automatically failing components in any distributed system has the potential to cause problems. There are many examples of high-profile applications that have taken themselves off-line through unchecked automated failover strategies. Some of the situations that might lead to pathological in an automated failover solution include:
-
Scenario 1 — Thundering herd
Imagine a scenario where a Couchbase Server cluster of five nodes is operating at 80-90% aggregate capacity in terms of network load. Everything is running well, though at the limit. Now a node fails and the software decides to automatically failover that node. It is unlikely that all of the remaining four nodes would be able to handle the additional load successfully.
The result is that the increased load could lead to another node failing and being automatically failed over. These failures can cascade leading to the eventual loss of the entire cluster. Clearly having 1/5th of the requests not being serviced would be more desirable than none of the requests being serviced.
The solution in this case would be to live with the single node failure, add a new server to the cluster, mark the failed node for removal and then rebalance. This way there is a brief partial outage, rather than an entire cluster being disabled.
One alternative preparative solution is to ensure there is excess capacity to handle unexpected node failures and allow replicas to take over.
Situation 2 — Network partition
In case of network partition or split-brain where the failure of a network device causes a network to be split, Couchbase implements automatic failover with the following restrictions:
- Automatic failover requires a minimum of three (3) nodes per cluster. This prevents a 2-node cluster from having both nodes fail each other over in the face of a network partition and protects the data integrity and consistency.
- Automatic failover occurs only if exactly one (1) node is down. This prevents a network partition from causing two or more halves of a cluster from failing each other over and protects the data integrity and consistency.
- Automatic failover occurs only once before requiring administrative action. This prevents cascading failovers and subsequent performance and stability degradation. In many cases, it is better to not have access to a small part of the dataset rather than having a cluster continuously degrade itself to the point of being non-functional.
- Automatic failover implements a 30 second delay when a node fails before it performs an automatic failover. This prevents transient network issues or slowness from causing a node to be failed over when it shouldn’t be.
If a network partition occurs, automatic failover occurs if and only if automatic failover is allowed by the specified restrictions. For example, if a single node is partitioned out of a cluster of five (5), it is automatically failed over. If more than one (1) node is partitioned off, autofailover does not occur. After that, administrative action is required for a reset. In the event that another node fails before the automatic failover is reset, no automatic failover occurs.
-
Situation 3 — Misbehaving node
If one node loses connectivity to the cluster (or “thinks” that it has lost connectivity to the cluster), allowing it to automatically failover the rest of the cluster would lead to that node creating a cluster-of-one. As a result a similar partition situation as described above arises again.
In this case the solution is to take down the node that has connectivity issues and let the rest of the cluster handle the load (assuming there is spare capacity available).
Manual (Monitored) Failover
Although automated failover has potential issues, choosing to use manual or monitored failover is not without potential problems.
If the cause of the failure is not identified, and the load that will be placed on the remaining system is not well understood, then automated failover can cause more problems than it is designed to solve. An alternative solution is to use monitoring to drive the failover decision. Monitoring can take two forms, either human or by using a system external to the Couchbase Server cluster that can monitor both the cluster and the node environment and make a more information driven decision.
-
Human intervention
One option is to have a human operator respond to alerts and make a decision on what to do. Humans are uniquely capable of considering a wide range of data, observations and experience to best resolve a situation. Many organizations disallow automated failover without human consideration of the implications.
-
External monitoring
Another option is to have a system monitoring the cluster via theManagement REST API. Such an external system is in the best position to order the failover of nodes because it can take into account system components that are outside the scope of Couchbase Server visibility.
For example, by observing that a network switch is flaking and that there is a dependency on that switch by the Couchbase cluster, the management system may determine that failing the Couchbase Server nodes will not help the situation.
If, however, everything around Couchbase Server and across the various nodes is healthy and that it does indeed look like a single node problem, and that the aggregate traffic can support loading the remaining nodes with all traffic, then the management system may fail the system over using the REST API or command-line tools.
Using Automatic Failover
Due to the potential for problems when using automated failover (see Automated failover considerations ), there are a number of restrictions on the automatic failover functionality in Couchbase Server:
Automatic failover is disabled by default. This prevents Couchbase Server from using automatic failover without the functionality being explicitly enabled.
Automatic failover is only available on clusters of at least three nodes.
Automatic failover will only fail over one node before requiring administrative interaction. This is to prevent a cascading failure from taking the cluster completely out of operation.
There is a minimum 30 second delay before a node will be failed over. This can be raised, but the software is hard coded to perform multiple “pings” of a node that is perceived down. This is to prevent a slow node or flaky network connection from being failed-over inappropriately.
If two or more nodes go down at the same time within the specified delay period, the automatic failover system will not failover any nodes.
If there are any node failures, an email can be configured to be sent out both when an automatic failover occurs, and when it doesn’t.
To configure automatic failover through the Administration Web Console, see Auto-Failover Settings. For information on using the REST API, see Retrieve Auto-Failover Settings.
Once an automatic failover has occurred, the Couchbase Cluster is relying on replicas to serve data. A rebalance should be initiated to return your cluster to proper operational state. For more information, see Handling a Failover Situation.
Resetting the Automatic failover counter
After a node has been automatically failed over, an internal counter is used to identify how many nodes have been failed over. This counter is used to prevent the automatic failover system from failing over additional nodes until the issue that caused the failover has been identified and rectified.
To re-enable automatic failover, the administrator must reset the counter manually.
Resetting the automatic failover counter should only be performed after restoring the cluster to a healthy and balanced state.
You can reset the counter using the REST API:
shell> curl -i -u cluster-username:cluster-password \
    http://localhost:8091/settings/autoFailover/resetCount
More information on using the REST API for this operation can be found in Resetting Auto-Failovers.
Initiating a Node Failover
In the event of a problem where you need to remove a node from the cluster due to hardware or system failure, you need to mark the node as failed over. This causes Couchbase Server to activate one of the available replicas for the buckets in the cluster.
Before marking a node for failover you should read Node Failover. You should not use failover to remove a node from the cluster for administration or upgrade. This is because initiating a failover activates the replicas for a bucket, reducing the available replicas with the potential for data loss if additional failovers occur.
You can explicitly mark a node as failed over using a number of different methods:
-
Using the Web Console
Go to the
Management -> Server Nodessection of the Administration Web Console. Find the node that you want to failover, and click theFail Overbutton. You can only failover nodes that the cluster has identified as being ‘Down’.You will be presented with a warning. Click
Fail Overto finish marking the node as failed over. ClickCancelif you want to cancel the operation. -
Using the Command-line
You can failover one or more nodes using the
failovercommand to thecouchbase-clicommand. To failover the node, you must specify the IP address (and port, if not the standard port) of the node you want to failover. For example:shell> couchbase-cli failover –cluster=localhost:8091\ -u cluster-username -p cluster-password\ –server-failover=192.168.0.72:8091This immediately marks the node as failed over.
Once the node has been marked as failed over you must handle the failover situation and get your cluster back into it’s configured operation state. For more information, see Handling a Failover Situation.
Handling a Failover Situation
Whether a node has been failed over manually or automatically, the health of your Couchbase Server cluster has been reduced. Once a node is failed over:
The number of available replicas for each bucket in your cluster will be reduced by one.
Replicas for the vBuckets handled by the failover node will be enabled on the other nodes in the cluster.
Remaining nodes will be required to handled all future updates to the stored data.
Once a node has been failed over, you should perform a rebalance operation. The rebalance operation will:
Redistribute and rebalance the stored data across the remaining nodes within the cluster.
Recreate replica vBuckets for all buckets within the cluster.
Return your cluster to it’s configured operational state.
You may decide to optionally add one or more new nodes to the cluster after a failover to return the cluster to the same, or higher, node count than before the failover occurred. For more information on adding new nodes, and performing the rebalance operation, see Performing a Rebalance.
Adding Back a Failed Node
You can add a failed node back to the cluster if you have identified and fixed the issue that originally made the node unavailable and suitable for being marked as failed over.
When a node is marked as failed over, no changes are made on the failed node. The persisted data files on disk remain in place, however, the node will no longer be synchronized with the rest of the cluster. You cannot add a failed over node back to the cluster and re-synchronize. Instead, the node will be added back and treated as a new node.
Data Files Should be Copied and/or Deleted Before Rejoining Cluster
Before adding a node back to the cluster, it is best practice to either move or delete the persisted data files before the node is added back to the cluster.
If you want to keep the files, you can copy or move the files to another location (for example another disk, or EBS volume). During the node addition and rebalance operation, the data files will be deleted, recreated and repopulated.
For more information on adding the node to the cluster and rebalancing, see Performing a Rebalance.
Backup and Restore with Couchbase
Backing up your data should be a regular process on your cluster to ensure that you do not lose information in the event of a serious hardware or installation failure.
Due to the active nature of Couchbase Server it is impossible to create a complete in-time backup and snapshot of the entire cluster. Because data is always being updated and modified, it would be impossible to take an accurate snapshot.
For detailed information on the restore processes and options, see Restore.
It is a best practice to backup and restore all nodes together to minimize any inconsistencies in data. Couchbase is always per-item consistent, but does not guarantee total cluster consistency or in-order persistence.
Backing Up
You can take a backup of a running Couchbase node. The cbbackup copies the
data in the data files, but the backup process must be performed on each bucket
and on all nodes of a cluster to take a backup of that cluster. The command does
not backup all the data automatically.
The cbbackup script takes the following arguments:
cbbackup [bucket_path_name] [dest_dir_path]
The cbbackup tool is located within the standard Couchbase command-line
directory. See Command-line Interface for
Administration.
Make sure that there is enough disk space to accommodate the backup. You will need at least as much storage space as currently used by the node for storing Couchbase data.
The user running the cbbackup command must have the correct permissions to
read/write to the files being backed up, and run the necessary additional
commands that are executed during the process.
Recommended best practice is to run the command as the couchbase user, as this
is the default owner of the files when Couchbase Server is installed.
The cbbackup script will also perform a vacuum of the database files to
defragment them which provides faster startup times. Depending on the amount of
data, this script can take an extended amount of time to run. It is a best
practice to make sure that your connection to the server running the script is
not broken.
-
Linux
shell> cbbackup /opt/couchbase/var/lib/couchbase/data/default-data/default /backups/2010-12-22/Backup the configuration file located at:
/opt/couchbase/var/lib/couchbase/config/config.dat -
Windows
Start a
powershellsession.-
Set the execution policy for the session:
shell> set-executionpolicy remotesigned -
Run the backup
shell> cbbackup "C:\Program Files\Couchbase\Server\var\lib\couchbase\data\default-data\default" \
       "C:/backup/2010-12-22/"
Copy the configuration file
config.datfile located atC:\Program Files\Couchbase\Server\var\lib\couchbase\config\config.dat.
Restore
When restoring a backup, you have to select the appropriate restore sequence based on the type of restore you are performing. There are a number of methods of restoring your cluster:
-
Restoring a cluster to a previous state, to the same cluster
This method should be used when you are restoring information to an identical cluster, or directly back to the cluster form which the backup was made. The cluster will need to be identically configured, with the same number of nodes and identical IP addresses to the cluster at the point when it was backed up.
For advice on using this method, see Restoring to the same cluster.
-
Restoring a cluster to a previous state, to a different cluster
If your cluster environment has changed in any way for example changes to the hardware or underlying configuration, for example disk layout or IP addresses, then you should use this method. When using Couchbase Server within a virtual or cloud environment, the IP address and/or size configuration is likely to have changed considerably.
For advice on using this method, see Restoring to a different cluster.
-
Restoring a cluster to a different configuration
If you want to restore data to a cluster with a different configuration, or in the event of a corruption of your existing cluster data, then you can use the
cbrestoretool. This natively restores data back into a new cluster and new configuration.For advice on using this method, see Restoring using cbrestore tool.
Make sure that any restoration of files also sets the proper ownership of those files to the couchbase user
Restoring to the same cluster
To restore the information to the same cluster, with the same configuration, you must shutdown your entire cluster while you restore the data, and then restart the cluster again. You are replacing the entire cluster data and configuration with the backed up version of the data files, and then re-starting the cluster with the saved version of the cluster files.
When restoring data back in to the same cluster, then the following must be true before proceeding:
The backup and restore must take between cluster using the same version of Couchbase Server.
The cluster must contain the same number of nodes.
Each node must have the IP address or hostname it was configured with when the cluster was backed up.
You must restore all of the
config.datconfiguration files as well as all of the database files to their original locations.
The steps required to complete the restore process are:
Stop the Couchbase Server service on all nodes. For more information, see Startup and Shutdown of Couchbase Server.
On each node, restore the database and configuration file (
config.dat) from your backup copies for each node.Restart the service on each node. For more information, see Startup and Shutdown of Couchbase Server.
Restoring to a different cluster
To restore the data to a different cluster you take a backup of the data, and recreate the bucket configuration on a new cluster. This enables Couchbase Server to load the data into the new cluster and repopulate the database with the backed up data. You cannot change the topology or number of nodes within the cluster using this method, but you can modify the physical characteristics of each node, including the hardware configuration or IP addresses.
You can use this feature to migrate an entire cluster into new set of machines. This is particularly useful when:
In cloud environments, where the IP addresses of nodes will have changed
Hardware configuration, such as RAM size, disk hardware or disk configuration and/or environment has changed.
To create dev/test clusters with the same data as the production cluster
To restore a cluster using this method, the following must be true:
You have a backup of each of the buckets in your cluster made using the
cbbackupcommand.The two clusters must have the same number of nodes.
The original cluster must be in a healthy state. This means that all nodes should be up and running and no rebalance or failover operation should be running.
It is a best practice for both clusters to be of the same OS and memory configuration.
The necessary steps for migrating data using this method are as follows:
Take a backup of the data files of all nodes, using the above procedure. Alternately, shut down the couchbase-server on all nodes and copy the DB files.
Install Couchbase Server (of at least version 1.7.1) on new nodes and cluster together. If using the web console to setup your cluster, a ‘default’ bucket will be created. Please delete this bucket before proceeding.
-
Place the copies of the original files into the data directory on all the new nodes.
You must ensure that each set of original data files gets placed onto one and only one node of the new cluster.
Please ensure that you retain file ownership properties for those files which you placed on the destination node.
Start couchbase-server on the new nodes
Create a bucket with the same name and SASL configuration on the new nodes.
After the bucket creation, each node will start loading items from the data files into memory.
The cluster will be in a balanced state after warm up.
Do not start a rebalance process while nodes are still warming up.
If any nodes go down during the warmup, it is a best practice to restart all nodes together.
Restoring using cbrestore tool
There are a number of bugs in older versions of the mbrestore script. Anyone
using mbrestore should make sure to get the latest script to ensure proper
functionality. You can download the latest from
here.
The latest version of the script will work with any previous versions of
Couchbase.
This is useful if:
You want to restore data into a cluster of a different size
You want to transfer/restore data into a different bucket
You have a broken or corrupted database file (usually from running out of space on a disk drive)
The cbrestore tool provides the following options:
cbrestore opts db_files (use -h for detailed help)

 -a --add Use add instead of set to avoid overwriting existing items
 -H --host Hostname of moxi server to connect to (default is 127.0.0.1)
 -p --port Port of moxi server to connect to (default is 11211)
 -t --threads Number of worker threads
 -u --username Username to authenticate with (this is the name of the bucket you are sending data into)
 -P --password Password to authenticate with (this is the password of the bucket you are sending data into)
Depending on the amount of data, this script can take an extended amount of time to run. It is a best practice to make sure that your connection to the server running the script is not broken, or that you are using something to let the script run in the background (i.e. screen). For example, on Linux:
shell> cbrestore -a default default-0.mb default-1.mb default-2.mb default-3.mb
For better speed/efficiency you can run the command on multiple nodes, with each node using a separate backup file. For example:
shell-node1> cbrestore -a -t 8 default default-0.mb
...
shell-node2> cbrestore -a -t 8 default default-1.mb
...
shell-node3> cbrestore -a -t 8 default default-2.mb
...
shell-node4> cbrestore -a -t 8 default default-3.mb
On Windows, ensure you correctly quote the filename arguments:
shell> cbrestore -a "C:/backup/2010-12-22/default" "C:/backup/2010-12-22/default-0.mb" \
    "C:/backup/2010-12-22/default-1.mb" "C:/backup/2010-12-22/default-2.mb" "C:/backup/2010-12-22/default-3.mb"
Rebalancing (Expanding and Shrinking your Cluster)
As you store data into your Couchbase Server cluster, you may need to alter the number of nodes in your cluster to cope with changes in your application load, RAM, disk I/O and networking performance requirements.
Couchbase Server is designed to actively change the number of nodes configured
within the cluster to cope with these requirements, all while the cluster is up
and running and servicing application requests. The overall process is broken
down into two stages; the addition and/or removal of nodes in the cluster, and
the rebalancing of the information across the nodes.
The addition and removal process merely configures a new node into the cluster, or marks a node for removal from the cluster. No actual changes are made to the cluster or data when configuring new nodes or removing existing ones.
During the rebalance operation:
-
Using the new Couchbase Server cluster structure, data is moved between the vBuckets on each node from the old structure. This process works by exchanging the data held in vBuckets on each node across the cluster. This has two effects:
Removes the data from machines being removed from the cluster. By totally removing the storage of data on these machines, it allows for each removed node to be taken out of the cluster without affecting the cluster operation.
Adds data and enables new nodes so that they can serve information to clients. By moving active data to the new nodes, they will be made responsible for the moved vBuckets and for servicing client requests.
Rebalancing moves both the data stored in RAM, and the data stored on disk for each bucket, and for each node, within the cluster. The time taken for the move is dependent on the level of activity on the cluster and the amount of stored information.
The cluster remains up, and continues to service and handle client requests. Updates and changes to the stored data during the migration process are tracked and will be updated and migrated with the data that existed when the rebalance was requested. By copying over the existing and actively updated information
The current vBucket map, used to identify which nodes in the cluster are responsible for handling client requests, is updated incrementally as each vBucket is moved. The updated vBucket map is communicated to Couchbase client libraries and enabled smart clients (such as Moxi), and allows clients to use the updated structure as the rebalance completes. This ensures that the new structure is used as soon as possible to help spread and even out the load during the rebalance operation.
Because the cluster stays up and active throughout the entire process, clients can continue to store and retrieve information and do not need to be aware that a rebalance operation is taking place.
There are four primary reasons that you perform a rebalance operation:
Adding nodes to expand the size of the cluster.
Removing nodes to reduce the size of the cluster.
Reacting to a failover situation, where you need to bring the cluster back to a healthy state.
You need to temporarily remove one or more nodes to perform a software, operating system or hardware upgrade.
Regardless of the reason for the rebalance, the purpose of the rebalance is migrate the cluster to a healthy state, where the configured nodes, buckets, and replicas match the current state of the cluster.
For information and guidance on choosing how, and when, to rebalance your cluster, read Choosing When to Rebalance. This will provide background information on the typical triggers and indicators that your cluster requires changes to the node configuration, and when a good time to perform the rebalance is required.
Instructions on how to expand and shrink your cluster, and initiate the rebalance operation are provided in Starting a Rebalance.
Once the rebalance operation has been initiated, you should monitor the rebalance operation and progress. You can find information on the statistics and events to monitor using Monitoring During Rebalance.
Common questions about the rebalancing operation are located in Common Rebalancing Questions.
For a deeper background on the rebalancing and how it works, see Rebalance Behind-the-Scenes.
Choosing When to Rebalance
Choosing when each of situations applies is not always straightforward. Detailed below is the information you need to choose when, and why, to rebalance your cluster under different scenarios.
Choosing when to expand the size of your cluster
You can increase the size of your cluster by adding more nodes. Adding more nodes increases the available RAM, disk I/O and network bandwidth available to your client applications and helps to spread the load around more machines. There are a few different metrics and statistics that you can use on which to base your decision:
-
Increasing RAM Capacity
One of the most important components in a Couchbase Server cluster is the amount of RAM available. RAM not only stores application data and supports the Couchbase Server caching layer, it is also actively used for other operations by the server, and a reduction in the overall available RAM may cause performance problems elsewhere.
There are two common indicators for increasing your RAM capacity within your cluster:
If you see more disk fetches occurring, that means that your application is requesting more and more data from disk that is not available in RAM. Increasing the RAM in a cluster will allow it to store more data and therefore provide better performance to your application.
If you want to add more buckets to your Couchbase Server cluster you may need more RAM to do so. Adding nodes will increase the overall capacity of the system and then you can shrink any existing buckets in order to make room for new ones.
-
Increasing disk I/O Throughput
By adding nodes to a Couchbase Server cluster, you will increase the aggregate amount of disk I/O that can be performed across the cluster. This is especially important in high-write environments, but can also be a factor when you need to read large amounts of data from the disk.
-
Increasing Disk Capacity
You can either add more disk space to your current nodes or add more nodes to add aggregate disk space to the cluster.
-
Increasing Network Bandwidth
If you see that you are or are close to saturating the network bandwidth of your cluster, this is a very strong indicator of the need for more nodes. More nodes will cause the overall network bandwidth required to be spread out across additional nodes, which will reduce the individual bandwidth of each node.
Choosing when to shrink your cluster
Choosing to shrink a Couchbase cluster is a more subjective decision. It is usually based upon cost considerations, or a change in application requirements not requiring as large a cluster to support the required load.
When choosing whether to shrink a cluster:
You should ensure you have enough capacity in the remaining nodes to support your dataset and application load. Removing nodes may have a significant detrimental effect on your cluster if there are not enough nodes.
You should avoid removing multiple nodes at once if you are trying to determine the ideal cluster size. Instead, remove each node one at a time to understand the impact on the cluster as a whole.
You should remove and rebalance a node, rather than using failover. When a node fails and is not coming back to the cluster, the failover functionality will promote its replica vBuckets to become active immediately. If a healthy node is failed over, there might be some data loss for the replication data that was in flight during that operation. Using the remove functionality will ensure that all data is properly replicated and continuously available.
Choosing when to Rebalance
Once you decide to add or remove nodes to your Couchbase Server cluster, there are a few things to take into consideration:
If you’re planning on adding and/or removing multiple nodes in a short period of time, it is best to add them all at once and then kick-off the rebalancing operation rather than rebalance after each addition. This will reduce the overall load placed on the system as well as the amount of data that needs to be moved.
Choose a quiet time for adding nodes. While the rebalancing operation is meant to be performed online, it is not a “free” operation and will undoubtedly put increased load on the system as a whole in the form of disk IO, network bandwidth, CPU resources and RAM usage.
Voluntary rebalancing (i.e. not part of a failover situation) should be performed during a period of low usage of the system. Rebalancing is a comparatively resource intensive operation as the data is redistributed around the cluster and you should avoid performing a rebalance during heavy usage periods to avoid having a detrimental affect on overall cluster performance.
Rebalancing requires moving large amounts of data around the cluster. The more RAM that is available will allow the operating system to cache more disk access which will allow it to perform the rebalancing operation much faster. If there is not enough memory in your cluster the rebalancing may be very slow. It is recommended that you don’t wait for your cluster to reach full capacity before adding new nodes and rebalancing.
Performing a Rebalance
Rebalancing a cluster involves marking nodes to be added or removed from the cluster, and then starting the rebalance operation so that the data is moved around the cluster to reflect the new structure.
For information on adding nodes to your cluster, see Adding a Node to a Cluster.
For information on adding nodes to your cluster, see Removing a Node from a Cluster.
In the event of a failover situation, a rebalance is required to bring the cluster back to a healthy state and re-enable the configured replicas. For more information on how to handle a failover situation, see Node Failover
The Couchbase Admin Web Console will indicate when the cluster requires a
rebalance because the structure of the cluster has been changed, either through
adding a node, removing a node, or due to a failover. The notification is
through the count of the number of servers that require a rebalance. You can see
a sample of this in the figure below, here shown on the Manage Server Nodes
page

To rebalance the cluster, you must initiate the rebalance process, detailed in Starting a Rebalance.
Adding a Node to a Cluster
There are a number of methods available for adding a node to a cluster. The result is the same in each case, the node is marked to be added to the cluster, but the node is not an active member until you have performed a rebalance operation.
The methods are:
-
Web Console — During Installation
When you are performing the Setup of a new Couchbase Server installation (see Setting up Couchbase Server ), you have the option of joining the new node to an existing cluster.
During the first step, you can select the
Join a cluster nowradio button, as shown in the figure below: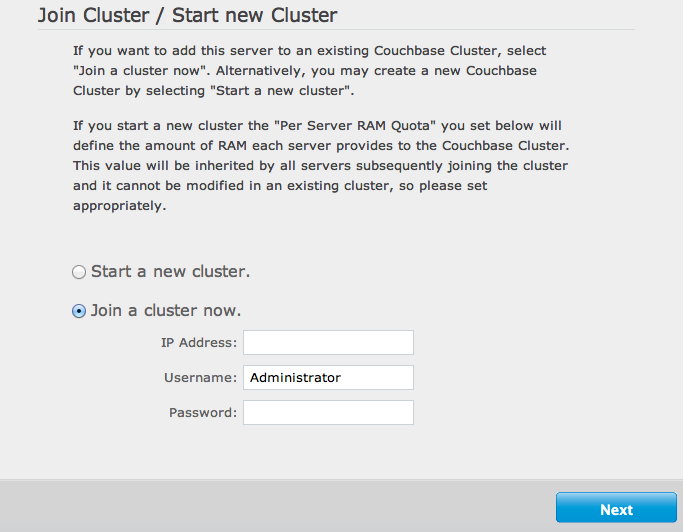
You are prompted for three pieces of information:
-
IP AddressThe IP address of any existing node within the cluster you want to join.
-
UsernameThe username of the administrator of the target cluster.
-
PasswordThe password of the administrator of the target cluster.
The node will be created as a new cluster, but the pending status of the node within the new cluster will be indicated on the Cluster Overview page, as seen in the example below:

-
-
Web Console — After Installation
You can add a new node to an existing cluster after installation by clicking the
Add Serverbutton within theManage Server Nodesarea of the Admin Console. You can see the button in the figure below.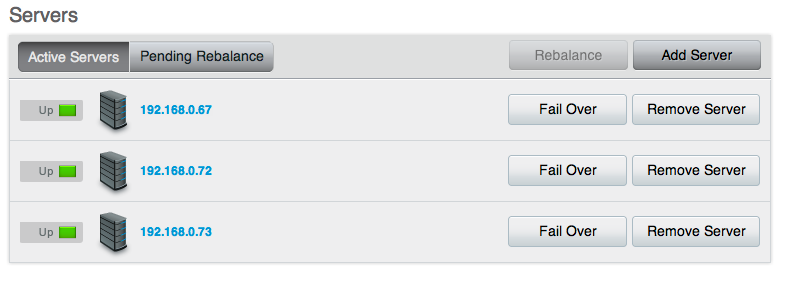
You will be presented with a dialog box, as shown below. Couchbase Server should be installed, and should have been configured as per the normal setup procedures. You can also add a server that has previously been part of this or another cluster using this method. The Couchbase Server must be running.
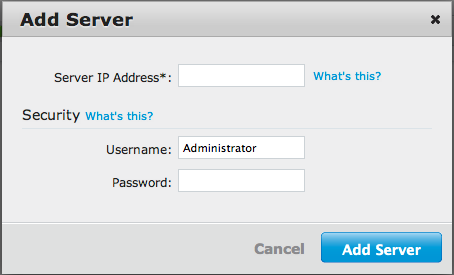
You need to fill in the requested information:
-
Server IP AddressThe IP address of the server that you want to add.
-
UsernameThe username of the administrator of the target node.
-
PasswordThe password of the administrator of the target node.
You will be provided with a warning notifying you that the operation is destructive on the destination server. Any data currently stored on the server will be deleted, and if the server is currently part of another cluster, it will be removed and marked as failed over in that cluster.
Once the information has been entered successfully, the node will be marked as ready to added to the cluster, and the servers pending rebalance count will be updated.
-
-
Using the REST API
Using the REST API, you can add nodes to the cluster by providing the IP address, administrator username and password as part of the data payload. For example, using
curlyou could add a new node:shell> curl -u cluster-username:cluster-password\ localhost:8091/controller/addNode \ -d "hostname=192.168.0.68&user=node-username&password=node-password"For more information, see Adding a Node to a Cluster.
-
Using the Command-line
You can use the
couchbase-clicommand-line tool to add one or more nodes to an existing cluster. The new nodes must have Couchbase Server installed, and Couchbase Server must be running on each node.To add, run the command:
shell> couchbase-cli server-add \
       –cluster=localhost:8091 \
       -u cluster-username -p cluster-password \
       –server-add=192.168.0.72:8091 \
       –server-add-username=node-username \
       –server-add-password=node-password
Where:
Parameter Description --clusterThe IP address of a node in the existing cluster. -uThe username for the existing cluster. -pThe password for the existing cluster. --server-addThe IP address of the node to be added to the cluster. --server-add-usernameThe username of the node to be added. --server-add-passwordThe password of the node to be added. If the add process is successful, you will see the following response:
SUCCESS: server-add 192.168.0.72:8091If you receive a failure message, you will be notified of the type of failure.
You can add multiple nodes in one command by supplying multiple
--server-addcommand-line options to the command.
Once a server has been successfully added, the Couchbase Server cluster will indicate that a rebalance is required to complete the operation.
You can cancel the addition of a node to a cluster without having to perform a rebalance operation. Canceling the operation will remove the server from the cluster without having transferred or exchanged any data, since no rebalance operation took place. You can cancel the operation through the web interface.
Removing a Node from a Cluster
Removing a node marks the node for removal from the cluster, and will completely disable the node from serving any requests across the cluster. Once removed, a node is no longer part of the cluster in any way and can be switched off, or can be updated or upgraded.
Like adding nodes, there are a number of solutions for removing a node:
-
Web Console
You can remove a node from the cluster from within the
Manage Server Nodessection of the Web Console, as shown in the figure below.To remove a node, click the
Remove Serverbutton next to the node you want to remove. You will be provided with a warning to confirm that you want to remove the node. ClickRemoveto mark the node for removal. -
Using the Command-line
You cannot mark a node for removal from the command-line without also initiating a rebalance operation. The
rebalancecommand accepts one or more--server-addand/or--server-removeoptions. This adds or removes the server from the cluster, and immediately initiates a rebalance operation.For example, to remove a node during a rebalance operation:
shell> couchbase-cli rebalance –cluster=127.0.0.1:8091 \
           -u Administrator -p Password \
           –server-remove=192.168.0.73
For more information on the rebalance operation, see Starting a Rebalance.
Removing a node does not stop the node from servicing requests. Instead, it only marks the node ready for removal from the cluster. You must perform a rebalance operation to complete the removal process.
Starting a Rebalance
Once you have configured the nodes that you want to add or remove from your cluster, you must perform a rebalance operation. This moves the data around the cluster so that the data is distributed across the entire cluster, removing and adding data to different nodes in the process.
If Couchbase Server identifies that a rebalance is required, either through
explicit addition or removal, or through a failover, then the cluster is in a
pending rebalance state. This does not affect the cluster operation, it merely
indicates that a rebalance operation is required to move the cluster into its
configured state.
To initiate a rebalance operation:
-
Using the Web Console
Within the
Manage Server Nodesarea of the Couchbase Administration Web Console, a cluster pending a rebalance operation will have enabled theRebalancebutton.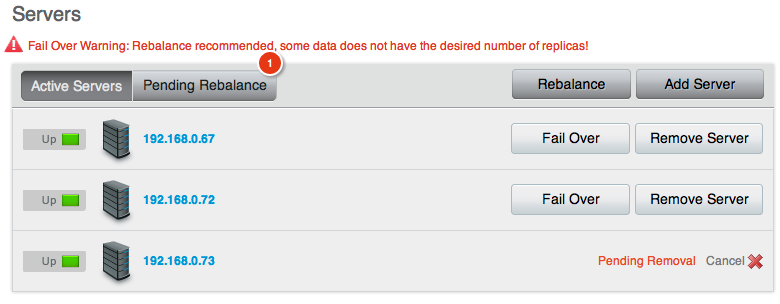
Clicking this button will immediately initiate a rebalance operation. You can monitor the progress of the rebalance operation through the web console. The progress of the movement of vBuckets is provided for each server by showing the movement progress as a percentage.
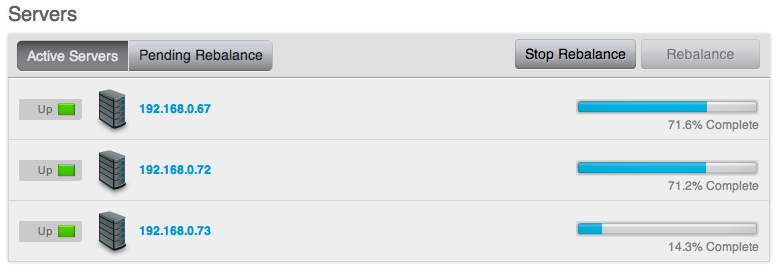
You can monitor the progress by viewing the
Active vBucketsstatistics. This should show the number of active vBuckets on nodes being added increased and the number of vBucketson nodes being removed reducing.You can monitor this through the UI by selecting the
vBucketsstatistic in theMonitoringsection of the Administration Web Console.You can stop a rebalance operation at any time during the process by clicking the
Stop Rebalancebutton. This only stops the rebalance operation, it does not cancel the operation. You should complete the rebalance operation. -
Using the Command-line
You can initiate a rebalance using the
couchbase-cliand therebalancecommand:shell> couchbase-cli rebalance -c 127.0.0.1:8091 -u Administrator -p Password INFO: rebalancing … … … … … … … … … … . … … … … … … … … … … … … … . … … … … … … … … … … … … … . … … … … … … … … … … … … … . … … … … … … … … … … … … … . … … … … … … … … … … … … … . … … … . . SUCCESS: rebalanced clusterYou can also use this method to add and remove nodes and initiate the rebalance operation using a single command. You can specify nodes to be added using the
--server-addoption, and nodes to be removed using the--server-remove. You can use multiple options of each type. For example, to add two nodes, and remove two nodes, and immediately initiate a rebalance operation:shell> couchbase-cli rebalance -c 127.0.0.1:8091 \ -u Administrator -p Password \ –server-add=192.168.0.72 \ –server-add=192.168.0.73 \ –server-remove=192.168.0.70 \ –server-remove=192.168.0.69The command-line provides an active view of the progress and will only return once the rebalance operation has either completed successfully, or in the event of a failure.
You can stop the rebalance operation by using the
stop-rebalancecommand tocouchbase-cli.
The time taken for a rebalance operation is entirely dependent on the number of servers, quantity of data, cluster performance and any existing cluster activity, and is therefore impossible to accurately predict or estimate.
Throughout any rebalance operation you should monitor the process to ensure that it completes successfully, see Monitoring During Rebalance.
Swap Rebalance
1.8.1
Swap Rebalance functionality was added to Couchbase Server 1.8.1.
Swap Rebalance is an automatic feature that optimizes the movement of data when you are adding and removing the same number of nodes within the same operation. The swap rebalance optimizes the rebalance operation by moving data directly from the nodes being removed to the nodes being added. This is more efficient than standard rebalancing which would normally move data across the entire cluster.
Swap rebalance can be used during an upgrade process to upgrade all the nodes of the cluster, without requiring data to be moved around the cluster degrading the performance. For more information, Upgrading to Couchbase Server 1.8.1 Using Swap Rebalance.
Swap rebalance only occurs if the following are true:
You are removing and adding the same number of nodes during rebalance. For example, if you have marked two nodes to be removed, and added another two nodes to the cluster.
There must be at least one Couchbase Server 1.8.1 node in the cluster.
Swap rebalance occurs automatically if the number of nodes being added and removed are identical. There is no configuration or selection mechanism to force a swap rebalance. If a swap rebalance cannot take place, then a normal rebalance operation will be used instead.
When Couchbase Server 1.8.1 identifies that a rebalance is taking place and that there are an even number of nodes being removed and added to the cluster, the swap rebalance method is used to perform the rebalance operation.
When a swap rebalance takes place, the rebalance operates as follows:
Data will be moved directly from a node being removed to a node being added on a one-to-one basis. This eliminates the need to restructure the entire vBucket map.
Active vBuckets are moved, one at a time, from a source node to a destination node.
Replica vBuckets are created on the new node and populated with existing data before being activated as the live replica bucket. This ensures that if there is a failure during the rebalance operation, that your replicas are still in place.
For example, if you have a cluster with 20 nodes in it, and configure two nodes (X and Y) to be added, and two nodes to be removed (A and B):
vBuckets from node A will be moved to node X.
vBuckets from node B will be moved to node Y.
The benefits of swap rebalance are:
Reduced rebalance duration. Since the move takes place directly from the nodes being removed to the nodes being added.
Reduced load on the cluster during rebalance.
Reduced network overhead during the rebalance.
Reduced chance of a rebalance failure if a failover occurs during the rebalance operation, since replicas are created in tandem on the new hosts while the old host replicas still remain available.
Because data on the nodes are swapped, rather than performing a full rebalance, the capacity of the cluster remains unchanged during the rebalance operation, helping to ensure performance and failover support.
The behavior of the cluster during a failover and rebalance operation with the swap rebalance functionality affects the following situations:
-
Stopping a rebalance
If rebalance fails, or has been deliberately stopped, the active and replica vBuckets that have been transitioned will be part of the active vBucket map. Any transfers still in progress will be canceled. Restarting the rebalance operation will continue the rebalance from where it left off.
-
Adding back a failed node
When a node has failed, removing it and adding a replacement node, or adding the node back, will be treated as swap rebalance.
Failed Over Nodes
With swap rebalance functionality, after a node has failed over, you should either clean up and re-add the failed over node, or add a new node and perform a rebalance as normal. The rebalance will be handled as a swap rebalance which will minimize the data movements without affecting the overall capacity of the cluster.
Monitoring During Rebalance
Monitoring a Rebalance
You should monitor the system during and immediately after a rebalance operation until you are confident that replication has completed successfully.
There are essentially two stages to rebalancing:
-
Backfilling
The first stage of replication involves reading all data for a given active vBucket and sending it to the server that is responsible for the replica. This can put increased load on the disk subsystem as well as network bandwidth but is not designed to impact any client activity.
You can monitor the progress of this task by watching for ongoing TAP disk fetches and/or watching
cbstats tap, orshell> cbstats <couchbase_node>:11210 tap | grep backfillBoth will return a list of TAP backfill processes and whether they are still running (true) or done (false).
When all have completed, you should see the Total Item count (
curr_items_tot) be equal to the number of active items multiplied by replica count.If you are continuously adding data to the system, these values may not line up exactly at a given instant in time. However, you should be able to determine whether there is a significant difference between the two figures.
Until this is completed, you should avoid using the “failover” functionality since that may result in loss of the data that has not yet been replicated.
-
Draining
After the backfill process is completed, all nodes that had replicas materialized on them will then need to persist those items to disk. It is important to continue monitoring the disk write queue and memory usage until the rebalancing operation has been completed, to ensure that your cluster is able to keep up with the write load and required disk I/O.
Common Rebalancing Questions
Provided below are some common questions and answers for the rebalancing operation.
-
How long will rebalancing take?
Because the rebalancing operation moves data stored in RAM and on disk, and continues while the cluster is still servicing client requests, the time required to perform the rebalancing operation is unique to each cluster. Other factors, such as the size and number of objects, speed of the underlying disks used for storage, and the network bandwidth and capacity will also impact the rebalance speed.
Busy clusters may take a significant amount of time to complete the rebalance operation. Similarly, clusters with a large quantity of data to be moved between nodes on the cluster will also take some time for the operation to complete. A busy cluster with lots of data may take a significant amount of time to fully rebalance.
-
How many nodes can be added or removed?
Functionally there is no limit to the number of nodes that can be added or removed in one operation. However, from a practical level you should be conservative about the numbers of nodes being added or removed at one time.
When expanding your cluster, adding more nodes and performing fewer rebalances is the recommend practice.
When removing nodes, you should take care to ensure that you do not remove too many nodes and significantly reduce the capability and functionality of your cluster.
Remember as well that you can remove nodes, and add nodes, simultaneously. If you are planning on performing a number of addition and removals simultaneously, it is better to add and remove multiple nodes and perform one rebalance, than to perform a rebalance operation with each individual move.
If you are swapping out nodes for servicing, then you can use this method to keep the size and performance of your cluster constant.
-
Will cluster performance be affected during a rebalance?
By design, there should not be any significant impact on the performance of your application. However, it should be obvious that a rebalance operation implies a significant additional load on the nodes in your cluster, particularly the network and disk I/O performance as data is transferred between the nodes.
Ideally, you should perform a rebalance operation during the quiet periods to reduce the impact on your running applications.
-
Can I stop a rebalance operation?
The vBuckets within the cluster are moved individually. This means that you can stop a rebalance operation at any time. Only the vBuckets that have been fully migrated will have been made active. You can re-start the rebalance operation at any time to continue the process. Partially migrated vBuckets are not activated.
The one exception to this rule is when removing nodes from the cluster. Stopping the rebalance cancels their removal. You will need to mark these nodes again for removal before continuing the rebalance operation.
To ensure that the necessary clean up occurs, stopping a rebalance incurs a five minute grace period before the rebalance can be restarted. This ensures that the cluster is in a fixed state before rebalance is requested again.
Rebalance Effect on Bucket Types
The rebalance operation works across the cluster on both Couchbase and
memcached buckets, but there are differences in the rebalance operation due to
the inherent differences of the two bucket types.
For Couchbase buckets:
Data is rebalance across all the nodes in the cluster to match the new configuration.
Updated vBucket map is communicated to clients as each vBucket is successfully moved.
No data is lost, and there are no changes to the caching or availability of individual keys.
For memcached buckets:
If new nodes are being added to the cluster, the new node is added to the cluster, and the node is added to the list of nodes supporting the memcached bucket data.
If nodes are being removed from the cluster, the data stored on that node within the memcached bucket will be lost, and the node removed from the available list of nodes.
In either case, the list of nodes handling the bucket data is automatically updated and communicated to the client nodes. Memcached buckets use the Ketama hashing algorithm which is designed to cope with server changes, but the change of server nodes may shift the hashing and invalidate some keys once the rebalance operation has completed.
Rebalance Behind-the-Scenes
The rebalance process is managed through a specific process called the
orchestrator. This examines the current vBucket map and then combines that
information with the node additions and removals in order to create a new
vBucket map.
The orchestrator starts the process of moving the individual vBuckets from the current vBucket map to the new vBucket structure. The process is only started by the orchestrator - the nodes themselves are responsible for actually performing the movement of data between the nodes. The aim is to make the newly calculated vBucket map match the current situation.
Each vBucket is moved independently, and a number of vBuckets can be migrated
simultaneously in parallel between the different nodes in the cluster. On each
destination node, a process called ebucketmigrator is started, which uses the
TAP system to request that all the data is transferred for a single vBucket, and
that the new vBucket data will become the active vBucket once the migration has
been completed.
While the vBucket migration process is taking place, clients are still sending data to the existing vBucket. This information is migrated along with the original data that existed before the migration was requested. Once the migration of the all the data has completed, the original vBucket is marked as disabled, and the new vBucket is enabled. This updates the vBucket map, which is communicated back to the connected clients which will now use the new location.
Changing Couchbase Quotas
Couchbase Server includes two key quotas for allocating RAM for storing data:
-
Couchbase Server Quota
The Couchbase Server quota is the amount of RAM available on each server allocated to Couchbase for all buckets. You may want to change this value if you have increased the physical RAM in your server, or added new nodes with a higher RAM configuration in a cloud deployment.
The Couchbase Server quota is initially set when you install the first node in your cluster. All nodes in the cluster use the same server quota configuration. The configuration value is set by configuring the RAM allocation for all nodes within the cluster.
To change the Couchbase Server Quota, use the
couchbase-clicommand, using thecluster-initcommand and the--cluster-init-ramsizeoption. For example, to set the server RAM quota to 8GB:shell> couchbase-cli cluster-init -c 127.0.0.1 \ -u Administrator -p Password \ –cluster-init-ramsize=8192Setting the value on one node sets the RAM quota for all the configured nodes within the cluster.
-
Bucket Quota
The bucket quota is the RAM allocated to an individual bucket from within the RAM allocated to the nodes in the cluster. The configuration is set on a per node basis; i.e. configuring a bucket with 100MB per node on an eight node cluster provides a total bucket size of 800MB.
The easiest way to configure the Bucket Quota is through the Couchbase Web Console. For more details, see Editing Couchbase Buckets.
The value can also be modified from the command-line using the
couchbase-clicommand:shell> /opt/couchbase/bin/couchbase-cli bucket-edit -c 127.0.0.1 \ -u Administrator -p Password \ –bucket=beer-sample –bucket-ramsize=200
Web Console for Administration
The Couchbase Web Console is the main administration method for managing your Couchbase installation. The Web Console provides the following functionality:
-
Cluster Overviewprovides a quick guide to the status of your Couchbase cluster.For more information, read Cluster Overview.
-
Data Bucketsprovides access to your data bucket configuration, including creating new buckets, editing existing configurations, and provides detailed analysis and statistics on the bucket activity.See Data Buckets.
-
Server Nodesdetails your active nodes and their configuration and activity. You can also fail over nodes and remove them from your cluster, and view server-specific performance and monitoring statistics.Read Server Nodes.
-
Logaccess allows you to view errors and problems.See Log for more information.
-
Settingsconfigures the console and cluster settings.See Settings for more information.
In addition to the navigable sections of the Couchbase Web Console, there are additional systems within the web console, including:
-
Update NotificationsUpdate notifications warn you when there is an update available for the installed Couchbase Server. See Update Notifications for more information on this feature.
-
Warnings and AlertsThe warnings and alerts system will notify you through the web console where there is an issue that needs to be addressed within your cluster. The warnings and alerts can be configured through the Settings.
For more information on the warnings and alerts, see Warnings and Alerts.
Cluster Overview
The Cluster Overview page is the home page for the Couchbase Web Console. The
page is designed to give you a quick overview of your cluster health, including
RAM and disk usage and activity. The page is divided into several sections: Cluster, Buckets, and Servers.

Cluster
The Cluster section provides information on the RAM and disk usage information for your cluster.
For the RAM information you are provided with a graphical representation of your RAM situation, including:
-
Total in ClusterTotal RAM configured within the cluster. This is the total amount of memory configured for all the servers within the cluster.
-
Total AllocatedThe amount of RAM allocated to data buckets within your cluster.
-
UnallocatedThe amount of RAM not allocated to data buckets within your cluster.
-
In UseThe amount of memory across all buckets that is actually in use (i.e. data is actively being stored).
-
UnusedThe amount of memory that is unused (available) for storing data.
The Disk Overview section provides similar summary information for disk
storage space across your cluster.
-
Total Cluster StorageTotal amount of disk storage available across your entire cluster for storing data.
-
Usable Free SpaceThe amount of usable space for storing information on disk. This figure shows the amount of space available on the configured path after non-Couchbase files have been taken into account.
-
Other DataThe quantity of disk space in use by data other than Couchbase information.
-
In UseThe amount of disk space being used to actively store information on disk.
-
FreeThe free space available for storing objects on disk.
Buckets
The Buckets section provides two graphs showing the Operations per second
and Disk fetches per second.
The Operations per second provides information on the level of activity on the
cluster in terms of storing or retrieving objects from the data store.
The Disk fetches per second indicates how frequently Couchbase is having to go
to disk to retrieve information instead of using the information stored in RAM.
Servers
The Servers section indicates overall server information for the cluster:
Active Serversis the number of active servers within the current cluster configuration.Servers Failed Overis the number of servers that have failed over due to an issue that should be investigated.Servers Downshows the number of servers that are down and not-contactable.Servers Pending Rebalanceshows the number of servers that are currently waiting to be rebalanced after joining a cluster or being reactivated after failover.
Web Console Statistics
Within the Data Bucket monitor display, information is shown by default for
the entire Couchbase Server cluster. The information is aggregated from all the
server nodes within the configured cluster for the selected bucket.
The following functionality is available through this display, and is common to all the graphs and statistics display within the web console.
-
Bucket SelectionThe
Data Bucketsselection list allows you to select which of the buckets configured on your cluster is to be used as the basis for the graph display. -
Server SelectionThe
Server Selectionoption enables you to enable the display for an individual server instead of for the entire cluster. You can select an individual node, which displays the Server Nodes for that node. SelectingAll Server Nodesshows the Data Buckets page. -
Interval SelectionThe
Interval Selectionat the top of the main graph changes interval display for all graphs displayed on the page. For example, selectingMinuteshows information for the last minute, continuously updating.As the selected interval increases, the amount of statistical data displayed will depend on how long your cluster has been running.
-
Statistic SelectionAll of the graphs within the display update simultaneously. Clicking on any of the smaller graphs will promote that graph to be displayed as the main graph for the page.
-
Individual Server SelectionClicking the blue triangle next to any of the smaller statistics graphs enables you to view the statistics on each individual server, instead of the default view which shows the entire cluster information for a given statistic.
Data Buckets
Couchbase Server incorporates a range of statistics and user interface available
through the Data Buckets and Server Nodes that shows overview and detailed
information so that administrators can better understand the current state of
individual nodes and the cluster as a whole.
The Data Buckets page displayed a list of all the configured buckets on your
system (of both Membase and memcached types). The page provides a quick overview
of your cluster health from the perspective of the configured buckets, rather
than whole cluster or individual servers.
The information is shown in the form of a table, as seen in the figure below.
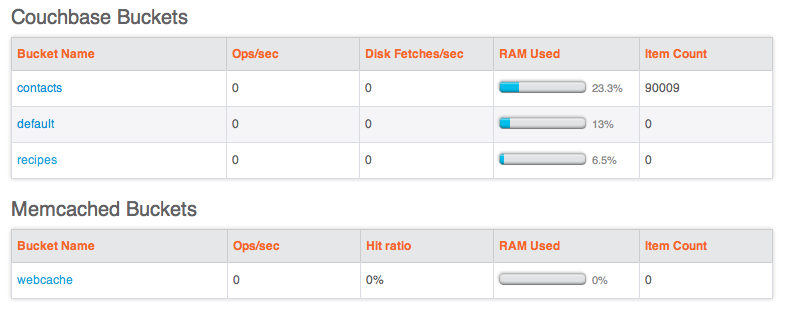
The list of buckets are separated by the bucket type. For each bucket, the following information is provided in each column:
Bucket nameis the given name for the bucket. Clicking on the bucket name takes you to the individual bucket statistics page. For more information, see Individual Bucket Monitoring.RAM Usage/Quotashows the amount of RAM used (for active objects) against the configure bucket size.Disk Usageshows the amount of disk space in use for active object data storage.Item Countindicates the number of objects stored in the bucket.Ops/secshows the number of operations per second for this data bucket.Disk Fetches/secshows the number of operations required to fetch items from disk.Clicking the
Informationbutton opens the basic bucket information summary. For more information, see Bucket Information.
To create a new data bucket, click the Create New Data Bucket. See Creating
and Editing Data Buckets
for details on creating new data buckets.
Creating and Editing Data Buckets
When creating a new data bucket, or editing an existing one, you will be presented with the bucket configuration screen. From here you can set the memory size, access control and other settings, depending on whether you are editing or creating a new bucket, and the bucket type.
Creating a new Bucket
When creating a new bucket, you are presented with the Create Bucket dialog,
as shown in the figure below.
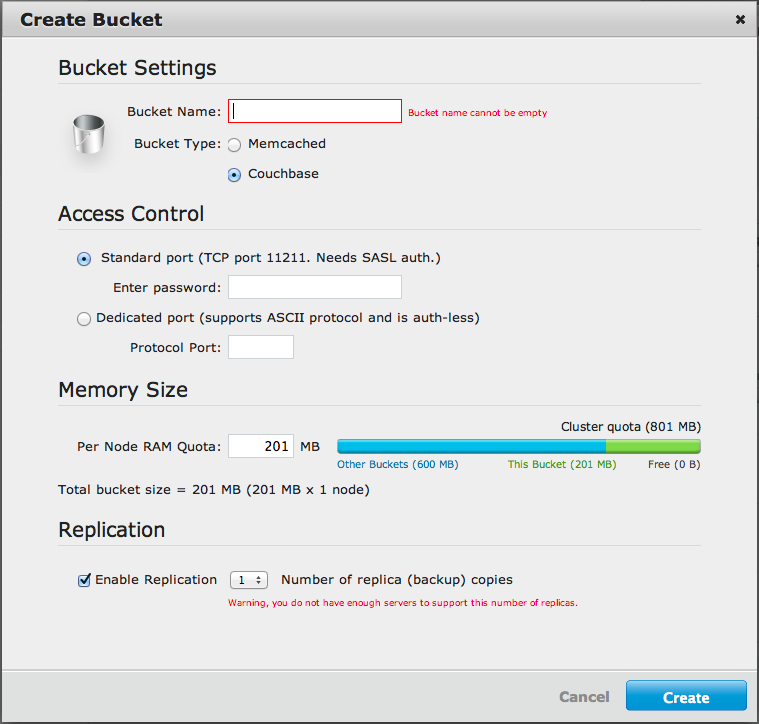
-
Bucket NameThe bucket name. The bucket name can only contain characters in range A-Z, a-z, 0-9 as well as underscore, period, dash and percent symbols.
-
Bucket TypeSpecifies the type of the bucket to be created, either
MemcachedorMembase. -
Access ControlThe access control configures the port your clients will use to communicate with the data bucket, and whether the bucket requires a password.
To use the TCP standard port (11211), the first bucket you create can use this port without requiring SASL authentication. For each subsequent bucket, you must specify the password to be used for SASL authentication, and client communication must be made using the binary protocol.
To use a dedicated port, select the dedicate port radio button and enter the port number you want to use. Using a dedicated port supports both the text and binary client protocols, and does not require authentication.
-
Memory Size
This option specifies the amount of available RAM configured on this server which should be allocated to the bucket being configured. Note that the allocation is the amount of memory that will be allocated for this bucket on each node, not the total size of the bucket across all nodes.
-
Replication
For Membase buckets you can enable replication to support multiple replicas of the default bucket across the servers within the cluster. You can configure up to three replicas. Each replica receives copies of all the documents that are managed by the bucket. If the host machine for a bucket fails, a replica can be promoted to take its place, providing continuous (high-availability) cluster operations in spite of machine failure.
You can disable replication by setting the number of replica copies to zero (0).
Once you selected the options for the new bucket, you can click Create button
to create and activate the bucket within your cluster. You can cancel the bucket
creation using the Cancel button.
Editing Couchbase Buckets
You can edit a limited number of settings for an existing Couchbase bucket:
Access Control, including the standard port/password or custom port settings.Memory Sizecan be modified providing you have unallocated space within your Cluster configuration. You can reduce the amount of memory allocated to a bucket if that space is not already in use.
The bucket name cannot be modified.
To delete the configured bucket entirely, click the Delete button.
Editing Memcached Buckets
For Memcached buckets, you can modify the following settings when editing an existing bucket:
Access Control, including the standard port/password or custom port settings.Memory Sizecan be modified providing you have unallocated space within your Cluster configuration. You can reduce the amount of memory allocated to a bucket if that space is not already in use.
You can delete the bucket entirely by clicking the Delete button.
You can empty a Memcached bucket of all the cached information that it stores by
using the Flush button.
Using the Flush button removes all the objects stored in the Memcached bucket.
Using this button on active Memcached buckets may delete important information.
Bucket Information
You can obtain basic information about the status of your data buckets by
clicking on the i button within the Data Buckets page. The bucket
information shows memory size, access, and replica information for the bucket,
as shown in the figure below.
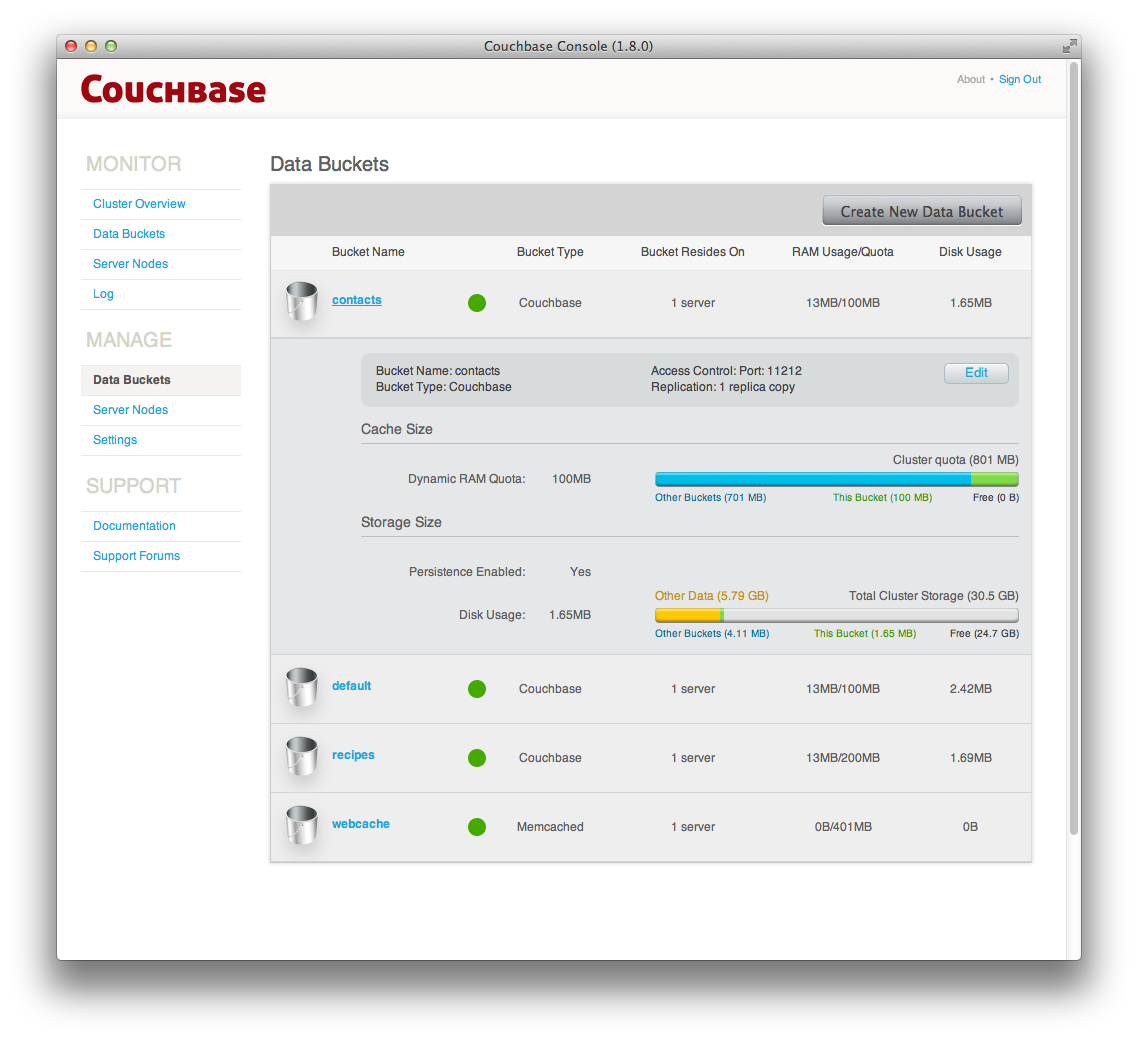
You can edit the bucket information by clicking the Edit button within the
bucket information display.
Individual Bucket Monitoring
Bucket monitoring within the Couchbase Web Console has been updated to show additional detailed information. The following statistic groups are available for Couchbase bucket types.
-
Summary
The summary section provides a quick overview of the cluster activity. For more information, see Bucket Monitoring — Summary Statistics.
-
vBucket Resources
This section provides detailed information on the vBucket resources across the cluster, including the active, replica and pending operations. For more information, see Bucket Monitoring — vBucket Resources.
-
Disk Queues
Disk queues show the activity on the backend disk storage used for persistence within a data bucket. The information displayed shows the active, replica and pending activity. For more information, see Bucket Monitoring — Disk Queues.
-
TAP Queues
The TAP queues section provides information on the activity within the TAP queues across replication, rebalancing and client activity. For more information, see Bucket Monitoring — TAP Queues.
-
Top Keys
This shows a list of the top 10 most actively used keys within the selected data bucket.
For Memcached bucket types, the Memcached static summary is provided. See Bucket Monitoring — Memcached Buckets.
Bucket Monitoring — Summary Statistics
The summary section is designed to provide a quick overview of the cluster activity. Each graph (or selected graph) shows information based on the currently selected bucket.
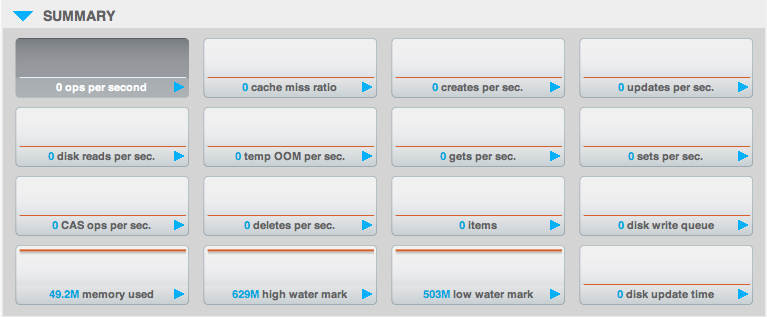
The following graph types are available:
-
ops per secondThe total number of operations per second on this bucket.
-
cache miss ratioPercentage of reads per second to this bucket which required a read from disk rather than RAM.
-
creates per sec.Number of new items created in this bucket per second.
-
updates per sec.Number of existing items updated in this bucket per second.
-
disk reads per sec.Number of reads per second from disk for this bucket.
-
temp OOM per secondNumber of temporary out-of-memory errors sent to clients for this bucket.
-
gets per secondNumber of get operations per second for this bucket.
-
sets per secondNumber of set/update operations per second for this bucket.
-
CAS ops per sec.Number of compare and swap operations per second for this bucket.
-
deletes per sec.Number of delete operations per second for this bucket.
-
itemsItem count for this bucket.
-
disk write queueSize of the disk write queue for this bucket.
-
memory usedCouchbase Server 1.8.1 or later
The memory used within this bucket.
-
high water markCouchbase Server 1.8.1 or later
The high water mark for memory usage.
-
low water markCouchbase Server 1.8.1 or later
The low water mark for memory usage.
-
disk update timeCouchbase Server 1.8.1 or later
The time taken to update the persisted informaiton on disk. This provides an indication of the fragmentation level of the SQLite data files used for persistence.
Bucket Monitoring — vBucket Resources
The vBucket statistics provide information for all vBucket types within the cluster across three different states. Within the statistic display the table of statistics is organized in four columns, showing the Active, Replica and Pending states for each individual statistic. The final column provides the total value for each statistic.
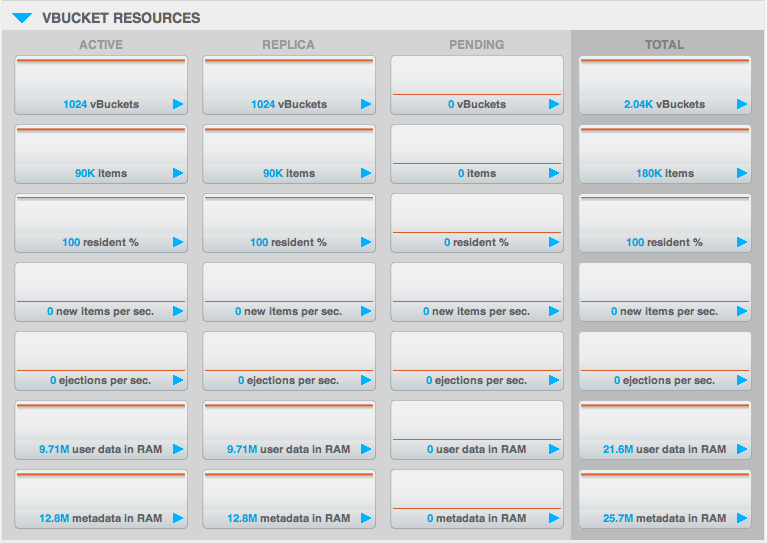
The Active column displays the information for vBuckets within the Active state. The Replica column displays the statistics for vBuckets within the Replica state (i.e. currently being replicated). The Pending columns shows statistics for vBuckets in the Pending state, i.e. while data is being exchanged during rebalancing.
These states are shared across all the following statistics. For example, the
graph new items per sec within the Active state column displays the number
of new items per second created within the vBuckets that are in the active
state.
The individual statistics, one for each state, shown are:
-
vBucketsThe number of vBuckets within the specified state.
-
itemsNumber of items within the vBucket of the specified state.
-
% resident itemsPercentage of items within the vBuckets of the specified state that are resident (in RAM).
-
new items per secondNumber of new items created in vBuckets within the specified state. Note that new items per second is not valid for the Pending state.
-
ejections per secondNumber of items ejected per second within the vBuckets of the specified state.
-
user data in RAMSize of user data within vBuckets of the specified state that are resident in RAM.
-
metadata in RAMSize of item metadata within the vBuckets of the specified state that are resident in RAM.
Bucket Monitoring — Disk Queues
The Disk Queues statistics section displays the information for data being placed into the disk queue. Disk queues are used within Couchbase Server to store the information written to RAM on disk for persistence. Information is displayed for each of the disk queue states, Active, Replica and Pending.
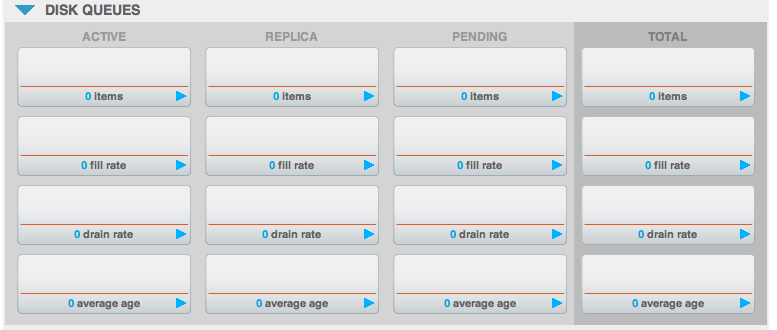
The Active column displays the information for the Disk Queues within the Active state. The Replica column displays the statistics for the Disk Queues within the Replica state (i.e. currently being replicated). The Pending columns shows statistics for the disk Queues in the Pending state, i.e. while data is being exchanged during rebalancing.
These states are shared across all the following statistics. For example, the
graph fill rate within the Replica state column displays the number of items
being put into the replica disk queue for the selected bucket.
The displayed statistics are:
-
itemsThe number of items waiting to be written to disk for this bucket for this state.
-
fill rateThe number of items per second being added to the disk queue for the corresponding state.
-
drain rateNumber of items actually written to disk from the disk queue for the corresponding state.
-
average ageThe average age of items (in seconds) within the disk queue for the specified state.
Bucket Monitoring — TAP Queues
The TAP queues statistics are designed to show information about the TAP queue activity, both internally, between cluster nodes and clients. The statistics information is therefore organized as a table with columns showing the statistics for TAP queues used for replication, rebalancing and clients.
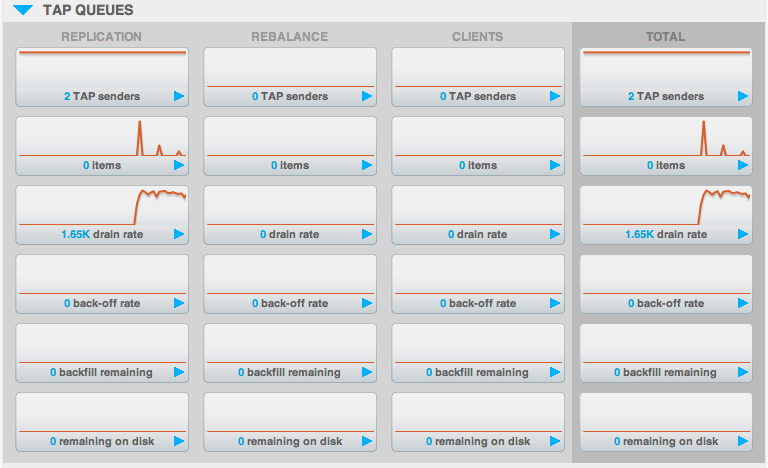
The statistics in this section are detailed below:
-
# tap sendersNumber of TAP queues in this bucket for internal (replica), rebalancing or client connections.
-
# itemsNumber of items in the corresponding TAP queue for this bucket.
-
fill rateNumber of items per second being put into the corresponding TAP queue for this bucket.
-
drain rateNumber of items per second being sent over the corresponding TAP queue connections to this bucket.
-
back-off rateNumber of back-offs per second received when sending data through the corresponding TAP connection to this bucket.
-
# backfill remainingNumber of items in the backfill queue for the corresponding TAP connection for this bucket.
-
# remaining on diskNumber of items still on disk that need to be loaded to service the TAP connection to this bucket.
Bucket Monitoring — Memcached Buckets
For Memcached buckets a separate suite of Memcached-specific statistics are displayed.
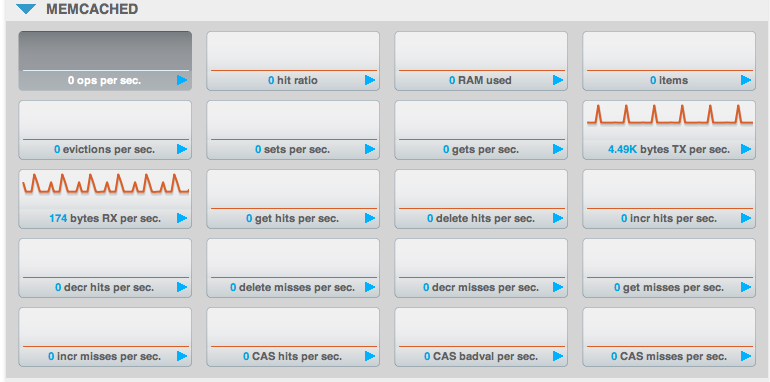
The Memcached statistics are:
-
Operations per sec.Total operations per second serviced by this bucket
-
Hit Ratio %Percentage of get requests served with data from this bucket
-
Memory bytes usedTotal amount of RAM used by this bucket
-
Items countNumber of items stored in this bucket
-
RAM evictions per sec.Number of items per second evicted from this bucket
-
Sets per sec.Number of set operations serviced by this bucket
-
Gets per sec.Number of get operations serviced by this bucket
-
Net. bytes TX per secNumber of bytes per second sent from this bucket
-
Net. bytes RX per sec.Number of bytes per second sent into this bucket
-
Get hits per sec.Number of get operations per second for data that this bucket contains
-
Delete hits per sec.Number of delete operations per second for data that this bucket contains
-
Incr hits per sec.Number of increment operations per second for data that this bucket contains
-
Decr hits per sec.Number of decrement operations per second for data that this bucket contains
-
Delete misses per sec.Number of delete operations per second for data that this bucket does not contain
-
Decr misses per sec.Number of decr operations per second for data that this bucket does not contain
-
Get Misses per sec.Number of get operations per second for data that this bucket does not contain
-
Incr misses per sec.Number of increment operations per second for data that this bucket does not contain
-
CAS ops per sec.Number of CAS operations per second for data that this bucket contains
-
CAS badval per sec.Number of CAS operations per second using an incorrect CAS ID for data that this bucket contains
-
CAS misses per sec.Number of CAS operations per second for data that this bucket does not contain
Server Nodes
In addition to monitoring buckets over all the nodes within the cluster, Couchbase Server also includes support for monitoring the statistics for an individual node.
The Server Nodes monitoring overview shows summary data for the Swap Usage, RAM Usage, CPU Usage and Active Items across all the nodes in your cluster.
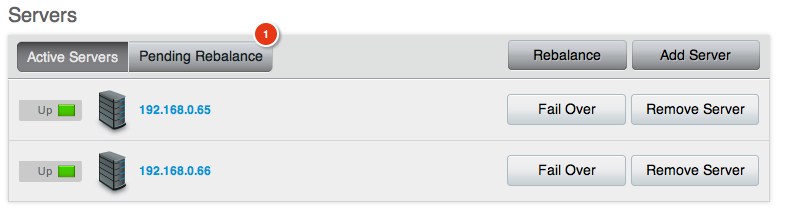
Clicking the server name provides server node specific information, including the IP address, OS, Couchbase version and Memory and Disk allocation information.
Selecting a server from the list shows a server-specific version of the Bucket Monitoring overview, showing a combination of the server-specific performance information, and the overall statistic information for the bucket across all nodes.
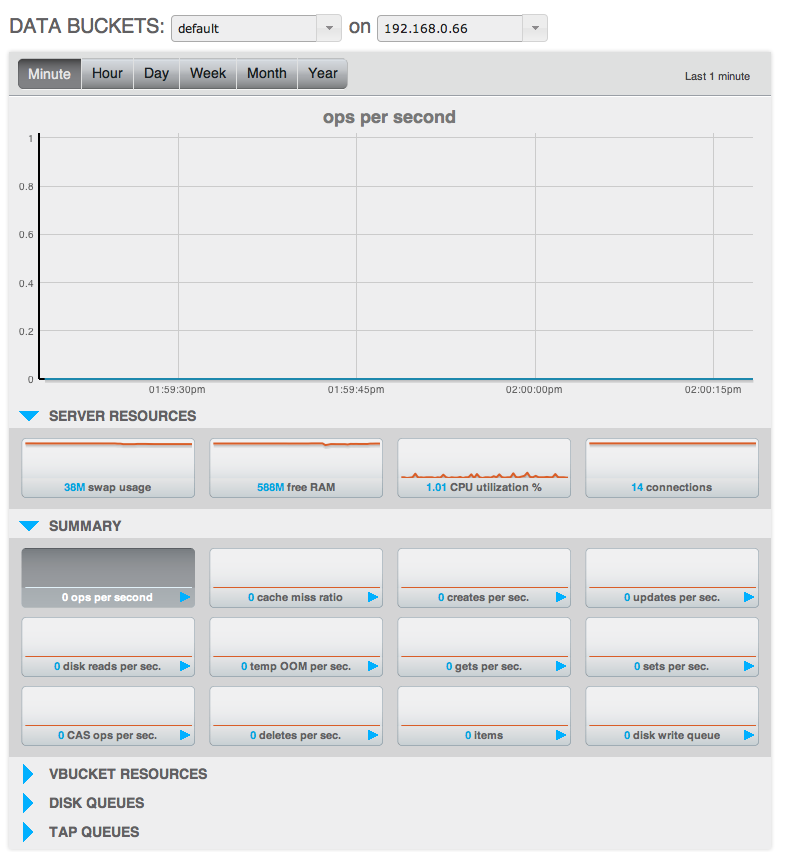
The graphs specific to the server are:
-
swap usage
Amount of swap space in use on this server.
-
free memory
Amount of RAM available on this server.
-
CPU utilization
Percentage of CPU utilized across all cores on the selected server.
-
connection count
Number of connects to this server of all types for client, proxy, TAP requests and internal statistics.
You can select an individual bucket and server to view a statistic for using the popup selections for the server and bucket, and clicking on the mini-graph for a given statistic.
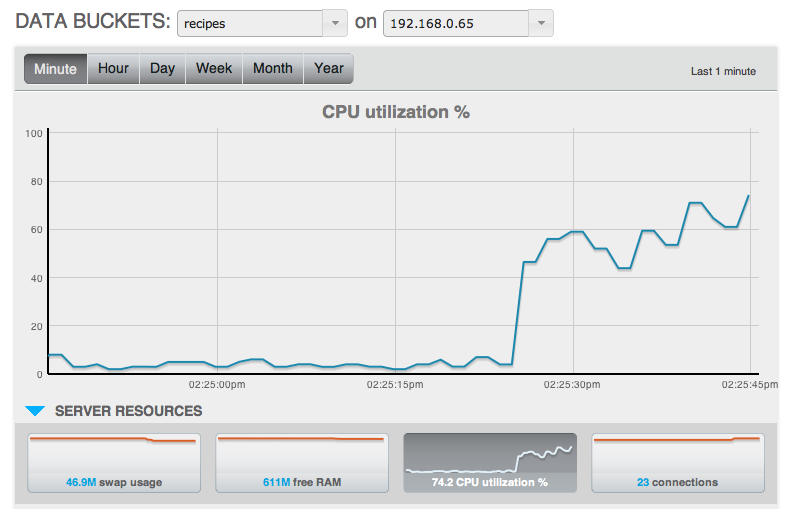
For more information on the data bucket statistics, see Data Buckets.
Couchbase Server States
Couchbase Server nodes can be in a number of different states depending on their current activity and availability. The displayed states are:
-
Up
Host is up, replicating data between nodes and servicing requests from clients.
-
Down
Host is down, not replicating data between nodes and not servicing requests from clients.
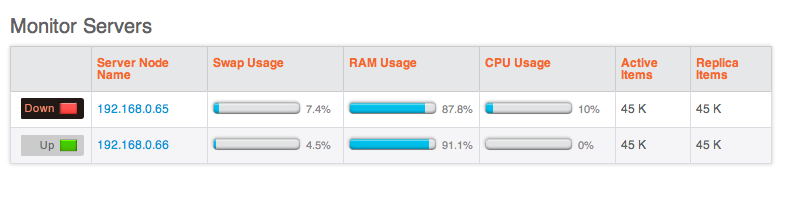
-
Pend
Host is up and currently filling RAM with data, but is not servicing requests from clients. Client access will be supported once the RAM has been pre-filled with information.
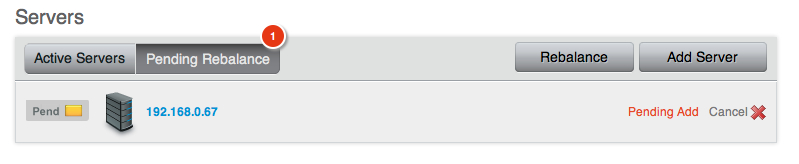
You can monitor the current server status using both the Manage: Server Nodes
and Monitor: Server Nodes screens within the Web Console.
Settings
The Settings interface sets the global settings for your Couchbase Server
instance.
Update Notification Settings
You can enable or disable Update Notifications by checking the Enable software
update notifications checkbox within the Update Notifications screen. Once
you have changed the option, you must click Save to record the change.
If update notifications are disabled then the Update Notifications screen will only notify you of your currently installed version, and no alert will be provided.
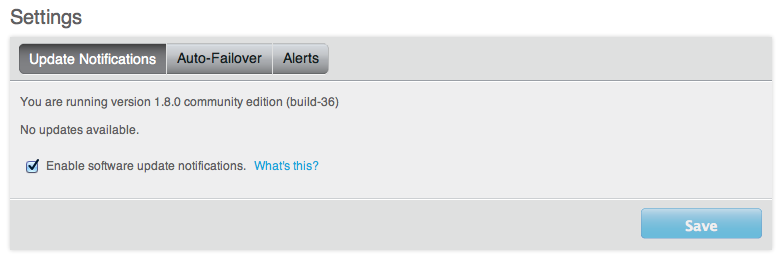
For more information on how Update Notifications work, see Update Notifications.
Auto-Failover Settings
The Auto-Failover settings enable auto-failover, and the timeout before the auto-failover process is started when a cluster node failure is detected.
To enable Auto-Failover, check the Enable auto-failover checkbox. To set the
delay, in seconds, before auto-failover is started, enter the number of seconds
it the Timeout box. The default timeout is 30 seconds.
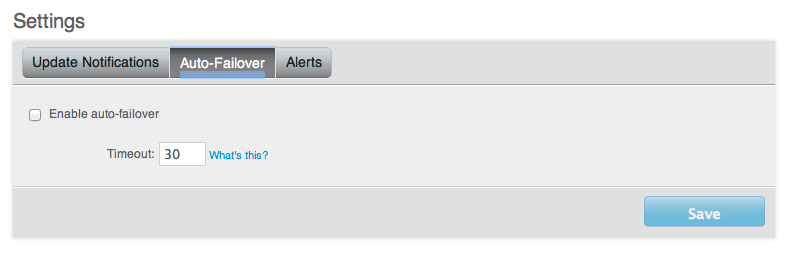
For more information on Auto-Failover, see Using Automatic Failover.
Alerts
You can enable email alerts to be raised when a significant error occurs on your Couchbase Server cluster. The email alert system works by sending email directly to a configured SMTP server. Each alert email is send to the list of configured email recipients.
The available settings are:
-
Enable email alertsIf checked, email alerts will be raised on the specific error enabled within the
Available Alertssection of the configuration. -
HostThe hostname for the SMTP server that will be used to send the email.
-
PortThe TCP/IP port to be used to communicate with the SMTP server. The default is the standard SMTP port 25.
-
UsernameFor email servers that require a username and password to send email, the username for authentication.
-
PasswordFor email servers that require a username and password to send email, the password for authentication.
-
Sender emailThe email address from which the email will be identified as being sent from. This email address should be one that is valid as a sender address for the SMTP server that you specify.
-
RecipientsA list of the recipients of each alert message. You can specify more than one recipient by separating each address by a space, comma or semicolon.
-
Available alertsYou can enable individual alert messages that can be sent by using the series of checkboxes. The supported alerts are:
-
Node was auto-failoveredThe sending node has been auto-failovered.
-
Maximum number of auto-failovered nodes was reachedThe auto-failover system will stop auto-failover when the maximum number of spare nodes available has been reached.
-
Node wasn't auto-failovered as other nodes are down at the same timeAuto-failover does not take place if there are no spare nodes within the current cluster.
-
Node wasn't auto-failovered as the cluster was too small (less than 3 nodes)You cannot support auto-failover with less than 3 nodes.
-

For more information on Auto-Failover, see Using Automatic Failover.
Log
The Log section of the website allows you to view the built-in event log for
Couchbase Server so that you can identify activity and errors within your
Couchbase cluster.
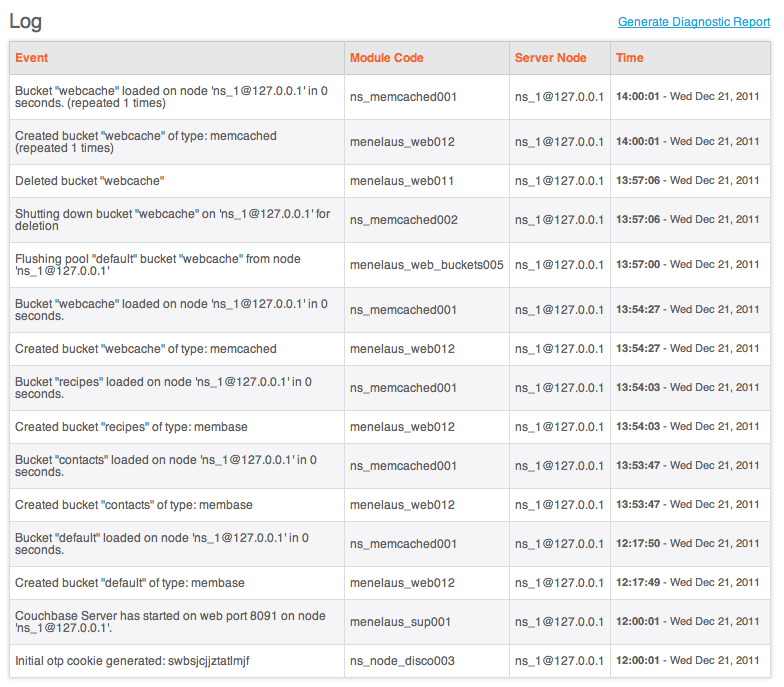
The Couchbase Web Console displays the following information about each logged event.
| Name | Description |
|---|---|
| Event | Event that triggered the alert. |
| Module | Code Software module in which the event occurred and an internal alert code associated with the event. |
| Server Node | Server Node that raised the log entry. |
| Time | Time and date when the event occurred. |
Diagnostic Report
You can run a diagnostic report to get a snapshot of your deployment, including
version information, the state of the cluster, and log output. To generate a
diagnostic report: Under Monitor in the left-hand navigation menu, click Log.
Click Generate Diagnostic Report ( http://hostname:8091/diag ). The
Couchbase Web Console opens a new browser window and downloads the text of the
diagnostic report.
Update Notifications
During installation you can select to enable the Update Notification function. Update notifications allow a client accessing the Couchbase Web Console to determine whether a newer version of Couchbase Server is available for download.
If you select the Update Notifications option, the Web Console will
communicate with Couchbase Servers to confirm the version number of your
Couchbase installation. During this process, the client submits the following
information to the Couchbase Server:
The current version of your Couchbase Server installation. When a new version of Couchbase Server becomes available, you will be provided with notification of the new version and information on where you can download the new version.
Basic information about the size and configuration of your Couchbase cluster. This information will be used to help us prioritize our development efforts.
You can enable/disable software update notifications
The process occurs within the browser accessing the web console, not within the server itself, and no further configuration or internet access is required on the server to enable this functionality. Providing the client accessing the Couchbase server console has internet access, the information can be communicated to the Couchbase Servers.
The update notification process the information anonymously, and the data cannot be tracked. The information is only used to provide you with update notification and to provide information that will help us improve the future development process for Couchbase Server and related products.
If the browser or computer that you are using to connect to your Couchbase Server web console does not have Internet access, the update notification system will not work.
Notifications
If an update notification is available, the counter within the button display within the Couchbase Console will be displayed with the number of available updates.
Viewing Available Updates
To view the available updates, click on the Update Notifications link. This
displays your current version and update availability. From here you can be
taken to the download location to obtain the updated release package.
Warnings and Alerts
A new alerting systems has been built into the Couchbase Web Console. This is sued to highlight specific issues and problems that you should be aware of and may need to check to ensure the health of your Couchbase cluster. Alerts are provided as a popup within the web console.
The following errors and alerts are supported:
-
IP Address Changes
If the IP address of a Couchbase Server in your cluster changes, you will be warned that the address is no longer available. You should check the IP address on the server, and update your clients or server configuration.
-
OOM (Hard)
Indicates if the bucket memory on a node is entirely used for metadata.
-
Commit Failure
Indicates that writing data to disk for a specific bucket has failed.
-
Metadata Overhead
Indicates that a bucket is now using more than 50% of the allocated RAM for storing metadata and keys, reducing the amount of RAM available for data values.
-
Disk Usage
Indicates that the available disk space used for persistent storage has reached at least 90% of capacity.
Command-line Interface for Administration
Couchbase Server includes a number of command-line tools that can be used to manage and monitor a Couchbase Server cluster or server. Most operations correspond to Couchbase REST API requests, and were applicable we cross-reference these REST reqeusts: REST API for Administration.
Couchbase command-line tools are described individually within the following sections:
Couchbase Server installer places tools in a number of directories, dependent on the tool and platform. You can either go to that directory and use the command line tool, or create a symbolic link to the directory:
| Linux | /opt/couchbase/bin
|
|---|---|
| Windows | C:\Program Files\Couchbase\Server\bin\cli
|
| Mac OS X | /Applications/Couchbase\ Server.app/Contents/Resources/couchbase-core/bin
|
Command-Line Tools Availability
As of Couchbase Server 1.8.1 GA, the following command-line tools have been deprecated and replaced with the corresponding tool as noted in the table below. In Couchbase 1.8 and earlier versions, both sets of tools were available, although those prefixed with m- or mb- were deprecated:
| Deprecated Tool | Replacement Tool |
|---|---|
membase |
couchbase-cli
|
mbadm-online-restore |
cbadm-online-restore
|
mbadm-online-update |
cbadm-online-update
|
mbadm-tap-registration |
cbadm-tap-registration
|
mbbackup-incremental |
cbbackup-incremental
|
mbbackup-merge-incremental |
cbbackup-merge-incremental
|
mbbackup |
cbbackup
|
mbbrowse_logs |
cbbrowse_logs
|
mbcollect_info |
cbcollect_info
|
mbdbconvert |
cbdbconvert
|
mbdbmaint |
cbdbmaint
|
mbdbupgrade |
cbdbupgrade
|
mbdumpconfig.escript |
cbdumpconfig.escript
|
mbenable_core_dumps.sh |
cbenable_core_dumps.sh
|
mbflushctl |
cbflushctl
|
mbrestore |
cbrestore
|
mbstats |
cbstats
|
mbupgrade |
cbupgrade
|
mbvbucketctl |
cbvbucketctl
|
Using a deprecated tool will result in a warning message that the tool is deprecated and will no longer be supported.
Using couchbase-cli
| Linux | /opt/couchbase/bin/couchbase-cli
|
|---|---|
| Windows | C:\Program Files\Couchbase\Server\bin\cli\couchbase-cli.exe
|
| Mac OS X | /Applications/Couchbase\ Server.app/Contents/Resources/couchbase-core/bin/couchbase-cli
|
This tool provides access to various management operations for Couchbase Server clusters, nodes and buckets. The basic usage format is:
couchbase-cli COMMAND CLUSTER [OPTIONS]
Where:
-
CLUSTERis a cluster specification. You can use either:–cluster=HOST[:PORT]Or the shortened form:
-c HOST[:PORT] OPTIONSis zero or more options.
| Command | Description |
|---|---|
server-list |
List all servers in a cluster |
server-info |
Show details on one server |
server-add |
Add one or more servers to the cluster |
server-readd |
Re-add a server that was failed over to the cluster |
rebalance |
Start a cluster rebalancing |
rebalance-stop |
Stop current cluster rebalancing |
rebalance-status |
Show status of current cluster rebalancing |
failover |
Failover one or more servers |
cluster-init |
Set the username, password and port of the cluster |
node-init |
Set node specific parameters |
bucket-list |
List all buckets in a cluster |
bucket-create |
Add a new bucket to the cluster |
bucket-edit |
Modify an existing bucket |
bucket-delete |
Delete an existing bucket |
bucket-flush |
Flush a given bucket |
help |
Show longer usage/help and examples |
| Option | Command | Description |
|---|---|---|
--user=USERNAME, -u USERNAME |
Administrator username for accessing the cluster | |
--password=PASSWORD, -p PASSWORD |
Administrator password for accessing the cluster | |
--output=KIND, -o KIND |
Output kind, either json for JSON format, or standard for the native format for the command. |
|
--debug, -d |
Output debug information. | |
--server-add=HOST[:PORT] |
server-add, server-readd, rebalance |
Server to be added |
--server-add-username=USERNAME |
server-add, server-readd, rebalance |
Admin username for the server to be added |
--server-add-password=PASSWORD |
server-add, server-readd, rebalance |
Admin password for the server to be added |
--server-remove=HOST[:PORT] |
rebalance |
The server to be removed |
--server-failover=HOST[:PORT] |
failover |
Server to failover |
--cluster-init-username=USER |
cluster-init |
New admin username |
--cluster-init-password=PASSWORD |
cluster-init |
New admin password |
--cluster-init-port=PORT |
cluster-init |
New cluster port |
--cluster-init-ramsize=300 |
cluster-init |
New RAM quota |
--bucket=BUCKETNAME |
bucket* |
Bucket to act on |
--bucket-type=TYPE |
bucket* |
Memcached or Couchbase |
--bucket-port=PORT |
bucket* |
Supports ASCII protocol and is auth-less |
--bucket-password=PASSWORD |
bucket* |
Standard port, exclusive with bucket-port |
--bucket-ramsize=RAMSIZEMB |
bucket* |
RAM quota in MB |
--bucket-replica=COUNT |
bucket* |
Replication count |
Listing Servers
To list servers in a cluster you can provide the host:port for any one of the
nodes in the cluster and also provide the --output=json option as we do below:
shell> couchbase-cli server-list -c 192.168.0.1:8091 -u Administrator -p password --output=json
This will return the following information about the cluster as well as nodes in the cluster:
Memory usage, including quotas and consumption for RAM and disk.
List of nodes in cluster, including Couchbase Server version, OS, and memory per node.
List of REST API endpoints for cluster.
Failover and alert settings for the cluster.
If you do not provide the --output=json option, you will get a response from
the individual node your provided in your command and whether the node is
active.
Getting Node Information
To retrieve information about a specified node, provide the host:port for that particular node:
shell> couchbase-cli server-info -c 192.168.0.1:8091 -u Administrator -p password
Couchbase Server returns information about the node, including:
Whether the node is functioning or not.
Memory usage, including allocated memory, memory quota and free memory.
Items stored for node, total items, including replica data.
CPU utilization for the node.
Ports and disk path associated with a node.
Availability and uptime for the node.
Adding Nodes to a Cluster
To a node to a cluster without performing rebalance, you use the server-add
command:
shell> couchbase-cli server-add -c 192.168.0.1:8091 \
     --server-add=192.168.0.2:8091 -u Administrator -p password
To a node to a cluster and then immediately rebalance the cluster, you use the
rebalance command with the --server-add=HOST[:PORT] option. In the option
provide the host and port for the node you want to add to the cluster:
shell> couchbase-cli rebalance -c 192.168.0.1:8091 \
     --server-add=192.168.0.2:8091
Removing Nodes from Clusters
To remove a node from the cluster, use the rebalance command and specify the
URI for the node you want to remove in the --server-remove option:
shell> couchbase-cli rebalance -c 10.4.2.4:8091 -u Administrator -p password --server-remove=10.4.2.4:8091
Additional servers can be specified by using addition --server-remove option.
The operation imediately triggers s rebalance after the nodes have been removd
from the cluster.
INFO: rebalancing . . . . . . . . . . . . . . .
Rebalancing a Cluster
To remove a node from a cluster and then rebalance the entire cluster, use the
rebalance command with the --server-remove=HOST[:PORT] option. In the option
specify the host and port for the node you want to remove:
shell> couchbase-cli rebalance -c 192.168.0.1:8091 \
     --server-remove=192.168.0.2:8091
To remove and add nodes to/from a cluster and then rebalance, use the
rebalance command with the --server-remove=HOST[:PORT] and
--server-add=HOST[:PORT] options:
shell> couchbase-cli rebalance -c 192.168.0.1:8091 \
      --server-remove=192.168.0.2 \
      --server-add=192.168.0.4
Couchbase Server will remove one node, add another node, and then perform a cluster rebalance. During the rebalance, you will see status updates from the server:
. METHOD: GET
PARAMS:  {}
ENCODED_PARAMS:
REST CMD: GET /pools/default/rebalanceProgress
response.status: 200
To view the status of a cluster rebalance, use the rebalance-status command:
shell> couchbase-cli rebalance-status -c 10.4.2.6 -u Administrator -p password
If the rebalance is in progress without any errors, Couchbase Server will return:
(u'running', None)
To stop a current cluster rebalance, use the rebalance-stop command:
shell> couchbase-cli rebalance-stop -c 192.168.0.1:8091
When Couchbase server stops the rebalance, it will return:
SUCCESS: rebalance cluster stopped
Initializing Nodes
Initialize a new node on the cluster
shell> couchbase-cli cluster-init -c 192.168.0.1:8091 \
      --cluster-init-username=Administrator \
      --cluster-init-password=password \
      --cluster-init-port=8080 \
      --cluster-init-ramsize=8192
Viewing Buckets
To list all buckets in a cluster use the bucket-list command. For this
operation, Couchbase Server does not require authentication:
shell> couchbase-cli bucket-list -c 192.168.0.1:8091
Couchbase Server returns a list of buckets in the cluster, including:
The type of bucket, either membase or couchbase bucket.
Memory usage for the bucket, included memory quota, memory used, and number of replicas for the bucket.
What type of authentication is required for a bucket, either none or SASL.
Creating New Buckets
Create a new couchbase bucket with a dedicated port with the bucket-create
command and associated bucket options. Note that the minimum size you can
specify is 100MB, and the maximum number of replicas is 3.
shell> couchbase-cli bucket-create -c 192.168.0.1:8091 --bucket=test_bucket \
      --bucket-type=couchbase --bucket-port=11222 --bucket-ramsize=200 \
      --bucket-replica=1
To create a new memcached bucket with SASL authentication use the
bucket-create command and the --bucket-password=PASSWORD option:
shell> couchbase-cli bucket-create -c 192.168.0.1:8091 --bucket=test_bucket \
      --bucket-type=memcached--bucket-password=password \
      --bucket-ramsize=200
To view the status of a cluster rebalance, use the
Updating Bucket Properties
The following is an example demonstration how to modify the port dedicated to a
bucket. In the case of updating bucket properties with couchbase-cli you
should provide other existing bucket properties as options, even though you
might not be changing these other properties. This is because the command to
update bucket properties may interpret missing options as meaning the option
should be reset to a default/nothing. We recommend you review the current bucket
properties and provide your new option and existing options that you want to
maintain:
shell> couchbase-cli bucket-edit -c 192.168.0.1:8091 --bucket=test_bucket \
      --bucket-port=11222 --bucket-ramsize=400
You cannot change the name of a bucket with couchbase-cli, the Couchbase REST
API, or Couchbase Administration Console. You can however delete the bucket and
create a new bucket with the new name and properties of your choice.
Deleting Buckets
To delete a bucket:
This operation is data destructive. The service makes no attempt to confirm with the user before removing a bucket. Client applications using this are advised to check again with the end user, or client application before sending such a request.
shell> couchbase-cli bucket-delete -c 192.168.0.1:8091 --bucket=test_bucket
Using cbstats
You can use cbstats to access information about individual nodes, and the
buckets associated with the nodes, in a Couchbase cluster. The utility is
located in one of the following directories, depending upon your platform
install:
| Linux | /opt/couchbase/bin/cbstats
|
|---|---|
| Windows | C:\Program Files\Couchbase\Server\bin\cbstats.exe
|
| Mac OS X | /Applications/Couchbase \Server.app/Contents/Resources/couchbase-core/bin/cbstats
|
You can use this utility to getcouchbase node statistics. The general format for using it is:
shell> cbstats HOST:BUCKET_PORT COMMAND [-flags] [bucketname password]
For this command, note that host and port are specifically for a bucket, not a node or cluster. The following describes the command format:
HOSTis the hostname andBUCKET_PORTis the dedicated port for the bucket.COMMANDis one of thecbstatsfrom the commands listed below.-flagsare one of the optional flags described below.bucketnameis the name of the Couchbase or memcached bucket.passwordis the for bucket-level authentication.
The following are the possible cbstats commands you can use:
| Command | Description |
|---|---|
all |
Provides statistics for a named bucket. |
allocator |
Memory allocation for bucket, if exists. |
checkpoint [vbid] |
Checkpoints are internal markers used to flag items in queue. View them with this command. |
dispatcher [logs] |
|
hash [detail] |
|
items |
|
kvstore |
|
kvtimings |
|
raw argument |
|
reset |
Resets hit- and miss- counters which indicate number of requests and failed requests. |
slabs |
|
tap [username password] |
|
tapagg |
|
timings |
Shows history and time durations of different read/write operations. In milliseconds. |
vkey keyname vbid |
|
help |
For example, the cbstats output can be used with other command-line tools to
sort and filter the data.
watch --diff "cbstats \
    ip-10-12-19-81:11210 all | egrep 'item|mem|flusher|ep_queue|bg|eje|resi|warm'"
Retrieving Bucket Statistics
Use the all command to get information about a named bucket:
./cbstats 10.4.2.5:11220 all newbucket password | grep -E 'uptime|bytes_read|bytes_written'
The types of bucket statistics returned by all include:
Connection information for the bucket including attempted connections, rejections and port information.
Hits and Misses: hits are the number of requests made for bucket information and misses are requests made for keys that cannot be found. Both hit- and miss- statistics are grouped by operation.
Memory quota and usage.
Couchbase Server will return these statistics about a memcached or Couchbase bucket. In the case of memcached buckets, statistics about persistence do not apply and therefore do not appear:
| Name | Description |
|---|---|
accepting_conns |
Connections accepted by a node. |
auth_cmds |
Number of authentication commands handled with success or failure. |
auth_errors |
Number of failed authentications. |
bucket_active_conns |
Active connection to bucket. |
bucket_conns |
|
bytes_read |
Total number of bytes read by this node from network. |
bytes_written |
Total number of bytes sent by this node to network. |
cas_badval |
Total number of CAS commands that failed to modify a value due to a bad CAS id. |
cas_hits |
Number of successful CAS requests. |
cas_misses |
Number of CAS requests against missing keys. |
cmd_flush |
|
Cumulative number of flush requests for bucket. |
|
cmd_get |
Cumulative number of get requests for node. |
cmd_set |
Cumulative number of set requests for node. |
conn_yields |
Number of times any connection yielded to another one due to hitting the -R limit. |
connection_structures |
Number of connection structures allocated by node. |
curr_connections |
Number of open connections |
curr_connections |
Number of open connections |
curr_items |
Current number of items stored. |
curr_items_tot |
Number of current items including those not active (replica, dead and pending states.) |
daemon_connections |
Number of connection structures used by this node internally. |
decr_hits |
Number of successful decrement requests. |
decr_misses |
Number of decrement requests against missing keys. |
delete_hits |
Number of deletion requests against missing keys. |
delete_misses |
Number of deletion requests against missing keys. |
ep_bg_fetched |
Number of items fetched from disk. |
ep_commit_num |
Total number of write commits. |
ep_commit_time |
Number of seconds transpired for most recent commit. |
ep_commit_time_total |
Cumulative seconds spent committing. |
ep_data_age |
Age of data that has been persisted to disk. |
ep_data_age_highwat |
Oldest age of data that has been persisted to disk |
ep_db_cleaner_status |
Status of database maintenance process that removes invalid items with old vBucket versions. |
ep_db_strategy |
SQLite db strategy. |
ep_dbinit |
Number of seconds to initialize DB. |
ep_dbshards |
Number of shards for db store |
ep_diskqueue_drain |
Total items in queue to be persisted that have been stored on disk. |
ep_diskqueue_fill |
Total items waiting in queue to be stored on disk. |
ep_diskqueue_items |
Total items in disk queue. |
ep_diskqueue_memory |
Total memory used in disk queue. |
ep_diskqueue_pending |
Total bytes of pending disk writes. |
ep_exp_pager_stime |
Interval set for regular maintenance process that removes expired items from node. In seconds. |
ep_expired |
Number of times any item was expired for a node/bucket. |
ep_flush_all |
Boolean that is set to true if disk flush_all is scheduled. |
ep_flush_all |
Boolean that is set to true if disk flush_all is scheduled. |
ep_flush_duration |
Number of seconds duration of most recent flush. |
ep_flush_duration_highwat |
Longest duration required to flush data. |
ep_flush_duration_total |
Cumulative seconds spent flushing data. |
ep_flush_preempts |
Number of flush early exits for read requests. |
ep_flusher_deduplication |
|
ep_flusher_state |
Current state of the flusher thread. |
ep_flusher_todo |
Number of items remaining to be written to disk. |
ep_inconsistent_slave_chk |
Flag indicating whether we allow a “downstream” master to receive checkpoint messages. |
ep_io_num_read |
Number of io read operations. |
ep_io_num_write |
Number of io write operations. |
ep_io_read_bytes |
Number of bytes read (key + values) |
ep_io_write_bytes |
Number of bytes written (key + values). |
ep_item_begin_failed |
Number of times a transaction failed to start due to storage errors. |
ep_item_commit_failed |
Number of times a transaction failed to commit data due to storage errors. |
ep_item_flush_expired |
Number of times an item is not flushed due to the expiry of the item. |
ep_item_flush_failed |
Number of times an item failed to flush due to storage errors. |
ep_items_rm_from_checkpoints |
Number of items removed from closed unreferenced checkpoints. |
ep_keep_closed_checkpoints |
Boolean indicating a checkpoint status retained or deleted. |
ep_kv_size |
Memory used to store item metadata, keys and values, regardless of a vBucket state. If Couchbase Server ejects a value, it decrements this number by the size of the value. |
ep_latency_arith_cmd |
The total elapsed time for increment and decrement requests. |
ep_latency_get_cmd |
The total elapsed time for get requests for bucket/node. |
ep_latency_store_cmd |
The total elapsed time for store requests. |
ep_max_data_size |
Maximum amount of data allowed in memory. |
ep_max_txn_size |
Max number of updates per transaction. |
ep_mem_high_wat |
High water mark for auto-evictions. |
ep_mem_low_wat |
Low water mark for auto-evictions. |
ep_mem_tracker_enabled |
|
ep_min_data_age |
Minimum age for data before it can be persisted. |
ep_num_active_non_resident |
Number of non-resident items in active vBuckets. Non-resident items have their values ejected onto disk. |
ep_num_checkpoint_remover_runs |
Number of times Couchbase Server ran checkpoint remover to remove closed unreferenced checkpoints. |
ep_num_eject_failures |
Number of values that could not be ejected from RAM to disk. |
ep_num_eject_replicas |
Number of times Couchbase Server ejected replica values from memory to disk. |
ep_num_expiry_pager_runs |
Number of times Couchbase Server ran maintenance processes to purge expired items from memory/disk. |
ep_num_non_resident |
The number of non-resident items. Non-resident items are keys that have the key and metadata stored in RAM, but the value is ejected onto disk. |
ep_num_not_my_vbuckets |
Number of times a ‘Not My VBucket’ exception has occurred for a node. This exception occurs when a request comes for data stored in another vBucket associated with a node. |
ep_num_pager_runs |
Number of times this node has run the maintenance process to free additional memory. |
ep_onlineupdate |
Returns true if engine is in online updated mode. |
ep_onlineupdate_revert_add |
Number of reverted newly added items. |
ep_onlineupdate_revert_delete |
Number of reverted deleted items. |
ep_onlineupdate_revert_update |
Number of reverted updated items. |
ep_oom_errors |
Number of times an unrecoverable out of memory error occurred while this node processed requests. |
ep_overhead |
Extra memory used by transient data, such as persistence queue, replication queues, checkpoints, and so forth. |
ep_pending_ops |
Number of operations awaiting pending vBuckets. |
ep_pending_ops_max |
Maximum operations awaiting 1 pending vBucket. |
ep_pending_ops_max_duration |
Maximum time used waiting on pending vBuckets. |
ep_pending_ops_total |
Total blocked pending operations. |
ep_queue_age_cap |
Queue age cap setting. |
ep_queue_size |
Number of items queued for storage. |
ep_storage_age |
How long an item has been waiting in queue to be persisted to disk. |
ep_storage_age_highwat |
The longest an item has been waiting in queue to be persisted to disk. |
ep_storage_type |
Indicates whether disk storage is SQLite or Couchstore. |
ep_store_max_concurrency |
Maximum allowed concurrency at the storage level. |
ep_store_max_readers |
Maximum number of concurrent read-only storage threads allowed for this node. |
ep_store_max_readwrite |
Maximum number of concurrent read-write storage threads allowed for this node. |
ep_tap_bg_fetch_requeued |
Number of times a TAP background fetch task is requeued. |
ep_tap_bg_fetched |
Number of TAP background fetches from disk. |
ep_tap_keepalive |
How long to maintain existing TAP connection state after a client disconnect. |
ep_tmp_oom_errors |
Number of times temporary out of memory errors have occurred for this node while processing requests. |
ep_too_old |
Number of times an object was stored on disk after being stale for too long. |
ep_too_young |
Number of times an object is not stored on disk because it is too new. |
ep_total_cache_size |
Total size of all items for this node, regardless of vBucket state, or whether or not the value for an item is ejected into RAM. |
ep_total_del_items |
Total number of items flagged for deletion that are persisted on disk. |
ep_total_enqueued |
Total number of items waiting in queue to be persisted on disk. |
ep_total_new_items |
Total new keys for a node that have been persisted. |
ep_total_persisted |
Total number of items for node that have been persisted. |
ep_uncommitted_items |
Items that are new or updated but are not yet persisted. |
ep_value_size |
Memory used to store values for resident keys. These are items which are stored on both RAM and disk in entirety. |
ep_vb_total |
Total number of vBuckets. |
ep_vbucket_del |
Number of deletions that have occurred for a vBucket. |
ep_vbucket_del_fail |
Number of deletions that have failed for a vBucket. |
ep_version |
Version number of underlying Couchbase Server component, ep_engine. |
ep_warmed_up |
Number of items warmed up. |
ep_warmup |
True if node is ready to accept new writes and reads. |
ep_warmup_dups |
Duplicates encountered during node warmup. |
ep_warmup_oom |
Out of memory errors encountered during warmup. |
ep_warmup_thread |
Indicates complete if the node is done with its initialization phase. |
ep_warmup_time |
Time (µs) spent by warming data. |
get_hits |
Number of keys that have been requested and found. |
get_misses |
Number of items that have been requested but not found. |
incr_hits |
Number of successful increment requests. |
incr_misses |
Number of increment requests made for keys that cannot be found. |
libevent |
Maximum number of bytes this node is allowed to use for storage. |
limit_maxbytes |
Total number of items for node that have been persisted. |
listen_disabled_num |
Occurs if there are too many simultaneous connections. Incremented when Couchbase Server rejects a connection request. |
max_conns_on_port_ |
Maximum number of connections allowed on specified port. |
mem_used |
Total memory used by Couchbase Server component, ep_engine. |
pid |
ID for this server process. |
pointer_size |
Default size of pointers on the host OS; typically 32- or 64- bit. |
rejected_conns |
Connection requests rejected by this node. |
rusage_system |
Accumulated system time for this process, in form for seconds:microseconds. |
rusage_user |
Accumulated user time for this process, in form for seconds:microseconds. |
threads |
Number of worker threads requested. |
time |
Current UNIX time according to the node. |
uptime |
Number of seconds since this node initially started |
vb_active_curr_items |
Number of items in RAM. |
vb_active_eject |
Number of times this node ejected values from RAM onto disk. |
vb_active_ht_memory |
Memory used to store keys and values |
vb_active_itm_memory |
Total items in memory. |
vb_active_num |
Number of active vBuckets |
vb_active_num_non_resident |
Number of non-resident items; non-resident items are those with keys and metadata in RAM, but the values are stored on disk to conserve resources. |
vb_active_ops_create |
Number of create requests made on node. |
vb_active_ops_delete |
Number of delete requests made on node. |
vb_active_ops_reject |
Number of requests made on node but rejected by node. |
vb_active_ops_update |
Number of update requests made on node. |
vb_active_perc_mem_resident |
Percentage of memory taken up by resident data. This is data where the key, metadata and value all reside in RAM. |
vb_active_queue_age |
Total of all ages for items in disk queue. In milliseconds. |
vb_active_queue_drain |
Total number of keys that have been drained from a disk-write queue. |
vb_pending_queue_fill |
Total items waiting in queue for disk write. |
vb_pending_queue_memory |
Total memory used by queue for disk writes. |
vb_pending_queue_pending |
Total bytes used by items awaiting disk persistence. |
vb_pending_queue_size |
Pending items in disk-write queue. |
vb_replica_curr_items |
Number of items for vBuckets in replica state. |
vb_replica_eject |
Number of times the value for a key has been ejected from RAM to disk. |
vb_replica_ht_memory |
Memory used to store keys and values. |
vb_replica_itm_memory |
Total bytes taken up by items memory. |
vb_replica_num |
Number of replica vBuckets for this node. |
vb_replica_num_non_resident |
Number of non-resident items; these are keys and associated metadata in RAM, while the associated value for the keys are stored on disk. |
vb_replica_ops_create |
Number of create requests made for replica-state vBuckets. |
vb_replica_ops_delete |
Number of delete requests made for replica-state vBuckets.. |
vb_replica_ops_reject |
Number of rejected requests made for replica-state vBuckets. |
vb_replica_ops_update |
Number of update requests made for replica-state vBuckets. |
vb_replica_perc_mem_resident |
Percentage of resident memory. Resident data are items stored entirely in RAM and disk, including keys, values, and metadata. |
vb_replica_queue_age |
Total age in milliseconds of items waiting in queue to be stored to disk. |
vb_replica_queue_drain |
Total items from this vBucket drained from the disk-write queue. |
vb_replica_queue_fill |
Total items awaiting disk persistence from this vBucket. |
vb_replica_queue_memory |
Memory used for disk queue for this vBucket. |
vb_replica_queue_pending |
Total bytes of disk-queue items for this vBucket |
vb_replica_queue_size |
Replica items in disk queue. |
version |
Version number of ep_engine component. |
Viewing Memory Allocations
To view memory allocations, and memory usage for a bucket:
Couchbase Server 1.8 on OSX using different memory allocation than other platforms, therefore this information is not available.
./cbstats 10.4.2.5:11210 allocator -a -b _admin -p _admin
Viewing Timing for Operations
You may find this information useful for measuring your node and cluster. This command returns the time required for operations to complete. All times are provided in milliseconds:
./cbstats 10.4.2.5:11210 timings
Couchbase Server returns a histogram showing total operations, and then detail about operations that completed within different time intervals:
(1 total)
    0 - 1us       : (100.00%) 1 ##################################################
 disk_invalid_vbtable_del (1 total)
    1ms - 2ms     : (100.00%) 1 ##################################################
 get_stats_cmd (3702 total)
    0 - 1us       : (  0.05%)   2
    1us - 2us     : (  4.73%) 173 ##
    2us - 4us     : ( 29.58%) 920 ###########
    4us - 8us     : ( 30.90%)  49
    8us - 16us    : ( 31.06%)   6
    32us - 64us   : ( 31.58%)  19
    64us - 128us  : ( 40.46%) 329 ####
    128us - 256us : ( 55.73%) 565 #######
    256us - 512us : ( 60.37%) 172 ##
    512us - 1ms   : ( 72.42%) 446 #####
    1ms - 2ms     : ( 82.66%) 379 ####
    2ms - 4ms     : ( 98.54%) 588 #######
    4ms - 8ms     : ( 99.95%)  52
    8ms - 16ms    : (100.00%)   2
 set_vb_cmd (1024 total)
    8us - 16us    : (  0.49%)   5
    16us - 32us   : ( 76.56%) 779 ####################################
    32us - 64us   : ( 98.83%) 228 ##########
    64us - 128us  : (100.00%)  12
Using cbflushctl
The cbflushctl command enables you to control many of the configuration, RAM
and disk parameters of a running cluster.
Changes to the cluster configuration using cbflushctl are not retained after a
cluster restart. Any configuration you had set will return to cluster defaults.
You can find this tool at one of the following locations, depending upon your platform:
| Linux | /opt/couchbase/bin/cbflushctl
|
|---|---|
| Windows | C:\Program Files\Couchbase\Server\bin\cbflushctl.exe
|
| Mac OS X | /Applications/Couchbase\ Server.app/Contents/Resources/couchbase-core/bin/cbflushctl
|
Usage:
cbflushctl host:port COMMAND bucket-name bucket-password
Where COMMAND is one of the following commands:
-
drainDrain the disk write queue for the specified bucket.
-
startEnable the disk write queue for the specified bucket (start persistence).
-
stopDisable the disk write queue for the specified bucket (stop persistence).
-
evict keyEvict the specified key from memory, providing the key has been persisted to disk.
-
setSet the value for a configurable parameter within the persistence system. For more information, see cbflushctlset Command.
Note that for each command you must specify the bucketname (and bucket password if configured) to configure the appropriate bucket. If you want to set the parameter on multiple buckets you must specify each bucket individually.
cbflushctlset Command
The set command configures a specific parameter or value within the
persistence component. This is used to enable or configure specific behavior
within the persistence system, such as disabling the client flush_all command
support, or changing the watermarks used when determining keys to be evicted
from RAM after they have been persisted.
-
bg_fetch_delayDelay before executing a bg fetch (test feature)
-
chk_max_itemsMaximum items before creating a new checkpoint
-
chk_periodDuration before creating a new checkpoint
-
exp_pager_stimeExpiry Pager Sleeptime
-
inconsistent_slave_chkEnables active to active replication
-
queue_age_capMaximum queue age before flushing data
-
max_checkpointsMaximum number of checkpoints
-
max_sizeMax memory used by the server
-
max_txn_sizeMaximum number of items in a flusher transaction
-
mem_high_watHigh water mark
-
mem_low_watLow water mark
-
min_data_ageMinimum data age before flushing data
-
sync_cmd_timeoutThe timeout for the sync command
-
tap_throttle_queue_capDestination disk write queue cap for tap backoff (‘infinite’ means no cap)
-
tap_throttle_thresholdDestination memory threshold for tap backoff
-
keep_closed_chksKeep all closed checkpoints in memory
-
flushall_enabledEnable or disable the
flush_alloperation. Theflush_alloperation is disabled by default in Couchbase Server 1.8.1. To enable support for theflush_alloperation it must be enabled on each bucket:shell> cbflushctl localhost:11210 set flushall_enabled true sample sampleTo disable
flush_allon a given bucket, setflushall_enabledto false:shell> cbflushctl localhost:11210 set flushall_enabled false sample sample
Using tap.py
Linux | /opt/couchbase/bin/ep_engine/management/tap.py
———-|————————————————-
Usage:
/opt/couchbase/bin/ep_engine/management/tap.py host:port
Using cbvbucketctl
| Linux | /opt/couchbase/bin/cbvbucketctl
|
|---|---|
| Windows | C:\Program Files\Couchbase\Server\bin\cbvbucketctl.exe
|
| Mac OS X | /Applications/Couchbase\ Server.app/Contents/Resources/couchbase-core/bin/cbvbucketctl
|
Usage:
mbvbucketctl Usage:
mbvbucketctl host:port list [username password] or
mbvbucketctl host:port rm vbid [username password] or
mbvbucketctl host:port set vbid vbstate [username password]
Usingcbvbuckettool
Usage:
shell> cbvbuckettool mapfile key0 [key1 ... keyN]
The cbvbuckettool expects a vBucketServerMap JSON mapfile, and will print the
vBucketId and servers each key should live on. You may use ‘-’ instead for the
filename to specify stdin.
Examples:
shell> cbvbuckettool file.json some_key another_key
Or
shell> curl http://host:8091/pools/default/buckets/default | cbvbuckettool - some_key another_key
An example of running it with output:
shell> curl http://127.0.0.1:8091/pools/default/buckets/default | cbvbuckettool - some_key another_key
key: some_key vBucketId: 260 master: http://127.0.0.1:11210/ replicas:
key: another_key vBucketId: 1022 master: http://127.0.0.1:11210/ replicas:
Using cbdbmaint
| Linux | /opt/couchbase/bin/cbdbmaint
|
|---|---|
| Windows | C:\Program Files\Couchbase\Server\bin\cbdbmaint.exe
|
| Mac OS X | /Applications/Couchbase\ Server.app/Contents//Resources/couchbase-core/bin/cbdbmaint
|
Usage:
cbdbmaint [--vacuum] [--backupto=<dest_dir>] [--port=11210]
Using cbcollect_info
| Linux | /opt/couchbase/bin/cbcollect_info
|
|---|---|
| Windows | C:\Program Files\Couchbase\Server\bin\cbcollect_info
|
| Mac OS X | /Applications/Couchbase\ Server.app/Contents//Resources/couchbase-core/bin/cbcollect_info
|
Usage:
cbcollect_info [options] output_file

Options:
  -h, --help  show this help message and exit
  -v          increase verbosity level
REST API for Administration
The Couchbase Management REST API enables you to manage a Couchbase Server deployment. It conforms to Representational State Transfer (REST) constraints, in other words, the REST API follows a RESTful architecture. You use the REST API to manage clusters, server nodes, and buckets, and to retrieve run-time statistics within your Couchbase Server deployment.
The REST API is not used to directly manage data that is in memory or is on
disk. The cache data management operations such as set and get, for example,
are handled by Couchbase SDKs. See Couchbase
SDKs.
The REST API accesses several different systems within the Couchbase Server product.
Please provide RESTful requests; you will not receive any handling instructions, resource descriptions, nor should you presume any conventions for URI structure for resources represented. The URIs in the REST API may have a specific URI or may even appear as RPC or some other architectural style using HTTP operations and semantics.
In other words, you should build your request starting from Couchbase Cluster URIs, and be aware that URIs for resources may change from version to version. Also note that the hierarchies shown here enable your reuse of requests, since they follow a similar pattern for accessing different parts of the system.
The REST API is built on a number of basic principles:
-
JSON Responses
The Couchbase Management REST API returns many responses as JavaScript Object Notation (JSON). On that node, you may find it convenient to read responses in a JSON reader. Some responses may have an empty body, but indicate the response with standard HTTP codes. For more information, see RFC 4627 ( http://www.ietf.org/rfc/rfc4627.txt ) and www.json.org.
-
HTTP Basic Access Authentication
The Couchbase Management REST API uses HTTP basic authentication. The browser-based Web Console for Administration and Command-line Interface for Administration also use HTTP basic authentication.
-
Versatile Server Nodes
All server nodes in a cluster share the same properties and can handle any requests made via the REST API.; you can make a REST API request on any node in a cluster you want to access. If the server node cannot service a request directly, due to lack of access to state or some other information, it will forward the request to the appropriate server node, retrieve the results, and send the results back to the client.
In order to use the REST API you should be aware of the different terms and concepts discussed in the following sections.
Types of Resources
There are a number of different resources within the Couchbase Server and these resources will require a different URI/RESTful-endpoint in order to perform an operations:
-
Cluster/Pool
A cluster is a group of one or more nodes; it is a collection of physical resources that are grouped together and provide services and a management interface. A single default cluster exists for every deployment of Couchbase Server. A node, or instance of Couchbase Server, is a member of a cluster. Couchbase Server collects run-time statistics for clusters, maintaining an overall pool-level data view of counters and periodic metrics of the overall system. The Couchbase Management REST API can be used to retrieve historic statistics for a cluster.
-
Server Nodes
A Server node, also known as ‘node’, is a physical or virtual machine running Couchbase Server. Each node is as a member of a cluster.
-
Buckets
A bucket is a logical grouping of data within a cluster. It provides a name space for all the related data in an application; therefore you can use the same key in two different buckets and they are treated as unique items by Couchbase Server.
Couchbase Server collects run-time statistics for buckets, maintaining an overall bucket-level data view of counters and periodic metrics of the overall system. Buckets are categorized by storage type: 1) memcached buckets are for in-memory, RAM-based information, and 2) Couchbase buckets, which are for persisted data.
HTTP Request Headers
You will use the following HTTP request headers when you create your request:
| Header | Supported Values | Description of Use | Required |
|---|---|---|---|
| Accept | Comma-delimited list of media types or media type patterns. | Indicates to the server what media type(s) this client is prepared to accept. | Recommended |
| Authorization | Basic plus username and password (per RFC 2617). |
Identifies the authorized user making this request. | No, unless secured |
| Content-Length | Body Length (in bytes) | Describes the size of the message body. | Yes, on requests that contain a message body. |
| Content-Type | Content type | Describes the representation and syntax of the request message body. | Yes, on requests that contain a message body. |
| Host | Origin hostname | Required to allow support of multiple origin hosts at a single IP address. | All requests |
| X-YYYYY-Client-Specification-Version | String | Declares the specification version of the YYYYY API that this client was programmed against. | No |
HTTP Status Codes
The Couchbase Server will return one of the following HTTP status codes in response to your REST API request:
| HTTP Status | Description |
|---|---|
| 200 OK | Successful request and an HTTP response body returns. If this creates a new resource with a URI, the 200 status will also have a location header containing the canonical URI for the newly created resource. |
| 201 Created | Request to create a new resource is successful, but no HTTP response body returns. The URI for the newly created resource returns with the status code. |
| 202 Accepted | The request is accepted for processing, but processing is not complete. Per HTTP/1.1, the response, if any, SHOULD include an indication of the request’s current status, and either a pointer to a status monitor or some estimate of when the request will be fulfilled. |
| 204 No Content | The server fulfilled the request, but does not need to return a response body. |
| 400 Bad Request | The request could not be processed because it contains missing or invalid information, such as validation error on an input field, a missing required value, and so on. |
| 401 Unauthorized | The credentials provided with this request are missing or invalid. |
| 403 Forbidden | The server recognized the given credentials, but you do not possess proper access to perform this request. |
| 404 Not Found | URI you provided in a request does not exist. |
| 405 Method Not Allowed | The HTTP verb specified in the request (DELETE, GET, HEAD, POST, PUT) is not supported for this URI. |
| 406 Not Acceptable | The resource identified by this request cannot create a response corresponding to one of the media types in the Accept header of the request. |
| 409 Conflict | A create or update request could not be completed, because it would cause a conflict in the current state of the resources supported by the server. For example, an attempt to create a new resource with a unique identifier already assigned to some existing resource. |
| 500 Internal Server Error | The server encountered an unexpected condition which prevented it from fulfilling the request. |
| 501 Not Implemented | The server does not currently support the functionality required to fulfill the request. |
| 503 Service Unavailable | The server is currently unable to handle the request due to temporary overloading or maintenance of the server. |
Using the Couchbase Administrative Console
Although part of the REST API, the Couchbase Administrative Console uses many of the same REST API endpoints you would use for a REST API request.
For a list of supported browsers, see Getting
Started System Requirements. For the Couchbase Web
Console, a separate UI hierarchy is served from each node of the system (though
asking for the root “/” would likely return a redirect to the user agent). To
launch the Couchbase Web Console, point your browser to the appropriate host and
port, for instance on your development machine: http://localhost:8091
Viewing Cluster Information
One of the first ways to discover the URI endpoints for the REST API is to find the clusters available. For this you provide the Couchbase Server IP address, port number, and append ‘/pools’.
Example Request:
shell> curl -u admin:password http://localhost:8091/pools
GET /pools
Host: node.in.your.pool.com
Authorization: Basic xxxxxxxxxxxxxxxxxxx
Accept: application/json
X-memcachekv-Store-Client-Specification-Version: 0.1
HTTP/1.1 200 OK
Content-Type: application/json
Content-Length: nnn


{"pools": [
            {
            "name":"default",
            "uri":"/pools/default",
            "streamingUri":"/poolsStreaming/default"
            }
          ],
          "isAdminCreds":false,
          "uuid":"c25913df-59a2-4886-858c-7119d42e36ab",
          "implementationVersion":"1.8.1-927-rel-enterprise",
          "componentsVersion":
             {
             "ale":"8cffe61",
             "os_mon":"2.2.6",
             "mnesia":"4.4.19",
             "inets":"5.6",
             "kernel":"2.14.4",
             "sasl":"2.1.9.4",
             "ns_server":"1.8.1-927-rel-enterprise",
             "stdlib":"1.17.4"}
 }
Couchbase Server returns only one cluster per group of systems and the cluster will typically have a default name.
Couchbase Server returns the build number for the server in
implementation_version, the specifications supported are in the
componentsVersion. While this node can only be a member of one cluster, there
is flexibility which allows for any given node to be aware of other pools.
The Client-Specification-Version is optional in the request, but advised. It allows for implementations to adjust representation and state transitions to the client, if backward compatibility is desirable.
Getting Information on Nodes
To view information about nodes that exist in a Couchbase Cluster, you use this request:
shell> curl -u admin:password 10.4.2.4:8091/pools/nodes
Couchbase server returns this response in JSON:
{"storageTotals":
                    {
                    "ram":
                    {
                    "quotaUsed":10246684672.0,
                    "usedByData":68584936,
                    "total":12396216320.0,
                    "quotaTotal":10246684672.0,
                    "used":4347842560.0},
                    "hdd":
                          {"usedByData":2560504,
                          "total":112654917632.0,
                          "quotaTotal":112654917632.0,
                          "used":10138942586.0,
                          "free":102515975046.0}
                     },
                     "name":"nodes",
                     "alerts":[],
                     "alertsSilenceURL":"/controller/resetAlerts?token=0",
                     "nodes":
                            [{"systemStats":
                                      {
                                      "cpu_utilization_rate":2.5,
                                      "swap_total":6140452864.0,
                                      "swap_used":0
                                      },
                             "interestingStats":
                                      {
                                      "curr_items":0,
                                      "curr_items_tot":0,
                                      "vb_replica_curr_items":0
                                      },
                              "uptime":"5782",
                              "memoryTotal":6198108160.0,
                              "memoryFree":3777110016.0,
                              "mcdMemoryReserved":4728,
                              "mcdMemoryAllocated":4728,
                              "clusterMembership":"active",
                              "status":"healthy",
                              "hostname":"10.4.2.5:8091",
                              "clusterCompatibility":1,
                              "version":"1.8.1-937-rel-community",
                              "os":"x86_64-unknown-linux-gnu",
                              "ports":
                                      {
                                      "proxy":11211,
                                      "direct":11210
                                      }
                            .......

                                  }],
                       "buckets":
                                {"uri":"/pools/nodes/buckets?v=80502896" },
                                "controllers":{"addNode":{"uri":"/controller/addNode"},
                                "rebalance":{"uri":"/controller/rebalance"},
                                "failOver":{"uri":"/controller/failOver"},
                                "reAddNode":{"uri":"/controller/reAddNode"},
                                "ejectNode":{"uri":"/controller/ejectNode"},
                                "testWorkload":{"uri":"/pools/nodes/controller/testWorkload"}},
                                "balanced":true,
                                "failoverWarnings":["failoverNeeded","softNodesNeeded"],
                                "rebalanceStatus":"none",
                                "rebalanceProgressUri":"/pools/nodes/rebalanceProgress",
                                "stopRebalanceUri":"/controller/stopRebalance",
                                "nodeStatusesUri":"/nodeStatuses",
                                "stats":{"uri":"/pools/nodes/stats"},
                                "counters":{"rebalance_success":1,"rebalance_start":1},
                                "stopRebalanceIsSafe":true}
Retrieving Bucket Statistics from Nodes
To retrieve statistics about a bucket on a node, you can first retrieve a list of nodes in a cluster with this request:
shell> curl -u Admin:password http://10.4.2.4:8091/pools/default/buckets/default/nodes
You can send this request using the IP address and port for any node in the cluster. This sends the following HTTP request:
GET /pools/default/buckets/default/nodes HTTP/1.1
User-Agent: curl/7.21.4 (universal-apple-darwin11.0) libcurl/7.21.4 OpenSSL/0.9.8r zlib/1.2.5
Host: 10.4.2.4:8091
Accept: */*
If Couchbase Server successfully handles the reuqest, you will get a response similar to the following example:
{"servers":[
    {"hostname":"10.4.2.6:8091",
    "uri":"/pools/default/buckets/default/nodes/10.4.2.6%3A8091",
    "stats":
            {"uri":"/pools/default/buckets/default/nodes/10.4.2.6%3A8091/stats"}}
        ....
You can then make a REST request to the specific IP address and port of given
node shown in the response and add /stats as the endpoint:
shell> curl -u Administrator:password http://10.4.2.4:8091/pools/default/buckets/default/nodes/10.4.2.4%3A8091/stats
This sends the following HTTP request:
GET /pools/default/buckets/default/nodes/10.4.2.4%3A8091/stats HTTP/1.1
User-Agent: curl/7.21.4 (universal-apple-darwin11.0) libcurl/7.21.4 OpenSSL/0.9.8r zlib/1.2.5
Host: 10.4.2.4:8091
Accept: */*
If Couchbase Server successfully handles the reuqest, you will get a response similar to the following example:
{"hostname":"10.4.2.4:8091","hot_keys":[{"name":"[2012-11-05::3:47:01]
....
"samplesCount":60,"isPersistent":true,"lastTStamp":1352922180718,"interval":1000}}
The statistics returned will be for the individual bucket associated with that node.
Provisioning a Node
Creating a new cluster or adding a node to a cluster is called provisioning.
You need to:
Create a new node by installing a new Couchbase Server.
Configure disk path for the node.
Optionally configure memory quota for the cluster. Any nodes you add to a cluster will inherit the memory quota set for the cluster; if the cluster does not have a memory quota specified, any node you add will default to 80% of physical memory. The minimum size you can specify for is 100MB.
Add the node to your existing cluster.
Whether you are adding a node to an existing cluster or starting a new cluster, the node’s disk path must be configured. Your next steps depends on whether you create a new cluster or you want to add a node to an existing cluster. If you create a new cluster you will need to secure it by providing an administrative username and password. If you add a node to an existing cluster you will need the URI and credentials to use the REST API with that cluster.
Configuring Disk Path for a Node
You configure node resources through a controller on the node. The primary resource you will want to configure is the disk path for the node, which is where Couchbase Server persists items for the node. You must configure a disk path for a node prior to creating a new cluster or adding a node to an existing cluster.
Note that the disk path must already exist and must already be writable before you perform this request.
Example as follows:
shell> curl -u admin:password -d path=/var/tmp/test http://localhost:8091/nodes/self/controller/settings
HTTP Request
POST /nodes/self/controller/settings HTTP/1.1
Host: node.in.your.cluster:8091
Content-Type: application/x-www-form-urlencoded; charset=UTF-8
Authorization: Basic YWRtaW46YWRtaW4=
Content-Length: xx path=/var/tmp/test
HTTP Response
HTTP/1.1 200 OK
Content-Type: application/json
Content-Length: 0
Configuring Memory Quota for a Cluster
When you specify a memory quota for a cluster, that minimum will apply to each and every node in the cluster. If you do not have this specified for a cluster, you must do so before you add nodes to the cluster. The minimum size you can specify for is 256MB, or Couchbase Server will return an error. Here we set the memory quota for a cluster at 400MB:
shell> curl -u admin:password -d memoryQuota=400 http://localhost:8091/pools/default
POST /pools/default HTTP/1.1
Host: node.in.your.cluster:8091
Content-Type: application/x-www-form-urlencoded; charset=UTF-8
Authorization: Basic YWRtaW46YWRtaW4=
Content-Length: xx memoryQuota=400
Response
HTTP/1.1 200 OK
Content-Type: application/json
Content-Length: 0
Adding a Node to a Cluster
You add a new node with the at the RESTful endpoint
host:port/controller/addNode. You will need to provide an administrative
username and password as parameters:
shell> curl -u Administrator:password \
    10.2.2.60:8091/controller/addNode \
    -d "hostname=10.2.2.64&user=Administrator&password=password"
Here we create a request to add a new node to the cluster at 10.2.2.60:8091 by
using method, controller/addNode and by providing the IP address for the new
node as well as credentials. If successful, Couchbase Server will respond:
Status Code 200 OK
      {"otpNode":"ns_1@10.4.2.6"}
Setting Username and Password for a Node
While this can be done at any time for a cluster, it is typically the last step you complete when you add node into being a new cluster. The response will indicate the new base URI if the parameters are valid. Clients will want to send a new request for cluster information based on this response.
Example
shell> curl -u admin:password -d username=Administrator \
    -d password=letmein \
    -d port=8091 \
    http://localhost:8091/settings/web
POST /settings/web HTTP/1.1
Host: node.in.your.cluster:8091
Content-Type: application/x-www-form-urlencoded; charset=UTF-8
Authorization: Basic YWRtaW46YWRtaW4=
Content-Length: xx
username=Administrator&password=letmein&port=8091
HTTP/1.1 200 OK
Content-Type: application/json
Server: Couchbase Server 1.6.0
Pragma: no-cache
Date: Mon, 09 Aug 2010 18:50:00 GMT
Content-Type: application/json
Content-Length: 39
Cache-Control: no-cache no-store max-age=0
{"newBaseUri":"http://localhost:8091/"}
Note that even if it is not to be changed, the port number must be specified when you update username/password.
Retrieve Auto-Failover Settings
Use this request to retrieve any auto-failover settings for a cluster. Auto-failover is a global setting for all clusters. You need to be authenticated to read this value. Example:
shell> curl -u Administrator:letmein http://localhost:8091/settings/autoFailover
If successful Couchbase Server returns any auto-failover settings for the cluster as JSON:
{"enabled":false,"timeout":30,"count":0}
The following parameters and settings appear:
enabled: either true if auto-failover is enabled or false if it is not.timeout: seconds that must elapse before auto-failover executes on a cluster.count: can be 0 or 1. Number of times any node in a cluster can be automatically failed-over. After one auto-failover occurs, count is set to 1 and Couchbase server will not perform auto-failure for the cluster again again unless you reset the count to 0. If you want to failover more than one node at a time in a cluster, you will need to do so manually. do it manually.
The HTTP request and response are as follows:
GET /settings/autoFailover HTTP/1.1
Host: node.in.your.pool.com
Authorization: Basic YWRtaW46YWRtaW4=
Accept: */*
HTTP/1.1 200 OK
Content-Type: application/json
Content-Length: nnn
{ "enabled": false, "timeout": 30, "count": 0 }
Possible errors include:
This endpoint isn't available yet.
HTTP 401 Unauthorized
Enabling/Disabling Auto-Failover
This is a global setting you apply to all clusters. You need to be authenticated to change this value. An example of this request:
shell> curl "http://localhost:8091/settings/autoFailover" \
-i -u Administrator:letmein -d 'enabled=true&timeout=600'
Possible parameters are:
enabled(true|false) (required): Indicates whether Couchbase Server will perform auto-failover for the cluster or not.timeout(integer that is greater than or equal to 30) (required; optional when enabled=false): The number of seconds a node must be down before Couchbase Server performs auto-failover on the node.
POST /settings/autoFailover HTTP/1.1
Host: node.in.your.cluster:8091
Content-Type: application/x-www-form-urlencoded
Authorization: Basic YWRtaW46YWRtaW4=
Content-Length: 14
enabled=true&timeout=60
200 OK
The possible errors include:
400 Bad Request, The value of "enabled" must be true or false.
400 Bad Request, The value of "timeout" must be a positive integer bigger or equal to 30.
401 Unauthorized
This endpoint isn't available yet.
Resetting Auto-Failovers
This resets the number of nodes that Couchbase Server has automatically failed-over. You can send to request to set the auto-failover number to 0. This is a global setting for all clusters. You need to be authenticated to change this value. No parameters are required:
shell> curl -X POST -i -u Administrator:letmein \
    http://localhost:8091/settings/autoFailover/resetCount
POST /settings/autoFailover/resetCount HTTP/1.1
Host: node.in.your.cluster:8091
Content-Type: application/x-www-form-urlencoded
Authorization: Basic YWRtaW46YWRtaW4=
200 OK
Possible errors include:
This endpoint isn't available yet.
401 Unauthorized
View Settings for Email Notifications
The response to this request will specify whether you have email alerts set, and which events will trigger emails. This is a global setting for all clusters. You need to be authenticated to read this value:
shell> curl -u Administrator:letmein http://localhost:8091/settings/alerts
GET /settings/alerts HTTP/1.1
Host: node.in.your.pool.com
Authorization: Basic YWRtaW46YWRtaW4= Accept: */*
{
    "recipients": ["root@localhost"],
    "sender":"couchbase@localhost",
    "enabled":true,
    "emailServer":{"user":"","pass":"","host":"localhost","port":25,"encrypt":false},
    "alerts":
      ["auto_failover_node",
      "auto_failover_maximum_reached",
      "auto_failover_other_nodes_down",
      "auto_failover_cluster_too_small"]
  }
Possible errors include:
This endpoint isn't available yet.
Enabling/Disabling Email Notifications
This is a global setting for all clusters. You need to be authenticated to change this value. If this is enabled, Couchbase Server sends an email when certain events occur. Only events related to auto-failover will trigger notification:
shell> curl -i -u Administrator:letmein \
    -d 'enabled=true&sender=couchbase@localhost&recipients=admin@localhost,membi@localhost&emailHost=localhost&emailPort=25&emailEncrypt=false' http://localhost:8091/settings/alerts
Possible parameters include:
enabled: (true or false) (required). Whether to enable or disable email notifications,sender(string) (optional, default: couchbase@localhost). Email address of the sender,recipients(string) (required). Comma-separated list of email recipients,emailHost(string) (optional, default: localhost). Host address of the SMTP server,emailPort(integer) (optional, default: 25). Port of the SMTP server,emailEncrypt(true|false) (optional, default: false). Whether you want to use TLS or not,emailUser(string) (optional, default: “”): Username for the SMTP server,emailPass(string) (optional, default: “”): Password for the SMTP server,alerts(string) (optional, default: auto_failover_node, auto_failover_maximum_reached, auto_failover_other_nodes_down, auto_failover_cluster_too_small). Comma separated list of alerts that should cause an email to be sent. Possible values are: auto_failover_node, auto_failover_maximum_reached, auto_failover_other_nodes_down, auto_failover_cluster_too_small.
POST /settings/alerts HTTP/1.1
Host: node.in.your.cluster:8091
Content-Type: application/x-www-form-urlencoded
Authorization: Basic YWRtaW46YWRtaW4=
Content-Length: 14 enabled=true&sender=couchbase@localhost&recipients=admin@localhost,membi@localhost&emailHost=localhost&emailPort=25&emailEncrypt=false�
200 OK
Possible HTTP errors include:
400 Bad Request
401 Unauthorized
JSON object ({"errors": {"key": "error"}}) with errors.
Possible errors returned in a JSON document include:
alerts: alerts contained invalid keys. Valid keys are: [list_of_keys].
email_encrypt: emailEncrypt must be either true or false.
email_port: emailPort must be a positive integer less than 65536.
enabled: enabled must be either true or false.
recipients: recipients must be a comma separated list of valid email addresses.
sender: sender must be a valid email address.
general: No valid parameters given.
Sending Test Emails
This is a global setting for all clusters. You need to be authenticated to change this value. In response to this request, Couchbase Server sends a test email with the current configurations. This request uses the same parameters used in setting alerts and additionally an email subject and body.
curl -i -u Administrator:letmein http://localhost:8091/settings/alerts/sendTestEmail \
  -d 'subject=Test+email+from+Couchbase& \
  body=This+email+was+sent+to+you+to+test+the+email+alert+email+server+settings.&enabled=true& \
  recipients=vmx%40localhost&sender=couchbase%40localhost& \
  emailUser=&emailPass=&emailHost=localhost&emailPort=25&emailEncrypt=false& \
  alerts=auto_failover_node%2Cauto_failover_maximum_reached%2Cauto_failover_other_nodes_down%2Cauto_failover_cluster_too_small'
POST /settings/alerts/sendTestEmail HTTP/1.1
Host: node.in.your.cluster:8091
Content-Type: application/x-www-form-urlencoded
Authorization: Basic YWRtaW46YWRtaW4=
200 OK
Possible errrors include:
400 Bad Request: Unknown macro: {"error"} 401 Unauthorized
This endpoint isn't available yet.
Viewing Cluster Details
At the highest level, the response for this request describes a cluster, as mentioned previously. The response contains a number of properties which define attributes of the cluster, controllers for the cluster, and enables you to make certain requests of the cluster.
Note that since buckets could be renamed and there is no way to determine the name for the default bucket for a cluster, the system will attempt to connect non-SASL, non-proxied to a bucket clients to a bucket named “default”. If it does not exist, Couchbase Server will drop the connection.
You should not use the rely on the node list here to create a server list to connect using a Couchbase Server. You should instead issue an HTTP get call to the bucket to get the node list for that specific bucket.
GET /pools/default
Host: node.in.your.pool.com
Authorization: Basic xxxxxxxxxxxxxxxxxxx
Accept: application/json
X-memcachekv-Store-Client-Specification-Version: 0.1
HTTP/1.1 200 OK
Content-Type: application/json
Content-Length: nnn
{
    "name":"default",
    "nodes":[{

        "hostname":"10.0.1.20",

        "status":"healthy",
        "uptime":"14",
        "version":"1.6.0",
        "os":"i386-apple-darwin9.8.0",
        "memoryTotal":3584844000.0,
        "memoryFree":74972000,
        "mcdMemoryReserved":64,
        "mcdMemoryAllocated":48,
        "ports":{

            "proxy":11213,
            "direct":11212
        },
        "otpNode":"ns_1@node.in.your.pool.com",
        "otpCookie":"fsekryjfoeygvgcd",
        "clusterMembership":"active"
    }],
    "storageTotals":{

        "ram":{
            "total":2032558080,
            "used":1641816064

        },
        "hdd":{
            "total":239315349504.0,
            "used": 229742735523.0
        }
    },
    "buckets":{

        "uri":"/pools/default/buckets"
    },
    "controllers":{
        "ejectNode":{
            "uri":"/pools/default/controller/ejectNode"
        },
        "addNode":{


            "uri":"/controller/addNode"
        },
        "rebalance":{


            "uri":"/controller/rebalance"
        },
        "failover":{


            "uri":"/controller/failOver"
        },
        "reAddNode":{


            "uri":"/controller/reAddNode"
        },
        "stopRebalance":{


            "uri":"/controller/stopRebalance"
        }
    },
    "rebalanceProgress":{


        "uri":"/pools/default/rebalanceProgress"
    },
    "balanced": true,
    "etag":"asdas123",
    "initStatus":

    "stats":{
        "uri":"/pools/default/stats"
    }
}
The controllers in this list all accept parameters as x-www-form-urlencoded,
and perform the following functions:
| Function | Description |
|---|---|
| ejectNode | Eject a node from the cluster. Required parameter: “otpNode”, the node to be ejected. |
| addNode | Add a node to this cluster. Required parameters: “hostname”, “user” and “password”. Username and password are for the Administrator for this node. |
| rebalance | Rebalance the existing cluster. This controller requires both “knownNodes” and “ejectedNodes”. This allows a client to state the existing known nodes and which nodes should be removed from the cluster in a single operation. To ensure no cluster state changes have occurred since a client last got a list of nodes, both the known nodes and the node to be ejected must be supplied. If the list does not match the set of nodes, the request will fail with an HTTP 400 indicating a mismatch. Note rebalance progress is available via the rebalanceProgress uri. |
| rebalanceProgress | Return status of progress for a rebalance. |
| failover | Failover the vBuckets from a given node to the nodes which have replicas of data for those vBuckets. The “otpNode” parameter is required and specifies the node to be failed over. |
| reAddNode | The “otpNode” parameter is required and specifies the node to be re-added. |
| stopRebalance | Stop any rebalance operation currently running. This takes no parameters. |
Viewing Buckets and Bucket Operations
If you create your own SDK for Couchbase, you can either the proxy path or the direct path to connect to Couchbase Server. If your SDK uses the direct path, your SDK will not be insulated from most reconfiguration changes to the bucket. This means your SDK will need to either poll the bucket’s URI or connect to the streamingUri to receive updates when the bucket configuration changes. Bucket configuration can happen for instance, when nodes are added, removed, or if a node fails.
To retrieve information for all buckets in a cluster:
curl http://10.4.2.5:8091/pools/default/buckets
GET /pools/default/buckets
Host: node.in.your.pool.com
Authorization: Basic xxxxxxxxxxxxxxxxxxx
Accept: application/json
X-memcachekv-Store-Client-Specification-Version: 0.1
HTTP/1.1 200 OK
Server: Couchbase Server 1.6.0
Pragma: no-cache
Date: Wed, 03 Nov 2010 18:12:19 GMT
Content-Type: application/json
Content-Length: nnn
Cache-Control: no-cache no-store max-age=0
[
    {
        "name": "default",
        "bucketType": "couchbase",
        "authType": "sasl",
        "saslPassword": "",
        "proxyPort": 0,
        "uri": "/pools/default/buckets/default",
        "streamingUri": "/pools/default/bucketsStreaming/default",
        "flushCacheUri": "/pools/default/buckets/default/controller/doFlush",
        "nodes": [
            {
                "uptime": "784657",
                "memoryTotal": 8453197824.0,
                "memoryFree": 1191157760,
                "mcdMemoryReserved": 6449,
                "mcdMemoryAllocated": 6449,
                "clusterMembership": "active",
                "status": "unhealthy",
                "hostname": "10.1.15.148:8091",
                "version": "1.6.0",
                "os": "windows",
                "ports": {
                    "proxy": 11211,
                    "direct": 11210
                }
            }
        ],
        "stats": {
            "uri": "/pools/default/buckets/default/stats"
        },
        "nodeLocator": "vbucket",
        "vBucketServerMap": {
            "hashAlgorithm": "CRC",
            "numReplicas": 1,
            "serverList": [
                "192.168.1.2:11210"
            ],
        "vBucketMap": [ [ 0, -1 ], [ 0, -1 ], [ 0, -1 ], [ 0, -1 ], [ 0, -1 ], [ 0, -1 ]]
    },
        "replicaNumber": 1,
        "quota": {
            "ram": 104857600,
            "rawRAM": 104857600
        },
        "basicStats": {
            "quotaPercentUsed": 24.360397338867188,
            "opsPerSec": 0,
            "diskFetches": 0,
            "itemCount": 0,
            "diskUsed": 0,
            "memUsed": 25543728
        }
    },
    {
        "name": "test-application",
        "bucketType": "memcached",
        "authType": "sasl",
        "saslPassword": "",
        "proxyPort": 0,
        "uri": "/pools/default/buckets/test-application",
        "streamingUri": "/pools/default/bucketsStreaming/test-application",
        "flushCacheUri": "/pools/default/buckets/test-application/controller/doFlush",
        "nodes": [
            {
                "uptime": "784657",
                "memoryTotal": 8453197824.0,
                "memoryFree": 1191157760,
                "mcdMemoryReserved": 6449,
                "mcdMemoryAllocated": 6449,
                "clusterMembership": "active",
                "status": "healthy",
                "hostname": "192.168.1.2:8091",
                "version": "1.6.0",
                "os": "windows",
                "ports": {
                    "proxy": 11211,
                    "direct": 11210
                }
            }
        ],
        "stats": {
            "uri": "/pools/default/buckets/test-application/stats"
        },
        "nodeLocator": "ketama",
        "replicaNumber": 0,
        "quota": {
            "ram": 67108864,
            "rawRAM": 67108864
        },
        "basicStats": {
            "quotaPercentUsed": 4.064150154590607,
            "opsPerSec": 0,
            "hitRatio": 0,
            "itemCount": 1385,
            "diskUsed": 0,
            "memUsed": 2727405
        }
    }
]
Getting Individual Bucket Information
To retrieve information for a single bucket associated with a cluster, you make this request, where the last default can be replaced with the name of a specific bucket, if you have named buckets:
shell> curl -u admin:password http://10.4.2.5:8091/pools/default/buckets/bucket_name
Couchbase Server returns a large JSON document with bucket information including internal vBucket information:
{
    "name":"default",
    "bucketType":"membase",
    "authType":"sasl",
    "saslPassword":"",
    "proxyPort":0,
    "uri":"/pools/default/buckets/bucket_name",
    "streamingUri":"/pools/default/bucketsStreaming/default",
    "flushCacheUri":"/pools/default/buckets/default/controller/doFlush",
    "nodes":[
        {
            "systemStats":
            {
                "cpu_utilization_rate":1.5151515151515151,
                "swap_total":6140452864.0,
                "swap_used":0
            },

                ......

            "replicaNumber":1,
            "quota":
            {
                "ram":10246684672.0,
                "rawRAM":5123342336.0
            },
            "basicStats":
            {
                "quotaPercentUsed":0.5281477251650123,
                "opsPerSec":0,"diskFetches":0,
                "itemCount":0,
                "diskUsed":7518856,
                "memUsed":54117632
            }
        }
    ]
}
GET http://10.4.2.5:8091/pools/default/buckets/bucket_name
200 OK
Getting Bucket Information
The individual bucket request is exactly the same request you would use for an entire bucket list, plus the name of the bucket, or a default, for the default bucket. An example request is as follows:
curl -u admin:password hostname:8091/pools/default/buckets/newbucket
The following is a sample request to the bucket:
GET /pools/default/buckets/newbucket
Host: node.in.your.pool.com
Authorization: Basic xxxxxxxxxxxxxxxxxxx
Accept: application/json
X-memcachekv-Store-Client-Specification-Version: 0.1
The next example is a sample response:
HTTP/1.1 200 OK
Content-Type: application/json
Content-Length: nnn
{
  "name": "newbucket",
  "bucketType": "couchbase",
  "authType": "sasl",
  "saslPassword": "",
  "proxyPort": 0,
  "uri": "/pools/default/buckets/default",
  "streamingUri": "/pools/default/bucketsStreaming/default",
  "flushCacheUri": "/pools/default/buckets/default/controller/doFlush",
  "nodes": [
    {
      "uptime": "308",
      "memoryTotal": 3940818944.0,
      "memoryFree": 1608724480,
      "mcdMemoryReserved": 3006,
      "mcdMemoryAllocated": 3006,
      "replication": 1.0,
      "clusterMembership": "active",
      "status": "healthy",
      "hostname": "172.25.0.2:8091",
      "clusterCompatibility": 1,
      "version": "1.6.4r_107_g49a149d",
      "os": "i486-pc-linux-gnu",
      "ports": {
        "proxy": 11211,
        "direct": 11210
      }
    },
    {
      "uptime": "308",
      "memoryTotal": 3940818944.0,
      "memoryFree": 1608724480,
      "mcdMemoryReserved": 3006,
      "mcdMemoryAllocated": 3006,
      "replication": 1.0,
      "clusterMembership": "active",
      "status": "healthy",
      "hostname": "172.25.0.3:8091",
      "clusterCompatibility": 1,
      "version": "1.6.4r_107_g49a149d",
      "os": "i486-pc-linux-gnu",
      "ports": {
        "proxy": 11211,
        "direct": 11210
      }
    },
    {
      "uptime": "308",
      "memoryTotal": 3940818944.0,
      "memoryFree": 1608597504,
      "mcdMemoryReserved": 3006,
      "mcdMemoryAllocated": 3006,
      "replication": 1.0,
      "clusterMembership": "active",
      "status": "healthy",
      "hostname": "172.25.0.4:8091",
      "clusterCompatibility": 1,
      "version": "1.6.4r_107_g49a149d",
      "os": "i486-pc-linux-gnu",
      "ports": {
        "proxy": 11211,
        "direct": 11210
      }
    }
  ],
  "stats": {
    "uri": "/pools/default/buckets/default/stats"
  },
  "nodeLocator": "vbucket",
  "vBucketServerMap": {
    "hashAlgorithm": "CRC",
    "numReplicas": 1,
    "serverList": [
      "172.25.0.2:11210",
      "172.25.0.3:11210",
      "172.25.0.4:11210"
    ],
    "vBucketMap": [
      [1,0],
      [2,0],
      [1,2],
      [2,1],
      [1,2],
      [0,2],
      [0,1],
      [0,1]
    ]
  },
  "replicaNumber": 1,
  "quota": {
    "ram": 1887436800,
    "rawRAM": 629145600
  },
  "basicStats": {
    "quotaPercentUsed": 14.706055058373344,
    "opsPerSec": 0,
    "diskFetches": 0,
    "itemCount": 65125,
    "diskUsed": 139132928,
    "memUsed": 277567495
  }
}
Streaming Bucket Request
The streamingUri is exactly the same request as a bucket level-request except it streams HTTP chunks using chunked encoding. The stream contains the vBucket Map for a given bucket. When the vBucket changes it will resend an update map to console output. A response is in the form of line-delimited chunks: “\n\n\n\n.” This will likely be converted to a “zero chunk” in a future release of this API, and thus the behavior of the streamingUri should be considered evolving. The following is an example request:
curl -u admin:password localhost:8091/pools/default/bucketsStreaming/default
Here is a sample HTTP request:
GET /pools/default/bucketsStreaming/default HTTP/1.1
User-Agent: curl/7.21.4 (universal-apple-darwin11.0) libcurl/7.21.4 OpenSSL/0.9.8r zlib/1.2.5
Host: localhost:8091
Accept: */*
Here is a example, abbreviated response of the vBucket content stream:
....
        "vBucketMap":[[0,-1],[0,-1],[0,-1],[0,-1],[0,-1],[0,-1],[0,-1],[0,-1],[0,-1],[0,-1]
        ....
Getting Bucket Statistics
You can use the REST API to get bucket statistics from Couchbase Server. Your request URL should be taken from the stats.uri property of a bucket response. By default this request returns stats samples for the last minute and for heavily used keys. You use provide additional query parameters in a request to get samplings of statistics over different time periods:
zoom: Determines level of granularity and time period for statistics. Indicate one of the following as a URI parameters: (minute | hour | day | week | month | year). This indicates you want a sampling of statistics within the last minute, hour, day, week, and so forth. If you indicate ‘zoom = minute’ you will get 60 timestamps and statistics from within the last minute. If you indicate week, you will get 100 timestamps and statistics from the last week, and so forth.resampleForUI: Indicates the number of samplings you want Couchbase Server to provide with bucket statistics. Indicate 1 if you want 60 samplings of statistics.haveTStamp: Request samplings that are newer than the given timestamp. Specified in Unix epoch time.
The following is an example request:
curl -u admin:password -v http://localhost:8091/pools/default/buckets/test/stats
The following shows the actual HTTP request:
GET /pools/default/buckets/test/stats HTTP/1.1
User-Agent: curl/7.21.4 (universal-apple-darwin11.0) libcurl/7.21.4 OpenSSL/0.9.8r zlib/1.2.5
Host: localhost:8091
Accept: */*
The following is the HTTP response. For the sake of brevity, some of the JSON sampling is abbreviated:
HTTP/1.1 200 OK
Content-Type: application/json
Content-Length: nnn
{
    "op": {
        "samples": {
            "hit_ratio": [
                0, 0, 0, 0, 0, 0, 0, 0, 0, 0, 0, 0, 0, 0, 0, 0, 0, 0, 0, 0, 0, 0,
                0, 0, 0, 0, 0, 0, 0, 0, 0, 0, 0, 0, 0, 0, 0, 0, 0, 0, 0, 0, 0, 0,
                0, 0, 0, 0, 0, 0, 0, 0, 0, 0, 0, 0, 0, 0, 0
            ],
            "ep_cache_miss_rate": [ 0, 0, 0, 0, 0, 0, 0, 0, 0, 0, 0, 0, 0, 0,
                                    0, 0, 0, 0, 0, 0, 0, 0, 0, 0, 0, 0, 0, 0, 0, 0, 0, 0, 0, 0, 0, 0,
                                    0, 0, 0, 0, 0, 0, 0, 0, 0, 0, 0, 0, 0, 0, 0, 0, 0, 0, 0, 0, 0, 0,
                                    0 ],


                .....


            "samplesCount": 60,
            "isPersistent": true,
            "lastTStamp": 1292513777166.0,
            "interval": 1000
        },
        "hot_keys": [
            {
                "name": "48697",
                "ops": 0.0009276437847866419
            },
            {
                "name": "8487",
                "ops": 0.0009276437847866419
            },
            {
                "name": "77262",
                "ops": 0.0009276437847866419
            },
            {
                "name": "58495",
                "ops": 0.0009276437847866419
            },
            {
                "name": "21003",
                "ops": 0.0009276437847866419
            },
            {
                "name": "26850",
                "ops": 0.0009276437847866419
            },
            {
                "name": "73717",
                "ops": 0.0009276437847866419
            },
            {
                "name": "86218",
                "ops": 0.0009276437847866419
            },
            {
                "name": "80344",
                "ops": 0.0009276437847866419
            },
            {
                "name": "83457",
                "ops": 0.0009276437847866419
            }
        ]
    }
}
Managing Buckets
You can create a new bucket with a POST command sent to the URI for buckets in a cluster. This can be used to create either a couchbase or a memcached type bucket. The bucket name cannot have a leading underscore.
When you create a bucket you must provide the authType parameter:
If you set
authTypeto “none”, then you must specify a proxyPort number.If you set
authTypeto “sasl”, then you may optionally provide a “saslPassword” parameter. For Couchbase Sever 1.6.0, any SASL authentication-based access must go through a proxy at port 11211.
ramQuotaMB specifies how much memory, in megabytes, you want to allocate to
each node for the bucket. The minimum supported value is 100MB.
If the items stored in a memcached bucket take space beyond the
ramQuotaMB, Couchbase Sever typically will evict items on least-requested-item basis. Couchbase Server may evict other infrequently used items depending on object size, or whether or not an item is being referenced.In the case of Couchbase buckets, the system may return temporary failures if the
ramQuotaMBis reached. The system will try to keep 25% of the available ramQuotaMB free for new items by ejecting old items from occupying memory. In the event these items are later requested, they will be retrieved from disk.
Creating a Memcached Bucket
To create a memcached bucket:
curl -v -u Administrator:password -d name=newbucket -d ramQuotaMB=100 -d authType=none \
-d bucketType=memcached -d proxyPort=11216 http://localhost:8091/pools/default/buckets
If successful, the HTTP 200 response will contain no URI to check for the bucket, but most bucket creation will complete within a few seconds. You can do a REST request on the new bucket stats to confirm it exists:
curl -u admin:password -v http://localhost:8091/pools/default/buckets/newbucket/stats
The following is the actual HTTP request:
POST /pools/default/buckets HTTP/1.1
Authorization: Basic QWRtaW5pc3RyYXRvcjpwYXNzd29yZA==
User-Agent: curl/7.21.4 (universal-apple-darwin11.0) libcurl/7.21.4 OpenSSL/0.9.8r zlib/1.2.5
Host: localhost:8091
Accept: */*
Content-Length: 80
Content-Type: application/x-www-form-urlencoded
And the following is the HTTP response sent when Couchbase Server successfully creates the new bucket:
HTTP/1.1 202 Accepted
Server: Couchbase Server 1.8.1-937-rel-community
Pragma: no-cache
Location: /pools/default/buckets/newbucket
Date: Fri, 13 Jul 2012 18:40:25 GMT
Content-Length: 0
Cache-Control: no-cache
Creating a Couchbase Bucket
In addition to the parameters used to create a memcached bucket, you can provide
replicaNumber to specify the number of replicas for a Couchbase bucket:
shell> curl -u admin:password -d name=newbucket -d ramQuotaMB=20 -d authType=none \
     -d replicaNumber=2 -d proxyPort=11215 http://localhost:8091/pools/default/buckets
POST /pools/default/buckets
HTTP/1.1
Host: node.in.your.cluster:8091
Content-Type: application/x-www-form-urlencoded; charset=UTF-8
Authorization: Basic YWRtaW46YWRtaW4=
Content-Length: xx
name=newbucket&ramQuotaMB=20&authType=none&replicaNumber=2&proxyPort=11215
202: bucket will be created.
Getting a Bucket Request
GET /pools/default/buckets/Another bucket
HTTP/1.1 200 OK
Content-Type: application/com.couchbase.store+json
Content-Length: nnn
{
    "name" : "Another bucket",
    "bucketRules" :
    {
        "cacheRange" :
        {
            "min" : 1,
            "max" : 599
        },
        "replicationFactor" : 2
    }
    "nodes" : [
        {
            "hostname" : "10.0.1.20",
            "uri" : "/addresses/10.0.1.20",
            "status" : "healthy",
            "ports" :
            {
                "routing" : 11211,
                "kvcache" : 11311
            }
        },
        {
            "hostname" : "10.0.1.21",
            "uri" : "/addresses/10.0.1.21",
            "status" : "healthy",
            "ports" :
            {
                "routing" : 11211,
                "kvcache" : 11311
            }
        }
    ]
}
Clients MUST use the nodes list from the bucket, not the pool to indicate which are the appropriate nodes to connect to.
Modifying Bucket Properties
You can modify buckets by posting the same parameters used to create the bucket to the bucket’s URI.
Do not omit a parameter for a bucket property in your request, even if you are not modifying the property. This may be equivalent to not setting it in many cases. We recommend you do a request to get current bucket settings, make modifications as needed and then make your POST request to the bucket URI. You cannot change the name of a bucket via the REST API, or any other means besides removing the bucket and creating a new one witht he new name.
Increasing the Memory Quota for a Bucket
Increasing a bucket’s ramQuotaMB from the current level. Note, the system will not let you decrease the ramQuotaMB for a couchbase bucket type and memcached bucket types will be flushed when the ramQuotaMB is changed:
As of 1.6.0, there are some known issues with changing the ramQuotaMB for memcached bucket types.
Example of a request:
shell> curl -u admin:password -d ramQuotaMB=25 -d authType=none \
    -d proxyPort=11215 http://localhost:8091/pools/default/buckets/bucket_name
The response will be 202, indicating the quota will be changed asynchronously throughout the servers in the cluster. An example:
HTTP/1.1 202 OK
Server: Couchbase Server 1.6.0
Pragma: no-cache
Date: Wed, 29 Sep 2010 20:01:37 GMT
Content-Length: 0
Cache-Control: no-cache no-store max-age=0
Changing Bucket Authentication
Changing a bucket from port based authentication to SASL authentication can be done with:
shell> curl -u admin:password -d ramQuotaMB=130 -d authType=sasl proxyPort = 11215 \
    -d saslPassword=letmein \
    http://localhost:8091/pools/default/buckets/bucket_name
Flushing a Bucket
This operation is data destructive.The service makes no attempt to double check with the user. It simply moves forward. Clients applications using this are advised to double check with the end user before sending such a request.
As of Couchbase 1.6 bucket flushing via REST API is not supported. Flushing via Couchbase SDKs as of Couchbase Server 1.8.1 is disabled by default.
The bucket details provide a bucket URI at which a simple request can be made to flush the bucket.
POST /pools/default/buckets/default/controller/doFlush
Host: node.in.your.pool.com
Authorization: Basic xxxxxxxxxxxxxxxxxxx
X-memcachekv-Store-Client-Specification-Version: 0.1
You can use any HTTP parameters in this request. Since the URI is in the bucket details, neither the URI nor the parameters control what is actually done by the service. The simple requirement is for a POST is that it has an appropriate authorization header, if the system is secured.
HTTP Response, if the flush is successful
204 No Content
Possible errors include:
404 Not Found
Couchbase Server will return a HTTP 404 response if the URI is invalid or if it does not correspond to a bucket in the system.
Deleting a Bucket
To delete a bucket from Couchbase Server via the REST API, provide administrative username and password in a request. The URI is for the named bucket you want to delete, and the request is a HTTP DELETE
This operation is data destructive. The service makes no attempt to confirm with the user before removing a bucket. Clients applications using this are advised to check again with the end user, or client application before sending such a request.
The following is an example request to delete the bucket named ‘bucket_name’:
curl -v -X DELETE -u Administrator:password http://localhost:8091/pools/default/buckets/bucket_name
The following is the HTTP request:
DELETE /pools/default/buckets/bucket_name
Host: node.in.your.pool.com
Authorization: Basic xxxxxxxxxxxxxxxxxxx
X-memcachekv-Store-Client-Specification-Version: 0.1
If successful, Couchbase Server returns the following HTTP response:
HTTP/1.1 200 OK
Adding a Node to a Cluster
Clusters cannot be merged if they are made of multiple nodes. However, you can add a single node to an existing cluster. You will need to provide several parameters to add a node to a cluster:
shell> curl -u admin:password -d clusterMemberHostIp=192.168.0.1 \
    -d clusterMemberPort=8091 \
    -d user=admin -d password=admin123
    http://localhost:8091/node/controller/doJoinCluster
The following arguments are required:
| Argument | Description |
|---|---|
| clusterMemberHostIp | Hostname or IP address to a member of the cluster the node receiving this POST will be joining |
| clusterMemberPort | Port number for the RESTful interface to the system |
If your cluster requires credentials, you will need to provide the following parameters in your request:
| Argument | Description |
|---|---|
| user | Administration user |
| password | Password associated with the Administration user |
POST /node/controller/doJoinCluster
Host: target.node.to.do.join.from:8091
Authorization: Basic xxxxxxxxxxxx
Accept: */*
Content-Length: xxxxxxxxxx
Content-Type: application/x-www-form-urlencoded
clusterMemberHostIp=192.168.0.1&clusterMemberPort=8091&user=admin&password=admin123
200 OK with Location header pointing to pool details of pool just joined - successful join
400 Bad Request - missing parameters, etc.
401 Unauthorized - credentials required, but not supplied
403 Forbidden bad credentials - invalid credentials
Removing a Node from a Cluster
When a node is temporarily or permanently down, you may want to remove it from a cluster:
shell> curl -u admin:password -d otpNode=ns_1@192.168.0.107 \
    http://192.168.0.106:8091/controller/ejectNode
POST /controller/ejectNode
Host: altnernate.node.in.cluster:8091
Authorization: Basic xxxxxxxxxxxx
Accept: */*
Content-Length: xxxxxxxxxx
Content-Type: application/x-www-form-urlencoded
otpNode=ns_1@192.168.0.1
200 OK - node ejected
400 Error, the node to be ejected does not exist
401 Unauthorized - Credentials were not supplied and are required
403 Forbidden - Credentials were supplied and are incorrect
Initiating a Rebalance
To start a rebalance process through the REST API you must supply two arguments containing the list of nodes that have been marked to be ejected, and the list of nodes that are known within the cluster. You can obtain this information by getting the current node configuration as reported by Getting Information on Nodes. This is to ensure that the client making the REST API request is aeare of the current cluster configuration. Nodes should have been previously added or marked for removal as appropriate.
The information must be supplied via the ejectedNodes and knownNodes
parameters as a POST operation to the /controller/rebalance endpoint. For
example:
> curl -v -u Administrator:password -X POST
'http://172.23.121.11:8091/controller/rebalance' -d
'ejectedNodes=&knownNodes=ns_1@172.23.121.11,ns_1@172.23.121.12'
The corresponding raw HTTP request:
POST /controller/rebalance HTTP/1.1
Authorization: Basic QWRtaW5pc3RyYXRvcjpUYW1zaW4=
User-Agent: curl/7.24.0 (x86_64-apple-darwin12.0) libcurl/7.24.0 OpenSSL/0.9.8r zlib/1.2.5
Host: 192.168.0.77:8091
Accept: */*
Content-Length: 63
Content-Type: application/x-www-form-urlencoded
The response will be 200 (OK) if the operation was successfully submitted.
If the wrong node information has been submitted, JSON with the mismatch error will be returned:
{"mismatch":1}
Progress of the rebalance operation can be obtained by using Getting Rebalance Progress.
Getting Rebalance Progress
Once a rebalance process has been started the progress of the rebalance can be
monitored by accessing the /pools/default/rebalanceProgress endpoint. This
returns a JSON structure continaing the current progress information:
shell> curl -u admin:password 'http://Administrator:Password@192.168.0.77:8091/pools/default/rebalanceProgress'
As a pure REST API call:
GET /pools/default/rebalanceProgress HTTP/1.1
Authorization: Basic QWRtaW5pc3RyYXRvcjpUYW1zaW4=
User-Agent: curl/7.24.0 (x86_64-apple-darwin12.0) libcurl/7.24.0 OpenSSL/0.9.8r zlib/1.2.5
Host: 192.168.0.77:8091
Accept: */*
The response data packet contains a JSON structure showing the rebalance progress for each node. The progress figure is provided as a percentage (shown as a floating point value betweeen 0 and 1).
{
    "status":"running",
    "ns_1@192.168.0.56":{"progress":0.2734375},
    "ns_1@192.168.0.77":{"progress":0.09114583333333337}
}
Using System Logs
Couchbase Server logs various messages, which are available via the REST API. These log messages are optionally categorized by the module. You can retrieve a generic list of recent log entries or recent log entries for a particular category. If you perform a GET request on the systems logs URI, Couchbase Server will return all categories of messages.
Messages may be labeled, “info” “crit” or “warn”. Accessing logs requires administrator credentials if the system is secured.
GET /pools/default/logs?cat=crit
Host: node.in.your.pool.com
Authorization: Basic xxxxxxxxxxxxxxxxxxx
Accept: application/json
X-memcachekv-Store-Client-Specification-Version: 0.1
201: bucket was created and valid URIs returned
HTTP/1.1
200 OK
Content-Type: application/json
Content-Length: nnn
[
    {
        "cat":"info",
        "date": "",
        "code": "302",
        "message": "Some information for you."
    },
    {
        "cat":"warn",
        "date": "",
        "code": "502",
        "message": "Something needs attention."
    }
]
Client Logging Interface
If you create your own Couchbase SDK you may might want to add entries to the central log. These entries would typically be responses to exceptions such as difficulty handling a server response. For instance, the Web UI uses this functionality to log client error conditions. To add entries you provide a REST request:
POST /logClientError
Host: node.in.your.pool.com
Authorization: Basic xxxxxxxxxxxxxxxxxxx
Accept: application/json
X-memcachekv-Store-Client-Specification-Version: 0.1
200 - OK
Developing with Couchbase
You can find information on client libraries for use with Couchbase Server at Develop with Couchbase Server SDKs
Use Cases
Couchbase is a generalized database management system, but looking across Couchbase deployments, it is clear that there are some patterns of use. These patterns tend to rely Couchbase’s unique combination of linear, horizontal scalability; sustained low latency and high throughput performance; and the extensibility of the system facilitated through Tap and NodeCode. This page highlights these use cases.
Session store
User sessions are easily stored in Couchbase, such as by using a document ID naming scheme like “user:USERID”. The item expiration feature of Couchbase can be optionally used to have Couchbase automatically delete old sessions. There are two ways that Couchbase Server will remove items that have expired:
Lazy Deletion: when a key is requested Couchbase Server checks a key for expiration; if a key is past its expiration Couchbase Server removes it from RAM. This applies to data in Couchbase and memcached buckets.
Maintenance Intervals: items that have expired will be removed by an automatic maintenance process that runs every 60 minutes.
When Couchbase Server gets a requests for a key that is past its expiration it removes it from RAM; when a client tries to retrieve the expired item, Couchbase Server will return a message that the key does not exist. Items that have expired but have not been requested will be removed every 60 minutes by default by an automatic maintenance process.
Besides the usual SET operation, CAS identifiers can be used to ensure concurrent web requests from a single user do not lose data.
Many web application frameworks such as Ruby on Rails and various PHP and Python web frameworks also provide pre-integrated support for storing session data using Memcached protocol. These are supported automatically by Couchbase.
Social gaming
Game state, property state, timelines, conversations & chats can also be modeled in Couchbase. The asynchronous persistence algorithms of Couchbase were designed, built and deployed to support some of the highest scale social games on the planet. In particular, the heavy dual read & write storage access patterns of social games (nearly every user gesture mutates game state) is serviced by Couchbase by asynchronously queueing mutations for disk storage and also by collapsing mutations into the most recently queued mutation. For example, a player making 10 game state mutations in 5 seconds (e.g., planting 10 flowers in 5 seconds) will likely be collapsed by Couchbase automatically into just one queued disk mutation. Couchbase also will force-save mutated item data to disk, even if an item is heavily changed (the user keeps on clicking and clicking). Additionally, game state for that player remains instantly readable as long as it is in the memory working set of Couchbase.
Ad, offer and content targeting
The same underpinnings that power social games is well suited to real-time ad and content targeting. For example, Couchbase provides a fast storage capability for counters. Counters are useful for tracking visits, associating users with various targeting profiles (eg, user-1234 is visited a page about “automobiles” and “travel”) and in tracking ad-offers and ad-inventory.
Multi-GET operations in Couchbase allow ad applications to concurrently “scatter-gather” against profiles, counters, or other items in order to allow for ad computation and serving decisions under a limited response latency budget.
Real-time logging and alerting
Other features of Couchbase, such as the ability to PREPEND and APPEND values onto existing items, allow for high performance event tracking. Couchbase is also well suited as a aggregation backend, where events need to be consolidated for fast, real-time analysis.
For example, if your application needs to process the “firehose” of events from high-scale conversation services such as Twitter, such as by matching user interest in terms (eg, user-1234 is interested in conversations about “worldcup” and “harrypotter”), Couchbase can be used as the database for fast topic to subscriber matching, allowing your application to quickly answer, “who is interested in event X?”
Best practices
Included below are a number of best practices that you should follow when developing applications using Couchbase.
What should I store in an object
Couchbase is most suited towards fast-changing data items of relatively small size. Couchbase buckets support document data up to 20 Mbytes. For example, think shopping carts, user profile, user sessions, timelines, game states, pages, conversations and product catalog, instead of large audio or video media blobs.
How should I store an object?
Couchbase, similar to Memcached, can store any binary bytes, and the encoding is up to you or your client library. Some memcached client libraries, for example, offer convenience functions to serialize/deserialize objects from your favorite web application programming language (Java, Ruby, PHP, Python, etc) to a blob for storage. Please consult your client library API documentation for details.
An additional consideration on object encoding/seralization is whether your objects will need to be handled by multiple programming languages. For example, it might be inconvenient for a Java client application to decode a serialized PHP object. In these cases, consider cross-language encodings such as JSON, XML, Google Protocol Buffers or Thrift.
The later two (Protocol Buffers and Thrift) have some advantages in providing more efficient object encodings than text-based encodings like JSON and XML. One key to Couchbase performance is to watch your working set size, so the more working set items you can fit into memory, the better.
On that note, some client libraries offer the additional feature of optionally compressing/decompressing objects stored into Couchbase. The CPU-time versus space tradeoff here should be considered, in addition to how you might want to version objects under changing encoding schemes. For example, you might consider using the ‘flags’ field in each item to denote the encoding kind and/or optional compression. When beginning application development, however, a useful mantra to follow is to just keep things simple.
Objects that refer to other objects
Although Couchbase is a document store and you can store any byte-array value that you wish, there are some common patterns for handling items that refer to other items. Some example use cases. For example: User 1234 is interested in topics A, B, X, W and belongs to groups 1, 3, 5
Shopping Cart 222 points to product-1432 and product-211
A Page has Comments, and each of those Comments has an Author. Each Author, in turn, has a “handle”, an avatar image and a karma ranking.
Nested Items
You can store serialized, nested structures in Couchbase, such as by using encodings like JSON or XML (or Google Protocol Buffers or Thrift). A user profile item stored in Couchbase can then track information such as user interests. For example, in JSON:
{ "key": "user-1234", "handle": "bobama", "avatarURL": ...,
"interests": [ "A", "B", "X", "W" ], "groups": [ 1, 3, 5 ], ...
        }
If the above is stored in Couchbase under document ID “user-1234”, you can then know the interests for that user by doing a simple GET for user-1234 and decoding the JSON response.
Simple Lists
To handle reverse lookups (who are the users interested in topic X?), a common solution is to store simple lists. For example, under document ID “topic-X”, you might have store the following list:
user-1234,user-222,user-987,
Such lists can be easily constructed by using Couchbase’s APPEND or PREPEND operations, where you append/prepend values that look like “user-XXXXX,”.
Note that the list is delimited by commas, but that can be any character you choose.
Handling List Item Deletion
The above works when a user registers her interest in a topic, but how can you handle when a user wants to unregister their interest (eg, unsubscribe or unfollow)?
One approach is to use the CAS identifiers to do atomic replacement. A client application first does a GET-with-caS (a “gets” request in the ascii protocol) of the current list for a topic. Then the client removes the given user from the list response, and finally does a SET-with-CAS-identifier operation (a “cas” request in the ascii protocol) while supplying the same CAS identifier that was returned with the earlier “gets” retrieval.
If the SET-with-CAS request succeeds, the client has successfully replaced the list item with a new, shorter list with the relevant list entry deleted.
The SET-with-CAS-identifier operation might fail, however, if another client mutated the list while the first client was attempting a deletion. In this case the first client can try to repeat the list item delete operation.
Under a highly contended or fast mutating list however (such as users trying to follow a popular user or topic), the deleting client will have a difficult time making progress.
Handling Highly Contended List Item Deletion
Instead of performing a SET-with-CAS to perform list item deletion, one pattern is to explicitly track deleted items. This could be done using APPEND for list additions and PREPENDS for list deletions, with an additional “tombstone” deletion character. For example, anything before the “|” character is considered deleted:
user-222,|user-1234,user-222,user-987,
So, after the client library retrieves that list and does some post-processing, the effective, actual list of interested subscribers is user-1234 and user-987.
Care must be taken to count correctly, in case user-222 decides to add themselves again to the list (and her clicks are faster than whatever logic your application has to prevent duplicate clicks):
user-222,|user-1234,user-222,user-987,user-222
A similar encoding scheme would use ‘+’ or ‘-’ delimiter characters to the same effect, where the client sends an APPEND of “+ID” to add an entry to a list, and an APPEND of “-ID” to remove an entry from a list. The client application would still perform post-processing on the list response, tracking appropriate list entry counts. In this and other encodings, we must take care not to use the delimiter characters that were chosen:
+1234+222+987-222
Yet another variation on this would be store deleted items to a separate paired list. So your application might have two lists for a topic, such as a “follow-X” and “unfollow-X”.
Compressing Lists
Eventually, your application may need to garbage collect or compress the lists. To do so, you might have your client application do so by randomly piggy-backing on other requests to retrieve the list.
Again, with heavily contended, fast mutating list, attempts to compress a list may be fruitless as SET-with-CAS attempts can fail. Some solutions, as with many in software engineering, involve adding a level of indirection. For example, you could keep two lists for each topic, and use marker items to signal to clients which list is considered active:
topic-X.a => +1234+222+987-222 topic-X.b => (empty)
topic-X.active => topic-X.a
A client could multi-GET on topic-X.a and topic-X.b, and the combined result would contain the full list. To mutate the list, the client would look at the “pointer” item of topic-X.active, and know to APPEND values to topic-X.a.
A randomly self-chosen client may choose to garbage-collect the active list when it sees the list length is large enough, by writing a compressed version of topic-X.a into topic-X.b (note: XXX) and by flipping the topic-X.active item to point to “b”. New clients will start APPEND'ing values to topic-X.b. Old, concurrent clients might still be APPEND'ing values to the old active item of topic-X.a, so other randomly self-selected clients can choose to help continue to compress topic-X.a into topic-X.b so that topic-X.a will be empty and ready for the next flip.
An alternative to a separate “topic-X.active” pointer item would be instead to PREPEND a tombstone marker value onto the front of the inactivated list item. For example, if ‘^’ was the tombstone marker character, all concurrent clients would be able to see in that a certain list should not be appended to:
topic-X.a => +1234+222+987-222 topic-X.b => ^+1234
There are concurrency holes in this “active flipping” scheme, such as if there’s a client process failure at the step noted above at “XXX”, so for periods of time there might be duplicates or reappearing list items.
In general, the idea is that independent clients try to make progress towards an eventually stabilized state. Please consider your application use cases as to whether temporary inconsistencies are survivable.
Large Lists
If your lists get large (e.g., some user has 200,000 followers), you may soon hit the default 1 megabyte value byte size limits of Couchbase. Again, a level of indirection is useful here, by have another item that lists the lists…
topic-X => +0+1 topic-X.0 => ... many actual items ...
topic-X.1 => ... more actual items ...
The “topic-X” item just lists pointers to items that have the actual lists.
In this approach, you could have randomly self-selected clients decide to add new topic sub-lists (topic-X.N) and APPEND'ing updated info to the “index” item (topic-X).
Other randomly self-chosen clients could attempt to compress topic sub-lists that are old.
Multi-GET
Once your client application has a list of document IDs, the highest performance approach to retrieve the actual items is to use a multi-GET request. Doing so allows for concurrent retrieval of items across your Couchbase cluster. This will perform better than a serial loop that tries to GET for each item individually and sequentially.
Locking
Advisory locks can be useful to control access to scarce resources. For example, retrieving information from backend or remote systems might be slow and consume a lot of resources. Instead of letting any client access the backend system and potentially overwhelm the backend system with high concurrent client requests, you could create an advisory lock to allow only one client at a time access the backend.
Advisory locks in Couchbase or Memcached can be created by setting expiration times on a named data item and by using the ‘add’ and ‘delete’ commands to access that named item. The ‘add’ or ‘delete’ commands are atomic, so you can be know that only one client will become the advisory lock owner.
The first client that tries to ADD a named lock item (with an expiration timeout) will succeed. Other clients will see error responses to an ADD command on that named lock item, so they can know that some other client is owning the named lock item. When the current lock owner is finished owning the lock, it can send an explicit DELETE command on the named lock item to free the lock.
If the lock owning client crashes, the lock will automatically become available to the next client that polls for the lock (using ‘add’) after the expiration timeout.
Data partitioning with buckets
Couchbase allows you to partition your data into separate containers or namespaces. These containers are called ‘buckets’. Couchbase will keep item storage separated for different buckets, allowing you to perform operations like statistics gathering and flush_all on a per-bucket basis, which are not workable using other techniques such as simulating namespaces by document ID-prefixing.
Couchbase Server supports two different bucket types, Couchbase and memcached. For a full discussion of the major differences, see Buckets.
Couchbase for Memcached Users
Configuring Couchbase as Memcached
While Couchbase Server is completely compatible with the open-source memcached protocol, we realize that there are still good use cases for using a cache. For this reason, we have included standard memcached functionality into the Couchbase Server product. Simply configure a bucket to be of type “Memcached” and it will behave almost identically to the open source version. There are a few differences around memory management but your clients and applications will not see a difference.
Q: What are the behavioral differences between Couchbase and Memcached?
A: The biggest difference is that Couchbase is a database. It will persist your data and return an error if there is not enough RAM or disk space available. Memcached is a cache, and will evict older data to make room for new data. Couchbase also provides replication so that you always have access to your data in the event of a failure. Memcached runs only out of RAM and has no replication so the loss of a server will result in the loss of that cache.
Q: What are the advantages to using this Memcached over the open source version?
A: We provide a much enhanced UI for the purposes of configuration and monitoring. Also, through the use of “smart clients”, your application can be dynamically updated with cluster topology changes. Using this server also gives you an easy path to upgrade to a Couchbase bucket type for the enhanced HA, persistence and querying capabilities.
Couchbase Architecture
From a client perspective, Couchbase Server speaks memcached protocol, which is well understood by many, if not most application developers. The difference, of course, is that Couchbase Server has persistence and replication capabilities while still allowing for memcached like speed.
Cluster Design
Individual Couchbase Server nodes are clustered together. Within a cluster data is automatically replicated between nodes of a cluster. Cluster nodes can be added and removed without interrupting access to data within the cluster.
All clusters start with a single node, typically one installed from a package. Either through the Web UI or from the REST interface, Couchbase Server allows one or more nodes to be added to the cluster. When a node is added to the cluster, it does not immediately start performing data operations. This is to allow the user to perform one or more changes to the cluster before initiating a rebalance. During a rebalance the data and replicas of that data, contained in sub-partitions of the cluster called vBuckets, are redistributed throughout the cluster. By design, a given vBucket is only active in one place within the cluster at a given point in time. By doing so, Couchbase Server is always consistent for any given item.
Data is moved between nodes, both when rebalancing and replicating, using a set of managed eBucketmigrator processes in the cluster. This process uses a new protocol called TAP. TAP is generic in nature though, and it has very clear use cases outside replication or migration of data. Incidentally, TAP doesn’t actually stand for anything. The name came about when thinking about how to “tap into” a Couchbase Server node. This could be thought of along the lines of a ‘wiretap’ or tapping into a keg.
Cluster replication defaults to asynchronous, but is designed to be synchronous. The benefit of replication being asynchronous is that Couchbase Server has speeds similar to memcached in the default case, taking a data safety risk for a short interval.
Cluster coordination and communication is handled by the ns_server erlang
process. Generally, users of Couchbase Server need not be aware of the details
about how ns_server performs its tasks, as interfacing with the cluster is
done with the aforementioned REST API for
Administration. As part of keeping the system simple,
all nodes of the cluster expose the state of the cluster.
Persistence Design
Generally speaking, Couchbase Server is memory oriented, by which we mean that it tends to be designed around the working set being resident in memory, as is the case with most highly interactive web applications. However, the set of data in memory at any given point in time is only the hot data. Data is persisted to disk by Couchbase Server asynchronously, based on rules in the system.
Component Overview
From a developer perspective, it is useful to know how all of the components of Couchbase Server come together. A Couchbase Server node consists of:
-
ns_serverns_serveris the main process that runs on each node. As it says in it’s source repository summary, it is the supervisor. One of these runs on each node and then spawns processes, which then later spawn more processes. -
ebucketmigratorThe
ebucketmigratorcomponent ofns_serveris responsible for handling the redistribution of information within the cluster nodes during rebalance operations. -
menelausMenelaus is really two components, which are part of the
ns_servercomponent. The main focus of menelaus is providing the RESTful interface to working with a cluster. Built atop that RESTful interface is a very rich, sophisticated jQuery based application which makes REST calls to the server. -
memcached
Though Couchbase Server is different than memcached, it does leverage the core of memcached. The core includes networking and protocol handling.
The bulk of Couchbase Server is implemented in two components:
-
Couchbase Server engine (
ep-engine)This is loaded through the memcached core and the bucket_engine. This core component provides persistence in an asynchronous fashion and implements the TAP protocol.
-
bucket engine
The bucket engine provides a way of loading instances of engines under a single memcached process. This is how Couchbase Server provides multitenancy.
-
-
MoxiA memcached proxy, moxi “speaks” vBucket hashing (implemented in libvbucket) and can talk to the REST interface to get cluster state and configuration, ensuring that clients are always routed to the appropriate place for a given vBucket.
Across multiple cloud instances, VMs or physical servers, all of these components come together to become a couchbase cluster.
Disk Storage (Growing Data Sets Beyond Memory)
Couchbase Server has asynchronous persistence as a feature. One feature-of-that-feature is that the working set stored by an individual Couchbase Server node can be larger than the cache dedicated to that node. This feature is commonly referred to as “disk greater than memory”.
Design
Each instance of ep-engine in a given node will have a certain memory quota associated with it. This memory quota is sometimes referred to as >the amount of cache memory. That amount of memory will always store the index to the entire working set. By doing so, we ensure most items are quickly fetched and checks for the existence of items is always fast.
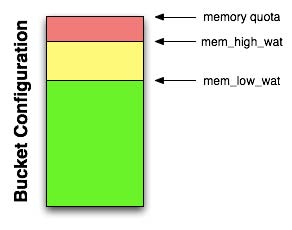
In addition to the quota, there are two watermarks the engine will use to determine when it is necessary to start freeing up available memory. These are mem_low_wat and mem_high_wat.
As the system is loaded with data, eventually the mem_low_wat is passed. At this time, no action is taken. This is the “goal” the system will move toward when migrating items to disk. As data continues to load, it will evenutally reach mem_high_wat. At this point a background job is scheduled to ensure items are migrated to disk and the memory is then available for other Couchbase Server items. This job will run until measured memory reaches mem_low_wat. If the rate of incoming items is faster than the migration of items to disk, the system may return errors indicating there is not enough space. This will continue until there is available memory.
Consequences of Memory faster than Disk
Obviously, the migration of data to disk is generally much slower and has much lower throughput than setting things in memory. When an application is setting or otherwise mutating data faster than it can be migrated out of memory to make space available for incoming data, the behavior of the server may be a bit different than the client expects with memcached. In the case of memcached, items are evicted from memory, and the newly mutated item is stored. In the case of couchbase, however, the expectation is that we’ll migrate items to disk.
When Couchbase Server determines that RAM is at 90% of the bucket quota, the
server will return TMPFAIL to clients when storing data. This indicates that
the out of memory issue is temporary and can be retried. The reason for the
response is that there are still outstanding items in the disk write queue that
need to be persisted to disk before they can safely be ejected from memory. The
situation is rare and seen only when very large volumes of writes in a short
period of time. Clients will still be able to read data from memory.
When Couchbase Server determines that there is not enough memory to store
information immediately, the server will return TMP_OOM, the temporary out of
memory error. This is designed to indicate that the inability to store the
requested information is only a temporary, not a permanent, lack of memory. When
the client receives this error, the storage process can either be tried later or
fail, dependending on the client and application requirements.
DGM Implementation Details
The actual process of eviction is relatively simple now. When we need memory, we look around in hash tables and attempt to find things we can get rid of (i.e. things that are persisted on disk) and start dropping it. We will also eject data as soon as it’s persisted iff it’s for an inactive (e.g. replica) vBucket if we’re above our low watermark for memory. If we have plenty of memory, we’ll keep it loaded.
The bulk of this page is about what happens when we encounter values that are not resident.
Get Flow
In the current flow, a get request against a given document ID will first fetch the value from the hash table. For any given item we know about, there will definitely be a document ID and its respective metadata will always be available in the hash table. In the case of an “ejected” record, the value will be missing, effectively pointed to NULL. This is useful for larger objects, but not particularly efficient for small objects. This is being addressed in future versions.
When fetching a value, we will first look in the hash table. If we don’t find it, we don’t have it. MISS.
If we do have it and it’s resident, we return it. HIT.
If we have it and it’s not resident, we schedule a background fetch and let the dispatcher pull the object from the DB and reattach it to the stored value in memory. The connection is then placed into a blocking state so the client will wait until the item has returned from slower storage.
The background fetch happens at some point in the future via an asynchronous job dispatcher.

When the job runs, the item is returned from disk and then the in-memory item is pulled and iff it is still not resident, will have the value set with the result of the disk fetch.*
Once the process is complete, whether the item was reattached from the disk value or not, the connection is reawakened so the core server will replay the request from the beginning.
It’s possible (though very unlikely) for another eject to occur before this process runs in which case the entire fetch process will begin again. The client has no particular action to take after the get request until the server is able to satisfy it.
An item may be resident after a background fetch either in the case of another background fetch for the same document ID having completed prior to this one or another client has modified the value since we looked in memory. In either case, we assume the disk value is older and will discard it.
Concurrent Reads and Writes
Concurrent reads and writes are sometimes possible under the right conditions. When these conditions are met, reads are executed by a new dispatcher that exists solely for read-only database requests, otherwise, the read-write dispatcher is used.
The underlying storage layer reports the level of concurrency it supports at startup time (specifically, post init-script evaluation). For stock SQLite, concurrent reads are allowed if both the journal-mode is WAL and read_uncommitted is enabled.
Future storage mechanisms may allow for concurrent execution under different conditions and will indicate this by reporting their level of concurrency differently.
The concurrentDB engine parameter allows the user to disable concurrent DB access even when the DB reports it’s possible.
The possible concurrency levels are reported via the ep_store_max_concurrency,
ep_store_max_readers and, ep_store_max_readwrite stats. The dispatcher stats
will show the read-only dispatcher when it’s available.
Mutation Flow
New data is better than old data, so a set always wins. Similarly, a delete always wins. Increment, decrement, add, etc are all atomic, but you can imagine them working as a get + store.
Couchbase APIs
A Couchbase cluster communicates with clients in two ways; the primary way clients interact with Couchbase Server is through manipulating data through various operations supported by couchbase. This is always through memcached protocol, and almost always through a client written for the particular programming language and platform you use.
In addition, there is also a RESTful interface which allows so-called “control plane” management of a cluster. Through this, a client may get information about or make changes to the cluster. For example, with the REST interface, a client can do things such as gather statistics from the cluster, define and make changes to buckets and even add/remove new nodes to the cluster.
memcached protocol
Couchbase Server supports the textual memcached protocol as described in protocol.txt. The textual protocol is disabled for the direct port to Couchbase Server due to the lack of vBucket support in couchbase. All access to Couchbase Server with the textual protocol must go through moxi.
One minor difference with Couchbase Server compared to memcached is that Couchbase Server allows for larger item sizes. Where memcached is 1MByte by default (tunable in more recent versions), Couchbase Server defaults to a maximum item size of 20MByte.
memcapable 1.0
memcapable is a tool included in lib memcached that is used to verify if a
memcached implementation adheres to the memcached protocol. It does this by
sending all of the commands specified in the protocol description and verifies
the result. This means that the server must implement an actual item storage and
all of the commands to be able to pass the memcapable testsuite.
Command line options
memcapable supports a number of command line options you may find useful (try
running memcapable -h to see the list of available options). If you run
memcapable without any options it will try to connect to localhost:11211 and
run the memcapable testsuite (see
Example ). If
you’re trying to implement your own server and one of the tests fails, you might
want to know why it failed. There is two options you might find useful for that:
-v or -c. The -v option prints out the assertion why the test failed, and
may help you figure out the problem. I’m a big fan of debuggers and corefiles,
so I prefer -c. When using -c memcapable will dump core whenever a test
fails, so you can inspect the corefile to figure out why the test failed.
Example
The following example tests the server listening on port 11211 on the local host (in this example I’ve got the stock memcached server running there)
shell> memcapable
ascii quit [pass]
ascii version [pass]
ascii verbosity [pass]
ascii set [pass]
ascii set noreply [pass]
ascii get [pass]
ascii gets [pass]
ascii mget [pass]
ascii flush [pass]
ascii flush noreply [pass]
ascii add [pass]
ascii add noreply [pass]
ascii replace [pass]
ascii replace noreply [pass]
ascii CAS [pass]
ascii CAS noreply [pass]
ascii delete [pass]
ascii delete noreply [pass]
ascii incr [pass]
ascii incr noreply [pass]
ascii decr [pass]
ascii decr noreply [pass]
ascii append [pass]
ascii append noreply [pass]
ascii prepend [pass]
ascii prepend noreply [pass]
ascii stat [pass]
binary noop [pass]
binary quit [pass]
binary quitq [pass]
binary set [pass]
binary setq [pass]
binary flush [pass]
binary flushq [pass]
binary add [pass]
binary addq [pass]
binary replace [pass]
binary replaceq [pass]
binary delete [pass]
binary deleteq [pass]
binary get [pass]
binary getq [pass]
binary getk [pass]
binary getkq [pass]
binary incr [pass]
binary incrq [pass]
binary decr [pass]
binary decrq [pass]
binary version [pass]
binary append [pass]
binary appendq [pass]
binary prepend [pass]
binary prependq [pass]
binary stat [pass]
All tests passed
The following example runs the test named “binary prepend”
trond@opensolaris> memcapable -T "binary prepend"
binary prepend [pass]
All tests passed
The following example runs the test suite, but prompts the user before each test
trond@opensolaris> memcapable -P ascii quit
Press <return> when you are ready?
ascii quit [pass]
ascii version
Press <return> when you are ready? quit
Buckets
Buckets are used to compartmentalize data within Couchbase Server and are also used as the basic mechanism used to replicate and duplicate information (if supported). Couchbase Server supports two different bucket types. These are:
-
memcached Buckets
The memcached buckets are designed to fully support the core memcached protocol as an in-memory caching solution. The support and functionality is therefore limited to the same functionality as within a standalone memcached implementation.
The main features are:
Item size is limited to 1 Mbyte.
Persistence is not supported.
Replication is not supported; data is available only on one node.
Statistics are limited to those directly related to the in-memory nature of the data. Statistics related to persistence, disk I/O and replication/rebalancing are not available.
Client setup should use ketama consistent hashing
memcached buckets do not use vBuckets, so there is no rebalancing.
-
Couchbase Buckets
Couchbase buckets support the full range of Couchbase-specific functionality, including balancing, persistence and replication. The main features are:
Item size is limited to 20 Mbyte.
Persistence, including data sets larger than the allocated memory size.
Replication and rebalancing are fully supported.
Full suite of statistics supported.
In addition to these overall bucket differences, there are also security and network port differences that enable you to configure and structure the connectivity to the different bucket types differently.
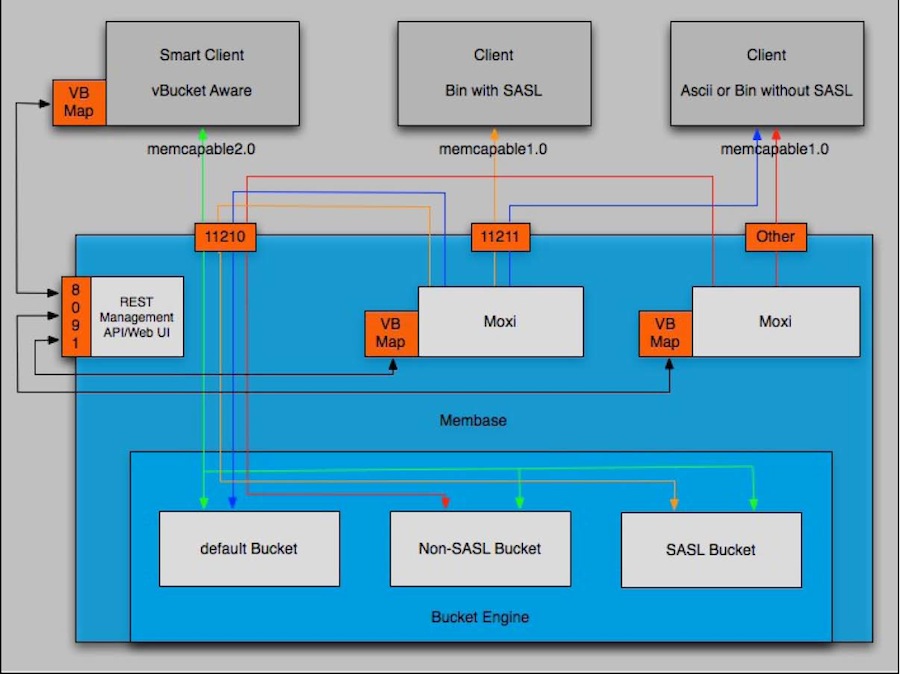
There are three bucket interface types that can be be configured:
-
The default Bucket
The default bucket is a Couchbase bucket that always resides on port 11211 and is a non-SASL authenticating bucket. When Couchbase Server is first installed this bucket is automatically set up during installation. This bucket may be removed after installation and may also be re-added later, but when re-adding a bucket named “default”, the bucket must be place on port 11211 and must be a non-SASL authenticating bucket. A bucket not named default may not reside on port 11211 if it is a non-SASL bucket. The default bucket may be reached with a vBucket aware smart client, an ASCII client or a binary client that doesn’t use SASL authentication.
-
Non-SASL Buckets
Non-SASL buckets may be placed on any available port with the exception of port 11211 if the bucket is not named “default”. Only one Non-SASL bucket may placed on any individual port. These buckets may be reached with a vBucket aware smart client, an ASCII client or a binary client that doesn’t use SASL authentication
-
SASL Buckets
SASL authenticating Couchbase buckets may only be placed on port 11211 and each bucket is differentiated by its name and password. SASL bucket may not be placed on any other port beside 11211. These buckets can be reached with either a vBucket aware smart client or a binary client that has SASL support. These buckets cannot be reached with ASCII clients.
vBuckets
For simplicity, in this section we completely ignore Couchbase Server multi-tenancy (or what we have historically called a “bucket,” which represents a “virtual couchbase instance” inside a single couchbase cluster). The bucket and vBucket concepts are not to be confused - they are not related. For purposes of this section, a bucket can simply be viewed as synonymous with “a couchbase cluster.”
A vBucket is defined as the “owner” of a subset of the key space of a Couchbase Server cluster.
Every document ID “belongs” to a vBucket. A mapping function is used to calculate the vBucket in which a given document ID belongs. In couchbase, that mapping function is a hashing function that takes a document ID as input and outputs a vBucket identifier. Once the vBucket identifier has been computed, a table is consulted to lookup the server that “hosts” that vBucket. The table contains one row per vBucket, pairing the vBucket to its hosting server. A server appearing in this table can be (and usually is) responsible for multiple vBuckets.
The hashing function used by Couchbase Server to map document IDs to vBuckets is configurable - both the hashing algorithm and the output space (i.e. the total number of vBuckets output by the function). Naturally, if the number of vBuckets in the output space of the hash function is changed, then the table which maps vBuckets to Servers must be resized.
Couchbase Document ID-vBucket-Server Mapping Illustrated
The vBucket mechanism provides a layer of indirection between the hashing algorithm and the server responsible for a given document ID. This indirection is useful in managing the orderly transition from one cluster configuration to another, whether the transition was planned (e.g. adding new servers to a cluster) or unexpected (e.g. a server failure).
The diagram below shows how document ID-Server mapping works when using the
vBucket construct. There are 3 servers in the cluster. A client wants to look up
(get) the value of document ID. The client first hashes the ID to calculate the
vBucket which owns ID. Assume Hash(ID) = vB8. The client then consults the
vBucket-server mapping table and determines Server C hosts vB8. The get
operation is sent to Server C.
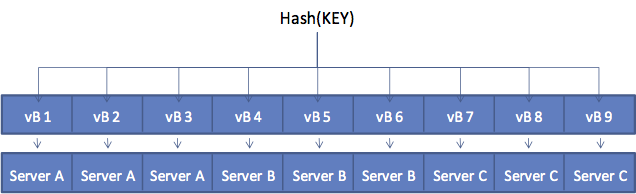
After some period of time, there is a need to add a server to the cluster (e.g. to sustain performance in the face of growing application use). Administrator adds Server D to the cluster and the vBucket Map is updated as follows.
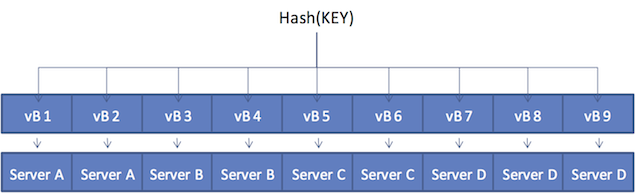
The vBucket-Server map is updated by an internal Couchbase algorithm and that updated table is transmitted by Couchbase to all cluster participants - servers and proxies.
After the addition, a client once again wants to look up (get) the value of document ID. Because the hashing algorithm in this case has not changed 1 Hash(ID) = vB8 as before. The client examines the vBucket-server mapping table and determines Server D now owns vB8. The get operation is sent to Server D.
vBuckets in a world of memcached clients
The interface between clients and your Couchbase Cluster will largely depend on the client environment you are using. For the majority of client interfaces, asmartclient is available that can talk natively to the Couchbase Cluster. This provides the client with a number of advantages in terms of the interface and sharing of information between the cluster and the client, and results in better overall performance and availability in failover situations.
Although you can continue to use memcached compatible clients, there are
significant performance disadvantages to this deployment model, as it requires
the use of a proxy that handles the mapping and distribution of information to
the correct vBucket and node.
If you want to continue to use the memcached you should use the client-side
Moxi deployment solution, as outlined in Client-Side (standalone)
Proxy.
Monitoring Couchbase
There are a number of different ways in which you can monitor Couchbase. You should be aware however of some of the basic issues that you will need to know before starting your monitoring procedure.
Port numbers and accessing different buckets
In a Couchbase Server cluster, any communication (stats or data) to a port other than 11210 will result in the request going through a Moxi process. This means that any stats request will be aggregated across the cluster (and may produce some inconsistencies or confusion when looking at stats that are not “aggregatable”).
In general, it is best to run all your stat commands against port 11210 which will always give you the information for the specific node that you are sending the request to. It is a best practice to then aggregate the relevant data across nodes at a higher level (in your own script or monitoring system).
When you run the below commands (and all stats commands) without supplying a bucket name and/or password, they will return results for the default bucket and produce an error if one does not exist.
To access a bucket other than the default, you will need to supply the bucket name and/or password on the end of the command. Any bucket created on a dedicated port does not require a password.
Monitoring startup (warmup)
If a Couchbase Server node is starting up for the first time, it will create whatever DB files necessary and begin serving data immediately. However, if there is already data on disk (likely because the node rebooted or the service restarted) the node needs to read all of this data off of disk before it can begin serving data. This is called “warmup”. Depending on the size of data, this can take some time.
When starting up a node, there are a few statistics to monitor. Use the
cbstats command to watch the warmup and item stats:
shell> cbstats localhost:11210 all | »
    egrep "warm|curr_items"
| curr_items: | 0 |
|---|---|
| curr_items_tot: | 15687 |
| ep_warmed_up: | 15687 |
| ep_warmup: | false |
| ep_warmup_dups: | 0 |
| ep_warmup_oom: | 0 |
| ep_warmup_thread: | running |
| ep_warmup_time: | 787 |
And when it is complete:
shell> cbstats localhost:11210 all | »
    egrep "warm|curr_items"
| curr_items: | 10000 |
|---|---|
| curr_items_tot: | 20000 |
| ep_warmed_up: | 20000 |
| ep_warmup: | true |
| ep_warmup_dups: | 0 |
| ep_warmup_oom: | 0 |
| ep_warmup_thread: | complete |
| ep_warmup_time | 1400 |
| Stat | Description |
|---|---|
| curr_items | The number of items currently active on this node. During warmup, this will be 0 until complete |
| curr_items_tot | The total number of items this node knows about (active and replica). During warmup, this will be increasing and should match ep_warmed_up |
| ep_warmed_up | The number of items retrieved from disk. During warmup, this should be increasing. |
| ep_warmup_dups | The number of duplicate items found on disk. Ideally should be 0, but a few is not a problem |
| ep_warmup_oom | How many times the warmup process received an Out of Memory response from the server while loading data into RAM |
| ep_warmup_thread | The status of the warmup thread. Can be either running or complete |
| ep_warmup_time | How long the warmup thread was running for. During warmup this number should be increasing, when complete it will tell you how long the process took |
Disk Write Queue
Couchbase Server is a persistent database which means that part of monitoring the system is understanding how we interact with the disk subsystem.
Since Couchbase Server is an asynchronous system, any mutation operation is committed first to DRAM and then queued to be written to disk. The client is returned an acknowledgement almost immediately so that it can continue working. There is replication involved here too, but we’re ignoring it for the purposes of this discussion.
We have implemented disk writing as a 2-queue system and they are tracked by the stats. The first queue is where mutations are immediately placed. Whenever there are items in that queue, our “flusher” (disk writer) comes along and takes all the items off of that queue, places them into the other one and begins writing to disk. Since disk performance is so dramatically different than RAM, this allows us to continue accepting new writes while we are (possibly slowly) writing new ones to the disk.
The flusher will process 250k items a a time, then perform a disk commit and continue this cycle until its queue is drained. When it has completed everything in its queue, it will either grab the next group from the first queue or essentially sleep until there are more items to write.
Monitoring the Disk Write Queue
There are basically two ways to monitor the disk queue, at a high-level from the Web UI or at a low-level from the individual node statistics.
From the Web UI, click on Monitor Data Buckets and select the particular bucket that you want to monitor. Click “Configure View” in the top right corner and select the “Disk Write Queue” statistic. Closing this window will show that there is a new mini-graph. This graph is showing the Disk Write Queue for all nodes in the cluster. To get a deeper view into this statistic, you can monitor each node individually using the ‘stats’ output (see Server Nodes for more information about gathering node-level stats). There are two statistics to watch here:
ep_queue_size (where new mutations are placed) flusher_todo (the queue of items currently being written to disk)
SeeThe Dispatcher for more information about monitoring what the disk subsystem is doing at any given time.
Couchbase Server Statistics
Couchbase Server provides statistics at multiple levels throughout the cluster. These are used for regular monitoring, capacity planning and to identify the performance characteristics of your cluster deployment. The most visible statistics are those in the Web UI, but components such as the REST interface, the proxy and individual nodes have directly accessible statistics interfaces.
REST Interface Statistics
To interact with statistics provided by REST, use the Couchbase Web Console. This GUI gathers statistics via REST and displays them to your browser. The REST interface has a set of resources that provide access to the current and historic statistics the cluster gathers and stores. See the REST documentation for more information.
Couchbase Server Node Statistics
Detailed stats documentation can be found in the repository.
Along with stats at the REST and UI level, individual nodes can also be queried for statistics either through a client which uses binary protocol or through the cbstats utility shipped with Couchbase Server.
For example:
shell> cbstats localhost:11210 all
 auth_cmds:                   9
 auth_errors:                 0
 bucket_conns:                10
 bytes_read:                  246378222
 bytes_written:               289715944
 cas_badval:                  0
 cas_hits:                    0
 cas_misses:                  0
 cmd_flush:                   0
 cmd_get:                     134250
 cmd_set:                     115750
…
The most commonly needed statistics are surfaced through the Web Console and have descriptions there and in the associated documentation. Software developers and system administrators wanting lower level information have it available through the stats interface.
There are seven commands available through the stats interface:
stats(referred to as ‘all’)dispatcherhashtaptimingsvkeyreset
stats Command
This displays a large list of statistics related to the Couchbase process including the underlying engine (ep_* stats).
dispatcher Command
This statistic will show what the dispatcher is currently doing:
dispatcher
     runtime: 45ms
       state: dispatcher_running
      status: running
        task: Running a flusher loop.
nio_dispatcher
       state: dispatcher_running
      status: idle
The first entry, dispatcher, monitors the process responsible for disk access. The second entry is a non-IO (non disk) dispatcher. There may also be a ro_dispatcher dispatcher present if the engine is allowingconcurrent reads and writes. When a task is actually running on a given dispatcher, the “runtime” tells you how long the current task has been running. Newer versions will show you a log of recently run dispatcher jobs so you can see what’s been happening.
Couchbase Server Moxi Statistics
Moxi, as part of it’s support of memcached protocol, has support for the
memcached stats command. Regular memcached clients can request statistics
through the memcached stats command. The stats command accepts optional
arguments, and in the case of Moxi, there is a stats proxy sub-command. A
detailed description of statistics available through Moxi can be found
here.
For example, one simple client one may use is the commonly available netcat (output elided with ellipses):
$ echo "stats proxy" | nc localhost 11211
STAT basic:version 1.6.0
STAT basic:nthreads 5
…
STAT proxy_main:conf_type dynamic
STAT proxy_main:behavior:cycle 0
STAT proxy_main:behavior:downstream_max 4
STAT proxy_main:behavior:downstream_conn_max 0
STAT proxy_main:behavior:downstream_weight 0
…
STAT proxy_main:stats:stat_configs 1
STAT proxy_main:stats:stat_config_fails 0
STAT proxy_main:stats:stat_proxy_starts 2
STAT proxy_main:stats:stat_proxy_start_fails 0
STAT proxy_main:stats:stat_proxy_existings 0
STAT proxy_main:stats:stat_proxy_shutdowns 0
STAT 11211:default:info:port 11211
STAT 11211:default:info:name default
…
STAT 11211:default:behavior:downstream_protocol 8
STAT 11211:default:behavior:downstream_timeout 0
STAT 11211:default:behavior:wait_queue_timeout 0
STAT 11211:default:behavior:time_stats 0
STAT 11211:default:behavior:connect_max_errors 0
STAT 11211:default:behavior:connect_retry_interval 0
STAT 11211:default:behavior:front_cache_max 200
STAT 11211:default:behavior:front_cache_lifespan 0
STAT 11211:default:behavior:front_cache_spec
STAT 11211:default:behavior:front_cache_unspec
STAT 11211:default:behavior:key_stats_max 4000
STAT 11211:default:behavior:key_stats_lifespan 0
STAT 11211:default:behavior:key_stats_spec
STAT 11211:default:behavior:key_stats_unspec
STAT 11211:default:behavior:optimize_set
STAT 11211:default:behavior:usr default
…
STAT 11211:default:pstd_stats:num_upstream 1
STAT 11211:default:pstd_stats:tot_upstream 2
STAT 11211:default:pstd_stats:num_downstream_conn 1
STAT 11211:default:pstd_stats:tot_downstream_conn 1
STAT 11211:default:pstd_stats:tot_downstream_conn_acquired 1
STAT 11211:default:pstd_stats:tot_downstream_conn_released 1
STAT 11211:default:pstd_stats:tot_downstream_released 2
STAT 11211:default:pstd_stats:tot_downstream_reserved 1
STAT 11211:default:pstd_stats:tot_downstream_reserved_time 0
STAT 11211:default:pstd_stats:max_downstream_reserved_time 0
STAT 11211:default:pstd_stats:tot_downstream_freed 0
STAT 11211:default:pstd_stats:tot_downstream_quit_server 0
STAT 11211:default:pstd_stats:tot_downstream_max_reached 0
STAT 11211:default:pstd_stats:tot_downstream_create_failed 0
STAT 11211:default:pstd_stats:tot_downstream_connect 1
STAT 11211:default:pstd_stats:tot_downstream_connect_failed 0
STAT 11211:default:pstd_stats:tot_downstream_connect_timeout 0
STAT 11211:default:pstd_stats:tot_downstream_connect_interval 0
STAT 11211:default:pstd_stats:tot_downstream_connect_max_reached 0
…
END
Troubleshooting
When troubleshooting your Couchbase Server deployment there are a number of different approaches available to you. For specific answers to individual problems, see Common Errors.
General Tips
The following are some general tips that may be useful before performing any more detailed investigations:
Try pinging the node.
Try connecting to the Couchbase Server Web Console on the node.
Try to use telnet to connect to the variousports that Couchbase Server uses.
Try reloading the web page.
Check firewall settings (if any) on the node. Make sure there isn’t a firewall between you and the node. On a Windows system, for example, the Windows firewall might be blocking the ports (Control Panel > Windows Firewall).
Make sure that the documented ports are open between nodes and make sure the data operation ports are available to clients.
Check your browser’s security settings.
Check any other security software installed on your system, such as antivirus programs.
Click Generate Diagnostic Report on the Log page to obtain a snapshot of your system’s configuration and log information for deeper analysis. This information can be sent to Couchbase Technical Support to diagnose issues.
Responding to Specific Errors
The following table outlines some specific areas to check when experiencing different problems:
| Severity | Issue | Suggested Action(s) |
|---|---|---|
| Critical | Couchbase Server does not start up. | Check that the service is running. |
| Check error logs. | ||
| Try restarting the service. | ||
| Critical | A server is not responding. | Check that the service is running. |
| Check error logs. | ||
| Try restarting the service. | ||
| Critical | A server is down. | Try restarting the server. |
| Use the command-line interface to check connectivity. | ||
| Informational | Bucket authentication failure. | Check the properties of the bucket that you are attempting to connect to. |
The primary source for run-time logging information is the Couchbase Server Web
Console. Run-time logs are automatically set up and started during the
installation process. However, the Couchbase Server gives you access to
lower-level logging details if needed for diagnostic and troubleshooting
purposes. Log files are stored in a binary format in the logs directory under
the Couchbase installation directory. You must use browse_logs to extract the
log contents from the binary format to a text file.
Log File Entries
The log file contains entries for various events, such as progress, information, error, and crash. Note that something flagged as error or crash does not necessarily mean that there is anything wrong. Below is an example of the output:
=PROGRESS REPORT==== 4-Mar-2010::11:54:23 ===
supervisor: {local,sasl_safe_sup}
started: [{pid,<0.32.0>},
{name,alarm_handler},
{mfa,{alarm_handler,start_link,[]}},
{restart_type,permanent},
{shutdown,2000},
{child_type,worker}]
=PROGRESS REPORT==== 4-Mar-2010::11:54:23 ===
supervisor: {local,sasl_safe_sup}
started: [{pid,<0.33.0>},
{name,overload},
{mfa,{overload,start_link,[]}},
{restart_type,permanent},
{shutdown,2000},
{child_type,worker}]
Look for ns_log in the output to see anything that would have been shown via
the Couchbase Server Web Console.
Linux Logs
Couchbase Server stores its logs different places, depending on the component
reporting the error. The core memory and replication logs are stored in an
efficient, space-limited binary format under
/opt/couchbase/var/lig/couchbase/logs. A Couchbase shell script (
cbbrowse_logs ) will output these logs in a human-readable text format.
To dump the most recent 100MB of logs as text, run the following command:
shell> cbbrowse_logs
You can redirect the output of this batch file to a text file that you can save
for later viewing or email to Couchbase Technical
Support. The
following example redirects output to a text file named nslogs.txt.
shell> cbbrowse_logs > /tmp/nslogs.txt
Windows Logs
Couchbase Server stores its logs in an efficient, space-limited binary format.
The binary run-time log files reside in the following path <install_path>\log
(where < install_path> is where you installed the Couchbase software).
You cannot open these binary files directly. To dump the run-time logs into a
text file, run the browse_logs.bat file, located
<install_path>\bin\browse_logs.bat. This command dumps the logs to standard
output in a human-readable text format. You can redirect the output of this
batch file to a text file that you can save for later viewing or email to
Couchbase Technical Support. The following
example redirects output to a text file named nslogs.txt.
shell> "C:\Program Files\Couchbase\Memcached Server\bin\browse_logs.bat" > C:\nslogs.txt
Mac OS X Logs
Couchbase Server stores it’s logs within the user-specific ~/Library/Logs
directory. The current log file is stored in Couchbase.log. If you stop and
restart the server, the current log will be renamed to Couchbase.log.old and a
new Couchbase.log will be created.
These files are stored in text format and are accessible within the Console
application.
Common Errors
This page will attempt to describe and resolve some common errors that are encountered when using Couchbase. It will be a living document as new problems and/or resolutions are discovered.
-
Problems Starting Couchbase Server for the first time
If you are having problems starting Couchbase Server on Linux for the first time, there are two very common causes of this that are actually quite related. When the
/etc/init.d/couchbase-serverscript runs, it tries to set the file descriptor limit and core file size limit:shell> ulimit -n 10240 ulimit -c unlimitedDepending on the defaults of your system, this may or may not be allowed. If Couchbase Server is failing to start, you can look through the logs (see Log File Entries ) and pick out one or both of these messages:
ns_log: logging ns_port_server:0:Port server memcached on node ‘ns_1@127.0.0.1’ exited with status 71. »
  Restarting. Messages: failed to set rlimit for open files. »
  Try running as root or requesting smaller maxconns value.
Alternatively you may additional see or optionally see:
ns_port_server:0:info:message - Port server memcached on node ‘ns_1@127.0.0.1’ exited with status 71. »
  Restarting. Messages: failed to ensure corefile creation
The resolution to these is to edit the /etc/security/limits.conf file and add these entries:
couchbase hard nofile 10240
  couchbase hard core unlimited
Appendix: FAQs
-
What kind of client do I use with
couchbase?couchbaseis compatible with existing memcached clients. If you have a memcached client already, you can just point it atcouchbase. Regular testing is done withspymemcached(the Java client),libmemcachedand fauna (Ruby client). See the Client Libraries page -
What is a “vbucket”?
An overview from Dustin Sallings is presented here: memcached vBuckets
-
What is a TAP stream?
A TAP stream is a when a client requests a stream of item updates from the server. That is, as other clients are requesting item mutations (for example, SET’s and DELETE’s), a TAP stream client can “wire-tap” the server to receive a stream of item change notifications.
When a TAP stream client starts its connection, it may also optionally request a stream of all items stored in the server, even if no other clients are making any item changes. On the TAP stream connection setup options, a TAP stream client may request to receive just current items stored in the server (all items until “now”), or all item changes from now onwards into in the future, or both.
Trond Norbye’s written a blog post about the TAP interface. See Blog Entry.
-
What ports does
couchbaseServer need to run on?The following TCP ports should be available:
8091 — GUI and REST interface
11211 — Server-side Moxi port for standard memcached client access
11210 — native
couchbasedata port21100 to 21199 — inclusive for dynamic cluster communication
-
What hardware and platforms does
couchbaseServer support?Couchbase Server supports Red Hat (and CentOS) versions 5 starting with update 2, Ubuntu 9 and Windows Server 2008 (other versions have been shown to work but are not being specifically tested). There are both 32-bit and 64-bit versions available. Community support for Mac OS X is available. Future releases will provide support for additional platforms.
-
How can I get
couchbaseon (this other OS)?The
couchbasesource code is quite portable and is known to have been built on several other UNIX and Linux based OSs. See Consolidated sources. -
Can I query
couchbaseby something other than the key name?Not directly. It’s possible to build these kinds of solutions atop TAP. For instance, via Cascading it is possible to stream out the data, process it with Cascading, then create indexes in Elastic Search.
-
What is the maximum item size in
couchbase?The default item size for
couchbasebuckets is 20 MBytes. The default item size for memcached buckets is 1 MByte. -
How do I the change password?
shell> couchbase cluster-init -c cluster_IP:8091 -u current_username-p current password –cluster-init-username=new_username –cluster-init-password=new_password -
How do I change the per-node RAM quota?
shell> couchbase cluster-init -c \ cluster_IP:8091 -u username-p password –cluster-init-ramsize=RAM_in_MB -
How do I change the disk path?
Use the
couchbasecommand-line tool:shell> couchbase node-init -c cluster_IP:8091 -u \ username-p password–node-init-data-path=/tmp -
Why are some clients getting different results than others for the same requests?
This should never happen in a correctly-configured
couchbasecluster, sincecouchbaseensures a consistent view of all data in a cluster. However, if some clients can’t reach all the nodes in a cluster (due to firewall or routing rules, for example), it is possible for the same key to end up on more than one cluster node, resulting in inconsistent duplication. Always ensure that all cluster nodes are reachable from every smart client or client-side moxi host.
Appendix: Uninstalling Couchbase Server
If you want to uninstall Couchbase Server from your system you must choose the method appropriate for your operating system.
Before removing Couchbase Server from your system, you should do the following:
Shutdown your Couchbase Server. For more information on the methods of shutting down your server for your platform, see Startup and Shutdown of Couchbase Server.
If your machine is part of an active cluster, you should rebalance your cluster to take the node out of your configuration. See Starting a Rebalance.
Update your clients to point to an available node within your Couchbase Server cluster.
Uninstalling on a RedHat Linux System
To uninstall the software on a RedHat Linux system, run the following command:
shell> sudo rpm -e couchbase-server
Refer to the RedHat RPM documentation for more information about uninstalling packages using RPM.
You may need to delete the data files associated with your installation. The
default installation location is /opt. If you selected an alternative location
for your data files, you will need to separately delete each data directory from
your system.
Uninstalling on an Debian/Ubuntu Linux System
To uninstall the software on a Ubuntu Linux system, run the following command:
shell> sudo dpkg -r couchbase-server
Refer to the Ubuntu documentation for more information about uninstalling
packages using dpkg.
You may need to delete the data files associated with your installation. The
default installation location is /opt. If you selected an alternative location
for your data files, you will need to separately delete each data directory from
your system.
Uninstalling on a Windows System
To uninstall the software on a Windows system you must have Administrator or Power User privileges to uninstall Couchbase.
To remove, choose Start > Settings > Control Panel, choose Add or Remove
Programs, and remove the Couchbase Server software.
Uninstalling on a Mac OS X System
To uninstall on Mac OS X, open the Applications folder, and then drag the
Couchbase Server application to the trash. You may be asked to provide
administrator credentials to complete the deletion.
To remove the application data, you will need to delete the CouchbaseServer
folder from the ~/Library/Application Support folder for the user that ran
Couchbase Server.
Appendix: Release Notes
The following sections provide release notes for individual release versions of Couchbase Server. To browse or submit new issues, see Couchbase Server Issues Tracker.
Release Notes for Couchbase Server 1.8.1 GA (03 July 2012)
Couchbase Server 1.8.1 contains a number of stability, memory reporting, and rebalancing fixes and improvements, including:
-
Rebalancing has been updated to support an optimized rebalancing operation when swapping in and out the same number of nodes. This significantly improves the rebalance operation allowing you to swap nodes in and out for maintenance (memory fragmentation, disk fragmentation), upgrades and other operations. Therefore reducing the impact on the entire cluster performance during the rebalance operation.
For more information, see Swap Rebalance.
Rebalancing stability has been improved, particularly in the event of an error or a problem during the rebalance operation. Specific improvements target large clusters.
Management of the memory allocated and used by different components within the system has been improved. This increases stability of the system as a whole and ensures that the memory information reported within the statistics is more accurate, allowing you to make better decisions.
Improved statistic information, including memory and disk fragmentation and memory usage.
Improved logging provides more information about what operations are taking place, and what errors and problems are being reported by the system.
New Features and Behavior Changes in 1.8.1
-
A new port (11209) has been enabled for communication between cluster nodes. You must ensure that this port has been opened through firewall and network configuration to ensure that cluster operation can take place.
Couchbase Server uses a new port for communication between cluster nodes. Port 11209 is used by the
ns_servercomponent for internode communication.Issues : MB-5651
Histogram timings are now provided for
get_statsrequests.-
When a node leaves a cluster (due to failover or removal), the database files would automatically be deleted. This behavior has now been changed so that the database files are not deleted when the node leaves the cluster.
Files are deleted when the node is added back to the cluster a rebalance operation is performed.
Issues : MB-4564
-
If the underlying database layer reported an error, the database would not be reopened. Database errors are now identified and re-opened on failure.
Issues : MB-5401
-
The
mem_user,high_watermarkandlow_watermarkhave been added to the Couchbase Server Administration Web Console.For more information, see Bucket Monitoring — Summary Statistics.
Issues : MB-4960
-
The
flush_alloperation has been disabled by default to prevent accidental flush operations affecting the data stored in a bucket. You can enableflush_allby setting the parameter using thecbflushctlcommand:shell> /opt/couchbase/bin/cbflushctl localhost:11210 set flushall_enabled true setting flush param: flushall_enabled trueBehavior Change: The
flush_alloperation is no longer supported by default.Issues : MB-5025
-
The
cbbackuputility will now execute an integrity check after the backup has been completed to check the integrity of the data files created during the backup process. This will report any problems in the generated backup files.Issues : MB-4884
-
When a node has been rebalanced out of the cluster, the configured location for the data files is reset. If you want to store the data files for a node in a different location than the default, you must re-iniitialize the configuration to set the correct location before the node is rebalanced back into the cluster.
Issues : MB-5499
-
When creating output file for
collect_info, the command now creates a directory first and then zips the data.Issues : MB-3351
-
The disk fragmentation statistics for the on-disk data files are now exposed through the statistics interface.
To get the fragmentation statistics, you can use the
kvtimingssubkey to the statistics. This outputs a variety of statistincs, including the newreadSeekandwriteSeekvalues. For example:shell> cbstats localhost:11210 kvtimings … readSeek (23537 total) 64 - 128 : ( 0.04%) 10 256 - 512 : ( 0.06%) 5 512 - 1KB : ( 0.11%) 10 1KB - 2KB : ( 55.14%) 12953 ####################################################### 2KB - 4KB : ( 56.52%) 325 # 4KB - 8KB : ( 57.24%) 169 8KB - 16KB : ( 57.28%) 10 16KB - 32KB : ( 57.33%) 12 32KB - 64KB : ( 57.66%) 78 64KB - 128KB : ( 59.84%) 512 ## 128KB - 256KB : ( 63.03%) 751 ### 256KB - 512KB : ( 88.75%) 6054 ######################### 512KB - 1MB : (100.00%) 2648 ########### … writeSeek (111824 total) 0 - 2 : ( 0.00%) 5 4 - 8 : ( 0.02%) 15 8 - 16 : ( 0.02%) 5 16 - 32 : ( 39.60%) 44254 ####################################### 32 - 64 : ( 39.60%) 5 64 - 128 : ( 40.43%) 925 512 - 1KB : ( 40.44%) 15 1KB - 2KB : ( 95.73%) 61826 ####################################################### 2KB - 4KB : ( 99.49%) 4203 ### 4KB - 8KB : ( 99.85%) 407 8KB - 16KB : ( 99.88%) 34 16KB - 32KB : ( 99.89%) 12 32KB - 64KB : ( 99.90%) 11 64KB - 128KB : ( 99.91%) 2 128KB - 256KB : ( 99.91%) 2 256KB - 512KB : ( 99.92%) 18 512KB - 1MB : ( 99.94%) 22 1MB - 2MB : (100.00%) 63 …These statistics show the distribtion of head seek distance that has had to be performed on every read/write operation within the SQLite data files. In a file with increasing fragmentation, these figures should increase.
The disk update time is also exposed as a graph through the Administration Web Console.
For more information, see Bucket Monitoring — Summary Statistics.
Issues : MB-4937
-
The UI will no longer report a rebalance as having failed through the Administration Web Console if the operation was stopped through the use of a REST API call or command line request.
Issues : MB-4963
Fixes in 1.8.1
-
Installation and Upgrade
-
Compiling Couchbase Server on Windows using
tcmallocleads to inconsitent memory accounting and reporting, which can lead to problems with the ejection of items.Issues : MB-4738
-
The shutdown of Couchbase Server may not have completed successfully leaving an instance of Erlang and
ns_serverrunning, which could prevent Couchbase Server from restarting successfully. The init scripts for shutting down Couchbase Server now terminate and wait for the processes to successfully stop before reporting that Couchbase Server has shut down.Issues : MB-4765
-
-
Cluster Operations
-
TAP stats sometimes show up as negative.
Issues : MB-3901
-
Moxi would trigger an assert when obtaining multiple keys during a rebalance operation.
Issues : MB-4334
-
Getting of memcached statistics is much faster.
Issues : MB-5307
-
Rebalancing in a new Couchbase Server 1.8 node if there are less than 500,000 items results in an imbalanced cluster.
Issues : MB-4595
-
Increasing the default timeouts on
ns_serverto avoid rebalance failures due toep-enginestats timeout issues in large cluster or clusters where some nodes are actively using swap.Issues : MB-5546
-
When upgrading from Couchbase Server 1.8.0 to 1.8.1 or Couchbase Server 1.8.0 to 2.0, an offline upgrade may fail with a rebalance failure reporting the error
{wait_for_memcached_failed,"bucket-1"}.Issues : MB-5532
-
The checkpoint implementation used to monitor items and mutations has been updated to record only the list of changed items. This requires less memory and reduces the overall memory footprint.
Issues : MB-4814
-
memcached crashes during rebalancing operation with “bucket_engine.c:1876: bucket_engine_release_cookie: Assertion `peh' failed” error.
-
User is unable to add the node back to the cluster because the failed over node is stuck in warmup phase.
Issues : MB-5279
-
Takeover TAP streams do not shut down gracefully in case of rebalance failure or rebalance being stopped by the user.
Issues : MB-4366
-
Auto-failover may failover two nodes instead of one if two failurs occur within less than one minute.
Issues : MB-4906
-
Rebalancing with multiple node changes when a bucket has less than 100k items could cause rebalance to hang and fail to complete successfully.
Issues : MB-4828
-
Logging mechanism has been modified to output into a text format. Previously we had logged information in binary format. New log files located at /var/lib/couchbase/logs. Log files can be up to 600MB in size. The three log files are log.*, error.* and info.*
Issues : MB-6607
-
The rebalance operation could fail to complete successfully if the node that failed during the rebalance operation was a master node. This could be triggered either by a manual or automatic failover.
This would lead to the cluster being marked in the rebalance running state, with no way to complete or stop the rebalance operation, or add or remove nodes and initiate a new rebalance.
-
Auto-failover fails over a node if some of the buckets are already rebalanced out but rebalance has been stopped or interrupted.
Issues : MB-5602
-
A rebalance issue may occur when removing a node and adding a replacement node. The backfill statistics for the rebalance may show that there are no further items to be transferred, but the rebalance process hangs.
Issues : MB-4864
-
Couchbase Server could mistakenly report that the cluster is in
rebalance_stateeven though the rebalance operation is not running.Issues : MB-4962
-
A rebalance operation could exit with
{mover_crashed, noproc}if the vBucket move operation completed very quickly.Issues : MB-4964
-
TAP doesn’t handle “garbage” data/messages over a dump connection.
Issues : MB-3669
-
Mixed clusters with Couchbase Server 1.8.1 and 1.7.1.1 or earlier are not supported.
Issues : MB-5194
-
-
Web Console
-
UI shows “\[16:14:07\] - IP address seems to have changed. Unable to listen on ‘ns_1@169.254.15.168’.” message every second after installing 1.8.1 on a Windows 7 virtual machine.
Issues : MB-5535
-
Phone home is unable to post data when json object is too large. The
Update
Notification
tab shows “Warning - There was a problem with retreiving the update information. ”.Issues : MB-5579
-
Removing a configured bucket through the UI could still indicate a
Cluster
Memory Fully Allocated
warning message, even though the bucket removal will have freed the memory allocation.Issues : MB-5019
-
Some of the alerts such as moxi crashing were not being displayed in the web console.
Issues : MB-5275
-
The Administration Web Console will now report a warning if there was a failure to persist data due to the underlying persistence layer (SQLite).
Issues : MB-5256
-
-
Command-line Tools
-
collect_infoshould include “diag” information.Issues : MB-5203
-
collect_infonow collects TAP and checkpoint stats from each node.Issues : MB-4482
-
ebucketmigratornow supports SASL authentication.Issues : MB-5385
-
cbbrowse_logscommand does not work on Mac OS X.Issues : MB-4703
-
The
cbworkloadgenanddocloadertools will now work with both Python 2.4 and Python 2.6.Issues : MB-4965
-
-
Cloud Support
-
Duplicating a virtual machine with Couchbase Server already installed could lead to problems because the same otpCookie value has been configured on each duplicated machine.
Issues : MB-4476
-
When using Couchbase Server within a VM, a pause could cause Couchbase Server to retain the original time, not the updated time when the VM was re-enabled.
Issues : MB-4189
-
Known Issues in 1.8.1
-
Installation and Upgrade
-
Performing a rolling upgrade from Membase Server 1.7.1 to Couchbase Server 1.8.1 fails during a rebalance with
{type,exit}, {what,{noproc,{gen_fsm,sync_send_event,}}}.Workaround : Start the rebalance operation from the Couchbase Server 1.8.1 node.
Issues : MB-5108
-
Running Couchbase as the
rootmay cause problems, but may not produce suitable warnings. Do not run as therootuser. Note that this is not the same as installing, which needs to be done byroot.Issues : MB-1475
-
Known issues when Couchbase runs out of disk space.
Workaround : Monitor your system resources closely and ensure that the Couchbase nodes don’t run out of disk space.
Issues : MB-3158
-
Large changes in wall-clock time negatively affect disk persistence ability and GUI display.
Workaround : Use NTP to keep systems synchronized and start Couchbase service after such synchronization has taken place.
-
Memcached process is not shutdown quickly with a high disk write queue.
Workaround : Make sure your disk write queue is as low as possible (or 0) before shutting down the service.
Issues : MB-3628
-
Performing a rolling upgrade from Membase Server 1.7.2 to Couchbase Server 1.8.1 fails with the message:
Unknown macro: {type,exit}
 , {what,{noproc,
 Unknown macro: {gen_fsm,sync_send_event,}
 }}
Workaround : You should retry the rebalance operation by initiating the rebalance on the 1.8.1 node.
Issues : MB-5108
-
The Linux installer tries to start
couchbase-serverand fails. This warning can safely be ignored.Issues : MB-3797
-
-
-
Cluster Operations
-
Connections to memcached buckets may be dropped during a rebalance due to a
replicator_died: exited (ns_single_vbucket_mover).Issues : MB-5343
-
Rebalance fails with
wait_for_memcachedif user stops rebalancing after one bucket was already rebalanced out because ns-server looks for “rebalanced out” buckets in the next rebalance attempt.Issues : MB-5434
-
Rebalance may fail with
gen_fsm, sync_send_eventerror during an online upgrade from Membase Server 1.7.2 to Couchbase Server 1.8.1 on Windows.Workaround : Wait 30 seconds between adding adding the node and starting the rebalance operation.
Issues : MB-5293
-
Rebelance may fail with
change_filter_failedif the password on an individual bucket is modified before the rebalance process completes.Issues : MB-5625
-
Some known issues when rebalancing with a very high ratio of data on disk versus data in RAM.
Workaround : Use more nodes than less to better distribute the on-disk data.
-
Rebalance may fail with
{case_clause,{{ok,replica},{ok_replica}}when rebalancing out a node which had been failed over due to network connectivity issues, but appears back during rebalance.Issues : MB-5298
-
Rebalance failure due to replicator_died with “memcached_error,auth_error,<<"Auth failure”>>“ because node was marked as ready before
isasl.pwwas read.Issues : MB-5513
-
When using Moxi in a cluster using
haproxy, it’s possible for a memory leak to cause a problem in Moxi when the topology appears to change. The problem is due tohaproxydisabling open connections, particularly those used for management, that Moxi may have open, but not using. Thehaproxycloses these open connections, whichmoxiidentifies as topology changes. The problem is particularly prevalent when using thebalance roundrobinload balancing type.Workaround : There are two possible workarounds to prevent the memory leak in
moxi:Use
balance sourceload balancing mode withinhaproxy. This reduces the effect ofhaproxyclosing the open network ports.-
Increase the network timeouts in
haproxy. You can do this by editing thehaproxyconfiguration file and adding the following two lines:timeout client 300000 timeout server 300000The above sets a 5 minute timeout. You can increase this to a larger number.
Issues : MB-4896
-
-
Command-line Tools
-
When running
cbbackupon Windows a temporary file will be created on the startup drive that contains a copy of the database data, even when the backup is being created on another volume.Issues : MB-5040
-
The
cbrestorecommand sometimes shows a Python interrupt error. This should only happen at the very end of the restore and does not affect the data being inserted.Issues : MB-3804
-
The backup operation may fail when the write-ahead logging (WAL) is large. An error,
Database disk image is malformedmay be returned by the backup process.Issues : MB-5095
-
The backup commands
cbbackup(formerlymbbackupmay fail to work correctly unless run ascouchbaseormembaseuser.Workaround : Run as
couchbaseormembaseuser.Issues : MB-4614
-
Release Notes for Couchbase Server 1.8.0 GA (23 January 2012)
Couchbase Server 1.8 is the updated and rebranded release of Membase Server.
To browse or submit new issues, see Couchbase Server Issues Tracker.
In line with the rebranding and name changes, there are some significant changes to the following areas of this release:
-
Directory Changes
Couchbase Server is now installed into a
couchbasedirectory, for example on Linux the default installation directory is/opt/couchbaseinstead of/opt/membase.During an upgrade, the location of your data files will not be modified.
-
Command Changes
The name of many of the core commands provided with Couchbase Server have been renamed, with the existing scripts deprecated. For example, the backup command
mbbackupin Membase Server is now calledcbbackup. See the full release note entry below for more detailed information.
New Features and Behavior Changes in 1.8.0
-
Ubuntu 9.x is no longer a supported platform and support will be removed in a future release.
Issues : MB-2506 ; Tags : deprecated
-
The
SYNCprotocol command has been deprecated. Applications and solutions should no longer use theSYNCcommand. The command will be removed entirely in a future version.Tags : deprecation
-
Ubuntu 8.x is no longer a supported platform.
Issues : MB-2506 ; Tags : removal
-
Internet Explorer 7 as a supported browser for the Couchbase Web Admin Console is now deprecated, and support will be removed entirely in a future release.
Tags : deprecation
-
Allow disk write queue upper limit to be modified at runtime.
Issues : MB-4418
-
Red Hat/CentOS 5.4 is no longer a supported platform and will be removed entirely in a future release.
Issues : MB-2506 ; Tags : deprecated
-
The following command-line tools have been deprecated and replaced with the corresponding tool as noted in the table below.
Deprecated Tool Replacement Tool membasecouchbase-climbadm-online-restorecbadm-online-restorembadm-online-updatecbadm-online-updatembadm-tap-registrationcbadm-tap-registrationmbbackup-incrementalcbbackup-incrementalmbbackup-merge-incrementalcbbackup-merge-incrementalmbbackupcbbackupmbbrowse_logscbbrowse_logsmbcollect_infocbcollect_infombdbconvertcbdbconvertmbdbmaintcbdbmaintmbdbupgradecbdbupgradembdumpconfig.escriptcbdumpconfig.escriptmbenable_core_dumps.shcbenable_core_dumps.shmbflushctlcbflushctlmbrestorecbrestorembstatscbstatsmbupgradecbupgradembvbucketctlcbvbucketctlUsing a deprecated tool will result in a warning message that the tool is deprecated and will no longer be supported.
For more information, see Command-line Interface for Administration.
Tags : deprecation
-
The
membasebucket type has been deprecated. Thecouchbasebucket type should be used instead to select the balanced, persistent and replicated buckets supported by a Couchbase cluster.For more information, see Buckets.
Tags : deprecation
Fixes in 1.8.0
-
Cluster Operations
-
Unclassified
-
Installer dependencies on RHEL 5.4 have been updated.
Issues : MB-4561
-
Installation of Membase on Amazon Linux would fail.
Issues : MB-3419
-
Rebalancing process might hang when adding or removing nodes in a large cluster where client load is running.
-
Unable to create a default bucket using
membase-cli.Issues : MB-4453
-
The
ep_num_not_my_vbucketsstat doesn’t reset.Issues : MB-3852
-
Decreased memory usage by coalesce checkpoints in the replica side if item persistence is slower. Server will maintain only two replica checkpoints for each
vbucket.Issues : MB-4578
-
Fixed a case where there are two replicas where replication cursor would get stuck and slave node didn’t replicate the data into the other node in the replication chain.
Issues : MB-4461
-
Selecting the master node during rolling upgrade where there are different membase/couchbase servers in the cluster.
Issues : MB-4592
-
Known Issues in 1.8.0
-
Installation and Upgrade
-
Running Couchbase as the
rootmay cause problems, but may not produce suitable warnings. Do not run as therootuser. Note that this is not the same as installing, which needs to be done byroot.Issues : MB-1475
-
Known issues when Couchbase runs out of disk space.
Workaround : Monitor your system resources closely and ensure that the Couchbase nodes don’t run out of disk space.
Issues : MB-3158
-
Large changes in wall-clock time negatively affect disk persistence ability and GUI display.
Workaround : Use NTP to keep systems synchronized and start Couchbase service after such synchronization has taken place.
-
Memcached process is not shutdown quickly with a high disk write queue.
Workaround : Make sure your disk write queue is as low as possible (or 0) before shutting down the service.
Issues : MB-3628
-
The Linux installer tries to start
couchbase-serverand fails. This warning can safely be ignored.Issues : MB-3797
-
-
Cluster Operations
-
Some known issues when rebalancing with a very high ratio of data on disk versus data in RAM.
Workaround : Use more nodes than less to better distribute the on-disk data.
-
When using Moxi in a cluster using
haproxy, it’s possible for a memory leak to cause a problem in Moxi when the topology appears to change. The problem is due tohaproxydisabling open connections, particularly those used for management, that Moxi may have open, but not using. Thehaproxycloses these open connections, whichmoxiidentifies as topology changes. The problem is particularly prevalent when using thebalance roundrobinload balancing type.Workaround : There are two possible workarounds to prevent the memory leak in
moxi:Use
balance sourceload balancing mode withinhaproxy. This reduces the effect ofhaproxyclosing the open network ports.-
Increase the network timeouts in
haproxy. You can do this by editing thehaproxyconfiguration file and adding the following two lines:timeout client 300000 timeout server 300000The above sets a 5 minute timeout. You can increase this to a larger number.
Issues : MB-4896
-
-
Command-line Tools
-
The
cbrestorecommand sometimes shows a Python interrupt error. This should only happen at the very end of the restore and does not affect the data being inserted.Issues : MB-3804
-
The backup commands
cbbackup(formerlymbbackupmay fail to work correctly unless run ascouchbaseormembaseuser.Workaround : Run as
couchbaseormembaseuser.Issues : MB-4614
-
-
Unclassified
-
An imbalanced cluster situation can occur during a rebalance if the cluster has been up for a short period of time (because of start or restart of the cluster), when there is a low number of stored items (less than 500k).
Issues : MB-4595 ; Tags : rebalance
-
Scripts and tools supplied with Couchbase Server require Python 2.6. You may need to upgrade your Python installation.
Issues : MB-4667
-
The
ejectNodeoperation is possibly dangerous to active servers.Workaround : Only use
ejectNodeon nodes not currently responsible for any vbuckets.Issues : MB-3423
UDP access blocked by malformed request
-
Performing a rolling upgrade from version 1.7.1, might cause rebalance to stick and fail to complete successfully.
Workaround : You can perform a in-place upgrade (shutdown the entire cluster, upgrade, and restart) to get round this issue.
Issues : MB-4615 ; Tags : incompatibility, rebalance, upgrade
-
A rebalance issue may occur when removing a node and adding a replacement node. The backfill statistics for the rebalance may show that there are no further items to be transferred, but the rebalance process hangs.
Issues : MB-4864
-
Appendix: Limits
Couchbase Server has a number of limits and limitations that may affect your use of Couchbase Server.
| Limit | Value |
|---|---|
| Max key length | 250 bytes |
| Max value size | 20 Mbytes |
| Max data size | none |
| Max metadata | Approximately 150 bytes per document |
| Max Recommended Buckets | 10 |
Known Limitations
The following list provides a summary of the known limitations within Couchbase Server 1.8.
-
Amazon “micro” and “small” instances are not supported.
Workaround : It is a best practice to use at least “large” instances to provide enough RAM for Couchbase to run.
Issues : MB-3911
-
Couchbase Server fails to run on Windows system with PGP (http://www.pgp.com) installed.
Workaround : Uninstall PGP on any systems running Couchbase.
Issues : MB-3688
-
Network Filesystems (CIFS/NFS) are not supported for data file storage. Block-based storage (iSCSI, EBS, etc) work correctly.
Issues : MB-3333
-
Unsynchronized clocks can lead to UI not displaying graphs.
Workaround : Make sure all the clocks (and their timezones) are synchronized in a Couchbase cluster. Use NTP or some other synchronization technology.
Issues : MB-2833
-
Rebooting a node that re-enables the firewall service on that node will mark all the vBuckets on the node as dead and unavailable.
Issues : MB-5282