Couchbase Plug-in for Elasticsearch 1.3
A newer version of this software is available
You are viewing the documentation for an older version of this software. To find the documentation for the current version, visit the Couchbase documentation home page.
The Couchbase Plug-in for Elasticsearch enables you to provide full-text search in your application using the open source search engine, Elasticsearch. This means that your users can retrieve application documents from Couchbase Server based on text in your documents. For instance if you provide a product catalog, users can find items based on text descriptions of the products.
You use Couchbase Server with Elasticsearch to provide quality, rapid full-text search results. The data model for Elasticsearch is already very compatible with the schema-free, document-oriented model used by Couchbase Server. Since search is often a more CPU-intensive process, you can scale your Elasticsearch cluster separately from your Couchbase cluster to best meet the demands of your users. In doing so, search functions will not slow the performance of Couchbase Server reads or writes.
This guide is not meant to be an exhaustive manual on Elasticsearch or Couchbase Server topics, however you may find the following related sources useful if you want to know more about these two solutions:
Couchbase Server Manual : covers installation, operations, monitoring, views, xdcr, tools, and trouble-shooting for the server.
Elasticsearch : the definitive site for downloads, documentation, blogs and tutorials on Elasticsearch.
Couchbase SDKs : describes installation and use of Couchbase SDKs from your web application.
How the Plug-In Works
The Couchbase Plug-in for Elasticsearch continuously streams data between Couchbase Server and Elasticsearch. Any document changes made in Couchbase Server will be sent to Elasticsearch via the plugin which insures your search index contains the most current items in your system. The plug-in enables the following:
Provides Real-Time Replication. The plug-in continuously transfers data to the search cluster after Couchbase Server writes the data to disk; it will help keep your search index on Elasticsearch current with the information in Couchbase Server.
Topology Aware. Using the plug-in, the system can handle node failures within a Couchbase cluster or Elasticsearch cluster and adapt accordingly. Replication from a Couchbase cluster will continue from functioning nodes and the items will be sent to available servers in the Elasticsearch cluster.
Recovery from Network Failure. The plug-in is aware of what data has already been replicated from Couchbase what data still needs to be replicated. If a network failure interrupts data transfer from a Couchbase cluster, once the network issue has been resolved, replication can resume for remaining data.
If you are already building applications with Couchbase Server, you are probably aware of using views to index and query data from the server. You use this functionality to find, retrieve, and sort data based on document metadata and specified document attributes. For instance you could use views to retrieve all beer documents where the alcohol percentage is greater than 8%. Or you could use views to calculate the average alcohol percentage of all beers in an application. Providing full-text search for Couchbase documents with Elasticsearch complements this functionality by enabling you to provide text-based search results. The following shows the different elements in a system using Couchbase Server and Elasticsearch:
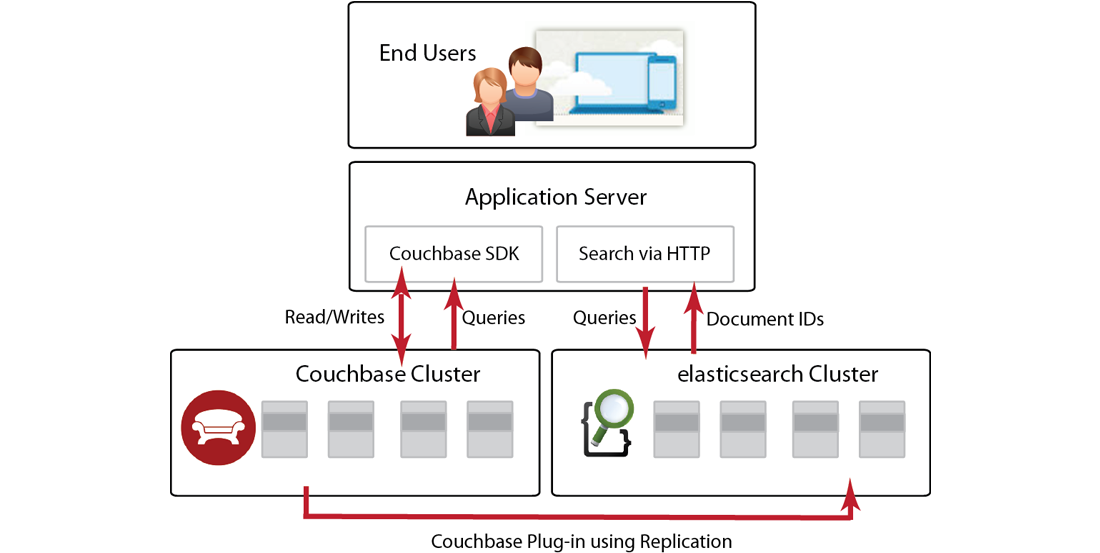
Your website or web application interacts with Couchbase Server via a Couchbase SDK. These SDKs are provided in a variety of popular web programming languages and are responsible for establishing a connection with the server and for communicating reads/writes and other functions with the server. As mentioned earlier you can also index and query data from Couchbase Server using views and your Couchbase SDK.
To provide full-text search with Couchbase Server you need to have a cluster of Elasticsearch engines, the Couchbase Plug-in for Elasticsearch, and a running Couchbase cluster. After an application writes or updates data in Couchbase Server, the server replicates a copy of that data to the Elasticsearch cluster for indexing. The Elasticsearch cluster will perform indexing based on text content in your data; then via an Elasticsearch client, you send a search query to Elasticsearch via HTTP. Elasticsearch does not keep an entire copy of each item replicated from Couchbase cluster. After Elasticsearch indexes an item it keeps the ID for the item and other metadata, but discards the content to remain efficient. After your application queries Elasticsearch for an item via HTTP, it will send back document IDs which you can use to retrieve the entire document from Couchbase Server.
How Querying Works
Using Couchbase Server with Elasticsearch, users can actually perform searches based on rich text content within a document, such as information in text descriptions. Imagine a user wants to find a beer that has a nice fruity flavor reminiscent of blueberries. Your application can take in a query string as a web form parameter and send the query to Elasticsearch as JSON containing the term ‘blueberry’. Your application would send a query via HTTP to Elasticsearch as follows:
GET http://127.0.0.1:9200/beer-sample/_search?q=blueberry
Elasticsearch responds by sending the document ID for this beer document in a JSON array. The array will contain elements with document IDs for those documents which match the query parameter:
....
"hits" : [{
    ....
    "_source": {
        "meta" : {
            "id": "110ac410b16h"
            .....
        }
    }
}....
For purposes of brevity we omit other details from the JSON response. The “id” field in the response is the ID you use to retrieve a document from Couchbase Server. With this ID, we can retrieve a document from Couchbase for the beer document with a blueberry aroma in the text description:
{
    "name" : "Wild Blueberry Lager",
    "abv" : 8,
    "brewery_id" : "110f01",
    "description" : "....blueberry aroma....",
    "style" : "Belgian Fruity Lambic"
    ....
}
With Elasticsearch you can use text search queries, you can also provide logic and regular expressions to describe search criterion. The rest of this guide will show you how you can implement full text search using Couchbase Server, the Couchbase Plug-in and Elasticsearch.
Installation and Configuration
Before you can work with Couchbase and Elasticsearch, you need to set up Couchbase Plug-in for Elasticsearch, a Couchbase 2.0 or later cluster, and an Elasticsearch cluster. After you install the clusters, start them. The Couchbase cluster stores any items from your application and sends replicas of these items to the Elasticsearch cluster for indexing. Your Couchbase cluster can contain one or more instances of Couchbase server, and your Elasticsearch cluster can contain one or more instances of the search engine. For more information about setting up and using these components, see the following links:
Couchbase Plug-in for Elasticsearch. Be aware that the Couchbase plug-in v1.3.0 is compatible only with Elasticsearch 1.0.1.
Couchbase Server requirements. This topic describes supported platforms, hardware requirements, software requirements, and network settings.
Couchbase Server installation. Couchbase Server comes with an easy-to-use installer, however you may want further information about platform-specific installation steps.
Elasticsearch installation. installation instructions and system prerequisites for Elasticsearch. Be aware that the Couchbase Plug-in 1.3.0 for Elasticsearch is only compatibility with Elasticsearch 1.0.1. See the release notes for Couchbase plug-ins that are compatible with earlier versions of Elasticsearch.
For now you probably need only one instance of Couchbase Server running in a cluster and one instance of the Elasticsearch engine. Later as you test your integration under load and deploy your implementation, you will need to add more servers to handle the workload. At this phase, the most important point about the Couchbase Server installation is to make sure that you include the beer-sample data, which is available as an installation option. The examples in this guide build on data contained in the sample database. For more information about using sample buckets, see Couchbase Web Console, Installing Sample Buckets.
Installing the Plug-ins
To enable full-text search of data in Couchbase, you transmit data from a Couchbase cluster to an Elasticsearch cluster where it will be indexed by Elasticsearch. The Couchbase Plug-in for Elasticsearch helps transmit data from Couchbase using a protocol understood by Elasticsearch. The plug-in ensures that information from Couchbase can be mapped and converted into data which Elasticsearch will index and query.
This plug-in is compatible only with Elasticsearch 1.0.1 and with Couchbase Server 2.5.1 and earlier and and earlier. For more information about the administrative tool for Elasticsearch, see Elasticsearch head. For more information about setting up Elasticsearch, see Elasticsearch Install
-
Go to your installation directory for Elasticsearch:
cd elasticsearch-<version> Install the Couchbase Plug-in. Replace the version number with the appropriate one.
bin/plugin -install transport-couchbase -url \
http://packages.couchbase.com.s3.amazonaws.com/releases/elastic-search-adapter/1.3.0/elasticsearch-transport-couchbase-1.3.0.zip
After a successful installation, the plug-in installer returns:
DONE Installed transport-couchbase
-
Set the username and password for the plug-in:
echo "couchbase.password: password" >> config/elasticsearch.yml ; echo "couchbase.username: Administrator" >> config/elasticsearch.yml -
The other plug-in to install is a third party plug-in for Elasticsearch called
head; this plug-in provides a simple web user interface you can use to interact with Elasticsearch:bin/plugin -install mobz/elasticsearch-head -
After you are done installing the two plug-ins, you can start Elasticsearch:
bin/elasticsearchElasticsearch will start and run on your machine in the background.
-
You can open the administrative client for Elasticsearch by going to this URL in a browser
http://localhost:9200/_plugin/head/. The following screen with a randomized name will appear: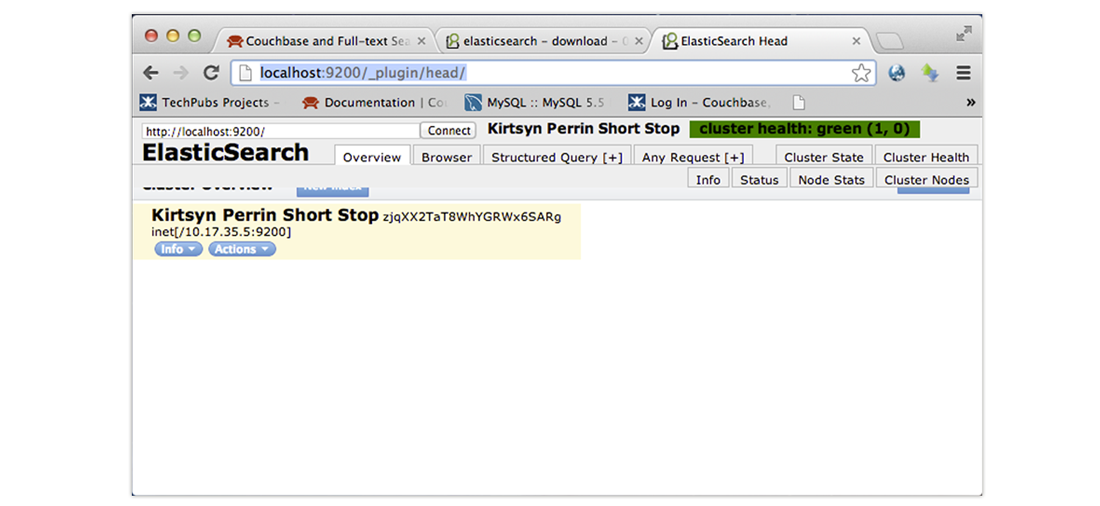
At this point you have the Couchbase Plug-in for Elasticsearch and the Elasticsearch engine installed and running. You can now set up the index templates for Elasticsearch and set up Couchbase Server to send data to Elasticsearch.
Updating Configurations
After installation you are now ready to transfer data from Couchbase Server to Elasticsearch and begin indexing the data. In Elasticsearch you will create an index template to define the scope of indexing and searching. In Couchbase Server, you will change the default setting for replication so that the timing and performance will work with Elasticsearch clusters.
-
We need to provide an index template that Elasticsearch will use on information from Couchbase. The one we use below is an example provided as part of the Couchbase Plug-in for Elasticsearch:
shell>    curl -X PUT http://localhost:9200/_template/couchbase \
 -d @plugins/transport-couchbase/couchbase_template.json
You can also provide your own index template in the future. If you provide more than one template, you can maintain multiple indexes that can be individually updated. Upon success, Elasticsearch returns:
{"ok":true,"acknowledged":true} -
For each Couchbase data bucket that we want to search, we create an empty index in Elasticsearch:
shell> curl -X PUT http://localhost:9200/beer-sampleIn this case we name our index
beer-sample. Upon success Elasticsearch returns the following:{"ok":true,"acknowledged":true} -
Provide this setting to Elasticsearch to change the number of concurrent requests it will handle:
shell>echo "couchbase.maxConcurrentRequests: 1024" >> config/elasticsearch.yml Stop and restart Elasticsearch for your changes to take effect.
-
Change the number of concurrent replicators in Couchbase Server from 32 to 8:
shell> curl -X POST -u Administrator:password1  \
 http://10.4.2.4:8091/internalSettings  \
 -d xdcrMaxConcurrentReps=8
When Couchbase Server successfully updates this setting, it will send a response as follows:
HTTP/1.1 200 OK
   Server: Couchbase Server 2.0.0-1941-rel-community
   Pragma: no-cache
   Date: Wed, 28 Nov 2012 18:20:22 GMT
   Content-Type: application/json
   Content-Length: 188
   Cache-Control: no-cache
One of the issues that can occur when an Elasticsearch node is overwhelmed by replication from Couchbase is that the node can fail. If this does occur, you may also experience errors from remaining nodes.
For more information about this XDCR parameter, see Couchbase Server Manual, Changing Internal XDCR Settings.
Indexing and Querying Data
The Couchbase Plug-in for Elasticsearch uses Cross Datacenter Replication (XDCR) feature in Couchbase Server. This feature can transmit all documents from a Couchbase data bucket or server cluster to another cluster. In this case we transmit documents from Couchbase to Elasticsearch using XDCR and as soon and these documents have been transmitted, the Elasticsearch engine will index them. For more information about XDCR in Couchbase Server, see Couchbase Server Manual, Cross Datacenter Replication :
Open Couchbase Web Console and login. This is the administrative user interface for Couchbase Server. For more information, see Couchbase Server Manual.
Click on the XDCR tab. Under this tab you can configure and start data replication between a source and destination cluster. In this case our source cluster is a Couchbase cluster and the destination is Elasticsearch.
-
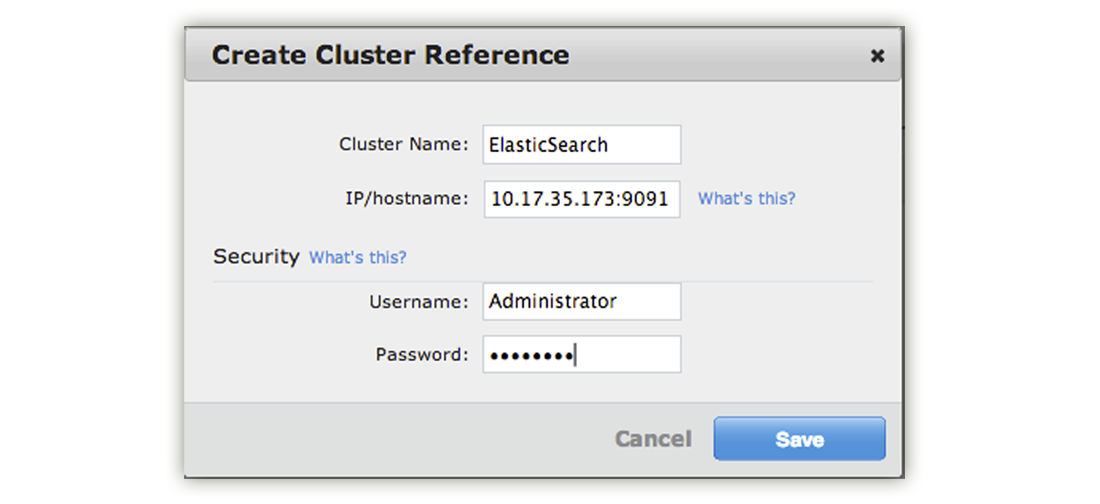
Click on Create Cluster Reference.
A panel will appear where you can specify information for your Elasticsearch cluster. This is the Elasticsearch cluster where Couchbase Server will send copies of documents from a databucket to be indexed.
-
Enter a name, hostname, username and password for your Elasticsesarch cluster then click Save. Be aware that Elasticsearch will be listening on port 9091 which is not a standard port for those familiar with Couchbase Server.
The reference to the new replication will appear in the Remote Clusters list under the XDCR Tab.
-
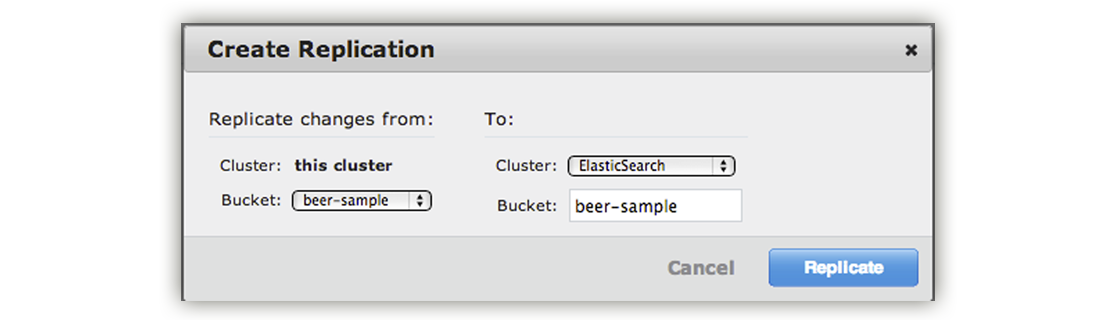
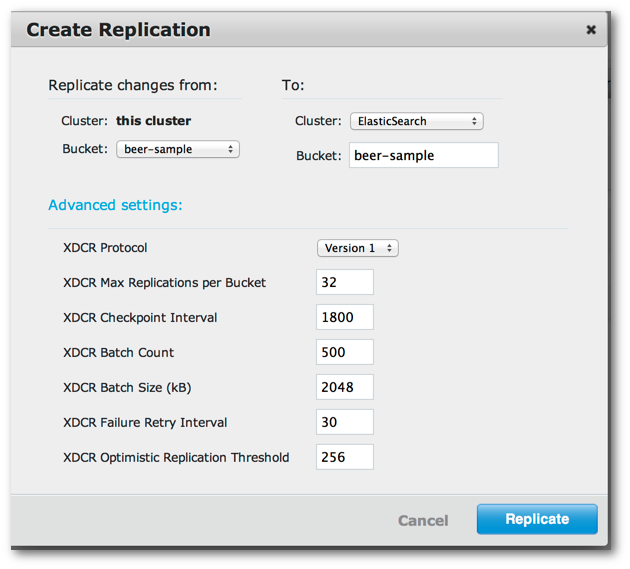
To set up replication, click Create Replication.
A panel appears where you can establish replication from your Couchbase cluster to Elasticsearch.
Under Replicate changes from: Bucket, choose
beer-sample.Under the section To: select ElasticSearch.
For Bucket: enter
beer-sample. This is actually the Elasticsearch index where the data will be sent for indexing.If you are using Couchbase Server 2.2 or later, click Advanced settings and change the XDCR Protocol setting to Version 1.
-
Finally click Replicate to start replication of documents to Elasticsearch. Couchbase Server will begin sending data from the beer-sample bucket to your Elasticsearch cluster.
Under the Ongoing Replications section, you will see the replication and status of replication.
-
You can also view the data transfer by clicking the Overview tab of Elasticsearch head:
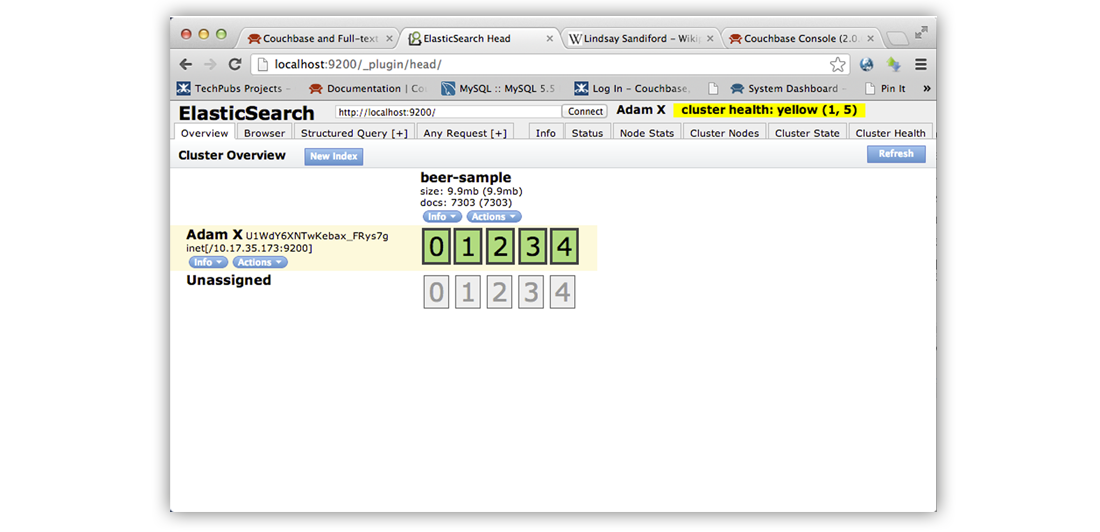
The
docsfield indicates the number of items that have been indexed by Elasticsearch. At this point you can begin querying data from Elasticsearch.Note that the number of documents displayed by Elasticsearch head may be greater than the actual number of documents in Couchbase Server. This is because XDCR and the Couchbase Plug-in for Elasticsearch will also send additional documents that describe the status of replication and Elasticsearch head will show this total number. There is an alternate, more accurate way you can determine the true number of documents indexed by Elasticsearch, which excludes extra status documents. You can use this method to debug possible data transfer issues between Couchbase and Elasticsearch. For more information, see Monitoring and Troubleshooting, Compare Document Count.
Querying Data
To issue a query to Elasticsearch, you send a request in the form of a simple Lucene-based string or you can use the more extensive JSON-based query syntax, DSL. When you query Elasticsearch, you send it as a REST-ful request using any REST client, or as a URI in a browser:
curl http://localhost:9200/beer-sample/_search?q=blueberry
Elasticsearch will return a result set as JSON as follows:
{"took":2,
"timed_out":false,
....
        "hits" : 8,
    ....
        {
        ....
        "_index":"beer-sample",
        "_type":"couchbaseDocument",
        "_id":"dark_horse_brewing_co-tres_blueberry_stout",
        "_score":1.8963704,
        "_source": ....
        "
        .....
        "_index":"beer-sample",
        "_type":"couchbaseDocument",
        "_id":"yegua_creek_brewing_dallas-blueberry_blonde",
        "_score":1.2890494,
        "_source": ....
        ....
        }
}
For the sake of brevity we show just the first two results out of a result set
containing eight hits. Each item has a “_score” field which Elasticsearch uses
to indicate the level of relevance for search hits. Notice that source
attribute will contain only metadata saved by Elasticsearch rather than the
entire document contents. We do this because Couchbase Server provides
incredibly fast access to the documents. So we use _id sent back by
Elasticsearch to retrieve the document out of Couchbase Server. To start we view
the document using Couchbase Web Console:
Copy one of the document IDs returned by Elasticsearch, for instance
dark_horse_brewing_co-tres_blueberry_stout.Click on the Data Bucket tab in Couchbase Web Console. A table appears with a list of all Couchbase Buckets.
Click on the Documents button for the
beer-samplebucket. A table appears which displays all documents in the bucket.-
In the Document ID field, paste the document ID
dark_horse_brewing_co-tres_blueberry_stout. The JSON document for that beer will appear. You can click on the document name to view the entire JSON document: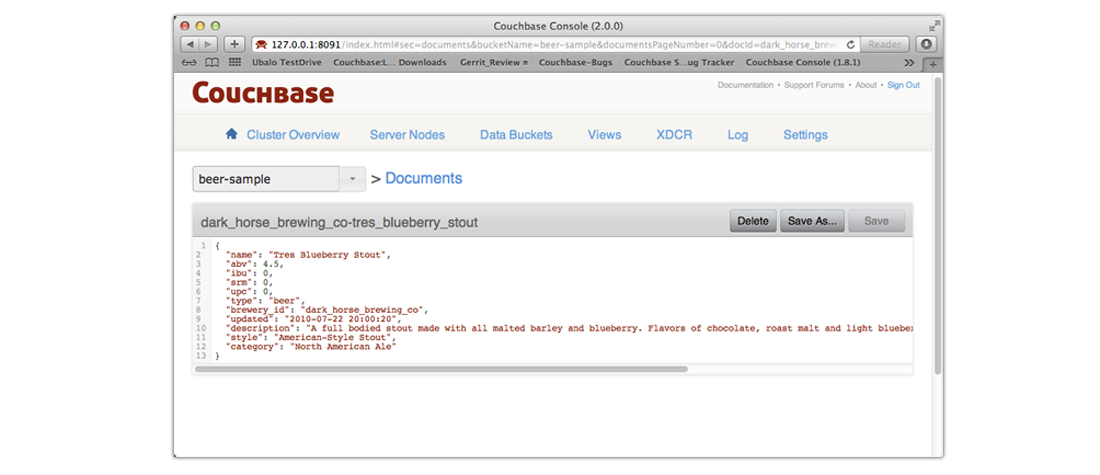
Elasticsearch supports more complex queries using their REST API; for instance you can search the beer database for a style ‘lambic’ and for ‘blueberry’ in the description. In this case you send a HTTP POST request. The JSON request will appear as follows:
{
"query": {
    "query_string": {
            "query_string": {
                "query": "style: lambic AND description: blueberry"
            }
        }
    }
}
Here we scope the search so that it looks for ‘lambic’ in the style field and ‘blueberry’ in the description and we get this result:
{
    "name" : "Wild Blueberry Lager",
    "abv" : 8,
    "brewery_id" : "110f01",
    "description" : "....blueberry aroma....",
    "style" : "Belgian Fruity Lambic"
    ....
}
Rather than using the web console to retrieve a document, you would typically use a Couchbase SDK to retrieve the documents the IDs. There are specific methods and functions available in each SDK to retrieve one or more items based on the IDs. For more information about reading and writing data from an application with Couchbase SDKs, see Couchbase Developer Guide.
For more information about the JSON request and response documents for Elasticsearch, see Elastic Search, Search API.
Document Design Considerations
Both Couchbase Server and Elasticsearch enable you to flexibly model data by using JSON documents to represent your application objects. These documents generally contain all the information about a data entity, and can be as complex as you choose. You can use nested data and structures such as arrays and hashes to provide additional information about your object. You also do not need to perform schema migrations for JSON documents. Instead you can flexibly write new data fields or values to represent new information in your documents.
Be aware that Elasticsearch automatically creates a mapping which defines what is searchable in your documents. So how you design your documents for search is influenced by Elasticsearch mappings. This guide is not intended to be an exhaustive description on how to model documents for use in Elasticsearch or how to modifying mapping in Elasticsearch. For more information, see Elasticsearch Guide and more specifically Elasticsearch Guide, Mapping.
There are a few document design considerations you should have in mind if you are going to use Couchbase Server with Elasticsearch. For instance, imagine you have a document to represent a product as follows:

Imagine your inventory system changes and you want to change your product SKU so that it is an integer. With the flexibility of JSON, you can update the schema for your product to look like this in Couchbase Server:

By design, there may be some cases where you do not want to update all your products to have integer SKUs. This may be an intentional design choice if your application logic does not depend on it, or you may want to change your application logic to handle both string and integer SKUs.
When you use Elasticsearch, it will generate a default mapping used to index items; this mapping describes how particular fields should be indexed. By default, Elasticsearch builds a mapping based on documents transmitted to it and it will make assumptions and generalizations about all documents based on the initial documents it receives. Each default mapping will assume specific data types for each field. Be aware that even though you can change a field type for a document in Couchbase Server, it can cause problems for Elasticsearch if you do not also update the default mapping. If you change the field type in Couchbase Server, Elasticsearch will not index the new documents containing the different field type and you will not receive the document ID as a search query. In this case, because we change the SKU from a string to an integer, all the products we add to our system with the integer SKU will not be indexed by Elasticsearch using the default mapping. For more information about changing a mapping see Elasticsearch Guide, Mapping.
To resolve this, whenever you update a document schema you probably want to update all documents which contain that field. In our example, we update the SKU field so that all documents have integers for SKUs. Elasticsearch will receive all updates to existing products and then index them. For more general information about data modeling for Couchbase Server, see Couchbase Developer Guide, Modeling Data.
Understanding Arrays in Elasticsearch
If you want to store an array of objects in a JSON document, be aware that you may need to provide your own specific mapping for Elasticsearch in order to achieve the results you expect from it. For example, imagine you have an object with two items that appear:
{
    "object1" : [
        {
            "name" : "blue",
            "count" : 4
        },
        {
            "name" : "green",
      "count" : 6
     }
    ]
}
If you search for a name set to blue and a count greater than 5, you will get this document in your index, even though the count associated with blue is 4 not 6. This is most likely not what you expected since the two conditions are satisfied by two different objects in the array. To handle these types of scenarios, you need to provide your own nested mapping for Elasticsearch. For more information see Elasticsearch Guide, Nested Type.
Enabling Document Expiration
Time to Live, also known as TTL, is the time until a document expires in Couchbase Server. By default, all documents will have a TTL of 0, which indicates the document will be kept indefinitely. When you create your own application, you can provide specific TTLs such as 30 seconds. As part of normal maintenance operations, Couchbase Server will periodically remove all items with expirations that have passed. By default this maintenance process runs every 60 minutes.
Be aware that if you use TTLs in Couchbase Server that this expiration will not be propagated with a document to Elasticsearch. Instead Couchbase Server will send information about the document deletion when the maintenance process runs on the 60- minute interval. This may cause some problems because the document ID can appear in an Elasticsearch index, but the document may no longer be available from Couchbase Server.
To mitigate this problem, you can manually enable the expiration field used by
Elasticsearch, _ttl. When you do this, Couchbase Server can propagate the
document TTL to Elasticsearch, and then Elasticsearch will remove the item from
an index when TTL expires. Because there is some time lag between the servers
during replication, indexing, and maintenance processes, document expiration
will not occur at the same exact time for each server. However if you use this
approach it can help reduce items in an Elasticsearch result set which are no
longer available from Couchbase. To enable this setting, see Elasticsearch
Guide, TTL
Field.
Learning More About Data Formats
There are two other final areas and resources you should be aware of as you model your documents for Elasticsearch:
Date Formats: While Elasticsearch enables you represent dates in several different manners, it will be easier to manage your system when you store dates in the same field and use a single date format. For more information about date formats supported by Elasticsearch, see Elasticsearch Guide, Date Formats.
Geographic Data: Be aware that Elasticsearch has a limited number of formats for geographic data. For more information see Elasticsearch Guide, Geo Point Type.
Monitoring and Troubleshooting
The most common problems you may need to troubleshoot include:
The following sections describe some of the causes of these issues and provides steps you can follow to resolve these problems. There are a few tasks you can perform to monitor the progress of Couchbase Plug-in for Elasticsearch. These tasks will help you determine if data is successfully transferred and indexed. It will help insure you resolve the most common problems that occur using the plug-in:
-
Check Outbound XDCR Operations
In Couchbase Web Console under Data Buckets, Click | Bucket-name | Outbound XDCR to view information about data replication via XDCR to Elasticsearch. The statistics in this section will indicate the rate of data transfer between Couchbase Server and Elasticsearch. For more information about monitoring XDCR, see Couchbase Server, Manual, Monitoring Replication.
-
Check Couchbase Plug-in for Elasticsearch Log files
The plug-in logs to the same directory and file that Elasticsearch uses at the root of a Elasticsearch node. For production systems the log is at
/var/log/elasticsearch. -
Compare Document Count
You can compare the number of documents in Couchbase Server with the number of documents in your Elasticsearch cluster. Be aware that this assumes your Couchbase Server has a static number of items, for instance your cluster is in a test environment where the number of documents is set and you do not add more during replication. In Couchbase Web Console, click on Data Buckets. The number of documents for a named bucket appears under
Item Count: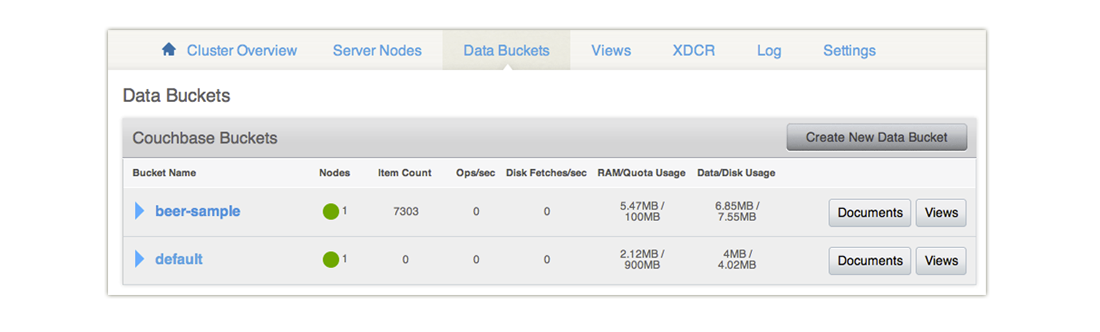
In this example we have 7303 items. Then we get the number of documents indexed by Elasticsearch:
curl http://[elasticsearch_host]:9200/[index-name]/couchbaseDocument/_countUpon success, you get the following result:
{"count":7303,"_shards":
      {
      "total":5,"successful":5,"failed":0
      }
  }
So the
countresult is the same number as the number of items from Couchbase Web Console; this provides assurance that all items from Couchbase are transferred and indexed.
Handling Data Transfer Issues
If you notice issues during data transfer from Couchbase Server to Elasticsearch, follow these steps and validate the following:
-
Check your Elasticsearch version
The most common problem you can encounter with Couchbase-Elasticsearch integration is that data fails to transfer due to an incompatible Elasticsearch version. Elasticsearch has evolved between versions and Couchbase Plugin for Elasticsearch has been specifically designed a tested for a particular version. If you use a higher version or lower version, it will result in failure to transfer data. If you have an incompatible version of the plug, you might see this message:
Attention - Failed to grab remote bucket info from any of known nodesAnd if you check the Elasticsearch head console, you will find a stack trace similar to this:
[2012-12-19 05:50:41,758][WARN ][org.eclipse.jetty.servlet.ServletHandler] Error for /pools/default/buckets
   java.lang.NoSuchMethodError:
   ….
If you get this error make sure you are using the plug-in with the correct version of Elasticsearch.
-
Check destination cluster references
The second most common error that occurs is when you create a cluster reference in Couchbase Web Console then at a later time create and start the replication. After you create a reference to your Elasticsearch cluster, the IP address may change, especially if you are using Elasticsearch on a laptop. In this case you will get this error under XDCR | Ongoing Replications | Status:

To resolve this error, check your remote Elasticsearch reference in XDCR and make sure the IP address is correct.
Handling Indexing Issues
If you encounter issues with indexing, such as failure to index items from Couchbase, or unexpected items in your search results, try to check the following items and performing the described fixes:
-
Change Settings for Initial Indexing
If you have an existing Couchbase data bucket with a large number of documents already in production, these documents will be transferred to Elasticsearch in bulk. Typically this works with Elasticsearch default settings, however there are some Elasticsearch settings you can change so that indexing quickly completes.
You use the Elasticsearch
refresh_intervalsetting to indicate how frequently the engine provides newly indexed items. During an initial bulk load of documents from Couchbase, you can reduce access to newly indexed items in exchange for overall faster indexing time. For more information about enabling and disabling this setting, see Elasticsearch Guide, Indices Update. -
Check Elasticsearch mappings
When you send documents to Elasticsearch it will automatically generate a mapping that contains rules for indexing fields. You can also provide your own mapping or update this mapping. Be aware that this default mapping from Elasticsearch includes assumptions about data types and data structures in your documents. Based on these assumptions, Elasticsearch may omit your document from the index. For instance, objects within an array may not be indexed as you expect.
For more information and potential fixes see Document Design Considerations. For general information about expected data structures for Elasticsearch see Elasticsearch, Mapping, Types and related sections.
-
Check your documents
Validate your documents as well-formed JSON. The Couchbase Plug-in for Elasticsearch will take any items that are binary data and will log an error message. Elastic search cannot index documents which are not valid JSON, for instances.jpgs and other forms of binary data cannot be indexed by Elasticsearch.
If you change a field type for your documents after Elasticsearch has indexed, it may omit your document from the index. For more information on how to resolve this issue by updating your documents, see Document Design Considerations
Managing Performance
There are few areas you can adjust which will impact your system performance with Couchbase and Elasticsearch:
-
Disable Fields from Indexing.
When any search engine has to index large blocks of data, the process is more CPU intensive than smaller blocks of data. So if you have objects with large amounts of text that are not important for search results, you can provide a custom mapping and omit those fields from indexing using the setting
enabled. For more detailed information, see Elastic Search Guide, Object Type. -
Add Elasticsearch Nodes.
If your Couchbase Server cluster experiences a backlog of items in the replication queue, you may want to consider adding additional Elasticsearch nodes. This should increase how quickly items can be indexed by the search engine.
-
Adjusting Concurrent Replication
If you are running your Couchbase cluster and Elasticsearch cluster on hardware with high-performance CPUs, you can increase this setting to improve replication speed between the two clusters. In the case of Elasticsearch, there are also scenarios where you may want to decrease this setting from the default so you do not overwhelm an Elasticsearch node. This is discussed below; for more information about this XDCR parameter, see Couchbase Server Manual, Changing Internal XDCR Settings.
One of the key parameters you can use to adjust XDCR performance is
xdcrMaxConcurrentReps; this will increase or decrease the maximum concurrent replication by a Couchbase node. The default number of concurrent replications via XDCR is 32. For instance, if you have five nodes in a Couchbase cluster and you have one Elasticsearch node, Couchbase Server can generate up to 160 concurrent replications targeting the single Elasticsearch node. Each replication can require multiple TCP connections and both the concurrent replications and the number of connections may overwhelm the Elasticsearch node. If this does occur you can see the following types of errors in Couchbase Web Console | XDCR | Ongoing XDCR section:Error replicating vbucket 7: {badmatch, {error,all_nodes_failed, <<"Failed to grab remote bucket info from any of known nodes">>}}Error replicating vbucket 7: {error,{error,timeout}}}
This means that Couchbase Server cannot communicate with Elasticsearch in the time that it expects. Couchbase Server can recover from these types of errors and retry replication, however your replication may take longer to complete or operate with higher latency because the operations must be later retried. If you encounter this scenario, you should lower the default
xdcrMaxConcurrentRepssetting to 8 or less so that the total number of concurrent replications can be handled by your Elasticsearch node. For more information on changing this setting, see Couchbase Server Manual, Changing Internal XDCR Settings.
Advanced Settings and Features
The Couchbase Plug-in for Elasticsearch has several settings in a YAML file that you can update. In the beginning you will probably only update the username and password for the plug-in. Later you may want to change these additional settings:
couchbase.port: the port the plug-in will listen on. Default is 9091.
couchbase.username: the username for HTTP basic authentication. Default is Administrator.
couchbase.password: the password for HTTP basic authentication. No default established.
couchbase.defaultDocumentType: the type of documents stored in Elasticsearch. These documents contain indexing information from Elasticsearch. Defaults to
couchbaseDocument. You can change this if you define and implement your own document type which provides specialized Elasticsearch search features. For more information, see Elasticsearch Guide, Index APIcouchbase.checkpointDocumentType: type of document which stores status information about replication. Default is
couchbaseCheckpoint.couchbase.num_vbuckets: number of data partitions Elasticsearch should specify to Couchbase Server. Default corresponds to the number of partitions expected by Couchbase Server and that exist on the source Couchbase cluster. For Mac OSX, the value is 64, and for all other platforms it is 1024.
Understanding Metadata
As you get more advanced in your usage of Couchbase Plug-in for Elasticsearch, it might be helpful for you to understand what is actually sent via the plug-in and how Elasticsearch uses it. When you send a JSON document to Couchbase Server to store, it looks similar to the following:
{
   "name": "Green Monsta Ale",
   "abv": 7.3,
   "ibu": 0,
   "srm": 0,
   "upc": 0,
   "type": "beer",
   "brewery_id": "wachusetts_brewing_company",
   "updated": "2010-07-22 20:00:20",
   "description": "A BIG PALE ALE with an awsome balance of Belgian malts with Fuggles and East Kent Golding hops.",
   "style": "American-Style Strong Pale Ale",
   "category": "North American Ale"
}
Here we have a JSON document with all the information for a beer in our application. When Couchbase stores this document, it adds metadata about the document so that we now have JSON in Couchbase that looks like this:
{
    {
   "id": "wachusetts_brewing_company-green_monsta_ale",
   "rev": "1-00000005ce01e6210000000000000000",
   "expiration": 0,
   "flags": 0,
   "type": "json"
    }
    {
       "name": "Green Monsta Ale",
       "abv": 7.3,
       "ibu": 0,
       "srm": 0,
       "upc": 0,
       "type": "beer",
       "brewery_id": "wachusetts_brewing_company",
       "updated": "2010-07-22 20:00:20",
       "description": "A BIG PALE ALE with an awsome balance of Belgian malts with Fuggles and East Kent Golding hops.",
       "style": "American-Style Strong Pale Ale",
       "category": "North American Ale"
    }
}
The metadata that Couchbase Server stores with our beer document contains the key for the document, an internal revision number, expiration, flags and the type of document. When Couchbase Server replicates data to Elasticsearch via the plug-in, it sends this entire JSON including the metadata. Elasticsearch will then index the document and will store the following JSON with document metadata:
{
  "id": "wachusetts_brewing_company-green_monsta_ale",
  "rev": "1-00000005ce01e6210000000000000000",
  "expiration": 0,
  "flags": 0,
  "type": "json"
}
And finally when you query Elasticsearch and get a result set, it will contain the document metadata only:
{
    took: 22
    timed_out: false
    _shards: {
    total: 5
    successful: 5
    failed: 0
},
    hits: {
    total: 1
    max_score: 0.18642133
    hits: [
        {
        _index: beer-sample
        _type: couchbaseDocument
        _id: wachusetts_brewing_company-green_monsta_ale
        _score: 0.18642133
            _source: {
                meta: {
                    id: wachusetts_brewing_company-green_monsta_ale
                    rev: 1-00000005ce01e6210000000000000000
                    flags: 0
                    expiration: 0
                    }
                }
            }
        ]
    }
}
Learning More
If you want to learn more about full-text search for Couchbase Server, here are some additional resources:
Couchconf Presentation on Full Text Search Integration.
The Learning Portal a proof-of-concept application which demonstrates Couchbase and Elasticsearch together. The full source is also available on GitHub at Couchbaselabs, Learning Portal.
Blog post and tutorial on Elasticsearch with Couchbase, from Couchbaselabs.
Elasticsearch Guide, which is particularly useful for developing more advanced queries, indexing a field more than one way, and to provide custom mappings which influence your search results.
Appendix: Release Notes
This appendix contains release notes for individual versions of Couchbase Plug-in for Elasticsearch.
Release Notes for Couchbase Plug-in for Elasticsearch 1.3.0 GA (April 2014)
This release is compatibility only with Elasticsearch 1.0.1.
This release is compatible with Couchbase Server 2.5.x, and it is backward compatible with earlier 2.x releases.
- Support for new XDCR checkpointing protocol CBES-26.
- Fixed failure handling due to bounded queue with Elasticsearch 1.x CBES-27.
Release Notes for Couchbase Plug-in for Elasticsearch 1.2.0 GA (October 2013)
This release adds compatibility with Elasticsearch 0.90.5.
This release is compatible with Couchbase Server 2.2, and it is backward compatible with earlier 2.x releases.
Release Notes for Couchbase Plug-in for Elasticsearch 1.1.0 GA (August 2013)
This release adds compatibility with Elasticsearch 0.90.2.
Release Notes for Couchbase Plug-in for Elasticsearch 1.0.0 GA (February 2013)
This is the first general availability (GA) release. It contains the following enhancements and bug fixes:
Now compatible with version 0.20.2 of Elasticsearch.
Now supports document expiration using Elasticsearch TTL.
Now supports XDCR conflict resolution to reduce bandwidth usage in some cases.
Fixed Couchbase index template to allow searching on the document metadata.
Fixed data corruption under high load (CBES-11).
Fixed recognition of non-JSON documents (CBES-11).
Improved log information when indexing stub documents.
Release Notes for Couchbase Plug-in for Elasticsearch 1.0.0 Beta (February 2013)
This is the beta release of the plug-in.