Introduction
A newer version of this software is available
You are viewing the documentation for an older version of this software. To find the documentation for the current version, visit the Couchbase documentation home page.
Welcome to the official Java SDK documentation. The first section, Getting Started, covers the basic functionality, laying the foundation for the later sections. If you want to see how to build a full-blown application on top of Couchbase, look for the Tutorial section next.
The Using the APIs section holds self-contained reference material about API usage. Go there if you want to dig into topics like storing data, using views and so on. Finally, Advanced Usage contains in-depth information about topics that come up during debugging and production.
Getting Started
This section shows you the basics of Couchbase Server and how to interact with it through the Java Client SDK. Here’s a quick outline of what you’ll do in this section:
Create a project in your favorite IDE and set up the dependencies.
Write a simple program that demonstrates how to connect to Couchbase Server and save some documents.
Write a program that demonstrates how to use create, read, update, and delete (CRUD) operations on documents in combination with JSON serialization and deserialization.
Explore some of the API methods that provide more specialized functions.
At this point we assume that you have a Couchbase Server 2.2 release (or later) running and you have the beer-sample bucket configured. If you need help setting up everything, see the following documents:
Using the Couchbase Web Console for information about using the Couchbase Administrative Console
Couchbase CLI for information about the command line interface
Couchbase REST API for information about creating and managing Couchbase resources
The TCP/IP port allocation on Microsoft Windows by default includes a restricted number of ports available for client communication. For more information about this issue, including information about how to adjust the configuration and increase the number of available ports, see MSDN: Avoiding TCP/IP Port Exhaustion.
Preparation
To get ready to build your first app, you need to install Couchbase Server, download the Couchbase Java SDK, and set up your IDE.
Installing Couchbase Server
Get the latest Couchbase Server 2.2 release (or later) and install it.
As you follow the download instructions and setup wizard, make sure you install the beer-sample default bucket. It contains beer and brewery sample data, which you use with the examples.
If you already have Couchbase Server 2.2 but do not have the beer-sample bucket installed, open the Couchbase Web Console and select Settings > Sample Buckets. Select the beer-sample checkbox, and then click Create. A notification box in the upper-right corner disappears when the bucket is ready to use.
Downloading the Couchbase Client Libraries
To include the Client SDK in your project, you can either
manually include all dependencies in your CLASSPATH, or if you want it to be
easier, you can use a dependency manager such as Maven. Since the Java SDK 1.2.0 release,
all Couchbase-related dependencies are published in the Maven Central Repository.
To include the libraries directly in your project,
download the zip file and add
all the JAR files to your CLASSPATH of the system/project. Most IDEs also allow
you to add specific JAR files to your project. Make sure you add the following
dependencies in your CLASSPATH :
couchbase-client-1.2.3.jar, or latest version available
spymemcached-2.10.1.jar
commons-codec-1.5.jar
httpcore-4.1.1.jar
netty-3.5.5.Final.jar
httpcore-nio-4.1.1.jar
jettison-1.1.jar
Previous releases are also available as zip archives as well as through Maven Central: * Couchbase Java Client 1.2.2 * Couchbase Java Client 1.2.1 * Couchbase Java Client 1.2.0
If you use a dependency manager, the syntax varies for each tool. The following examples show how to set up the dependencies when using Maven, sbt (for Scala programs), and Gradle.
To use Maven to include the SDK, add the following dependency to your pom.xml file:
<dependency>
    <groupId>com.couchbase.client</groupId>
    <artifactId>couchbase-client</artifactId>
    <version>1.2.3</version>
</dependency>
If you program in Scala and want to manage your dependencies through sbt, then you can do it with these additions to your build.sbt file:
libraryDependencies += "couchbase" % "couchbase-client" % "1.2.3"
For Gradle you can use the following snippet:
repositories {
  mavenCentral()
}

dependencies {
  compile "com.couchbase.client:couchbase-client:1.2.3"
}
Now that you have all needed dependencies in the CLASSPATH environment variable, you can set up your IDE.
Setting up your IDE
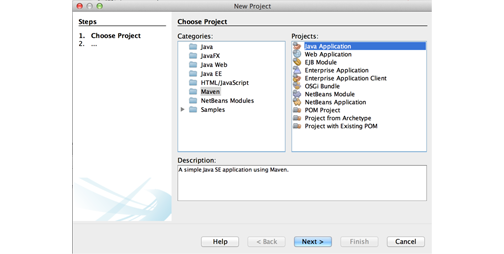
The NetBeans IDE is used in this example, but you can use any other Java-compatible IDE. After you install the NetBeans IDE and open it:
-
Select File > New Project > Maven > Java Application, and then click Next.
-
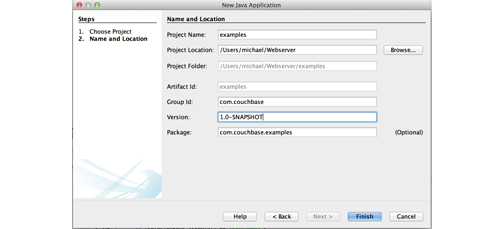
Enter a name for your new project and change the location to the directory you want.
We named the project “examples.”
-
Enter a namespace for the project in the Group Id field.
We used the
com.couchbasenamespace for this example, but you can use your own if you like. If you do so, just make sure you change the namespace later in the source files when you copy them from our examples.Now that your project, you can add the Couchbase Maven repository to use the Java SDK.
Click Finish.
In the Projects window, right-click Dependencies > Add Dependency.
-
Enter the following settings to add the Couchbase Java SDK from the Maven repository:
Group ID: com.couchbase.client
Artifact ID: couchbase-client
Version: 1.2.3
For now, you need to add only the Couchbase Java SDK itself because the transitive dependencies are fetched automatically.
Click Add.
Now all the dependencies are in place and you can move forward to your first application with Couchbase.
Hello Couchbase
To follow the tradition of first programming tutorials, we start with a “Hello Couchbase” example. In this example, we connect to the a Couchbase node, set a simple document, retrieve the document, and then print the value out. This first example contains the full source code, but in later examples we omit the import statements and also assume an existing connection to the cluster.
Listing 1: Hello Couchbase!
package com.couchbase.examples;

import com.couchbase.client.CouchbaseClient;
import java.net.URI;
import java.util.ArrayList;

public class App {
  public static void main(String[] args) throws Exception {
    ArrayList<URI> nodes = new ArrayList<URI>();

    // Add one or more nodes of your cluster (exchange the IP with yours)
    nodes.add(URI.create("http://127.0.0.1:8091/pools"));

    // Try to connect to the client
    CouchbaseClient client = null;
    try {
      client = new CouchbaseClient(nodes, "default", "");
    } catch (Exception e) {
      System.err.println("Error connecting to Couchbase: " + e.getMessage());
      System.exit(1);
    }

    // Set your first document with a key of "hello" and a value of "couchbase!"
    client.set("hello", "couchbase!").get();

    // Return the result and cast it to string
    String result = (String) client.get("hello");
    System.out.println(result);

    // Shutdown the client
    client.shutdown();
  }
}
The code in Listing 1 is very straightforward, but there is a lot going on that is worth a little more discussion:
-
Connect. The
CouchbaseClientclass accepts a list of URIs that point to nodes in the cluster. If your cluster has more than one node, Couchbase strongly recommends that you add at least two or three URIs to the list. The list does not have to contain all nodes in the cluster, but you do need to provide a few nodes so that during the initial connection phase your client can connect to the cluster even if one or more nodes fail.After the initial connection, the client automatically fetches cluster configuration and keeps it up-to-date, even when the cluster topology changes. This means that you do not need to change your application configuration at all when you add nodes to your cluster or when nodes fail. Also make sure you use a URI in this format:
http://[YOUR-NODE]:8091/pools. If you provide only the IP address, your client will fail to connect. We call this initial URI the bootstrap URI.The next two arguments are for the
bucketand thepassword. The bucket is the container for all your documents. Inside a bucket, a key — the identifier for a document — must be unique. In production environments, Couchbase recommends that you use a password on the bucket (this can be configured during bucket creation), but when you are just starting out using thedefaultbucket without a password is fine. The beer-sample bucket also doesn’t have a password, so just change the bucket name and you’re set. -
Set and get. These two operations are the most important ones you will use from a Couchbase SDK. You use
setto create or overwrite a document and you usegetto read it from the server. There are lots of arguments and variations for these two methods, but if you use them as shown in the previous example it will get you pretty fair in your application development.Note that the
getoperation will read all types of information, including binary, from the server, so you need to cast it into the data format you want. In our case we knew we stored a string, so it makes sense to convert it back to a string when we get it later. Disconnect when you shutdown your server instance, such as at the end of your application, you should use the
shutdownmethod to prevent loss of data. If you use this method without arguments, it waits until all outstanding operations finish, but does not accept any new operations. You can also call this method with a maximum waiting time that makes sense if you do not want your application to wait indefinitely for a response from the server.
The logger for the Java SDK logs from INFO upwards by default. This means the Java SDK logs a good amount of
information about server communications. From our Hello Couchbase example the
log looks like this:
2012-12-03 18:57:45.777 INFO com.couchbase.client.CouchbaseConnection:  Added {QA sa=/127.0.0.1:11210, #Rops=0, #Wops=0, #iq=0, topRop=null, topWop=null, toWrite=0, interested=0} to connect queue
2012-12-03 18:57:45.788 INFO com.couchbase.client.CouchbaseConnection:  Connection state changed for sun.nio.ch.SelectionKeyImpl@76f8968f
2012-12-03 18:57:45.807 INFO com.couchbase.client.ViewConnection:  Added localhost to connect queue
2012-12-03 18:57:45.808 INFO com.couchbase.client.CouchbaseClient:  viewmode property isn't defined. Setting viewmode to production mode
couchbase!
2012-12-03 18:57:45.925 INFO com.couchbase.client.CouchbaseConnection:  Shut down Couchbase client
2012-12-03 18:57:45.929 INFO com.couchbase.client.ViewConnection:  Node localhost has no ops in the queue
2012-12-03 18:57:45.929 INFO com.couchbase.client.ViewNode:  I/O reactor terminated for localhost
From the log, you can determine which nodes the client is connected to, see whether views on the server are in development or production mode, and view other helpful output. These logs provide vital information when you need to debug any issues on Couchbase community forums or through Couchbase Customer Support.
Reading Documents
With Couchbase Server 2.0, you have two ways of fetching your documents: either
by the unique key through the get method, or through Views. Because Views are
more complex we will discuss them later in this guide. In the meantime, we show
get first:
Object get = client.get("mykey");
Because Couchbase Server stores all types of data, including binary, get returns an object of type Object. If you store JSON documents, the actual document is a
string, so you can safely convert it to a string:
String json = (String) client.get("mykey");
If the server finds no document for that key, it returns a null. It is
important that you check for null in your code, to prevent
NullPointerExceptions later down the stack.
With Couchbase Server 2.0 and later, you can also query for documents with secondary indexes, which we collectively call Views. This feature enables you to provide map functions to extract information and you can optionally provide reduce functions to perform calculations on information. This guide gets you started on how to use views through the Java SDK. If you want to learn more, including how to set up views with Couchbase Web Console, see Using the Views Editor in the Couchbase Server Manual.
This next example assumes you already have a view function set up with
Couchbase Web Console. After you create your View in the Couchbase Web Console, you can
query it from the Java SDK in three steps. First, you get the view definition
from the Couchbase cluster, second you create a Query object and third, you
query the cluster with both the View and the Query objects. In its simplest
form, it looks like this:
// 1: Get the View definition from the cluster
View view = client.getView("beer", "brewery_beers");

// 2: Create the query object
Query query = new Query();

// 3: Query the cluster with the view and query information
ViewResponse result = client.query(view, query);
The getView() method needs both the name of the design document and the name
of the view to load the proper definition from the cluster. The SDK needs them
to determine whether there is a view with the given map functions and also whether it
contains a reduce function or is even a spatial view.
You can query views with several different options. All options are available as
setter methods on the Query object. Here are some of them:
setIncludeDocs(boolean): Use to define if the complete documents should be included in the result.setReduce(boolean): Used to enable/disable the reduce function (if there is one defined on the server).setLimit(int): Limit the number of results that should be returned.setDescending(boolean): Revert the sorting order of the result set.setStale(Stale): Can be used to define the tradeoff between performance and freshness of the data.setDebug(boolean): Prints out debugging information in the logs.
Now that we have our view and the query objects in place, we can
issue the query command, which actually triggers indexing on a Couchbase
cluster. The server returns the results to the Java SDK in the ViewResponse
object. We can use it to iterate over the results and print out some details.
Here is a more complete example, which also includes the full documents and fetches only the first five results:
View view = client.getView("beer", "brewery_beers");
Query query = new Query();
query.setIncludeDocs(true).setLimit(5); // include all docs and limit to 5
ViewResponse result = client.query(view, query);

// Iterate over the result and print the key of each document:
for(ViewRow row : result) {
  System.out.println(row.getId());
  // The full document (as String) is available through row.getDocument();
}
In the logs, you can see the corresponding document keys automatically sorted in ascending order:
21st_amendment_brewery_cafe
21st_amendment_brewery_cafe-21a_ipa
21st_amendment_brewery_cafe-563_stout
21st_amendment_brewery_cafe-amendment_pale_ale
21st_amendment_brewery_cafe-bitter_american
Deleting Documents
If you want to get delete documents, you can use the delete operation:
OperationFuture<Boolean> delete = client.delete("key");
Again, delete is an asynchronous operation and therefore returns a
OperationFuture object on which you can block through the get() method. If you try
to delete a document that is not there, the result of the OperationFuture is false. Be aware that when you delete a document, the server does not
immediately remove a copy of that document from disk, instead it performs lazy
deletion for items that expired or deleted items. For more information about how
the server handles lazy expiration, see About Document
Expiration in the Couchbase Server Developer Guide.
Next Steps
You are now ready to start exploring Couchbase Server and the Java SDK on your own. If you want to learn more and see a full-fledged application on top of Couchbase Server 2.2, read the Web Application Tutorial. The Couchbase Server Manual and the Couchbase Developer Guide provide useful information for your day-to-day work with Couchbase Server. You can also look at the Couchbase Java SDK API Reference.
Tutorial
This tutorial builds on the foundation introduced in the Getting Started section and uses a complete web application. Make sure you have the beer-sample bucket installed because the application allows you to display and manage beers and breweries. If you still need to get the sample database, see Preparation.
The full source code for the example is available at couchbaselabs on GitHub. The sample application that you can download actually provides more content than we describe in this tutorial; but it should be easy for you to look around and understand how it functions if you first start reading this tutorial here.
Preview the Application
If you want to get up and running really quickly, here is how to do it with Jetty. This guide assumes you are using OS X or Linux. If you are using Windows, you need to modify the paths accordingly. Also, make sure you have Maven installed on your machine.
Download Couchbase Server 2.2 and install it. Make sure you install the beer-sample data set when you run the wizard because this tutorial uses it.
-
Add the following views and design documents to the
beer-samplebucket.Views and design documents enable you to index and query data from the database. Later we will publish the views as production views. For more information about using views from an SDK, see Couchbase Developer Guide, Finding Data with Views.
The first design document name is
beerand view name isby_name:function (doc, meta) { if(doc.type && doc.type == "beer") { emit(doc.name, null); } }The other design document name is
breweryand view name isby_name:function (doc, meta) { if(doc.type && doc.type == "brewery") { emit(doc.name, null); } } -
Clone the Java SDK beer repository from GitHub and
cdinto the directory:$ git clone git://github.com/couchbaselabs/beersample-java.git Cloning into ‘beersample-java’… remote: Counting objects: 153, done. remote: Compressing objects: 100% (92/92), done. remote: Total 153 (delta 51), reused 124 (delta 22) Receiving objects: 100% (153/153), 81.97 KiB | 120 KiB/s, done. Resolving deltas: 100% (51/51), done. $ cd beersample-java -
In Maven, run the application inside the Jetty container:
$ mvn jetty:run …. snip …. Dec 17, 2012 1:50:16 PM com.couchbase.beersample.ConnectionManager contextInitialized INFO: Connecting to Couchbase Cluster 2012-12-17 13:50:16.621 INFO com.couchbase.client.CouchbaseConnection: Added {QA sa=/127.0.0.1:11210, #Rops=0, #Wops=0, #iq=0, topRop=null, topWop=null, toWrite=0, interested=0} to connect queue 2012-12-17 13:50:16.624 INFO com.couchbase.client.CouchbaseConnection: Connection state changed for sun.nio.ch.SelectionKeyImpl@2e2a730e 2012-12-17 13:50:16.635 WARN net.spy.memcached.auth.AuthThreadMonitor: Incomplete authentication interrupted for node {QA sa=localhost/127.0.0.1:11210, #Rops=0, #Wops=0, #iq=0, topRop=null, topWop=null, toWrite=0, interested=8} 2012-12-17 13:50:16.662 WARN net.spy.memcached.auth.AuthThread: Authentication failed to localhost/127.0.0.1:11210 2012-12-17 13:50:16.662 INFO net.spy.memcached.protocol.binary.BinaryMemcachedNodeImpl: Removing cancelled operation: SASL auth operation 2012-12-17 13:50:16.664 INFO net.spy.memcached.auth.AuthThread: Authenticated to localhost/127.0.0.1:11210 2012-12-17 13:50:16.666 INFO com.couchbase.client.ViewConnection: Added localhost to connect queue 2012-12-17 13:50:16.667 INFO com.couchbase.client.CouchbaseClient: viewmode property isn’t defined. Setting viewmode to production mode 2012-12-17 13:50:16.866:INFO::Started SelectChannelConnector@0.0.0.0:8080 [INFO] Started Jetty Server Navigate to http://localhost:8080/welcome and enjoy the application.
Preparing Your Project
This tutorial uses Servlets and JSPs in combination with Couchbase Server 2.2 to
display and manage beers and breweries found in the beer-sample data set. The
easiest way to develop apps is by using an IDE such as Eclipse or NetBeans. You
can use the IDE to automatically publish apps to an application server such as
Apache Tomcat or GlassFish as a WAR file. We designed the code here to be as portable as possible, but you might need to change one or two things if you have a slightly different version or a customized setup in your environment.
Project Setup
In your IDE, create a new Web Project, either with or without Maven support.
If you have not already gone through the Getting Started section for the Java SDK, you
should review the information on how to include the Couchbase SDK and all the
required dependencies in your project. For more information, see
Preparation.
Also make sure to include Google GSON or your favorite JSON library as well.
This tutorial uses the following directory structure:
|-target
|-src
|---main
|-----java
|-------com
|---------couchbase
|-----------beersample
|-----resources
|-----webapp
|-------WEB-INF
|---------beers
|---------breweries
|---------maps
|---------tags
|---------welcome
|-------css
|-------js
If you use Maven, you should also have a pom.xml file in the root directory. Here is a sample pom.xml so you can see the general structure and dependencies. The full source is at the repository we mentioned earlier. See couchbaselabs on GitHub for the full pom.xml file.
<project xmlns="http://maven.apache.org/POM/4.0.0" xmlns:xsi="http://www.w3.org/2001/XMLSchema-instance"
xsi:schemaLocation="http://maven.apache.org/POM/4.0.0 http://maven.apache.org/xsd/maven-4.0.0.xsd">
<modelVersion>4.0.0</modelVersion>
<groupId>com.couchbase</groupId>
<artifactId>beersample-java</artifactId>
<version>1.0-SNAPSHOT</version>
<packaging>war</packaging>
<name>beersample-java</name>
<dependencies>
<dependency>
<groupId>couchbase</groupId>
<artifactId>couchbase-client</artifactId>
<version>1.2.3</version>
</dependency>
<dependency>
<groupId>com.google.code.gson</groupId>
<artifactId>gson</artifactId>
<version>2.2.2</version>
</dependency>
<dependency>
<groupId>javax</groupId>
<artifactId>javaee-web-api</artifactId>
<version>6.0</version>
<scope>provided</scope>
</dependency>
</dependencies>
</project>
To make the application more interactive, we use jQuery and Twitter Bootstrap. You can either download the libraries and put them in their appropriate css and js directories under the webapp directory, or clone the project repository and use it from there. Either way, make sure you have the following files in place:
css/bootstrap.min.css (the minified twitter bootstrap library)
css/bootstrap-responsive.min.css (the minified responsive layout classes from bootstrap)
From here, you should have a basic web application configured that has all the
dependencies included. We now move on and configure the beer-sample bucket so
we can use it in our application.
Creating Your Views
Views enable you to index and query data from your database. The beer-sample bucket comes with a small set of predefined view functions, but to have our application function correctly we need some more views. This is also a very good chance for you to see how you can manage views inside Couchbase Web Console. For more information on the topics, see Couchbase Developer Guide, Finding Data with Views and Couchbase Manual, Using the Views Editor.
Because we want to list beers and breweries by their name, we need to define one view function for each type of result that we want.
In Couchbase Web Console, click Views .
From the drop-down list box, choose the beer-sample bucket.
Click Development Views, and then click Create Development View to define your first view.
-
Give the view the names of both the design document and the actual view. Insert the following names:
Design Document Name:
_design/dev_beerView Name:
by_nameThe next step is to define the
mapfunction and optionally at this phase you could define areducefunction to perform information on the index results. In our example, we do not use thereducefunctions at all, but you can play around with reduce functions ro see how they work. For more information, see Couchbase Developer Guide, Using Built-in Reduce Functions and Creating Custom Reduces. -
Insert the following JavaScript
mapfunction and click Save.function (doc, meta) { if(doc.type && doc.type == "beer") { emit(doc.name, null); } }
Every map function takes the full document ( doc ) and its associated
metadata ( meta ) as the arguments. Your map function can then inspect this
data and emit the item to a result set when you want to have it in your index.
In our case we emit the name of the beer ( doc.name ) when the document has a
type field and the type is beer. For our application we do not need to emit a
value; therefore we emit a null here.
In general, you should try to keep the index as small as possible. You should
resist the urge to include the full document with emit(meta.id, doc), because
it will increase the size of your view indexes and potentially impact application performance. If you need to access the full document or large parts
of it, use the setIncludeDocs(true) directive, which does a get() call with the document ID in the background. Couchbase Server might return a version of
the document that is slightly out of sync with your view, but it will be a fast and efficient operation.
Now we need to provide a similar map function for the breweries. Because you already know how to do this, here is all the information you need to create it:
Design Document Name:
_design/dev_breweryView Name:
by_name-
Map Function:
function (doc, meta) {
     if(doc.type && doc.type == "brewery") {
       emit(doc.name, null);
     }
   }
The final step is to push the design documents to production mode for Couchbase Server. While the design documents are in development mode, the index is applied only on the local node. See, Couchbase Manual, Development and Production Views. To have the index on the whole data set:
In Couchbase Web Console, click Views.
Click the Publish button on both design documents.
Accept any dialog that warns you from overriding the old view function.
For more information about using views for indexing and querying from Couchbase Server, see the following useful resources:
General Information: Couchbase Server Manual: Views and Indexes.
Sample Patterns: to see examples and patterns you can use for views, see Couchbase Views, Sample Patterns.
Time-stamp Pattern: many developers frequently ask about extracting information based on date or time. To find out more, see Couchbase Views, Sample Patterns.
Bootstrapping Our Servlets
To tell the application server where and how the incoming HTTP requests should
be routed, we need to define a web.xml inside the WEB-INF directory of our
project:
<?xml version="1.0" encoding="UTF-8"?>
<web-app version="3.0" xmlns="http://java.sun.com/xml/ns/javaee" xmlns:xsi="http://www.w3.org/2001/XMLSchema-instance" xsi:schemaLocation="http://java.sun.com/xml/ns/javaee http://java.sun.com/xml/ns/javaee/web-app_3_0.xsd">
    <listener>
        <listener-class>com.couchbase.beersample.ConnectionManager</listener-class>
    </listener>
    <servlet>
        <servlet-name>WelcomeServlet</servlet-name>
        <servlet-class>com.couchbase.beersample.WelcomeServlet</servlet-class>
    </servlet>
    <servlet>
        <servlet-name>BreweryServlet</servlet-name>
        <servlet-class>com.couchbase.beersample.BreweryServlet</servlet-class>
    </servlet>
    <servlet>
        <servlet-name>BeerServlet</servlet-name>
        <servlet-class>com.couchbase.beersample.BeerServlet</servlet-class>
    </servlet>
    <servlet-mapping>
        <servlet-name>WelcomeServlet</servlet-name>
        <url-pattern>/welcome</url-pattern>
    </servlet-mapping>
    <servlet-mapping>
        <servlet-name>BreweryServlet</servlet-name>
        <url-pattern>/breweries/*</url-pattern>
        <url-pattern>/breweries</url-pattern>
    </servlet-mapping>
    <servlet-mapping>
        <servlet-name>BeerServlet</servlet-name>
        <url-pattern>/beers/*</url-pattern>
        <url-pattern>/beers</url-pattern>
    </servlet-mapping>
  <welcome-file-list>
    <welcome-file>welcome</welcome-file>
  </welcome-file-list>
</web-app>
This is not ready to run yet, because you have not implemented any of these classes yet, but we will do that soon. The listener directive references the
ConnectionMananger class, which we implement to manage the connection instance to our Couchbase cluster. The servlet directives define the servlet classes
that we use and the following servlet-mapping directives map HTTP URLs to them. The final welcome-file-list directive tells the application server where to route the root URL ( "/" ).
For now, comment out all servlet, servlet-mapping and welcome-file-list directives with the <!-- and --> tags, because the application server will complain that they are not implemented. When you implement the appropriate servlets, remove the comments accordingly. If you plan to add your own servlets, remember to add and map them inside the web.xml properly!
Managing Connections
The first class we implement is the ConnectionManager in the
src/main/java/com/couchbase/beersample directory. This is a
ServletContextListener that starts the CouchbaseClient on application startup and closes the connection when the application shuts down. Here is the
full class:
package com.couchbase.beersample;

public class ConnectionManager implements ServletContextListener {

  private static CouchbaseClient client;

  private static final Logger logger = Logger.getLogger(
    ConnectionManager.class.getName());

  @Override
  public void contextInitialized(ServletContextEvent sce) {
    logger.log(Level.INFO, "Connecting to Couchbase Cluster");
    ArrayList<URI> nodes = new ArrayList<URI>();
    nodes.add(URI.create("http://127.0.0.1:8091/pools"));
    try {
      client = new CouchbaseClient(nodes, "beer-sample", "");
    } catch (IOException ex) {
      logger.log(Level.SEVERE, ex.getMessage());
    }
  }

  @Override
  public void contextDestroyed(ServletContextEvent sce) {
    logger.log(Level.INFO, "Disconnecting from Couchbase Cluster");
    client.shutdown();
  }

  public static CouchbaseClient getInstance() {
    return client;
  }

}
In this example, we removed the comments and imports to shorten the listing a bit. The contextInitialized and contextDestroyed methods are called on start-up and shutdown. When the application starts, we initialize the CouchbaseClient with the list of nodes, the bucket name and an empty password. In a production deployment, you want to fetch these environment-dependent settings from a configuration file. We will call the getInstance() method from the servlets to obtain the CouchbaseClient instance.
When you publish your application, you should see in the server logs that the Java SDK correctly connects to the bucket. If you see an exception at this phase, it means that your settings are wrong or you have no Couchbase Server running at the given nodes. Here is an example server log from a successful connection:
INFO: Connecting to Couchbase Cluster
SEVERE: 2012-12-05 14:39:00.419 INFO com.couchbase.client.CouchbaseConnection:  Added {QA sa=/127.0.0.1:11210, #Rops=0, #Wops=0, #iq=0, topRop=null, topWop=null, toWrite=0, interested=0} to connect queue
SEVERE: 2012-12-05 14:39:00.426 INFO com.couchbase.client.CouchbaseConnection:  Connection state changed for sun.nio.ch.SelectionKeyImpl@1b554a4
SEVERE: 2012-12-05 14:39:00.458 INFO net.spy.memcached.auth.AuthThread:  Authenticated to localhost/127.0.0.1:11210
SEVERE: 2012-12-05 14:39:00.487 INFO com.couchbase.client.ViewConnection:  Added localhost to connect queue
SEVERE: 2012-12-05 14:39:00.489 INFO com.couchbase.client.CouchbaseClient:  viewmode property isn't defined. Setting viewmode to production mode
INFO: WEB0671: Loading application [com.couchbase_beersample-java_war_1.0-SNAPSHOT] at [/]
INFO: com.couchbase_beersample-java_war_1.0-SNAPSHOT was successfully deployed in 760 milliseconds.
The Welcome Page
The first servlet that we implement is the WelcomeServlet, so go ahead and remove the appropriate comments inside the web.xml file. You also want to enable the welcome-file-list at this point. When a user visits the application, we show him a nice greeting and give him all available options to choose.
Because there is no Couchbase Server interaction involved, we just tell it to render the JSP template:
package com.couchbase.beersample;

public class WelcomeServlet extends HttpServlet {

  @Override
  protected void doGet(HttpServletRequest request, HttpServletResponse response)
    throws ServletException, IOException {
    request.getRequestDispatcher("/WEB-INF/welcome/index.jsp")
      .forward(request, response);
  }

}
The index.jsp file uses styling from Twitter bootstrap to provide a clean layout. Aside from that, it shows a nice greeting and links to the servlets that provide the actual functionality:
<%@taglib prefix="t" tagdir="/WEB-INF/tags" %>
<%@page contentType="text/html" pageEncoding="UTF-8"%>
<%@ taglib prefix="c" uri="http://java.sun.com/jsp/jstl/core" %>
<t:layout>
    <jsp:body>
        <div class="span6">
          <div class="span12">
            <h4>Browse all Beers</h4>
            <a href="/beers" class="btn btn-warning">Show me all beers</a>
            <hr />
          </div>
          <div class="span12">
            <h4>Browse all Breweries</h4>
            <a href="/breweries" class="btn btn-info">Take me to the breweries</a>
          </div>
        </div>
        <div class="span6">
          <div class="span12">
            <h4>About this App</h4>
            <p>Welcome to Couchbase!</p>
            <p>This application helps you to get started on application
                development with Couchbase. It shows how to create, update and
                delete documents and how to work with JSON documents.</p>
            <p>The official tutorial can be found
                <a href="http://www.couchbase.com/docs/couchbase-sdk-java-1.1/tutorial.html">here</a>!</p>
          </div>
        </div>
    </jsp:body>
</t:layout>
There is one more interesting note to make here: it uses taglibs, which enables us to use the same layout for all pages. Because we have not created this layout, we do so now. Create the following layout.tag file in the /WEB-INF/tags directory:
<%@tag description="Page Layout" pageEncoding="UTF-8"%>
<!DOCTYPE HTML PUBLIC "-//W3C//DTD HTML 4.01 Transitional//EN"
"http://www.w3.org/TR/html4/loose.dtd">
<!DOCTYPE html>
<html lang="en">
<head>
<meta charset="utf-8">
<title>Couchbase Java Beer-Sample</title>
<meta name="viewport" content="width=device-width, initial-scale=1.0">
<meta name="description" content="The Couchbase Java Beer-Sample App">
<meta name="author" content="Couchbase, Inc. 2012">
<link href="/css/bootstrap.min.css" rel="stylesheet">
<link href="/css/beersample.css" rel="stylesheet">
<link href="/css/bootstrap-responsive.min.css" rel="stylesheet">
<!-- HTML5 shim, for IE6-8 support of HTML5 elements -->
<!--[if lt IE 9]>
<script src="http://html5shim.googlecode.com/svn/trunk/html5.js"></script>
<![endif]-->
</head>
<body>
<div class="container-narrow">
<div class="masthead">
<ul class="nav nav-pills pull-right">
<li><a href="/welcome">Home</a></li>
<li><a href="/beers">Beers</a></li>
<li><a href="/breweries">Breweries</a></li>
</ul>
<h2 class="muted">Couchbase Beer-Sample</h2>
</div>
<hr>
<div class="row-fluid">
<div class="span12">
<jsp:doBody/>
</div>
</div>
<hr>
<div class="footer">
<p>© Couchbase, Inc. 2012</p>
</div>
</div>
<script src="/js/jquery.min.js"></script>
<script src="/js/bootstrap.min.js"></script>
<script src="/js/beersample.js"></script>
</body>
</html>
Again, nothing fancy here. We just need it in place to make everything look clean afterwards. When you deploy your application, you should see in the logs that it is connects to the Couchbase cluster, and when you view it in the browser you should see a nice web page greeting.
Managing Beers
Now we reach the main portion of the tutorial where we actually interact with Couchbase Server. First, we uncomment the BeerServlet and its corresponding tags inside the web.xml file. We make use of the view to list all beers and make them easily searchable. We also provide a form to create, edit, or delete beers.
Here is the bare structure of our BeerServlet, which will be filled with live data soon. Once again, we removed comments and imports for the sake of brevity:
package com.couchbase.beersample;

public class BeerServlet extends HttpServlet {

  final CouchbaseClient client = ConnectionManager.getInstance();

  final Gson gson = new Gson();

  @Override
  protected void doGet(HttpServletRequest request, HttpServletResponse response)
    throws ServletException, IOException {
    try {
      if(request.getPathInfo() == null) {
        handleIndex(request, response);
      } else if(request.getPathInfo().startsWith("/show")) {
        handleShow(request, response);
      } else if(request.getPathInfo().startsWith("/delete")) {
        handleDelete(request, response);
      } else if(request.getPathInfo().startsWith("/edit")) {
        handleEdit(request, response);
      } else if(request.getPathInfo().startsWith("/search")) {
        handleSearch(request, response);
      }
    } catch (InterruptedException ex) {
      Logger.getLogger(BeerServlet.class.getName()).log(
        Level.SEVERE, null, ex);
    } catch (ExecutionException ex) {
      Logger.getLogger(BeerServlet.class.getName()).log(
        Level.SEVERE, null, ex);
    }
  }

  @Override
  protected void doPost(HttpServletRequest request, HttpServletResponse response)
    throws ServletException, IOException {
  }

  private void handleIndex(HttpServletRequest request,
    HttpServletResponse response) throws IOException, ServletException {
  }

  private void handleShow(HttpServletRequest request,
    HttpServletResponse response) throws IOException, ServletException {
  }

  private void handleDelete(HttpServletRequest request,
    HttpServletResponse response) throws IOException, ServletException,
    InterruptedException,
    ExecutionException {
  }

  private void handleEdit(HttpServletRequest request,
    HttpServletResponse response) throws ServletException, IOException {
  }

  private void handleSearch(HttpServletRequest request,
    HttpServletResponse response) throws IOException, ServletException {
  }

}
Because our web.xml file uses wildcards ( * ) to route every /beer that is
related to this servlet, we need to inspect the path through getPathInfo() and dispatch the request to a helper method that does the actual work. We use the
doPost() method to analyze and store the results of the web form. We also use
this method to edit and create new beers because we sent the form through a POST
request.
The first functionality we implement is a list of the top 20 beers in a table.
We can use the beer/by_name view we created earlier to get a sorted list of all beers. The following Java code belongs to the handleIndex method and builds the list:
// Fetch the View
View view = client.getView("beer", "by_name");

// Set up the Query object
Query query = new Query();

// We the full documents and only the top 20
query.setIncludeDocs(true).setLimit(20);

// Query the Cluster
ViewResponse result = client.query(view, query);

// This ArrayList will contain all found beers
ArrayList<HashMap<String, String>> beers = new ArrayList<HashMap<String, String>>();

// Iterate over the found documents
for(ViewRow row : result) {
  // Use Google GSON to parse the JSON into a HashMap
  HashMap<String, String> parsedDoc = gson.fromJson((String)row.getDocument(), HashMap.class);

  // Create a HashMap which will be stored in the beers list.
  HashMap<String, String> beer = new HashMap<String, String>();
  beer.put("id", row.getId());
  beer.put("name", parsedDoc.get("name"));
  beer.put("brewery", parsedDoc.get("brewery_id"));
  beers.add(beer);
}

// Pass all found beers to the JSP layer
request.setAttribute("beers", beers);

// Render the index.jsp template
request.getRequestDispatcher("/WEB-INF/beers/index.jsp")
  .forward(request, response);
The index action in the code above queries the view, parses the results with
GSON into a HashMap object and eventually forwards the ArrayList to the JSP layer. At this point we can implement the index.jsp template which iterates over the ArrayList and prints out the beers in a nicely formatted table:
<%@taglib prefix="t" tagdir="/WEB-INF/tags" %>
<%@page contentType="text/html" pageEncoding="UTF-8"%>
<%@ taglib prefix="c" uri="http://java.sun.com/jsp/jstl/core" %>
<t:layout>
  <jsp:body>
    <h3>Browse Beers</h3>

    <form class="navbar-search pull-left">
      <input id="beer-search" type="text" class="search-query" placeholder="Search for Beers">
    </form>

    <table id="beer-table" class="table table-striped">
      <thead>
        <tr>
          <th>Name</th>
          <th>Brewery</th>
          <th></th>
        </tr>
      </thead>
      <tbody>
        <c:forEach items="${beers}" var="beer">
            <tr>
              <td><a href="/beers/show/${beer.id}">${beer.name}</a></td>
              <td><a href="/breweries/show/${beer.brewery}">To Brewery</a></td>
              <td>
                <a class="btn btn-small btn-warning" href="/beers/edit/${beer.id}">Edit</a>
                <a class="btn btn-small btn-danger" href="/beers/delete/${beer.id}">Delete</a>
              </td>
            </tr>
          </c:forEach>
        </tbody>
      </table>
    </jsp:body>
</t:layout>
Here we use JSP tags to iterate
over the beers and use their properties, name and id, and fill the table rows with this information. In a browser you should now see a table with a list of beers with Edit and Delete buttons on the right. You can also see a link to the associated brewery that you can click on. Now we implement the delete action for each beer, because it’s very easy to do with Couchbase:
private void handleDelete(HttpServletRequest request,
  HttpServletResponse response) throws IOException, ServletException, InterruptedException, ExecutionException {

  // Split the Request-Path and get the Beer ID out of it
  String beerId = request.getPathInfo().split("/")[2];

  // Try to delete the document and store the OperationFuture
  OperationFuture<Boolean> delete = client.delete(beerId);

  // If the Future succeeded (returned true), redirect to /beers
  if(delete.get()) {
    response.sendRedirect("/beers");
  }
}
The delete method deletes a document from the cluster based on the given document key. Here, we wait on the OperationFuture to return from the get() method and if the server successfully deletes the item we get true and can redirect to the index action.
Now that we can delete a document, we want to enable users to edit beers. The edit action is very similar to the delete action, but it reads and updates the document based on the given ID instead of deleting it. Before we can edit a beer, we need to parse the string representation of the JSON document into a Java structure so we can use it in the template. We again make use of the Google GSON library to handle this for us:
private void handleEdit(HttpServletRequest request,
    HttpServletResponse response) throws ServletException, IOException {

    // Extract the Beer ID from the URL
    String[] beerId = request.getPathInfo().split("/");

    // If there is a Beer ID
    if(beerId.length > 2) {

      // Read the Document (as a JSON string)
      String document = (String) client.get(beerId[2]);

      HashMap<String, String> beer = null;
      if(document != null) {
        // Convert the String into a HashMap
        beer = gson.fromJson(document, HashMap.class);
        beer.put("id", beerId[2]);

        // Forward the beer to the view
        request.setAttribute("beer", beer);
      }
      request.setAttribute("title", "Modify Beer \"" + beer.get("name") + "\"");    } else {
      request.setAttribute("title", "Create a new beer");
    }

    request.getRequestDispatcher("/WEB-INF/beers/edit.jsp").forward(request, response);
  }
If the handleEdit method gets a beer document back from Couchbase Server and parses it into JSON, the document is converted to a HashMap object and then forwarded to the edit.jsp template. Also, we define a title variable that we use inside the template to determine whether we want to edit a document or create a new one. We can enable users to create new beers as opposed to editing an existing beer anytime we pass no Beer ID to the edit method. Here is the corresponding edit.jsp template:
<%@taglib prefix="t" tagdir="/WEB-INF/tags" %>
<%@page contentType="text/html" pageEncoding="UTF-8"%>
<%@ taglib prefix="c" uri="http://java.sun.com/jsp/jstl/core" %>
<t:layout>
  <jsp:body>
    <h3>${title}</h3>

    <form method="post" action="/beers/edit/${beer.id}">
      <fieldset>
        <legend>General Info</legend>
        <div class="span12">
          <div class="span6">
            <label>Name</label>
            <input type="text" name="beer_name" placeholder="The name of the beer." value="${beer.name}">

            <label>Description</label>
            <input type="text" name="beer_description" placeholder="A short description." value="${beer.description}">
          </div>
          <div class="span6">
            <label>Style</label>
            <input type="text" name="beer_style" placeholder="Bitter? Sweet? Hoppy?" value="${beer.style}">

            <label>Category</label>
            <input type="text" name="beer_category" placeholder="Ale? Stout? Lager?" value="${beer.category}">
          </div>
        </div>
      </fieldset>
      <fieldset>
        <legend>Details</legend>
        <div class="span12">
          <div class="span6">
            <label>Alcohol (ABV)</label>
            <input type="text" name="beer_abv" placeholder="The beer's ABV" value="${beer.abv}">

            <label>Biterness (IBU)</label>
            <input type="text" name="beer_ibu" placeholder="The beer's IBU" value="${beer.ibu}">
          </div>
          <div class="span6">
            <label>Beer Color (SRM)</label>
            <input type="text" name="beer_srm" placeholder="The beer's SRM" value="${beer.srm}">

            <label>Universal Product Code (UPC)</label>
            <input type="text" name="beer_upc" placeholder="The beer's UPC" value="${beer.upc}">
          </div>
        </div>
      </fieldset>
      <fieldset>
        <legend>Brewery</legend>
        <div class="span12">
          <div class="span6">
            <label>Brewery</label>
            <input type="text" name="beer_brewery_id" placeholder="The brewery" value="${beer.brewery_id}">
          </div>
        </div>
      </fieldset>
      <div class="form-actions">
          <button type="submit" class="btn btn-primary">Save changes</button>
      </div>
    </form>
  </jsp:body>
</t:layout>
This template is a little bit longer, but that is mainly because we have lots of fields on our beer documents. Note how we use the beer attributes inside the value attributes of the HTML input fields. We also use the unique ID in the form method to dispatch it to the correct URL on submit.
The last thing we need to do for form submission to work is the actual form parsing and storing itself. Since we do form submission through a POST request, we need to implement the doPost() method on our servlet:
@Override
protected void doPost(HttpServletRequest request, HttpServletResponse response) throws ServletException, IOException {

  // Parse the Beer ID
  String beerId = request.getPathInfo().split("/")[2];
  HashMap<String, String> beer = beer = new HashMap<String, String>();
  Enumeration<String> params = request.getParameterNames();

  // Iterate over all POST params
  while(params.hasMoreElements()) {
    String key = params.nextElement();
    if(!key.startsWith("beer_")) {
      continue;
    }
    String value = request.getParameter(key);

    // Store them in a HashMap with key and value
    beer.put(key.substring(5), value);
  }

  // Add two more fields
  beer.put("type", "beer");
  beer.put("updated", new Date().toString());

  // Set (add or override) the document (converted to JSON with GSON)
  client.set(beerId, 0, gson.toJson(beer));

  // Redirect to the show page
  response.sendRedirect("/beers/show/" + beerId);
}
The code iterates over all POST fields and stores them in a HashMap object. We then
use the set command to store the document to Couchbase Server and use Google
GSON to translate information out of the HashMap object into a JSON string. In this case, we could also wait for a OperationFuture response and return an error if we determine the set failed.
The last line redirects to a show method, which just shows all fields of the document. Because the patterns are the same as before, here is the handleShow method:
private void handleShow(HttpServletRequest request,
  HttpServletResponse response) throws IOException, ServletException {

  // Extract the Beer ID
  String beerId = request.getPathInfo().split("/")[2];
  String document = (String) client.get(beerId);
  if(document != null) {
    // Parse the JSON and set it for the template if a document was found
    HashMap<String, String> beer = gson.fromJson(document, HashMap.class);
    request.setAttribute("beer", beer);
  }

  // render the show.jsp template
  request.getRequestDispatcher("/WEB-INF/beers/show.jsp")
    .forward(request, response);
}
Again we extract the ID and if Couchbase Server finds the document it gets parsed into a HashMap and forwarded to the show.jsp template. If the server finds no document, we get a return of null in the Java SDK. The template then just prints out all keys and values in a table:
<%@taglib prefix="t" tagdir="/WEB-INF/tags" %>
<%@page contentType="text/html" pageEncoding="UTF-8"%>
<%@ taglib prefix="c" uri="http://java.sun.com/jsp/jstl/core" %>
<t:layout>
  <jsp:body>
    <h3>Show Details for Beer "${beer.name}"</h3>
    <table class="table table-striped">
      <tbody>
        <c:forEach items="${beer}" var="item">
          <tr>
              <td><strong>${item.key}</strong></td>
              <td>${item.value}</td>
          </tr>
        </c:forEach>
      </tbody>
    </table>
  </jsp:body>
</t:layout>
In the index.jsp template, you might notice the search box at the top. We can use it to dynamically filter our table results based on the user input. We will use nearly the same code for the filter as in the index method; except this time we make use of range queries to define a beginning and end to search for. For more information about performing range queries, see Ordering.
Before we implement the actual Java method, we need to put the following snippet in the js/beersample.js file. You might have already done this at the beginning of the tutorial, and if so, you can skip this step. This code takes any search box changes from the UI and updates the table with the JSON returned from the search method:
$("#beer-search").keyup(function() {
   var content = $("#beer-search").val();
   if(content.length >= 0) {
       $.getJSON("/beers/search", {"value": content}, function(data) {
           $("#beer-table tbody tr").remove();
           for(var i=0;i < data.length; i++) {
               var html = "<tr>";
               html += "<td><a href=\"/beers/show/"+data[i].id+"\">"+data[i].name+"</a></td>";
               html += "<td><a href=\"/breweries/show/"+data[i].brewery+"\">To Brewery</a></td>";
               html += "<td>";
               html += "<a class=\"btn btn-small btn-warning\" href=\"/beers/edit/"+data[i].id+"\">Edit</a>\n";
               html += "<a class=\"btn btn-small btn-danger\" href=\"/beers/delete/"+data[i].id+"\">Delete</a>";
               html += "</td>";
               html += "</tr>";
               $("#beer-table tbody").append(html);
           }
       });
   }
});
The code waits for key-up events on the search field and then does an AJAX query to the search method on the servlet. The servlet computes the result and sends it back as JSON. The JavaScript then clears the table, iterates over the result, and creates new rows with the new JSON results. The search method looks like this:
private void handleSearch(HttpServletRequest request, HttpServletResponse response) throws IOException, ServletException {

  // Exctract the searched value
  String startKey = request.getParameter("value").toLowerCase();

  // Prepare a query against the by_name view
  View view = client.getView("beer", "by_name");
  Query query = new Query();

  // Define the query params
  query.setIncludeDocs(true) // include the full documents
    .setLimit(20) // only show 20 results
    .setRangeStart(ComplexKey.of(startKey)) // Start the search at the given search value
    .setRangeEnd(ComplexKey.of(startKey + "\uefff")); // End the search at the given search plus the unicode "end"

  // Query the view
  ViewResponse result = client.query(view, query);

  ArrayList<HashMap<String, String>> beers = new ArrayList<HashMap<String, String>>();
  // Iterate over the results
  for(ViewRow row : result) {
    // Parse the Document to a HashMap
    HashMap<String, String> parsedDoc = gson.fromJson((String)row.getDocument(), HashMap.class);

      // Create a new Beer out of it
      HashMap<String, String> beer = new HashMap<String, String>();
      beer.put("id", row.getId());
      beer.put("name", parsedDoc.get("name"));
      beer.put("brewery", parsedDoc.get("brewery_id"));
      beers.add(beer);
  }

  // Return a JSON representation of all Beers
  response.setContentType("application/json");
  PrintWriter out = response.getWriter();
  out.print(gson.toJson(beers));
  out.flush();
}
You can use the setRangeStart() and setRangeEnd() methods to define the key range Couchbase Server returns. If we just provide the start range key, then we
get all documents starting from our search value. Because we want only those beginning with the search value, we can use the special "\uefff" UTF-8 character at the end, which means “end here.” You need to get used to this convention, but it’s very fast and efficient when accessing the view.
Wrapping Up
The tutorial presents an easy approach to start a web application with Couchbase Server as the underlying data source. If you want to dig a little bit deeper, see the full source code at couchbaselabs on GitHub. This contains more servlets and code to learn from. This might be extended and updated from time to time, so you might want to watch the repo.
Of course this is only the starting point for Couchbase, but together with the Getting Started Guide and other community resources you are well equipped to start exploring Couchbase Server on your own. Have fun working with Couchbase!
Using the APIs
The Client libraries provides an interface to both Couchbase and Memcached
clients using a consistent interface. The interface between your Java
application and your Couchbase or Memcached servers is provided through the
instantiation of a single object class, CouchbaseClient.
Creating a new object based on this class opens the connection to each configured server and handles all the communication with the servers when setting, retrieving and updating values. A number of different methods are available for creating the object specifying the connection address and methods.
Connecting to a Couchbase Bucket
You can connect to specific Couchbase buckets (in place of using the default
bucket or a hostname:port combination configured on the Couchbase cluster) by
using the Couchbase URI for one or more Couchbase nodes and specifying the
bucket name and password (if required) when creating the new CouchbaseClient
object.
For example, to connect to the local host and the default bucket:
List<URI> uris = new LinkedList<URI>();
uris.add(URI.create("http://127.0.0.1:8091/pools"));

try {
  client = new CouchbaseClient(uris, "default", "");
} catch (Exception e) {
  System.err.println("Error connecting to Couchbase: " + e.getMessage());
  System.exit(0);
}
The format of this constructor is:
CouchbaseClient(URIs,BUCKETNAME,BUCKETPASSWORD)
Where:
URISis aListof URIs to the Couchbase nodes. The format of the URI is the hostname, port and path/pools.BUCKETNAMEis the name of the bucket on the cluster that you want to use. Specified as aString.BUCKETPASSWORDis the password for this bucket. Specified as aString.
The returned CouchbaseClient object can be used as with any other
CouchbaseClient object.
Connecting using Hostname and Port with SASL
If you want to use SASL to provide secure connectivity to your Couchbase server,
create a CouchbaseConnectionFactory that defines the SASL
connection type, user bucket, and password.
The connection to Couchbase uses the underlying protocol for SASL. This is
similar to the earlier example except that it uses the
CouchbaseConnectionFactory class.
List<URI> baseURIs = new ArrayList<URI>();
baseURIs.add(base);

CouchbaseConnectionFactory cf = new CouchbaseConnectionFactory(baseURIs, "userbucket", "password");
client = new CouchbaseClient((CouchbaseConnectionFactory) cf);
Setting runtime Parameters for the CouchbaseConnectionFactoryBuilder
A final approach to creating the connection is using the
CouchbaseConnectionFactoryBuilder and CouchbaseConnectionFactory classes.
It’s possible to override some of the default parameters that are defined in
CouchbaseConnectionFactoryBuilder for a variety of reasons and customize the
connection for the session depending on expected load on the server and
potential network traffic.
For example, in the following program snippet, we instantiate a new
CouchbaseConnectionFactoryBuilder and use the setOpTimeout method to change
the default value to 10000 ms (10 seconds).
We subsequently use the buildCouchbaseConnection specifying the bucket name,
password and an username (which is not being used any more) to get a
CouchbaseConnectionFactory object. We then create a CouchbaseClient object.
List<URI> baseURIs = new ArrayList<URI>();
baseURIs.add(base);
CouchbaseConnectionFactoryBuilder cfb = new CouchbaseConnectionFactoryBuilder();

// Ovveride default values on CouchbaseConnectionFactoryBuilder

// For example - wait up to 10 seconds for an operation to succeed
cfb.setOpTimeout(10000);

CouchbaseConnectionFactory cf = cfb.buildCouchbaseConnection(baseURIs, "default", "", "");

client = new CouchbaseClient((CouchbaseConnectionFactory) cf);
For example, the following code snippet sets the OpTimeOut value to 10000 ms before creating the connection as we saw in the code above.
cfb.setOpTimeout(10000);
These parameters can be set at run time by setting a property on the command line (such as -DopTimeout=1000 ) or via properties in a file cbclient.properties in that order of precedence.
The following table summarizes the parameters that you can set. The table provides the parameter name, a brief description, the default value, and why the particular parameter might need to be modified.
| Parameter | Description | Default | When to Override the default value |
|---|---|---|---|
opTimeout |
Time in milliseconds for an operation to time out | 2500 ms | You can set this value higher when there is heavy network traffic and time-outs happen frequently. |
timeoutExceptionThreshold |
Number of operations to time out before the node is deemed down | 998 | You can set this value lower to deem a node is down earlier. |
readBufSize |
Read buffer size | 16384 | You can set this value higher or lower to optimize the reads. |
opQueueMaxBlockTime |
The maximum time to block waiting for op queue operations to complete, in milliseconds. | 10000 ms | The default has been set with the expectation that most requests are interactive and waiting for more than a few seconds is thus more undesirable than failing the request. However, this value could be lowered for operations not to block for this time. |
shouldOptimize |
Optimize behavior for the network | False | You can set this value to be true if the performance should be optimized for the network as in cases where there are some known issues with the network that may be causing adverse effects on applications. |
maxReconnectDelay |
Maximum number of milliseconds to wait between reconnect attempts. | 30000 ms | You can set this value lower when there is intermittent and frequent connection failures. |
MinReconnectInterval |
Default minimum reconnect interval in milliseconds | 1100 | This means that if a reconnect is needed, it won’t try to reconnect more frequently than the default value. The internal connections take up to 500 ms per request. You can set this value higher to try reconnecting less frequently. |
obsPollInterval |
Wait for the specified interval before the observe operation polls the nodes. | 400 | Set this higher or lower depending on whether the polling needs to happen less or more frequently depending on the tolerance limits for the observe operation as compared to other operations. |
obsPollMax |
The maximum number of times to poll the master and replicas to meet the desired durability requirements. | 10 | You could set this value higher if the observe operations do not complete after the normal polling. |
Shutting down the Connection
The preferred method for closing a connection is to cleanly shut down the active
connection with a time-out using the shutdown() method with an optional time-out
period and unit specification. The following example shuts down the active connection
to all the configured servers after 60 seconds:
client.shutdown(60, TimeUnit.SECONDS);
The unit specification relies on the TimeUnit object enumerator, which
supports the following values:
| Constant | Description |
|---|---|
TimeUnit.NANOSECONDS |
Nanoseconds |
TimeUnit.MICROSECONDS |
Microseconds |
TimeUnit.MILLISECONDS |
Milliseconds |
TimeUnit.SECONDS |
Seconds |
The method returns a Boolean value that indicates whether the shutdown request completed successfully.
You also can shut down an active connection immediately by using the shutdown()
method to your Couchbase object instance. For example:
client.shutdown();
In this form the shutdown() method returns no value.
Advanced Usage
This Couchbase SDK Java provides a complete interface to Couchbase Server through the Java programming language. For more information about Couchbase Server and Java read the Java SDK Getting Started Guide followed by the in-depth Couchbase and Java tutorial. We require Java SE 6 or later for running the Couchbase Client Library.
This section covers the following topics:
Logging from the Java SDK
Handling time-outs
Bulk load and exponential back-off
Retrying after receiving a temporary failure
Configuring Logging
Occasionally when you are troubleshooting an issue with a clustered deployment, you might find it helpful to use additional information from the Couchbase Java SDK logging. The SDK uses JDK logging and this can be configured by specifying a run-time define and adding some additional logging properties. You can set up Java SDK logging in the following ways:
Use spymemcached to log from the Java SDK. Because the SDK uses spymemcached and is compatible with spymemcached, you can use the logging provided to output SDK-level information.
Set your JDK properties to log Couchbase Java SDK information.
Provide logging from your application.
To provide logging via spymemcached:
System.setProperty("net.spy.log.LoggerImpl", "net.spy.memcached.compat.log.SunLogger");
or
System.setProperty("net.spy.log.LoggerImpl", "net.spy.memcached.compat.log.Log4JLogger");
The default logger logs everything to the standard error stream. To provide logging via the JDK, if you are running a command-line Java program, you can run the program with logging by setting a property:
-Djava.util.logging.config.file=logging.properties
The other alternative is to create a logging.properties and add it to your classpath:
logging.properties
handlers = java.util.logging.ConsoleHandler
java.util.logging.ConsoleHandler.level = ALL
java.util.logging.ConsoleHandler.formatter = java.util.logging.SimpleFormatter
com.couchbase.client.vbucket.level = FINEST
com.couchbase.client.vbucket.config.level = FINEST
com.couchbase.client.level = FINEST
The final option is to provide logging from your Java application. If you are writing your application in an IDE that manages command-line operations for you, it might be easier if you express logging in your application code. Here is an example:
// Tell things using spymemcached logging to use internal SunLogger API
Properties systemProperties = System.getProperties();
systemProperties.put("net.spy.log.LoggerImpl", "net.spy.memcached.compat.log.SunLogger");
System.setProperties(systemProperties);

Logger.getLogger("net.spy.memcached").setLevel(Level.FINEST);
Logger.getLogger("com.couchbase.client").setLevel(Level.FINEST);
Logger.getLogger("com.couchbase.client.vbucket").setLevel(Level.FINEST);

//get the top Logger
Logger topLogger = java.util.logging.Logger.getLogger("");

// Handler for console (reuse it if it already exists)
Handler consoleHandler = null;
//see if there is already a console handler
for (Handler handler : topLogger.getHandlers()) {
    if (handler instanceof ConsoleHandler) {
        //found the console handler
        consoleHandler = handler;
        break;
    }
}

if (consoleHandler == null) {
    //there was no console handler found, create a new one
    consoleHandler = new ConsoleHandler();
    topLogger.addHandler(consoleHandler);
}

//set the console handler to fine:
consoleHandler.setLevel(java.util.logging.Level.FINEST);
Handling Time-outs
The Java client library has a set of synchronous and asynchronous methods. While it does not happen in most situations, occasionally network IO can become congested, nodes can fail, or memory pressure can lead to situations where an operation can time out.
When a time-out occurs, most of the synchronous methods on the client return a RuntimeException showing a time-out as the root cause. Because the asynchronous operations give more specific control over how long it takes for an operation to be successful or unsuccessful, asynchronous operations throw a checked TimeoutException.
As an application developer, it is best to think about what you would do after this time-out. This might be something such as showing the user a message, doing nothing, or going to some other system for additional data.
In some cases you might want to retry the operation, but you should consider this carefully before performing the retry in your code—a retry might exacerbate the underlying problem that caused the time-out. If you choose to do a retry, providing it in the form of a back-off or exponential back-off is advisable. This can be thought of as a pressure relief valve for intermittent resource problems. For more information on back-off and exponential back-off, see Bulk Load and Exponential Backoff.
Timing-out and Blocking
If your application creates a large number of asynchronous operations, you might encounter immediate time-outs in response to the requests. When you perform an asynchronous operation, Couchbase Java SDK creates an object and puts the object into a request queue. The object and the request are stored in Java run-time memory. In other words, they are stored in local to your Java application run-time memory and require some amount of Java Virtual Machine IO to be serviced.
Rather than write so many asynchronous operations that can overwhelm a JVM and generate out of memory errors for the JVM, you can rely on SDK-level time-outs. The default behavior of the Java SDK is to start to immediately time-out asynchronous operations if the queue of operations to be sent to the server is overwhelmed.
You can also choose to control the volume of asynchronous requests that are issued by your application by setting a time-out for blocking. You might want to do this for a bulk load of data so that you do not overwhelm your JVM. Here’s an example:
List<URI> baselist = new ArrayList<URI>();
baselist.add(new URI("http://localhost:8091/pools"));

CouchbaseConnectionFactoryBuilder cfb = new CouchbaseConnectionFactoryBuilder();
cfb.setOpQueueMaxBlockTime(5000); // wait up to 5 seconds when trying to enqueue an operation

CouchbaseClient myclient = new CouchbaseClient(cfb.buildCouchbaseConnection(baselist, "default", "default", ""));
Bulk Load and Exponential Back-off
When you bulk load data to Couchbase Server, you can accidentally overwhelm available memory in the Couchbase cluster before it can store data on disk. If this happens, Couchbase Server immediately sends a response indicating the operation cannot be handled at the moment but can be handled later.
This is sometimes referred to as handling temporary out-of-memory (OOM). Note, though, that the actual temporary failure could be sent back for reasons other than OOM. However, temporary OOM is the most common underlying cause for this error.
To handle this problem, you could perform an exponential back-off as part of your bulk load. The back-off essentially reduces the number of requests sent to Couchbase Server as it receives OOM errors:
package com.couchbase.sample.dataloader;

import com.couchbase.client.CouchbaseClient;
import java.io.IOException;
import java.net.URI;
import java.util.List;
import net.spy.memcached.internal.OperationFuture;
import net.spy.memcached.ops.OperationStatus;

/**
 *
 * The StoreHandler exists mainly to abstract the need to store things
 * to the Couchbase Cluster even in environments where we may receive
 * temporary failures.
 *
 * @author ingenthr
 */
public class StoreHandler {

  CouchbaseClient cbc;
  private final List<URI> baselist;
  private final String bucketname;
  private final String password;

  /**
   *
   * Create a new StoreHandler.  This will not be ready until it's initialized
   * with the init() call.
   *
   * @param baselist
   * @param bucketname
   * @param password
   */
  public StoreHandler(List<URI> baselist, String bucketname, String password) {
    this.baselist = baselist; // TODO: maybe copy this?
    this.bucketname = bucketname;
    this.password = password;
  }

  /**
   * Initialize this StoreHandler.
   *
   * This will build the connections for the StoreHandler and prepare it
   * for use.  Initialization is separated from creation to ensure we would
   * not throw exceptions from the constructor.
   *
   *
   * @return StoreHandler
   * @throws IOException
   */
  public StoreHandler init() throws IOException {
    // I prefer to avoid exceptions from constructors, a legacy we're kind
    // of stuck with, so wrapped here
    cbc = new CouchbaseClient(baselist, bucketname, password);
    return this;
  }

  /**
   *
   * Perform a regular, asynchronous set.
   *
   * @param key
   * @param exp
   * @param value
   * @return the OperationFuture<Boolean> that wraps this set operation
   */
  public OperationFuture<Boolean> set(String key, int exp, Object value) {
    return cbc.set(key, exp, cbc);
  }

  /**
   * Continuously try a set with exponential backoff until number of tries or
   * successful.  The exponential backoff will wait a maximum of 1 second, or
   * whatever
   *
   * @param key
   * @param exp
   * @param value
   * @param tries number of tries before giving up
   * @return the OperationFuture<Boolean> that wraps this set operation
   */
  public OperationFuture<Boolean> contSet(String key, int exp, Object value,
          int tries) {
    OperationFuture<Boolean> result = null;
    OperationStatus status;
    int backoffexp = 0;

    try {
      do {
        if (backoffexp > tries) {
          throw new RuntimeException("Could not perform a set after "
                  + tries + " tries.");
        }
        result = cbc.set(key, exp, value);
        status = result.getStatus(); // blocking call, improve if needed
        if (status.isSuccess()) {
          break;
        }
        if (backoffexp > 0) {
          double backoffMillis = Math.pow(2, backoffexp);
          backoffMillis = Math.min(1000, backoffMillis); // 1 sec max
          Thread.sleep((int) backoffMillis);
          System.err.println("Backing off, tries so far: " + backoffexp);
        }
        backoffexp++;

        if (!status.isSuccess()) {
          System.err.println("Failed with status: " + status.getMessage());
        }

      } while (status.getMessage().equals("Temporary failure"));
    } catch (InterruptedException ex) {
      System.err.println("Interrupted while trying to set.  Exception:"
              + ex.getMessage());
    }

    if (result == null) {
      throw new RuntimeException("Could not carry out operation."); // rare
    }

    // note that other failure cases fall through.  status.isSuccess() can be
    // checked for success or failure or the message can be retrieved.
    return result;
  }
}
There is also a setting you can provide at the connection-level for Couchbase Java SDK that helps you avoid too many asynchronous requests:
List<URI> baselist = new ArrayList<URI>();
baselist.add(new URI("http://localhost:8091/pools"));

CouchbaseConnectionFactoryBuilder cfb = new CouchbaseConnectionFactoryBuilder();
cfb.setOpTimeout(10000);  // wait up to 10 seconds for an operation to succeed
cfb.setOpQueueMaxBlockTime(5000); // wait up to 5 seconds when trying to enqueue an operation

CouchbaseClient myclient = new CouchbaseClient(cfb.buildCouchbaseConnection(baselist, "default", "default", ""));
Retrying After Receiving a Temporary Failure
If you send too many requests all at once to Couchbase, you can create an out of memory problem, and the server sends back a temporary failure message. The message indicates you can retry the operation, however, the server will not slow down significantly; it just does not handle the request. In contrast, other database systems will become slower for all operations under load.
This gives your application a bit more control because the temporary failure messages gives you the opportunity to provide a back-off mechanism and retry operations in your application logic.
Java Virtual Machine Tuning Guidelines
Generally speaking, there is no reason to adjust any Java Virtual Machine parameters when using the Couchbase Java Client. In general, you should not start with specific tuning, but instead should use defaults from the application server first, and then measure application metrics such as throughput and response time. Then, if there is a need to make an improvement, make adjustments and remeasure.
The recommendations here are based on the Oracle (formerly Sun) HotSpot Virtual Machine and derivations such as the Java Virtual Machine shipped with Mac OS X and the OpenJDK project. Other Java virtual machines likely behave similarly.
By default, garbage collection (GC) times can easily go over 1 second. This can lead to higher than expected response times or even time-outs, as the default time-out is 2.5 seconds. This is true with simple tests even on systems with lots of CPUs and a good amount of memory.
The reason for this is that for the most part, by default, the JVM is weighted toward throughput instead of latency. Of course, much of this can be controlled with GC tuning on the JVM. For the HotSpot JVM, refer to this white paper: http://www.oracle.com/technetwork/java/javase/memorymanagement-whitepaper-150215.pdf
In the referenced white paper, the Concurrent Mark Sweep collector is recommended if your application needs short pauses. It also recommends advising the JVM to try to shorten pause times. Given the Couchbase client’s 2.5 second default time-out, with our basic testing we found the following to be useful:
-XX:+UseConcMarkSweepGC -XX:MaxGCPauseMillis=850
The white paper refers to a couple of tools that might be useful in gathering information on JVM GC performance. For example, adding -XX:+PrintGCDetails and -XX:+PrintGCTimeStamps is a simple way to generate log messages that you might correlate to application behavior. The logs might show a full GC event that takes several seconds during which no processing occurs and operations might time-out. Depending on your application’s workload, adjusting parameters related to how to perform a full GC, which collector to use, how long to pause the VM during GC, and even adding incremental mode might help, . One other common tool for getting information is JConsole. JConsole is more of an interactive tool, but it might help you identify changes to make in the different memory spaces used by the JVM to further reduce the need to run a GC on the old generation.
There is a CPU time trade-off when setting these tuning parameters. The white paper describes some additional tuning parameters that you can use.
If you are using JDK 7 update 4 or later, the G1 collector might be an even better option. Again, you should be guided by measuring performance from the application level.
Even with these, our testing showed some GC times near 0.5 seconds. While the Couchbase Client allows tuning of the time-out time to drop as low as you want, we do not recommend dropping it much below 1 second unless you are planning to tune other parts of the system beyond the JVM.
For example, most people run applications on networks that do not offer guaranteed response time. If the network is oversubscribed or minor blips occur on the network, there can be TCP retransmissions. While many TCP implementations ignore it, RFC 2988 specifies rounding up to 1 second when calculating TCP retransmit time-outs.
Achieving either maximum throughput or minimum per-operation latency can be enhanced with JVM tuning, supported by overall system tuning at the extremes.
Appendix: Release Notes
The following sections provide release notes for individual release versions of Couchbase Client Library Java. To browse or submit new issues, see the Couchbase Java Issues Tracker.
Release Notes for Couchbase Client Library Java 1.2.3 GA (3 December 2013)
The 1.2.3 release is the third bug fix release for the 1.2 series. It is a pure bug fix release, increasing the stability of the SDK in various scenarios.
Fixes in 1.2.3
SPY-146: When using persistence and replication constraints (that is, PersistTo and ReplicateTo), together with “special” UTF-8 characters that take up 2 bytes instead of one (for example the pound sign or euro sign), in 1.2.2 and earlier it doesn’t work‐a normal set() works, but a set with a constraint will lead to a time-out. Now the UTF-8 key is properly encoded for the underlying protocol.
SPY-144: During special failure conditions on the server side, the callback stack of an operation might grow out of bounds. This is now mitigated, improving the general stability of the client.
SPY-136: When a node is rebooted and a client later than 1.2.1 is used, the SASL (authentication) mechanism list might not respond immediately, leading to authentication failures. Now, the client waits until a valid responds is returned.
JCBC-380: When Couchbase Server is configured with an alternative admin port (not using 8091), the SDK is now aware of the change completely and does not force you to use 8091. This is a regression fix.
Release Notes for Couchbase Client Library Java 1.2.2 GA (5 November 2013)
The 1.2.2 release is the second bug fix release for the 1.2 series. It has important fixes for the replica read functionality and in general stabilizes the 1.2 release branch. Couchbase recommends that all 1.2.x users upgrade to the 1.2.2 release.
New Features and Behavior Changes in 1.2.2
-
JCBC-371: In this and a series of other changes, the overhead for vBucket objects during rebalance and in general has been reduced. During a rebalance process, existing Configurations are reused, leading to less garbage collection (especially when more than one
CouchbaseClientobject is used). The internal implementation has also been changed to be more memory efficient.This change is completely opaque. You just see less memory usage and garbage collector pressure in a profiler during rebalance.
-
JCBC-369: A small bug in the observe logic used for
ReplicateToandPersistTooperations has been fixed, but more importantly, the performance has been improved. The constant time for an operation that uses persistence or replication constraints has been reduced by exactly one observe interval, which defaults to 10 ms.Previously, the loop waited an interval at the end, even when the result was already correctly fetched. For applications making heavy use of
PersistToandReplicateTo, this should be a good performance enhancement. Also make sure to use Couchbase Server version 2.2 to benefit from server-side optimizations in that area.
Fixes in 1.2.2
JCBC-373, JCBC-374: In a series of changes, the stability and performance of replica read operations has been greatly improved. The code now also multicasts to the active node, increasing the chance that a replica read operation returns successfully, even when a replica node goes down. Also, thread-safety issues have been fixed and the actual calls are optimized to go only to the nodes that can (based on the configuration) answer such a get request.
JCBC-368: During bootstrap, a deadlock with the Netty IO provider has been resolved. Now, the deadlock is avoided and an exception is thrown to indicate what went wrong during streaming connection setup.
JCBC-375: In some cases, when a streaming connection was dropped because of a race condition, the new connection could not be established. This change fixes the condition and makes sure there is always a valid state.
SPY-141: Wrong assertions that would incorrectly throw an exception when a negative CAS value is received have been removed. Because this is a valid CAS identifier, the assumption can lead to false positives.
SPY-140: The correct queue is now used for the listener callbacks. Previously, the underlying queue was bounded and therefore threw exceptions in the wrong places (the IO thread). Because the number of threads is bounded, the queue needs to buffer incoming listener callbacks accordingly.
Release Notes for Couchbase Client Library Java 1.2.1 GA (11 October 2013)
The 1.2.1 release is the first bug fix release for the 1.2 series. It fixes some issues for newly added features in 1.2.0. Couchbase recommends that all 1.2.0 users upgrade to the 1.2.1 release.
New Features and Behavior Changes in 1.2.1
-
SPY-135: In addition to the exposed synchronous CAS with expiration methods, the asynchronous overloaded method is also exposed.
OperationFuture<CASResponse> casFuture = client.asyncCAS(key, future.getCas(), 2, value);
Fixes in 1.2.1
-
SPY-137: If the
ExecutorServicewas not overridden through the factory, it is now properly shut down onclient.shutdown(). This is not the case in 1.2.0, which results in some threads still running and preventing the app from halting completely. -
SPY-138: The default
ExecutorServicecan now be overridden properly through thesetListenerExecutorService(ExecutorService executorService)method.If you override the default
ExecutorService, you are also responsible for shutting it down properly afterward. Because it can be shared across many application scopes, the CouchbaseClient cannot shut it down on your behalf.CouchbaseConnectionFactoryBuilder builder = new CouchbaseConnectionFactoryBuilder(); ExecutorService service = Executors.newFixedThreadPool(1); CouchbaseConnectionFactory cf = builder.buildCouchbaseConnection(/…/); -
JCBC-366: Enabling metrics is now easier and works as originally designed. Now you can just enable it through the builder and do not need to set the property also.
CouchbaseConnectionFactoryBuilder builder = new CouchbaseConnectionFactoryBuilder();
builder.setEnableMetrics(MetricType.DEBUG);
CouchbaseConnectionFactory cf = builder.buildCouchbaseConnection();
Release Notes for Couchbase Client Library Java 1.2.0 GA (13 September 2013)
The 1.2.0 release is the first stable release of the 1.2 series and contains new features that are backward compatible. The underlying spymemcached library, which builds the foundation for many of those features, has been upgraded to 2.10.0.
New Features and Behavior Changes in 1.2.0
- The JARs are now served from the Maven Central Repository, which required a change of the
groupIdelement fromcouchbasetocom.couchbase.client. You can find a list of packages at http://search.maven.org/#search%7Cga%7C1%7Ca%3A%22couchbase-client%22. - Spymemcached has been upgraded to 2.10.0, which implements most of the required code for the new features.
-
JCBC-346: Couchbase Server 2.2 supports
a new authentication mechanism (SASL CRAM-MD5), which is now supported and automatically
detected/used by the client as well. You can still force the old one (
PLAIN) if needed, but this should not be the case in general. -
JCBC-347: The default
observepoll interval has been decreased from 100 ms to 10 ms, which should give better performance in most cases. Also, this aligns with replication performance improvements in the Couchbase Server 2.2 release. - JCBC-138: The SDK now properly replaces the node list passed in on bootstrap, randomizes it, and stores it. This means that when the streaming connection goes down, the full last known node list can be used to reestablish the streaming connection. Randomizing the node list better distributes the streaming connection throughout the cluster, so not always the first and same node will be used.
-
JCBC-343: In addition to blocking on the future or polling its status, you can now add a listener to be notified after it is completed. The callback is executed in a thread pool autonomously. Every future provides a
addListener()method where a anonymous class that acts as a callback can be passed in. Here is an example:OperationFuture<Boolean> setOp = client.set("setWithCallback", 0, "content");setOp.addListener(new OperationCompletionListener() { @Override public void onComplete(OperationFuture<?> f) throws Exception { System.out.println("I was completed!"); } };
- JCBC-330: To make it easier to supply a new time-out when using the CAS operations, there are now overloaded methods provided to add a custom time-out. See the API documentation for details.
- JCBC-280: Buckets can now not only be created and deleted, but also updated directly through the SDK.
-
JCBC-344: For easier administration and configuration purposes, you can now create a
CouchbaseConnectionFactorybased on system properties. Here is an example (the properties can be set through a file as well):System.setProperty("cbclient.nodes", "http://192.168.1.1:8091/pools;192.168.1.2"); System.setProperty("cbclient.bucket", "default"); System.setProperty("cbclient.password", "");CouchbaseConnectionFactory factory = new CouchbaseConnectionFactory(); CouchbaseClient client = new CouchbaseClient(factory);
If you need to customize options, the
CouchbaseConnectionFactoryBuilderclass provides a new method to construct a factory like this. The instantiation fails if any of the three properties are missing.
Fixes in 1.2.0
- JCBC-333: When view nodes are queried and they are in a state in which they don’t contain active vBuckets (partitions), an error might be returned. This fix ensures that the node is avoided while it is in this state (during rebalance in/out conditions).
-
JCBC-349: Because of a regression, the
flushcommand did not work on memcached-buckets since 1.1.9. This is now fixed. - JCBC-350: A race condition when loading documents from a replica has been fixed so that NPEs are no longer thrown.
- JCBC-351: Replica read has been hardened in a way that it also loads the document from the active node and silently discards replicas that are not in an active state. It only returns an exception if not a single replica read operation could be dispatched.