Couchbase Lite on Java — Installing
Description — Couchbase Lite on Java — a framework for developing offline-first Java applications for mobile and edge
Abstract — This content provides instructions that enable you to deploy Couchbase Lite on java
Related Content — Install | Prerequisites | Build and Run
GET STARTED
Couchbase Lite on Java enables development and deployment of Couchbase Lite applications to a JVM environment. You can deploy to a desktop or web server (for example, Tomcat), including embedded Tomcat deployments.
Use this page to familiarize yourself with the product, its components, deployment, and use.
You will learn:
-
Where to get the necessary binaries — Where to Get Binaries
-
What the binaries contain — Using Downloaded Binaries
-
How to deploy Couchbase Lite on Java — Preparing Your Build Environment
-
How to use Couchbase Lite on Java to create a simple application — Build and Run
| We use Intellij IDEA, gradle, Maven and Tomcat as tools to build and run the examples presented in this content. You are free to use the tools of your choice. |
Where to Get Binaries
Couchbase Lite on Java binaries are available for both Community (CE) and Enterprise (EE) editions from the Maven repositories — see: Preparing Your Build Environment for how.
Alternatively, you can download a version in .zip format — see: Using Downloaded Binaries for how.
Preparing Your Build Environment
Prerequisites
-
Planning to sync with a Couchbase Server?
You will need to have runnable instances of Couchbase Server and Sync Gateway installed. If you have not already done so see Preparatory Steps
-
Running on Microsoft Windows?
Windows requires C++ runtime installed. Please install the Visual C++ Redistribution package from this link: https://www.microsoft.com/en-us/download/details.aspx?id=52685
-
Running on Linux?
You must have loaded the shared libraries as described in Additional Steps for Linux
Assumptions
This section shows how to set up and use Couchbase Lite on Java to build desktop and web applications using gradle, Maven, Tomcat and Intellij IDEA Community Edition.
It assumes a familiarity with these products, however you are free to use your own choice of development tools.
The contents of your build.gradle file will depend on the type of project you are building, whether you are using Community or Enterprise edition and whether you prefer to use Maven-distributed binaries or a zip download.
| If you wish to use a downloaded zip instead of Maven then see - Using Downloaded Binaries |
If you are deploying to Linux, you will need the Couchbase Lite support library, which is available only on the zip download distributable — see Additional Steps for Linux
|
Defining Dependencies and Repositories
-
Console App Development
-
Web App Development
Steps
-
Create a project folder
-
Initialize it for a Gradle Java application
-
Include the following in the
build.gradlefile:- Community edition
-
Compile options
// Required only if your project has some Kotlin source code
kotlinOptions { jvmTarget = '1.8' }

// Set minimum JVM level to ensure availability of, for example, lambda expressions
compileOptions {
    targetCompatibility 1.8
    sourceCompatibility 1.8

//   ... other section content as required by user
}
Dependencies
dependencies { implementation "com.couchbase.lite:couchbase-lite-java:${version}" // ... other section content as required by user } - Enterprise Edition
-
Compile options
// Required only if your project has some Kotlin source code
kotlinOptions { jvmTarget = '1.8' }

// Set minimum JVM level to ensure availability of, for example, lambda expressions
compileOptions {
    targetCompatibility 1.8
    sourceCompatibility 1.8

//   ... other section content as required by user
}
Dependencies
dependencies {
    implementation "com.couchbase.lite:couchbase-lite-java-ee:${version}"

//   ... other section content as required by user
    }
Repositories
repositories {
    maven {url 'https://mobile.maven.couchbase.com/maven2/dev/'}

//   ... other section content as required by user
    }
-
Open the project folder in Intellij IDEA and import the gradle settings.
If you don’t have auto-import set for Gradle projects, then accept the Import Gradle Project prompt that is displayed bottom-right of the screen Note the Gradle menu at the extreme right of the screen:
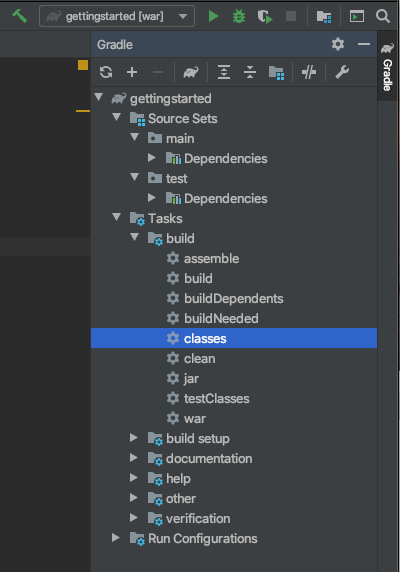
That’s it. You’re all set to start building your own Couchbase Lite on Java applications — see [Building a Getting Started App] for an example of how to do that.
// Define the main class for the application.
application {mainClassName = 'gettingstarted.GettingStarted'}

plugins {
    id 'java'
    id 'application'
}

// Required only if your project has some Kotlin source code
kotlinOptions { jvmTarget = '1.8' }

// Set minimum JVM level to ensure availability of, for example, lambda expressions
compileOptions {
    targetCompatibility 1.8
    sourceCompatibility 1.8

//   ... other section content as required by user
}

dependencies {
    implementation "com.couchbase.lite:couchbase-lite-java-ee:${version}"

//   ... other section content as required by user
    }

repositories {
    maven {url 'https://mobile.maven.couchbase.com/maven2/dev/'}

//   ... other section content as required by user
    }
This section explains how to set-up a build project to create Couchbase Lite on Java web apps using gradle and Intellij IDEA.
The WebApp Build Environment
In our examples here we build and deploy web apps using a gradle plugin based on the com.bmuschko.tomcat plugin. It provides a simple Tomcat harness that can be used from within gpIDE Community Edition or the command-line.
Of course if you are using gpIDE Ultimate Edition you can use its integrated tomcat features to achieve the same results.
For more about this plugin and its use see Using the Gradle WebApp Plugin
Running multiple Couchbase Lite on Java web apps
Each web application has its own *class loader (WebappX). This loads the classes, jars, and resources found in the application’s WEB-INF/classes and WEB-INF/lib folders, together with any shared jar files from $CATALINA_BASE/lib — see tomcat documentation for more.
So, if you are running multiple Couchbase Lite web applications, deploy your Couchbase Lite on Java library <pathToCbl>/libs to $CATALINA_BASE/lib. This means you do not need to deploy it in each web app and minimizes the size of each app.
| Configuring Couchbase Lite logging functionality will affect the logging of all web applications as the common class loader shares Couchbase Lite Console, File and Custom logging functionalities across all web apps. |
For information about building a WAR file see Deploying a WAR file to tomcat
Prerequisites
-
Ensure your build environment matches the runtime Tomcat environment. Specifically, that the Java and Tomcat versions are the same.
-
If your Tomcat server runs Linux, declare the shared libraries (
<pathToCbl>/support— as discussed in Additional Steps for Linux) in the$CATALINA_HOME/bin/setenv.shscript file. -
Ensure the Couchbase Lite jars (
<pathToCbl>/lib) are on the executable path within Tomcat — see: Running multiple Couchbase Lite on Java web appsThis also means you should declare the dependencies as providedCompileto avoid them being bundled into theWEB-INF/libsfolder
Steps
-
Create a project folder and initialize it for a Gradle Java application
gradle init -
Create your
build.gradlefile, including the following repositories and dependencies:-
For Community edition
dependencies { implementation "com.couchbase.lite:couchbase-lite-java:$2.8" // ... other section content as required by user } -
For Enterprise Edition
repositories {
    maven {url 'https://mobile.maven.couchbase.com/maven2/dev/'}

//   ... other section content as required by user
    }
dependencies {
    implementation "com.couchbase.lite:couchbase-lite-java-ee:${version}"

//   ... other section content as required by user
    }
-
-
Open the project folder in Intellij IDEA and import the gradle settings.
If you don’t have auto-import set for Gradle projects, then accept the Import Gradle Project prompt that is displayed bottom-right of the screen Note the Gradle menu at the extreme right of the screen:
If you want to deploy your app to a local tomcat container then see Deploying a WAR file to tomcat
That’s it. You’re all set to start building your own Couchbase Lite on Java applications — see [Building a Getting Started App] for an example of how to do that.
ext{
  TOMCAT_VERSION="9.0.24"
}

apply plugin: 'java'
apply plugin: 'war'
apply plugin: 'com.bmuschko.tomcat'

sourceCompatibility = 1.8

buildscript {
    repositories {
        jcenter()
    }
    dependencies {
        classpath 'com.bmuschko:gradle-tomcat-plugin:2.5'
    }
}

repositories {
    mavenCentral()
}

dependencies {
    //  Use for Enterprise version
    compileOnly "com.couchbase.lite:couchbase-lite-java-ee:2.7.0"
    //  Use for community versions
    //    compileOnly "com.couchbase.lite:couchbase-lite-java:2.7.0"
    compileOnly "javax.servlet:javax.servlet-api:4.0.1"
    tomcat "org.apache.tomcat.embed:tomcat-embed-core:${TOMCAT_VERSION}",
        "org.apache.tomcat.embed:tomcat-embed-logging-juli:9.0.0.M6",
        "org.apache.tomcat.embed:tomcat-embed-jasper:${TOMCAT_VERSION}"
}

tomcat {
    httpPort = 8080
    httpProtocol = 'org.apache.coyote.http11.Http11Nio2Protocol'
    ajpProtocol  = 'org.apache.coyote.ajp.AjpNio2Protocol'
    contextPath = '/'
}

[tomcatRun, tomcatRunWar].each { task ->
    fileTree("libs").visit { FileVisitDetails details ->
        task.additionalRuntimeResources << file(details.file.path)
    }
}
SUPPLEMENTARY INFORMATION
Preparatory Steps
Install Couchbase Server and Sync Gateway
Before you can run any Couchbase Lite on Java app you will need to have runnable instances of Couchbase Server and Sync Gateway. If you have not already done so:
Install Couchbase Server and Sync Gateway — see Install
Create the Getting Started App Database
-
Within Couchbase Server, create a bucket named getting-started.cblite2
For instructions — see Create a Bucket
-
Create a RBAC user for Sync Gateway
For instructions — see Create an RBAC User
-
Set username to
sync-gateway -
Set password to
password
-
Back to Preparing Your Build Environment
Using Downloaded Binaries
Package Contents
The download package contains a license file, jar libraries for the appropriate edition of the Couchbase Lite and a set of Linux shared libraries.
Get the download package from the Couchbase Downloads page.
-
Community Edition — couchbase-lite-java-2.8.3
-
Enterprise Edition — couchbase-lite-java-ee-2.8.3
When unpacked the package contains the following:
-
A
libfolder containing all necessary JAR files:-
couchbase-lite-java-2.8.3 or for EE couchbase-lite-java-ee-2.8.3
-
okhttp-3.14.7.jar
-
okio-1.17.2.jar
-
-
A
supportfolder containing the Linux native libraries:This means you do not need to download and-or build compatible versions of system libraries for the Linux platform of choice. -
libz(requires zlib v.1.2.11+) -
libC++requires libc++ v.3.6.0+) -
libicu(requires ICU4C v.5.4.1+)
-
Go back to GET STARTED
Steps
-
Download the zip file from the Couchbase Downloads page.
-
Unpack the downloaded file to a location accessible to — and usable by — your chosen build environment.
We’ll refer to that location —
<your dir>/couchbase-lite-java-2.8.3— as the<pathToCbl>. -
Include the following dependency in your
build.gradlefile, you can remove any Couchbase Lite Maven references:Dependencies { implementation fileTree(include: ['*.jar'], dir: <pathToCbl>/lib> }
Where <pathToCbl> is the location of the downloaded Couchbase Lite library.
apply plugin: 'java'
apply plugin: 'jar'
// apply plugin: 'war'
sourceCompatibility = 1.8
repositories {
  jcenter()
}
dependencies {
    implementation fileTree(dir: 'libs', include: '*.jar')
    compileOnly "javax.servlet:javax.servlet-api:4.0.1"
}
Back to Preparing Your Build Environment
Using Native Libraries for Linux
In addition to setting-up your build environment, you also need to make the supplied native libraries (<pathToCbl/support) available:
These libraries are provided only in the .zip distributable.
|
- Web Service/Tomcat
-
-
Copy the native libraries (
<pathToCbl>/support) to a location accessible to — and usable by — your build and runtime environments. -
Add the following libraries to the
LD_LIBRARY_PATHin `$CATALINA_BASE/bin/setenv.sh:If the setenv.sh file doesn’t exist, you will need to create a new file. LD_LIBRARY_PATH=<pathToCbl>/support/linux/x86_64/:$LD_LIBRARY_PATH
-
- Desktop
-
-
Copy the native libraries (
<pathToCbl>/support) to a location accessible to — and usable by — your build and runtime environments. -
Add the following libraries to the
LD_LIBRARY_PATHin the .bashrc file:export LD_LIBRARY_PATH=<pathToCbl>/support/linux/x86_64/:$LD_LIBRARY_PATH
-
Please refer to the Linux Platform Support section for the mini mum version requirements of those libraries.
Back to Preparing Your Build Environment
Using the Gradle WebApp Plugin
The simplest way to build and deploy your Couchbase Lite on Java web app is to use a gradle plugin that provides a simple Tomcat harness.
Our examples are based on the com.bmuschko.tomcat plugin — see com.bmuschko.tomcat on Github.
Including the plugin in your build.gradle file make a number of tomcat tasks available to you. View them using:
./gradlew tasksThis shows that the following web application tasks are now available:
-
tomcatJasper- Runs the JSP compiler and turns JSP pages into Java source. -
tomcatRun- Uses your files as and where they are and deploys them to Tomcat. -
tomcatRunWar- Assembles the web app into a war and deploys it to Tomcat. -
tomcatStop- Stops Tomcat.
So, to run the app use:
tomcatRunBack to Preparing Your Build Environment
Deploying a WAR file to tomcat
If you want to deploy your web app to a local Tomcat instance then you will need to generate a WAR file.
However, you should note that when creating a war file, if you use the implementation dependency type then your Couchbase Lite jar files will be bundled into WEB-INF/lib of the web application.
To exclude Couchbase Lite jar files from getting bundled and to use Couchbase Lite in multiple web applications, change the dependency type from implementation to providedCompile
-
You can do this using the Gradle command below from within your project folder:
./gradlew warThe generated war file will be at <PROJECT ROOT>/build/libs. -
Deploy the war file to Tomcat, by copying it to $CATALINA_BASE/webapps
You can also use Tomcat’s Manager App to deploy the war file — see tomcat’s Manager App documentation for more detail. -
To use common class loader approach to load Couchbase Lite libraries, copy all of the Couchbase Lite jar files in $CATALINA_BASE/lib.
For linux platform see also — Additional Steps for Linux
Back to Preparing Your Build Environment