Active Peer
Description — Couchbase Lite’s Peer-to-Peer Synchronization enables edge devices to synchronize securely without consuming centralized cloud-server resources
Abstract — How to set up a Replicator to connect with a Listener and replicate changes using peer-to-peer sync
Related Content — API Reference | Passive Peer | Active Peer
|
Code Snippets
All code examples are indicative only.
They demonstrate the basic concepts and approaches to using a feature.
Use them as inspiration and adapt these examples to best practice when developing applications for your platform.
|
Introduction
This content provides sample code and configuration examples covering the implementation of Peer-to-Peer Sync over WebSockets. Specifically it covers the implementation of an Active Peer.
This active peer (also referred to as a client and-or a replicator) will initiate the connection with a Passive Peer (also referred to as a server and-or listener) and participate in the replication of database changes to bring both databases into sync.
Subsequent sections provide additional details and examples for the main configuration options.
|
Secure Storage
The use of TLS, its associated keys and certificates requires using secure storage to minimize the chances of a security breach.
The implementation of this storage differs from platform to platform — see Using secure storage.
|
Configuration Summary
You should configure and initialize a replicator for each Couchbase Lite database instance you want to sync. Example 1 shows the initialization and configuration process.
// Set listener DB endpoint
NSURL *url = [NSURL URLWithString:@"ws://listener.com:55990/otherDB"];
CBLURLEndpoint *target = [[CBLURLEndpoint alloc] initWithURL:url];
CBLCollectionConfiguration *collectionConfig = [[CBLCollectionConfiguration alloc] initWithCollection:self.collection];

/**
 Optionally set custom conflict resolver callback.
 NOTE: This is set per collection, not on the replicator.
 */
collectionConfig.conflictResolver = [[LocalWinConflictResolver alloc] init]; (1)
CBLReplicatorConfiguration *replConfig = [[CBLReplicatorConfiguration alloc] initWithCollections:@[collectionConfig] target:target];

replConfig.replicatorType = kCBLReplicatorTypePush;

replConfig.continuous = YES;


// Only accept CA Certs
replConfig.acceptOnlySelfSignedServerCertificate = NO; (2)


// Here set client to use basic authentication
// Providing username and password credentials
// If prompted for them by server
replConfig.authenticator = [[CBLBasicAuthenticator alloc] initWithUsername:@"Our Username" password:@"Our Password"]; (3)

// Apply configuration settings to the replicator
self.replicator = [[CBLReplicator alloc] initWithConfig:replConfig]; (4)

// Retain token for use in deletion
id<CBLListenerToken> listenerToken = [self.replicator addChangeListener:^(CBLReplicatorChange *change) { (5)
    if (change.status.activity == kCBLReplicatorStopped) {
        NSLog(@"Replication stopped");
    } else {
        NSLog(@"Status:%d", change.status.activity);
    };
}];

// Run the replicator using the config settings
[self.replicator start]; (6)| 1 | Configure how the replication should perform Conflict Resolution. |
| 2 | Configure how the client will authenticate the server. Here we say connect only to servers presenting a self-signed certificate. By default, clients accept only servers presenting certificates that can be verified using the OS bundled Root CA Certificates — see: Authenticating the Listener. |
| 3 | Configure the credentials the client will present to the server. Here we say to provide Basic Authentication credentials. Other options are available — see: Example 7. |
| 4 | Initialize the replicator using your configuration object. |
| 5 | Register an observer, which will notify you of changes to the replication status. |
| 6 | Start the replicator. |
API References
You can find Objective-C API References here.
Device Discovery
This phase is optional: If the listener is initialized on a well known URL endpoint (for example, a static IP Address or well known DNS address) then you can configure Active Peers to connect to those.
Prior to connecting with a listener you may execute a Peer discovery phase to dynamically discover Peers.
For the Active Peer this involves browsing-for and selecting the appropriate service using a zero-config protocol such as Bonjour-- see: https://developer.apple.com/bonjour/.
Configure Replicator
- In this section
-
Configure Target | Sync Mode | Retry Configuration | Authenticating the Listener | Client Authentication
Configure Target
Use the Initialize and define the replication configuration with local and remote database locations using the ReplicatorConfiguration object.
The constructor provides:
-
the name of the local database to be sync’d
-
the server’s URL (including the port number and the name of the remote database to sync with)
It is expected that the app will identify the IP address and URL and append the remote database name to the URL endpoint, producing for example:
wss://10.0.2.2:4984/travel-sampleThe URL scheme for web socket URLs uses
ws:(non-TLS) orwss:(SSL/TLS) prefixes.
// Set listener DB endpoint
NSURL *url = [NSURL URLWithString:@"ws://listener.com:55990/otherDB"];
CBLURLEndpoint *target = [[CBLURLEndpoint alloc] initWithURL:url];
CBLCollectionConfiguration *collectionConfig = [[CBLCollectionConfiguration alloc] initWithCollection:self.collection];

CBLReplicatorConfiguration *replConfig = [[CBLReplicatorConfiguration alloc] initWithCollections:@[collectionConfig] target:target];| 1 | Note use of the scheme prefix (wss://
to ensure TLS encryption — strongly recommended in production — or ws://) |
Sync Mode
Here we define the direction and type of replication we want to initiate.
We use ReplicatorConfiguration class’s replicatorType and
continuous parameters, to tell the replicator:
-
The type (or direction) of the replication:
pushAndPull;pull;push -
The replication mode, that is either of:
-
Continuous — remaining active indefinitely to replicate changed documents (
continuous=true). -
Ad-hoc — a one-shot replication of changed documents (
continuous=false).
-
replConfig.replicatorType = kCBLReplicatorTypePush;
replConfig.continuous = YES;|
Unless there is a solid use-case not to, always initiate a single This prevents the replications generating the same checkpoint |
Retry Configuration
Couchbase Lite for Objective-C’s replication retry logic assures a resilient connection.
The replicator minimizes the chance and impact of dropped connections by maintaining a heartbeat; essentially pinging the listener at a configurable interval to ensure the connection remains alive.
In the event it detects a transient error, the replicator will attempt to reconnect, stopping only when the connection is re-established, or the number of retries exceeds the retry limit (9 times for a single-shot replication and unlimited for a continuous replication).
On each retry the interval between attempts is increased exponentially (exponential backoff) up to the maximum wait time limit (5 minutes).
The REST API provides configurable control over this replication retry logic using a set of configiurable properties — see: Table 1.
Property |
Use cases |
Description |
|---|---|---|
{url-api-prop-replicator-config-setHeartbeat} |
|
The interval (in seconds) between the heartbeat pulses. Default: The replicator pings the listener every 300 seconds. |
Change this to limit or extend the number of retry attempts. |
The maximum number of retry attempts
|
|
{url-api-prop-replicator-config-setMaxAttemptWaitTime} |
Change this to adjust the interval between retries. |
The maximum interval between retry attempts While you can configure the maximum permitted wait time, the replicator’s exponential backoff algorithm calculates each individual interval which is not configurable.
|
When necessary you can adjust any or all of those configurable values — see: Example 4 for how to do this.
config.heartbeat = 150; (1)
config.maxAttempts = 20; (2)
config.maxAttemptWaitTime = 600; (3)| 1 | Here we use {url-api-prop-replicator-config-setHeartbeat} to set the required interval (in seconds) between the heartbeat pulses |
| 2 | Here we use maxAttempts() to set the required number of retry attempts |
| 3 | Here we use {url-api-prop-replicator-config-setMaxAttemptWaitTime} to set the required interval between retry attempts. |
Authenticating the Listener
Define the credentials the your app (the client) is expecting to receive from the server (listener) in order to ensure that the server is one it is prepared to interact with.
Note that the client cannot authenticate the server if TLS is turned off. When TLS is enabled (Sync Gateway’s default) the client must authenticate the server. If the server cannot provide acceptable credentials then the connection will fail.
Use ReplicatorConfiguration properties {url-api-prop-replicator-config-AcceptOnlySelfSignedServerCertificate} and setPinnedServerCertificate(), to tell the replicator how to verify server-supplied TLS server certificates.
-
If there is a pinned certificate, nothing else matters, the server cert must exactly match the pinned certificate.
-
If there are no pinned certs and {url-api-prop-replicator-config-AcceptOnlySelfSignedServerCertificate} is
truethen any self-signed certificate is accepted. Certificates that are not self signed are rejected, no matter who signed them. -
If there are no pinned certificates and {url-api-prop-replicator-config-AcceptOnlySelfSignedServerCertificate} is
false(default), the client validates the server’s certificates against the system CA certificates. The server must supply a chain of certificates whose root is signed by one of the certificates in the system CA bundle.
-
CA Cert
-
Self Signed Cert
-
Pinned Certificate
Set the client to expect and accept only CA attested certificates.
// Only accept CA Certs
replConfig.acceptOnlySelfSignedServerCertificate = NO; (1)| 1 | This is the default. Only certificate chains with roots signed by a trusted CA are allowed. Self signed certificates are not allowed. |
Set the client to expect and accept only self-signed certificates
// Configure Server Authentication
// Here - expect and accept self-signed certs
replConfig.acceptOnlySelfSignedServerCertificate = YES; (1)| 1 | Set this to true to accept any self signed cert.
Any certificates that are not self-signed are rejected. |
Set the client to expect and accept only a pinned certificate.
NSURL *certURL = [[NSBundle mainBundle] URLForResource:@"cert" withExtension:@"cer"];
NSData *data = [[NSData alloc] initWithContentsOfURL:certURL];
SecCertificateRef certificate = SecCertificateCreateWithData(NULL, (__bridge CFDataRef)data);

replConfig.pinnedServerCertificate = (SecCertificateRef)CFAutorelease(certificate);
replConfig.acceptOnlySelfSignedServerCertificate=false;
Client Authentication
Here we define the credentials that the client can present to the server if prompted to do so in order that the server can authenticate it.
We use ReplicatorConfiguration's authenticator method to define the authentication method to the replicator.
Basic Authentication
Use the BasicAuthenticator to supply basic authentication credentials (username and word).
This example shows basic authentication using user name and password:
// Here set client to use basic authentication
// Providing username and password credentials
// If prompted for them by server
replConfig.authenticator = [[CBLBasicAuthenticator alloc] initWithUsername:@"Our Username" password:@"Our Password"]; (1)
Certificate Authentication
Use the ClientCertificateAuthenticator to configure the client TLS certificates to be presented to the server, on connection.
This applies only to the URLEndpointListener.
The server (listener) must have disableTLS set false and have a ClientCertificateAuthenticator configured, or it will never ask for this client’s certificate.
|
The certificate to be presented to the server will need to be signed by the root certificates or be valid based on the authentication callback set to the listener via ListenerCertificateAuthenticator.
This example shows client certificate authentication using an identity from secure storage.
/** Get identity from keychain */
CBLTLSIdentity *identity = [CBLTLSIdentity identityWithLabel:@"alias" error:&error]; (1)
config.authenticator = [[CBLClientCertificateAuthenticator alloc] initWithIdentity:identity]; (2)| 1 | Get an identity from secure storage and create a TLS Identity object |
| 2 | Set the authenticator to ClientCertificateAuthenticator and configure it to use the retrieved identity |
Initialize Replicator
Use the Replicator class’s initWith(config:) constructor, to initialize the replicator with the configuration you have defined.
You can, optionally, add a change listener (see Monitor Sync) before starting the replicator running using start().
// Apply configuration settings to the replicator
self.replicator = [[CBLReplicator alloc] initWithConfig:replConfig]; (1)


// Run the replicator using the config settings
[self.replicator start]; (2)| 1 | Initialize the replicator with the configuration |
| 2 | Start the replicator |
Monitor Sync
- In this section
-
Change Listeners | Replicator Status | Documents Pending Push
You can monitor a replication’s status by using a combination of Change Listeners and the replication.status.activity property — see; activity enum.
This enables you to know, for example, when the replication is actively transferring data and when it has stopped.
Change Listeners
Use this to monitor changes and to inform on sync progress; this is an optional step. You can add and a replicator change listener at any point; it will report changes from the point it is registered.
|
Best Practice
Do not forget to save the token so you can remove the listener later
|
Use the Replicator class to add a change listener as a callback to the Replicator (addChangeListener(_:)) — see: Example 9. You are then asynchronously notified of state changes.
You can remove a change listener with removeChangeListenerWithToken(CBLListenerToken:).
Replicator Status
You can use the CBLReplicatorStatus class to check the replicator status. That’s, whether it’s actively transferring data or if it has stopped — see: Example 9.
The returned ReplicationStatus structure comprises:
-
activity enum — stopped, offline, connecting, idle or busy — see states described in: Table 2
-
-
completed — the total number of changes completed
-
total — the total number of changes to be processed
-
-
error enum — the current error, if any
-
Adding a Change Listener
-
Using replicator.status
// Retain token for use in deletion
id<CBLListenerToken> listenerToken = [self.replicator addChangeListener:^(CBLReplicatorChange *change) { (1)
    if (change.status.activity == kCBLReplicatorStopped) {
        NSLog(@"Replication stopped");
    } else {
        NSLog(@"Status:%d", change.status.activity);
    };
}];
if (change.status.activity == kCBLReplicatorStopped) {
NSLog(@"Replication stopped");
} else {
NSLog(@"Status:%d", change.status.activity);
};Replication States
Table 2 shows the different states, or activity levels, reported in the API; and the meaning of each.
State |
Meaning |
|---|---|
|
The replication is finished or hit a fatal error. |
|
The replicator is offline as the remote host is unreachable. |
|
The replicator is connecting to the remote host. |
|
The replication caught up with all the changes available from the server.
The |
|
The replication is actively transferring data. |
The replication change object also has properties to track the progress (change.status.completed and change.status.total).
Since the replication occurs in batches the total count can vary through the course of a replication.
|
Replication Status and App Life Cycle
The following diagram describes the status changes when the application starts a replication, and when the application is being backgrounded or foregrounded by the OS. It applies to iOS only.
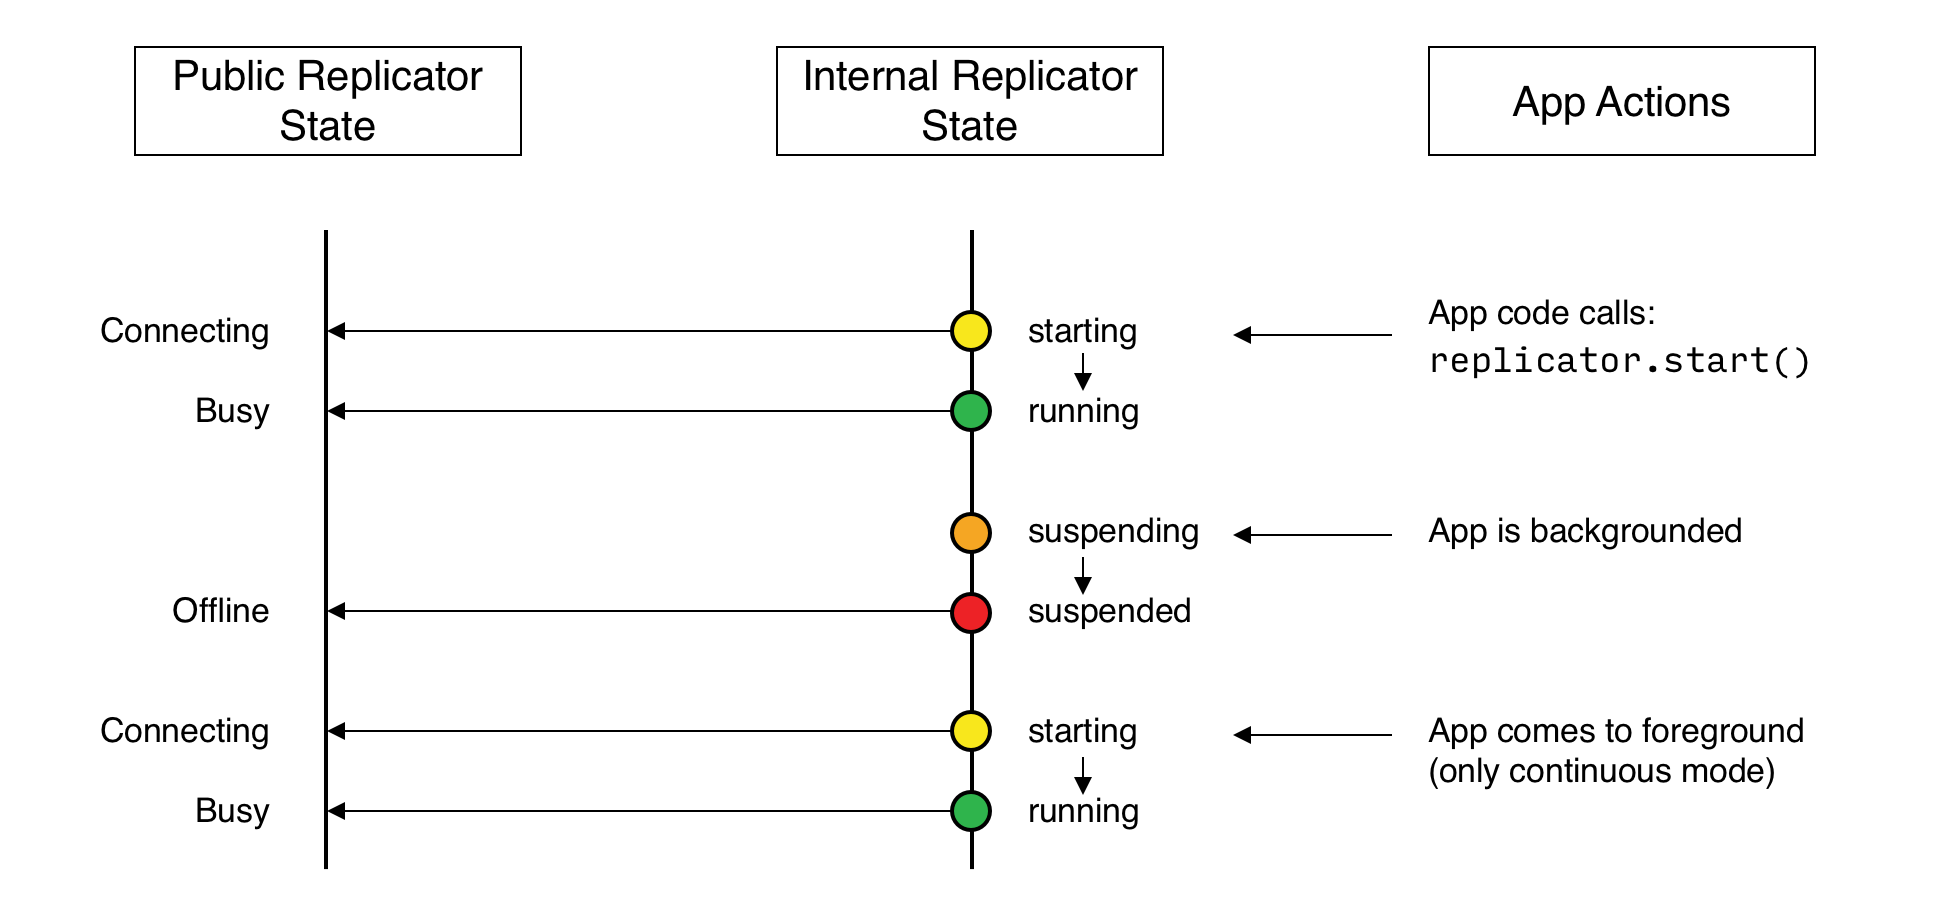
Additionally, on iOS, an app already in the background may be terminated.
In this case, the Database and Replicator instances will be null when the app returns to the foreground.
Therefore, as preventive measure, it is recommended to do a null check when the app enters the foreground, and to re-initialize the database and replicator if any of those is null.
On other platforms, Couchbase Lite doesn’t react to OS backgrounding or foregrounding events and replication(s) will continue running as long as the remote system does not terminate the connection and the app does not terminate. It is generally recommended to stop replications before going into the background otherwise socket connections may be closed by the OS and this may interfere with the replication process.
Documents Pending Push
| CBLReplicator.isDocumentPending() is quicker and more efficient. Use it in preference to returning a list of pending document IDs, where possible. |
You can check whether documents are waiting to be pushed in any forthcoming sync by using either of the following API methods:
-
Use the CBLReplicator.pendingDocumentIDs() method, which returns a list of document IDs that have local changes, but which have not yet been pushed to the server.
This can be very useful in tracking the progress of a push sync, enabling the app to provide a visual indicator to the end user on its status, or decide when it is safe to exit.
-
Use the CBLReplicator.isDocumentPending() method to quickly check whether an individual document is pending a push.
NSURL *url = [NSURL URLWithString:@"ws://localhost:4984/db"];
CBLURLEndpoint *target = [[CBLURLEndpoint alloc] initWithURL:url];

CBLCollectionConfiguration *collectionConfig = [[CBLCollectionConfiguration alloc] initWithCollection:self.collection];
CBLReplicatorConfiguration *replConfig = [[CBLReplicatorConfiguration alloc] initWithCollections:@[collectionConfig] target:target];

replConfig.replicatorType = kCBLReplicatorTypePush;
self.replicator = [[CBLReplicator alloc] initWithConfig:replConfig];

/** Get list of pending doc IDs */
NSError *err = nil;
NSSet *pendingDocIds = [self.replicator pendingDocumentIDsForCollection:self.collection error:&err]; (1)

if ([pendingDocIds count] > 0) {

    NSLog(@"There are %lu documents pending", (unsigned long)[pendingDocIds count]);

    [self.replicator addChangeListener:^(CBLReplicatorChange *change) {

        NSLog(@"Replicator activity level is %u", change.status.activity);
        /** Iterate and report-on the pending doc IDs  in 'mydocids' */
        for (NSString *docID in pendingDocIds) {

            NSError *err = nil;
            if (![change.replicator isDocumentPending:docID collection:wCollection error:&err]) { (2)
                NSLog(@"Doc ID %@ now pushed", docID);
            }
        }
    }];

    [self.replicator start];
};| 1 | CBLReplicator.pendingDocumentIDs() returns a list of the document IDs for all documents waiting to be pushed. This is a snapshot and may have changed by the time the response is received and processed. |
| 2 | CBLReplicator.isDocumentPending() returns true if the document is waiting to be pushed, and false otherwise. |
Stop Sync
Stopping a replication is straightforward. It is done using stop(). This initiates an asynchronous operation and so is not necessarily immediate. Your app should account for this potential delay before attempting any subsequent operations.
You can find further information on database operations in Databases.
// Remove the change listener
[listenerToken remove];

// Stop the replicator
[self.replicator stop];| 1 | Here we initiate the stopping of the replication using the stop() method. It will stop any active change listener once the replication is stopped. |
Conflict Resolution
Unless you specify otherwise, Couchbase Lite 4.x uses Last Write Wins (LWW) conflict resolution by default during replication. When conflicts occur during pull replication, the change with the latest timestamp wins. Timestamps are local to each device. See Handling Data Conflicts.
To use a different policy, specify a conflict resolver using conflictResolver as shown in Example 12.
For more complex solutions you can provide a custom conflict resolver - see: Handling Data Conflicts.
-
Local Wins
-
Remote Wins
-
Merge
@interface LocalWinConflictResolver :NSObject<CBLConflictResolver>
@end

@implementation LocalWinConflictResolver
- (CBLDocument*) resolve:(CBLConflict*)conflict {
    return conflict.localDocument;
}

@end
@interface RemoteWinConflictResolver:NSObject<CBLConflictResolver>
@end
@implementation RemoteWinConflictResolver
- (CBLDocument*) resolve:(CBLConflict*)conflict {
return conflict.remoteDocument;
}
@end@interface MergeConflictResolver:NSObject<CBLConflictResolver>
@end
@implementation MergeConflictResolver
- (CBLDocument*) resolve:(CBLConflict*)conflict {
NSDictionary *localDict = conflict.localDocument.toDictionary;
NSDictionary *remoteDict = conflict.remoteDocument.toDictionary;
NSMutableDictionary *result = [NSMutableDictionary dictionaryWithDictionary:localDict];
[result addEntriesFromDictionary:remoteDict];
return [[CBLMutableDocument alloc] initWithID:conflict.documentID
data:result];
}
@endJust as a replicator may observe a conflict — when updating a document that has changed both in the local database and in a remote database — any attempt to save a document may also observe a conflict, if a replication has taken place since the local app retrieved the document from the database.
To address that possibility, a version of the Collection.save() method also takes a conflict resolver as shown in Example 13.
The following code snippet shows an example of merging properties from the existing document (current) into the one being saved (new).
In the event of conflicting keys, it will pick the key value from new.
CBLDocument *doc = [self.collection documentWithID:@"xyz" error:&error];
CBLMutableDocument *mutableDocument = [doc toMutable];
[mutableDocument setString:@"apples" forKey:@"name"];

[self.collection saveDocument:mutableDocument
              conflictHandler:^BOOL(CBLMutableDocument *new, CBLDocument *current) {
    NSDictionary *currentDict = current.toDictionary;
    NSDictionary *newDict = new.toDictionary;
    NSMutableDictionary *result = [NSMutableDictionary dictionaryWithDictionary:currentDict];
    [result addEntriesFromDictionary:newDict];
    [new setData:result];
    return YES;
}
                        error:&error];
For more on replicator conflict resolution see: Handling Data Conflicts.