Data Sync using Sync Gateway
Description — Couchbase Lite for Swift — Synchronizing data changes between local and remote databases using Sync Gateway
Related Content — Handling Data Conflicts | Intra-device Data Sync | Peer-to-Peer
|
Code Snippets
The code examples are indicative only.
They demonstrate basic concepts and approaches to using a feature.
Use them as inspiration and adapt these examples to best practice when developing applications for your platform.
|
Introduction
Couchbase Lite for Swift provides API support for secure, bi-directional, synchronization of data changes between mobile applications and a central server database. It does so by using a replicator to interact with Sync Gateway. Simply put, the replicator is designed to send documents from a source to a target database. In this case, between a local Couchbase Lite database and remote Sync Gateway database (server or cloud).
This content provides sample code and configuration examples covering the implementation of a replication using Sync Gateway.
Your application runs a replicator (also referred to here as a client), which will initiate connection with a Sync Gateway (also referred to here as a server) and participate in the replication of database changes to bring both local and remote databases into sync.
Subsequent sections provide additional details and examples for the main configuration options.
Replication Protocol
Scheme
Couchbase Mobile uses a replication protocol based on WebSockets fof replication. To use this protocol the replication URL should specify WebSockets as the URL scheme (see the Configure Target section below).
- Incompatibilities
-
Couchbase Lite’s replication protocol is incompatible with CouchDB-based databases. And since Couchbase Lite 2.x+ only supports the new protocol, you will need to run a version of Sync Gateway that supports it — see: Compatibility.
- Legacy Compatibility
-
Clients using Couchbase Lite 1.x can continue to use
httpas the URL scheme. Sync Gateway 2.x+ will automatically use:-
The 1.x replication protocol when a Couchbase Lite 1.x client connects through
http://localhost:4984/db -
The 2.0 replication protocol when a Couchbase Lite 2.0 client connects through
ws://localhost:4984/db.
-
You can find further information in our blog: Introducing the Data Replication Protocol.
Configuration Summary
You should configure and initialize a replicator for each Couchbase Lite database instance you want to sync. Example 1 shows the configuration and initialization process.
let validUser = "syncuser"
let validPassword = "sync9455"
let cert:SecCertificate?
let passivePeerEndpoint = "10.1.1.12:8920"
let passivePeerPort = "8920"
let passiveDbName = "userdb"
var actDb:Database?
var thisReplicator:Replicator?
var replicatorListener:ListenerToken?


let tgtUrl = URL(string: "wss://10.1.1.12:8092/actDb")!
let targetEndpoint = URLEndpoint(url: tgtUrl)
var config = ReplicatorConfiguration(database: actDb!, target: targetEndpoint) (1)

config.replicatorType = .pushAndPull

// Configure Sync Mode
config.continuous = true

// Configure Server Security -- only accept self-signed certs
config.acceptOnlySelfSignedServerCertificate = true; (2)

// Configure Client Security (3)
//  Set Authentication Mode
let thisAuthenticator = BasicAuthenticator(username: "Our Username", password: "Our Password")
config.authenticator = thisAuthenticator

/* Optionally set custom conflict resolver call back */
config.conflictResolver = ( /* define resolver function */); (4)

// Apply configuration settings to the replicator
thisReplicator = Replicator.init( config: config) (5)

// Optionally add a change listener
// Retain token for use in deletion
let pushPullReplListener:ListenerToken? = thisReplicator?.addChangeListener({ (change) in (6)
  if change.status.activity == .stopped {
      print("Replication stopped")
  }
  else {
      print("Replicator is currently ", thisReplicator?.status.activity)
  }
})


    // Run the replicator using the config settings
    thisReplicator?.start()  (7)
Notes on Example
| 1 | Use the ReplicatorConfiguration class’s constructor — init(database:, target:) — to initialize the replicator configuration with the local database — see also: Configure Target |
| 2 | Configure how the client will authenticate the server. Here we say connect only to servers presenting a self-signed certificate. By default, clients accept only servers presenting certificates that can be verified using the OS bundled Root CA Certificates — see: Server Authentication. |
| 3 | Configure the credentials the client will present to the server. Here we say to provide Basic Authentication credentials. Other options are available — see: Client Authentication. |
| 4 | Configure how the replication should handle conflict resolution — see: Handling Data Conflicts topic for mor on conflict resolution. |
| 5 | Initialize the replicator using your configuration object — see: Initialize. |
| 6 | Optionally, register an observer, which will notify you of changes to the replication status — see: Monitor |
| 7 | Start the replicator — see: Start Replicator. |
Configure
- In this section
-
Configure Target | Sync Mode | Heartbeat | Server Authentication | Client Authentication | Monitor Document Changes | Custom Headers | Checkpoint Starts | Replication Filters | Channels | Delta Sync
Configure Target
Use the ReplicatorConfiguration class and init(database:, target:) constructor to initialize the replication configuration with local and remote database locations.
The constructor provides:
-
the name of the local database to be sync’d
-
the server’s URL (including the port number and the name of the remote database to sync with)
It is expected that the app will identify the IP address and URL and append the remote database name to the URL endpoint, producing for example:
wss://10.0.2.2:4984/travel-sampleThe URL scheme for web socket URLs uses
ws:(non-TLS) orwss:(SSL/TLS) prefixes.
let tgtUrl = URL(string: "wss://10.1.1.12:8092/travel-sample")!
let targetEndpoint = URLEndpoint(url: tgtUrl)
var config = ReplicatorConfiguration(database: actDb!, target: targetEndpoint) (1)
Notes on Example
| 1 | Note use of the wss:// prefix to ensure TLS encryption (strongly recommended in production) |
Sync Mode
Here we define the direction and type of replication we want to initiate.
We use ReplicatorConfiguration class’s replicatorType and
continuous parameters, to tell the replicator:
-
The direction of the replication:
pushAndPull;pull;push -
The type of replication, that is:
-
Continuous — remaining active indefinitely to replicate changed documents (
continuous=true). -
Ad-hoc — a one-shot replication of changed documents (
continuous=false).
-
config.replicatorType = .pushAndPull

// Configure Sync Mode
config.continuous = true
Heartbeat
A point to consider when initiating a replication, particularly a continuous replication, is keeping the connection alive. Couchbase Lite minimizes the chance of dropped connections by having the replicator maintain a heartbeat; essentially pinging the Sync Gateway at a configurable interval.
When necessary you can adjust this interval using heartbeat() as shown in — Example 4. You may need to do this when, for example, when the Sync Gateway is behind a load balancer, which may have its own keep-alive parameters — see Sync Gateway’s topic Load Balancer - Keep Alive.
The default heartbeat value is 300 (5 minutes).
let target =
  URLEndpoint(url: URL(string: "ws://foo.couchbase.com/db")!)

let config =  ReplicatorConfiguration(database: database, target: targetDatabase)
config.type = .pushAndPull
config.continuous = true
config.heartbeat = 60 (1)
repl = Replicator(config: config)| 1 | The heartbeat value sets the interval (in seconds) between the heartbeat pulses. |
Server Authentication
Define the credentials your app (the client) is expecting to receive from the Sync Gateway (the server) in order to ensure it is prepared to continue with the sync.
Note that the client cannot authenticate the server if TLS is turned off. When TLS is enabled (Sync Gateway’s default) the client must authenticate the server. If the server cannot provide acceptable credentials then the connection will fail.
Use ReplicatorConfiguration properties acceptOnlySelfSignedServerCertificate and setPinnedServerCertificate(), to tell the replicator how to verify server-supplied TLS server certificates.
-
If there is a pinned certificate, nothing else matters, the server cert must exactly match the pinned certificate.
-
If there are no pinned certs and acceptOnlySelfSignedServerCertificate is
truethen any self-signed certificate is accepted. Certificates that are not self signed are rejected, no matter who signed them. -
If there are no pinned certificates and acceptOnlySelfSignedServerCertificate is
false(default), the client validates the server’s certificates against the system CA certificates. The server must supply a chain of certificates whose root is signed by one of the certificates in the system CA bundle.
-
CA Cert
-
Self Signed Cert
-
Pinned Certificate
Set the client to expect and accept only CA attested certificates.
// Configure Server Security -- only accept CA Certs
config.acceptOnlySelfSignedServerCertificate = false (1)
Notes on Example
| 1 | This is the default. Only certificate chains with roots signed by a trusted CA are allowed. Self signed certificates are not allowed. |
Set the client to expect and accept only self-signed certificates
// Configure Server Security -- only accept self-signed certs
config.acceptOnlySelfSignedServerCertificate = true; (1)

// Configure Server Security -- only accept self-signed certs
config.acceptOnlySelfSignedServerCertificate = true; (2)
Notes on Example
| 1 | Set this to true to accept any self signed cert.
Any certificates that are not self-signed are rejected. |
Set the client to expect and accept only a pinned certificate.
// Get bundled resource and read into localcert
guard let pathToCert = Bundle.main.path(forResource: "listener-pinned-cert", ofType: "cer")
  else { /* process error */ }
guard let localCertificate:NSData =
             NSData(contentsOfFile: pathToCert)
  else { /* process error */ }

// Create certificate
// using its DER representation as a CFData
guard let pinnedCert = SecCertificateCreateWithData(nil, localCertificate)
  else { /* process error */ }

// Add `pinnedCert` and `acceptOnlySelfSignedServerCertificate=false` to `ReplicatorConfiguration`
config.acceptOnlySelfSignedServerCertificate = false
config.pinnedServerCertificate = pinnedCert
This all assumes that you have configured the Sync Gateway to provide the appropriate SSL certificates, and have included the appropriate certificate in your app bundle — for more on this see: Certificate Pinning.
Client Authentication
By default, Sync Gateway does not enable authentication. This is to make it easier to get up and running with synchronization. You can enable authentication with the following properties in the configuration file:
{
  "databases": {
    "mydatabase": {
      "users": {
        "GUEST": {"disabled": true}
      }
    }
  }
}
To authenticate with Sync Gateway, an associated user must first be created.
Sync Gateway users can be created through the POST /{db}/_user endpoint on the Admin REST API.
Provided that the user exists on Sync Gateway, there are two ways to authenticate from a Couchbase Lite client: Basic Authentication or Session Authentication.
Basic Authentication
You can provide a user name and password to the basic authenticator class method.
Under the hood, the replicator will send the credentials in the first request to retrieve a SyncGatewaySession cookie and use it for all subsequent requests during the replication.
This is the recommended way of using basic authentication.
The following example initiates a one-shot replication as the user username with the password password.
let url = URL(string: "ws://localhost:4984/mydatabase")!
let target = URLEndpoint(url: url)
let config = ReplicatorConfiguration(database: database, target: target)
config.authenticator = BasicAuthenticator(username: "john", password: "pass")

self.replicator = Replicator(config: config)
self.replicator.start()
Session Authentication
Session authentication is another way to authenticate with Sync Gateway.
A user session must first be created through the POST /{db}/_session endpoint on the Public REST API.
The HTTP response contains a session ID which can then be used to authenticate as the user it was created for.
The following example initiates a one-shot replication with the session ID that is returned from the POST /{db}/_session endpoint.
let url = URL(string: "ws://localhost:4984/mydatabase")!
let target = URLEndpoint(url: url)
let config = ReplicatorConfiguration(database: database, target: target)
config.authenticator = SessionAuthenticator(sessionID: "904ac010862f37c8dd99015a33ab5a3565fd8447")

self.replicator = Replicator(config: config)
self.replicator.start()
Custom Headers
Custom headers can be set on the configuration object. And the replicator will send those header(s) in every request. As an example, this feature can be useful to pass additional credentials when there is an authentication or authorization step being done by a proxy server (between Couchbase Lite and Sync Gateway).
let config = ReplicatorConfiguration(database: database, target: target)
config.headers = ["CustomHeaderName": "Value"]
Replication Filters
Replication Filters allow you to have quick control over which documents are stored as the result of a push and/or pull replication.
Push Filter
A push filter allows an app to push a subset of a database to the server, which can be very useful in some circumstances. For instance, high-priority documents could be pushed first, or documents in a "draft" state could be skipped.
The following example filters out documents whose type property is equal to draft.
let url = URL(string: "ws://localhost:4984/mydatabase")!
let target = URLEndpoint(url: url)

let config = ReplicatorConfiguration(database: database, target: target)
config.pushFilter = { (document, flags) in (1)
    if (document.string(forKey: "type") == "draft") {
        return false
    }
    return true
}

self.replicator = Replicator(config: config)
self.replicator.start()| 1 | The callback should follow the semantics of a pure function. Otherwise, long running functions would slow down the replicator considerably. Furthermore, your callback should not make assumptions about what thread it is being called on. |
Pull Filter
A pull filter gives an app the ability to validate documents being pulled, and skip ones that fail. This is an important security mechanism in a peer-to-peer topology with peers that are not fully trusted.
| Pull replication filters are not a substitute for channels. Sync Gateway channels are designed to be scalable (documents are filtered on the server) whereas a pull replication filter is applied to a document once it has been downloaded. |
let url = URL(string: "ws://localhost:4984/mydatabase")!
let target = URLEndpoint(url: url)

let config = ReplicatorConfiguration(database: database, target: target)
config.pullFilter = { (document, flags) in (1)
    if (flags.contains(.deleted)) {
        return false
    }
    return true
}

self.replicator = Replicator(config: config)
self.replicator.start()| 1 | The callback should follow the semantics of a pure function. Otherwise, long running functions would slow down the replicator considerably. Furthermore, your callback should not make assumptions about what thread it is being called on. |
| Losing access to a document (via the Sync Function) also triggers the pull replication filter. Filtering out such an event would retain the document locally. As a result, there would be a local copy of the document disjointed from the one that resides on Couchbase Server. Further updates to the document stored on Couchbase Server would not be received in pull replications and further local edits could be potentially pushed, which would result in 409 errors since access has been revoked. |
Channels
By default, Couchbase Lite gets all the channels to which the configured user account has access. This behavior is suitable for most apps that rely on user authentication and the sync function to specify which data to pull for each user.
Optionally, it’s also possible to specify a comma-separated list of channel names on Couchbase Lite’s replicator configuration object. In this case, the replication from Sync Gateway will only pull documents tagged with those channels.
Delta Sync
| This is an Enterprise Edition feature. |
With Delta Sync [1], only the changed parts of a Couchbase document are replicated. This can result in significant savings in bandwidth consumption as well as throughput improvements, especially when network bandwidth is typically constrained.
Replications to a Server (for example, a Sync Gateway, or passive listener) automatically use delta sync if the property is enabled at database level by the server — see: databases.$db.delta_sync.enabled.
Intra-device Data Sync replications automatically disable delta sync, whilst Peer-to-Peer replications automatically enable delta sync.
Initialize
- In this section
Start Replicator
Use the Replicator class’s init(config:) constructor, to initialize the replicator with the configuration you have defined.
You can, optionally, add a change listener (see Monitor) before starting the replicator running using start().
// Apply configuration settings to the replicator
thisReplicator = Replicator.init( config: config) (1)


    // Run the replicator using the config settings
    thisReplicator?.start()  (2)
Notes on Example
| 1 | Initialize the replicator with the configuration |
| 2 | Start the replicator |
Checkpoint Starts
Replicators use checkpoints to keep track of documents sent to the target database. Without checkpoints , Couchbase Lite would replicate the entire database content to the target database on each connection, even though previous replications may already have replicated some or all of that content.
This functionality is generally not a concern to application developers.
However, if you do want to force the replication to start again from zero, use the checkpoint reset method replicator.resetCheckpoint() before starting the replicator.
self.replicator.resetCheckpoint()
self.replicator.start()
Monitor
- In this section
-
Change Listeners | Replicator Status | Monitor Document Changes | Documents Pending Push
You can monitor a replication’s status by using a combination of Change Listeners and the replication.status.activity property — see; Activity.
This enables you to know, for example, when the replication is actively transferring data and when it has stopped.
You can also choose to monitor document changes — see: Monitor Document Changes.
Change Listeners
Use this to monitor changes and to inform on sync progress; this is an optional step.
|
Best Practice
You should register the listener before starting your replication, to avoid having to do a restart to activate it … and don’t forget to save the token so you can remove the listener later
|
Use the Replicator class to add a change listener as a callback to the Replicator (addChangeListener(_:)) — see: Example 9. You will then be asynchronously notified of state changes.
Remove your change listener before stopping the replicator — use the removeChangeListener(withToken:) method to do this.
Replicator Status
You can use the Replicator class’s Status property to check the replicator status. That is, whether it is actively transferring data or if it has stopped — see: Example 9.
The returned ReplicationStatus structure comprises:
-
Adding a Change Listener
-
Using replicator.status
// Optionally add a change listener
// Retain token for use in deletion
let pushPullReplListener:ListenerToken? = thisReplicator?.addChangeListener({ (change) in (1)
  if change.status.activity == .stopped {
      print("Replication stopped")
  }
  else {
      print("Replicator is currently ", thisReplicator?.status.activity)
  }
})
print("Replicator is currently ", thisReplicator?.status.activity)
}
})Replication States
Table 1 shows the different states, or activity levels, reported in the API; and the meaning of each.
State |
Meaning |
|---|---|
|
The replication is finished or hit a fatal error. |
|
The replicator is offline as the remote host is unreachable. |
|
The replicator is connecting to the remote host. |
|
The replication caught up with all the changes available from the server.
The |
|
The replication is actively transferring data. |
The replication change object also has properties to track the progress (change.status.completed and change.status.total).
Since the replication occurs in batches the total count can vary through the course of a replication.
|
Replication Status and App Life Cycle
The following diagram describes the status changes when the application starts a replication, and when the application is being backgrounded or foregrounded by the OS. It applies to iOS only.
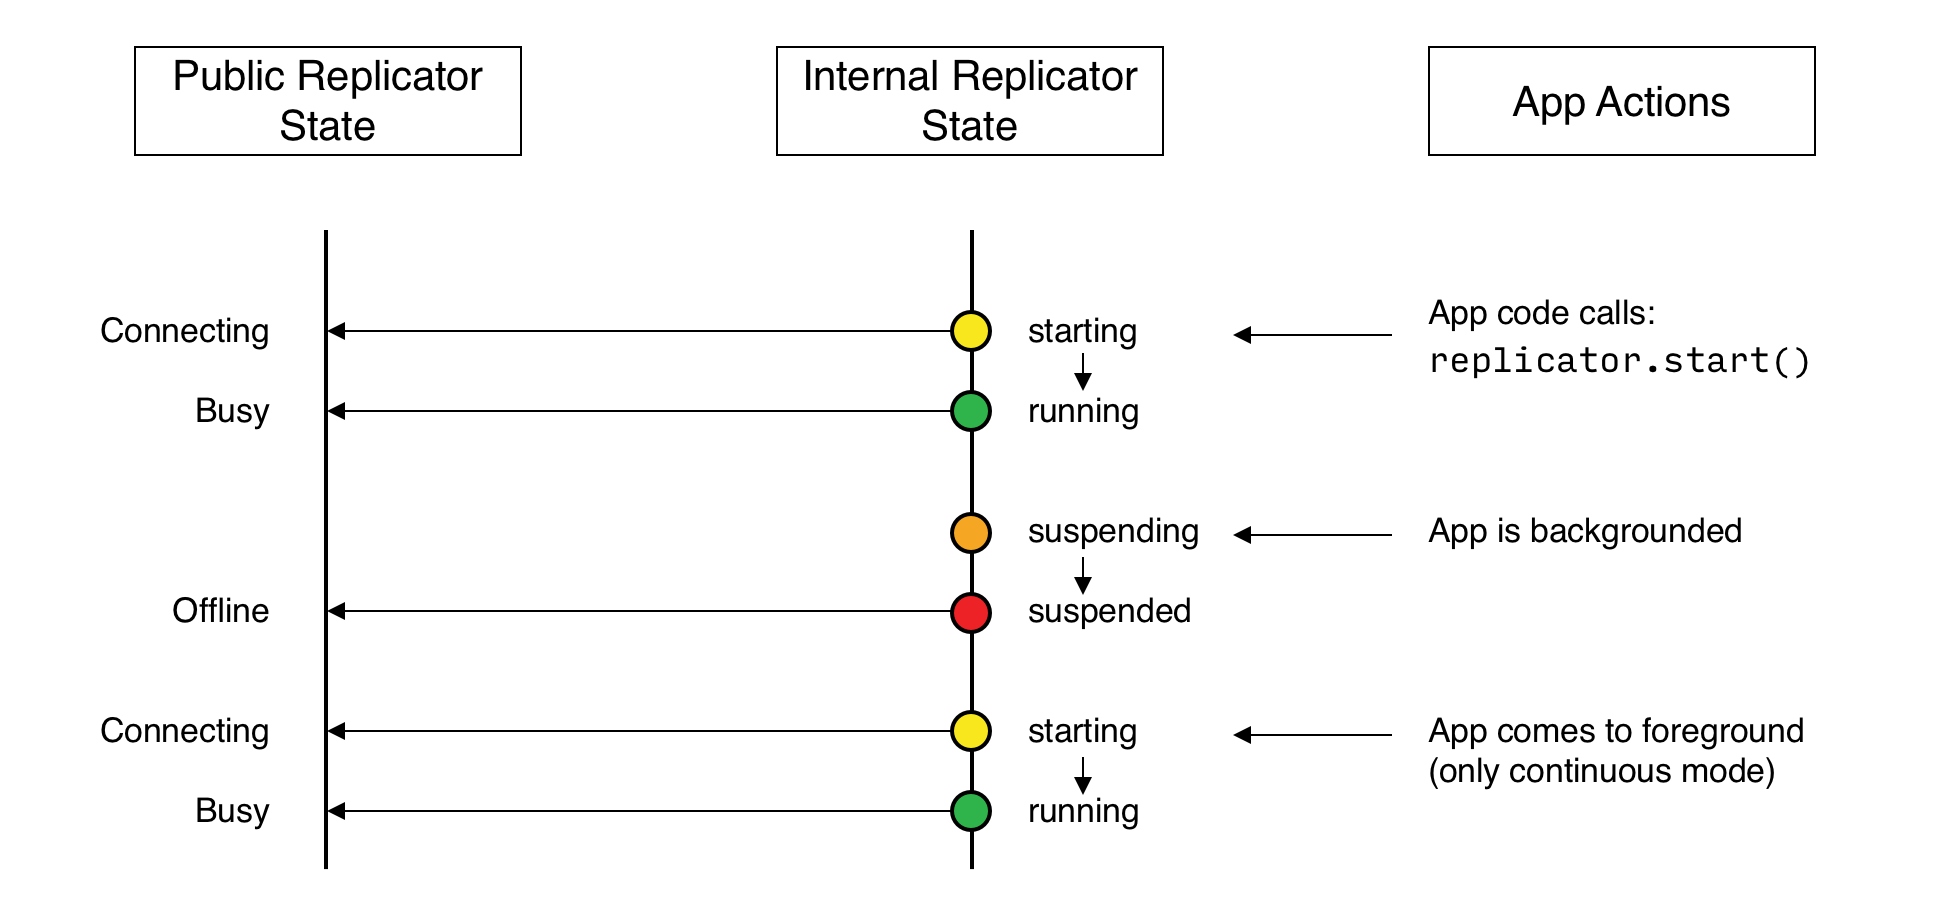
Additionally, on iOS, an app already in the background may be terminated.
In this case, the Database and Replicator instances will be null when the app returns to the foreground.
Therefore, as preventive measure, it is recommended to do a null check when the app enters the foreground, and to re-initialize the database and replicator if any of those is null.
On other platforms, Couchbase Lite doesn’t react to OS backgrounding or foregrounding events and replication(s) will continue running as long as the remote system does not terminate the connection and the app does not terminate. It is generally recommended to stop replications before going into the background otherwise socket connections may be closed by the OS and this may interfere with the replication process.
Monitor Document Changes
You can choose to register for document updates during a replication.
| You should register the listener before starting your replication, to avoid having to do a restart to activate it. |
For example, the code snippet in Example 10 registers a listener to monitor document replication performed by the replicator referenced by the variable replicator.
It prints the document ID of each document received and sent.
Stop the listener as shown in Example 11.
let token = self.replicator.addDocumentReplicationListener { (replication) in
    print("Replication type :: \(replication.isPush ? "Push" : "Pull")")
    for document in replication.documents {
        if (document.error == nil) {
            print("Doc ID :: \(document.id)")
            if (document.flags.contains(.deleted)) {
                print("Successfully replicated a deleted document")
            }
        } else {
            // There was an error
        }
    }
}

self.replicator.start()This code snippet shows how to stop the document listener using the token from the previous example.
self.replicator.removeChangeListener(withToken: token)Document Access Removal Behavior
When access to a document is removed on Sync Gateway (see: Sync Gateway’s Sync Function), the document replication listener sends a notification with the AccessRemoved flag set to true and subsequently purges the document from the database.
Documents Pending Push
| Replicator.isDocumentPending() is quicker and more efficient. Use it in preference to returning a list of pending document IDs, where possible. |
You can check whether documents are waiting to be pushed in any forthcoming sync by using either of the following API methods:
-
Use the Replicator.pendingDocumentIds() method, which returns a list of document IDs that have local changes, but which have not yet been pushed to the server.
This can be very useful in tracking the progress of a push sync, enabling the app to provide a visual indicator to the end user on its status, or decide when it is safe to exit.
-
Use the Replicator.isDocumentPending() method to quickly check whether an individual document is pending a push.
let url = URL(string: "ws://localhost:4984/mydatabase")!
let target = URLEndpoint(url: url)

let config = ReplicatorConfiguration(database: database, target: target)
config.replicatorType = .push

self.replicator = Replicator(config: config)
let mydocids:Set = self.replicator.pendingDocumentIds() (1)

if(!mydocids.isEmpty) {
  print("There are \(mydocids.count) documents pending")

  self.replicator.addChangeListener { (change) in
    print("Replicator activity level is \(change.status.activity.toString())")
    // iterate and report-on previously
    // retrieved pending docids 'list'
    for thisId in mydocids.sorted() {
      if(!self.replicator.isDocumentPending(thisid)) { (2)
        print("Doc ID \(thisId) now pushed")
      }
    }
  }

self.replicator.start()| 1 | Replicator.pendingDocumentIds() returns a list of the document IDs for all documents waiting to be pushed. This is a snapshot and may have changed by the time the response is received and processed. |
| 2 | Replicator.isDocumentPending() returns true if the document is waiting to be pushed, and false otherwise. |
Stop
Stopping a replication is straightforward. It is done using stop(). This initiates an asynchronous operation and so is not necessarily immediate. Your app should account for this potential delay before attempting any subsequent operations, for example closing the database.
You can find further information on database operations in Databases.
|
Best Practice
|
// Remove the change listener

thisReplicator?.removeChangeListener(withToken: pushPullReplListener)
// Stop the replicator
thisReplicator?.stop()| 1 | Here we initiate the stopping of the replication using the stop() method. We can then remove any active change listener. |
Error Handling
When replicator detects a network error it updates its status depending on the error type (permanent or temporary) and returns an appropriate HTTP error code.
The following code snippet adds a Change Listener, which monitors a replication for errors and logs the the returned error code.
self.replicator.addChangeListener { (change) in
    if let error = change.status.error as NSError? {
        print("Error code :: \(error.code)")
    }
}
For permanent network errors (for example, 404 not found, or 401 unauthorized):
Replicator will stop permanently, whether setContinuous is true or false. Of course, it sets its status to STOPPED
For recoverable or temporary errors: Replicator sets its status to OFFLINE, then:
-
If
setContinuous=trueit retries the connection indefinitely -
If
setContinuous=false(one-shot) it retries the connection a limited number of times.
The following error codes are considered temporary by the Couchbase Lite replicator and thus will trigger a connection retry.
-
408: Request Timeout -
429: Too Many Requests -
500: Internal Server Error -
502: Bad Gateway -
503: Service Unavailable -
504: Gateway Timeout -
1001: DNS resolution error
Load Balancers
Couchbase Lite [2] uses WebSockets as the communication protocol to transmit data. Some load balancers are not configured for WebSocket connections by default (NGINX for example); so it might be necessary to explicitly enable them in the load balancer’s configuration (see Load Balancers).
By default, the WebSocket protocol uses compression to optimize for speed and bandwidth utilization.
The level of compression is set on Sync Gateway and can be tuned in the configuration file (replicator_compression).
Certificate Pinning
Couchbase Lite for Swift supports certificate pinning.
Certificate pinning is a technique that can be used by applications to "pin" a host to its certificate. The certificate is typically delivered to the client by an out-of-band channel and bundled with the client. In this case, Couchbase Lite uses this embedded certificate to verify the trustworthiness of the server (for example, a Sync Gateway) and no longer needs to rely on a trusted third party for that (commonly referred to as the Certificate Authority).
The following steps describe how to configure certificate pinning between Couchbase Lite and Sync Gateway.
-
Create your own self-signed certificate with the
opensslcommand. After completing this step, you should have 3 files:cert.pem,cert.cerandprivkey.pem. -
Configure Sync Gateway with the
cert.pemandprivkey.pemfiles. After completing this step, Sync Gateway is reachable overhttps/wss. -
On the Couchbase Lite side, the replication must point to a URL with the
wssscheme and configured with thecert.cerfile created in step 1.This example loads the certificate from the application sandbox, then converts it to the appropriate type to configure the replication object.
let certURL = Bundle.main.url(forResource: "cert", withExtension: "cer")! let data = try! Data(contentsOf: certURL) let certificate = SecCertificateCreateWithData(nil, data as CFData) let url = URL(string: "wss://localhost:4985/db")! let target = URLEndpoint(url: url) let config = ReplicatorConfiguration(database: database, target: target) config.pinnedServerCertificate = certificate -
Build and run your app. The replication should now run successfully over https/wss with certificate pinning.
For more on pinning certificates see the blog entry: Certificate Pinning with Couchbase Mobile
Troubleshooting
Logs
As always, when there is a problem with replication, logging is your friend. You can increase the log output for activity related to replication with Sync Gateway — see Example 15.
// Replicator
Database.setLogLevel(.verbose, domain: .replicator)
// Network
Database.setLogLevel(.verbose, domain: .network)
For more on troubleshooting with logs, see: Using Logs.
Authentication Errors
If Sync Gateway is configured with a self signed certificate but your app points to a ws scheme instead of wss you will encounter an error with status code 11006 — see: Example 16
CouchbaseLite Replicator ERROR: {Repl#2} Got LiteCore error: WebSocket error 1006 "connection closed abnormally"If Sync Gateway is configured with a self signed certificate, and your app points to a wss scheme but the replicator configuration isn’t using the certificate you will encounter an error with status code 5011 — see: Example 17
CouchbaseLite Replicator ERROR: {Repl#2} Got LiteCore error: Network error 11 "server TLS certificate is self-signed or has unknown root cert"