Access Control How-To
How to implement Sync Gateway access controls using Configuration File, Admin REST API and-or the Sync Function to manage documents, users, roles and channels
The sync function API provides several methods that you can use to validate and control user access to databases and documents.
Related Topics: Concepts | How-to | Sync Function | Use XATTRs for Access Grants
Introduction
This topic will show how to use the various Access Control Concepts to provide effective and secure document distribution and control.
Mechanism
There are a number of ways in which you can control document distribution and user access, both statically a dynamically; these are itemized in Ways to configure access and illustrated in Example 1.
-
Legacy Pre 3.0: Use the Legacy Configuration Properties file’s admin_user_channels
-
Dynamically
-
At the time of user creation with Admin REST Endpoint {db}/_user/{name} using
admin_channel -
Using the Sync Function’s access().
-
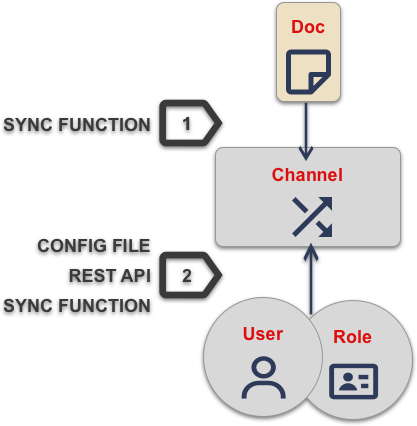
| 1 | Documents are assigned to channel using the Sync Function’s channel() API. |
| 2 | User and-or roles are granted access to channels by one of the means defined in Ways to configure access |
Create Users
Process
A user must be created on Sync Gateway before it can be granted access to documents.
You create and-or manage users using the following options — as shown in Example 2:
-
Admin REST API
Users are created via the Sync Gateway Admin REST API. -
OIDC
Configure OIDC authentication to auto-register a user following successful validation of an ID Token — User Authentication. -
Static Configuration (Pre 3.0):
Users can be statically configured within the Sync Gateway Configuration File — see: Legacy Pre-3.0 Configuration.
Note, to use this option in version 3.x users must run Sync Gateway with thedisable_persistent_configflag set totrue.
- Admin REST API
-
This is the default recommended option starting 3.0. Create a new user by sending a POST request to the Admin Rest Api
_userendpoint ({db}/_user/{name}). Update existing users by sending a PUT instead; in this case include the user name at the end of the url.The user credentials (username/password) are passed in the request body.
$ curl -vX POST "http://localhost:4985/mydatabase/_user/" -H
"accept: application/json" -H "Content-Type: application/json" -d
'{"name": "Edge1User", "password": "pass"}' (1)

$ curl -vX PUT "http://localhost:4985/mydatabase/_user/Edge1User" -H
"accept: application/json" -H "Content-Type: application/json" -d
'{"name": "Edge1User", "admin_channels": ["RandomChannel"]}' (2)
1 Add new user "Edge1User", no admin_channelsorroleis specified here.2 Update existing user "Edge1User" and add admin_channelsdata - OIDC
-
curl --location --request PUT 'http://localhost:4985/ourdb/_config' \
--header 'accept: application/json' \
--header 'Content-Type: application/json' \
--data-raw '{
  oidc: {
    providers: {
      google_implicit: {
        issuer:https://accounts.google.com,
        client_id:yourclientid-uso.apps.googleusercontent.com,
        register:true (1)
      },
    },
  }
}'
1 Use register=trueto automatically create a Sync Gateway user on successful completion of validation. - File-based Configuration Properties File
-
Persistent Configuration is enabled by default from 3.0.
To continue using legacy Pre-3.0 configuration you should start Sync Gateway with disable-persistent-config set true either in the configuration file or in Command Line Options.
Create users by hardcoding their credentials in the Configuration Properties file.
This method is convenient for testing and to get started.
Use the Admin REST API for production system changes.
{
  "databases": {
    "mydatabase": {
      "users": { (1)
        "GUEST": {"disabled": true},
        "Edge1User": {"password": "pass", (2)
                      "admin_channels": ["RandomChannel"]},
      }
    }
  }
}| 1 | databases.$db.users |
| 2 | Here we add the Edge1 user |
Create Roles
Related Concepts: Roles
Provisioning
The creation of roles is optional. It depends on the use case whether there is a need to logically group users.
You can create and-or manage roles using the following options
-
Admin REST API:
Roles are created via the Sync Gateway Admin REST API — see: Admin REST API. -
File-based Configuration Properties [1]
Note To use this option in v3.x, you must use the
-disable_persistent_configCLI option.Configure roles in the Legacy Configuration Properties file.
Note that removing a role effectively revokes access to the channel that role is associated with and may mean users will lose access to required documents.
-
Admin REST API
-
File-based Configuration Properties
| This is the default recommended option starting 3.0.. |
Create a new role using the /{db}/_role/ endpoint.
$ curl -vX POST "http://localhost:4985/mydatabase/_roles/" -H
"accept: application/json" -H "Content-Type: application/json" -d
'{"name": "Edge1", "admin_channels": ["channel1", "channel3"]]}' (1)| 1 | Here we add the Edge1 role. |
Create roles by hardcoding them in the Legacy Pre-3.0 Configuration. This method is convenient for testing and to get started. It is recommended to use the REST API for production systems.
{
  "databases": {
    "mydatabase": {
      "roles": { (1)
        "Edge1": {"admin_channels": ["channel1", "channel3"]}, (2)
        "Edge2": {"admin_channels": ["channel2", "channel3"]},
        "GUEST": {"disabled": true}
      }
    }
  }
}| 1 | databases.$db.users |
| 2 | Here we add the Edge1 role. |
Assign Users to Roles
Process
You can assign (or remove) users to (or from) roles using any of the following mechanisms:
-
Admin REST API
Assign a user to a role via the Admin REST API -
Configuration Properties file (Pre v3.x+)
Roles can be configured within using the DB section — see: Legacy Pre-3.0 Configuration.
Persistent Configuration is enabled by default from 3.0.
To continue using legacy Pre-3.0 configuration you should start Sync Gateway with disable-persistent-config set
trueeither in the configuration file or in Command Line Options. -
Sync Function
Programmatically assign users to roles.
Removing a role effectively revokes access to the channel that role is associated with. This may mean users will lose access to required documents.
- Admin REST API
-
The recommended method from 3.0 Assign a user to a role by sending a PUT request to the Admin REST API
_userendpoint (/{db}/_user/{name} ).Specify the roles to be assigned in the
admin_rolesarray.$ curl -vX PUT "http://localhost:4985/mydatabase/_user/{user}" -H (1) "accept: application/json" -H "Content-Type: application/json" -d '{ "admin_roles": ["Edge1"]}' (2)1 {user} is the user name to be updated, e.g. "Edge1User" 2 Include the role that the user is to be assigned to in admin_rolesSee also: /{db}/_role/{name}
- Sync Function
-
You can also use the Sync Function’s role() function to assign users to roles programmatically.
In this use case, where role assignment is done dynamically via the sync function, the role(s) to which user is assigned can be identified in two ways:
-
By document content — the role can be derived or specified as a property within the document body.
-
By user defined XATTR (3.0+) — the role can be specified within a special user-defined XATTR associated with the document — see: Use XATTRs for Access Grants
Note that both role and user must already exist. Nonexistent roles don’t cause an error, but have no effect on the user’s access privileges.
role ("Edge1User", "role:Edge1"); role ("Edge2User", "role:Edge2":); -
- File-based Configuration Properties
-
Persistent Configuration is enabled by default from 3.0.
To continue using legacy Pre-3.0 configuration you should start Sync Gateway with disable-persistent-config set true either in the configuration file or in Command Line Options.
Add the role the user is to be assigned to in the configuration file. This method is convenient for testing and to get started. Use the Admin REST API for production systems.
{
  "databases": {
    "mydatabase": {
      "users": { (1)
        "GUEST": {"disabled": true},
        "Edge1User": {"password": "pass", "admin_roles": ["Edge1"], (2)
                      "admin_channels": ["RandomChannel"]},
        "Edge2User": {"password": "pass", "admin_roles": ["Edge2"]}
      }
    }
  }
}| 1 | Within users find the user you want to assign to a role |
| 2 | Add the role the user is to be assigned to in admin_roles — see: databases.$db.users.$user.admin_roles |
Control Document Access
Related Concepts: Access control Model | Channels | Users | Roles
Read Access Control
Channels form the core of the Sync Gateway Access Control model.
Every document in the database is assigned a list of channels it is distributed to. Every user (or role) is granted access to a list of channels — as shown in Example 5.
Channels can be user-defined or they can be system channels (like the public, all-docs, wildcard)
This dual-purpose is reflected in the way you use channels:
-
By granting a user (or role) access to a channel, you are imposing access control. Users can only access documents that are channels that they have been granted access to.
-
By assigning a document to a channel you are imposing document routing and data segregation
You grant roles and-or users access to channels using:
-
Admin REST API
Using admin_channels property using the admin REST API endpoint — see /{db}/_user/{name} -
Dynamically via Sync Function
Programmatically within the sync function using the exposed helper function access() — see Sync Function API -
Configuration File (pre 3.0)
Using the appropriateadmin_channelsproperty in the Legacy Pre-3.0 Configuration.
Note: This option is disabled by default in 3.0; to use it, set thedisable_persistent_configCLI or configuration file property flag totrueand provide a full configuration
-
Admin REST API
-
Sync Function
-
File-base Configuration Properties
Add a channel to an existing user by sending a PUT request to the Admin REST API _role endpoint (/{db}/_role/{name} ).
Specify the roles to be assigned in the admin_channels array.
$ curl -vX PUT "http://localhost:4985/mydatabase/_user/{user}" -H (1)
"accept: application/json" -H "Content-Type: application/json" -d
'{ "admin_channels": ["Channel1","Channel3]}' (2)| 1 | {user} is the user name to be updated, e.g. "Edge1User" |
| 2 | Here we add Channel1 and Channel3 to the user |
You can also use the Sync Function’s access() function to allow channel access to roles and-or users programmatically.
In the case where channel assignment is done dynamically via the sync function, the channel(s) to which user/role is assigned is identified in two ways:
-
The user/role can be derived or specified as a property within the document body. In this case, the document content itself is used to govern access and routing
-
From 3.0, the role can be specified within a special user-defined XATTR associated with the document — see: Use XATTRs for Access Grants.
-
Version 3.x
-
All Versions
Here we are using a specific XATTR to determine which users need access to the document’s contents — for more on how to configure ths see Use XATTRs for Access Grants.
function (doc, oldDoc, meta) { (1)

  if (meta.xattrs.channelXattr === undefined) (2)
    {
      console.log("no user_xattr_key defined")
      channel(null)
    } else {
      channel(meta.xattrs.channelXattr) (3)


    }

// Further processing as required ../| 1 | The meta parameter exposes the user defined user_xattr_key if defined. The item takes the name configured for the database |
| 2 | Access the meta parameter object to check an xattr exists on this document |
| 3 | Use the content of the xattr to define the channels setting for this document |
Here we are using the document content (type) to determine which users need access to the document’s contents.
function (doc, olddoc) {

  // user logic

  if (doc.type=="type1") {
    access("Edge1User", "channel1") (1)
  } else if (doc.type="type2") {
    access("role:Edge2", "channel2") (2)
  } else {
    access("Edge1User", "Edge2User", "channel3")
  }

  // user logic
}| 1 | Here we add access to channel channel1 to the user Edge1User |
| 2 | The access() function can also operate on roles.
If a user name string begins with role: then the remainder of the string is interpreted as a role name.
NOTE There’s no ambiguity here, because : is an illegal character in a user or role name. |
| 3 | Here we allow access to the channel channel2 for the role Edge2 |
Add a channel to a user in the configuration file. This method is convenient for testing and to get started. Use the Admin REST API for production systems.
{
  "databases": {
    "mydatabase": {
      "users": {
        "GUEST": {"disabled": true},
        "Edge1User": {"password": "pass", "admin_roles": ["Edge1"],
              "admin_channels": ["Channel1","Channel3","RandomChannel"]} (1)
      },
      "roles": {
        "Edge1": {"admin_channels": ["channel1", "channel3"]},
        "Edge2": {"admin_channels": ["Channel2","Channel3","SkyChannel"]} (2)
      }
    }
  }
}| 1 | Here we have added the channel RandomChannel to the user Edge1User databases.$db.users.$user.admin_channel |
| 2 | Here we have added the channel SkyChannel to the role Edge2 databases.$db.users.$user.admin_channel |
Write Access Control
Channels enforce read access control to the documents. Any user who has access to a document can update the document.
Write access can be enforced at a document property level by implementing suitable logic within the Sync Function, using its helper functions to control the users allowed to make document updates and deletions — as shown in Example 6.
You can build user validation into your Sync Function. For example, you can require that the user making the change has a specific name, role or channel access — as shown in Example 7. Do this using any combination of: requireUser(), requireRole() or requireAccess().
Note that when sending a change to Sync Gateway through the Admin REST API, the Sync Function executes with admin privileges.
Calls to requireUser, requireAccess and requireRole will be no-ops, and will always appear successful.
This example shows Sync Function logic that allows only the document owner to make changes. It does so by requiring that the current user is the one recorded as an owner on the old document.
-
Version 3.x
-
All Versions
This example makes use of channel data stored in XATTRS, an option introduced in 3.0 — see Use XATTRs for Access Grants for more on this topic.
function (doc, oldDoc, meta) { (1)
  if (oldDoc) {
    requireUser(oldDoc.owner); (2)
  }
  if (meta.xattr.channelxattr) {
    requireAccess(meta.xattr.channelxattr); (3)
  } else
    {
      throw("No channel access granted") (4)
    }
}| 1 | Note the additional, optional, meta argument, which gives acsess to XATTR objects. |
| 2 | If the user making the change is not an owner of the pre-change document, an exception is thrown and the update is rejected with an error. |
| 3 | Here we check the designated XATTR for the document channel(s) and require the user making the change to have access to on or more of the channels. |
| 4 | If the XATTR is not set we throw an exception. |
This example makes use of document contents to store channel data.
function (doc, oldDoc) {
  if (oldDoc) {
    requireUser(oldDoc.owner); (1)
  }
  if (olddoc.channels) {
    requireAccess(olddoc.channels); (2)
  } else
    {
      throw("No channel access defined or granted") (3)
    }
}| 1 | If the user making the change is not an owner of the pre-change document, an exception is thrown and the update is rejected with an error. |
| 2 | Here we check the designated document content for the document channel(s) and require the user making the change to have access to on or more of the channels. |
| 3 | If the olddoc.channels value is not set we throw an exception. |
Here we show various ways to use some of the Sync Function API’s helper functions:
requireUser("snej") (1)

requireUser(["snej", "jchris", "tleyden"]) (2)

requireRole("admin") (3)

requireRole(["admin", "old-timer"]) (4)

requireAccess("events")  (5)

requireAccess(["events", "messages"]) (6)| 1 | throw an error if username is not "snej" |
| 2 | throw if username is not in the list |
| 3 | throw an error unless the user has the "admin" role |
| 4 | throw an error unless the user has one of those roles |
| 5 | throw an error unless the user has access to read the "events" channel |
| 6 | throw an error unless the can read one of these channels |
Verify Access
- Related Concepts
Purpose
Use the Admin REST API to see the:
-
Channels a user has access to
-
Channels a role has access to
-
Channels a document is assigned to
Context
The all_channels property of a user account determines the channels a user can access.
Its value is derived from the union of:
-
The user’s
admin_channelsproperty, which is set using the Admin REST API. -
The channels the user has been granted access to by access() calls from sync functions invoked for current revisions of documents.
-
The
all_channelsproperties of any roles the user belongs to. These are themselves computed using the above rules.
Process
-
Users
-
Roles
-
Document
Send a get request to the /{db}/_user/{name} endpoint
curl http://localhost:4985/db/_user/pupshawThe output shows that the user pupshaw has access to the following channels:
| 1 | all through its own admin_channels setting |
| 2 | hoopy through the froods role’s admin_channels setting |
{
    "admin_channels": [
        "all" (1)
    ],
    "admin_roles": [
        "froods"
    ],
    "all_channels": [
        "all",
        "hoopy" (2)
    ],
    "name": "pupshaw",
    "roles": [
        "froods"
    ]
}
Send a get request to the /{db}/_role/ endpoint
curl http://localhost:4985/db/_role/froodThe output shows that the role froods has access to the following channels:
| 1 | hoopy through its role’s admin_channels setting |
{
    "name": "froods",
    "admin_channels": [
        "hoopy" (1)
    ],
    "admin_roles": [
        "froods"
    ],
    "all_channels": [
        "hoopy" (2)
    ]
}
Send a get request to the /{db}/_alldocs endpoint
curl http://localhost:4985/ourdb/_all_docs?channels=true&keys=[ourdoc]" -H "accept: application/json"| 1 | The output shows that the document ourdoc is assigned to the channels: all and hoopyThat assignment to hoopy is what makes it available to our froods role and therefore to our user pupshaw. |
{
  "id": "ourdoc",
  "key": "ourdoc",
  "value": {
      "channels": [ (1)
          "short",
          "hoopy"
      ],
      "rev": "1-86effb929acbf953905dd0e3974f6051"
  }
}
Use Extended Attributes (XATTRS)
Related Concepts: Access control Model | Control Document Access
Why use XATTRS
XATTRs can be used to hold data used for document routing and access control [2]. When retrieved by the Sync Function, this data can be used to drive access grants. This approach has a few benefits:
-
It provide an added level of security, users can no longer identify the channels and users a document is available to by reading its contents, because the information is in metadata that is inaccessible to them
-
Separation of concerns. By separating access grant metadata from document contents, changes to access grants will not create a new document revision that is subsequently pushed to a client
Sync Gateway exposes a single user-definable XATTR for this purpose. Learn how to configure it in Configuration and how to use it in Setting and Use XATTRs in a Sync Function.
Configuration
Name the XATTR (see: user_xattr_key) to be used for channel routing by defining it using the Admin REST API’s Database Configuration — see: Example 8.
The actual value of this XATTR can be anything that enables the Sync Function to make an appropriate access grant. Its data type can be string, array, object — any valid JSON that meets the required use case.
This example uses the Admin REST API to specify the required XATTR name as channelXattr on the database hotels.
-
CURL
-
HTTP
curl -X POST 'http://localhost:4985/hotels/_config' \
--header 'Accept: application/json' \
--header 'Content-Type: application/json' \
--data-raw '{
    "user_xattr_key": "channelXattr" (1)
    }
}'
POST /hotels/_config HTTP/1.1
Host: http://localhost:4985
Accept: application/json
Content-Type: application/json
Content-Length: 999
{
“user_xattr_key”: “channelXattr” (1)
}| 1 | Here channelXattr is set as the name of the XATTR designated to hold channel routing information. |
Setting
You can set and maintain the value of the XATTR using a Couchbase Server SDK API. You cannot set it using the Sync Gateway REST API.
For an example of setting the value of the XATTR using the C# SDK, see Example 9, this can be easily translated to any of the available SDK languages. See Example 10 for an example of the metadata model.
using System;
using System.Threading.Tasks;
using Couchbase;
using Couchbase.KeyValue; (1)


namespace examples
{

    class Program
    {
        static async Task Main(string[] args)
        {
            // Set scope - cluster, bucket and collection
            var cluster =
                    await Cluster.ConnectAsync(
                                    "couchbase://localhost",
                                    "Administrator",
                                    "password");


            var bucket = await cluster.BucketAsync("travel-sample");
            var collection = bucket.DefaultCollection();

            // Set required  user_xattr_key name and value
            var our_user_xattr_key_name = "channelXattr"; (2)
            String[] channelXattrValue =
                {"channel1","channel3", "useradmin" }; (3)

            var ourDocumentType = "hotel";
            var documentKey = "";

            // Find our documents and get their ids
            var queryResult =
               await cluster.QueryAsync<dynamic>(
                   "select meta().id from `travel-sample`.`_default`.`_default` h where h.type = $1",
                        new Couchbase.Query.QueryOptions().Parameter(ourDocumentType)); (4)
            await foreach (var row in queryResult)
            {
                documentKey = row.id;
                Console.WriteLine("Working with document id: {0} ",
                                    documentKey);

                // Check if the document has an existing
                // user_xattr_key and update or insert new value
                var result =
                    await collection.LookupInAsync(
                            documentKey,
                            specs => specs.Exists(
                                path: our_user_xattr_key_name,
                                isXattr: true)
                            ); (5)

                if (result.Exists(0))
                {
                    // Update xattr for retrieved Id
                    await collection.MutateInAsync(
                            documentKey,
                            specs => specs.Upsert(
                                path: our_user_xattr_key_name, (6)
                                value: channelXattrValue, (7)
                                isXattr: true)); (8)

                    Console.Write("Updated Existing user_xattr_key: {0} to this value: {1}\n",
                        our_user_xattr_key_name,
                        string.Join(", ", channelXattrValue));

                }
                else
                {
                    // Insert xattr for retrieved id
                    await collection.MutateInAsync(
                            documentKey,
                            specs => specs.Insert(
                                path: our_user_xattr_key_name, (9)
                                value: channelXattrValue, (10)
                                isXattr: true)); (11)

                    Console.Write("Inserted New user_xattr_key: {0} with value {1}\n",
                        our_user_xattr_key_name,
                        string.Join(", ", channelXattrValue));

                }

            }
            Console.WriteLine("Completed Changes\n");
        }
    }
}| 1 | This is required to make the MutateInSpec class available, providing access to sub-documents, of which metadata is a special class |
| 2 | This string’s value is what we want this document’s XATTR to be called |
| 3 | This array contains the channels we want to include as the XATTR value |
| 4 | Here we get all documents that we want to set the XATTR on (type = 'hotel' in this instance) |
| 5 | Check if the XATTR has been defined yet |
| 6 | Update the XATTR — specify the item to update |
| 7 | Update the XATTR — set the required value |
| 8 | Update the XATTR — specify the item is an XATTR |
| 9 | Insert the XATTR — specify the item to add (channelXattr) |
| 10 | Insert the XATTR — set the required value using channelXattrValue |
| 11 | Insert the XATTR — specify the item is an XATTR |
Running the code produces the following output:
Working with document id: 1000
Updated Existing user_xattr_key:
  channelXattr to this value: channel1, channel3, useradmin

Working with document id: 1001
Inserted New user_xattr_key:
  channelXattr with this value: channel1, channel3, useradmin

Completed Changes{
"meta": { (1)
"id": "1000",
"rev": "7-1680c88cbce700000000000002000006",
"expiration": 0,
"flags": 33554438,
"type": "json"
},
"xattrs": { (2)
"channelXattr": [ (3)
"channel1",
"channel3",
"useradmin"
]
}
}| 1 | This is the Fixed (or System) metadata |
| 2 | This is the User metadata, where you can define extended attributes |
| 3 | Here channelXattr is the name of the designated xattr holding the channel routing information to be passed to the Sync Function. You will set the value of the xattr using the SDK API when the document is created and-or updated. |
For more on Couchbase Server metadata and extended attributes — see Couchbase Server topics: Metadata | Extended Attributes
Use XATTRs in a Sync Function
The designated XATTR is exposed to the Sync Function as an additional argument meta.xattrs.<xattr name>
function (doc, oldDoc, meta) { (1)

  if (meta.xattrs.channelXattr === undefined) (2)
    {
      console.log("no user_xattr_key defined")
      channel(null)
    } else {
      channel(meta.xattrs.channelXattr) (3)


    }

// Further processing as required ../| 1 | The meta parameter exposes the user defined user_xattr_key if defined. The item takes the name configured for the database |
| 2 | Access the meta parameter object to check an xattr exists on this document |
| 3 | Use the content of the xattr to define the channels setting for this document |
See: Sync Function topic for more information.