Install Couchbase Server on Windows
Couchbase Server can be installed on Windows Server for production use-cases, and Windows Desktop for development use-cases.
Use the instructions on this page to install Couchbase Server on Windows platforms using Couchbase-provided MSI packages. The instructions support both Enterprise and Community editions.
If you’re upgrading an existing installation of Couchbase Server, refer to Upgrading Couchbase Server.
Before You Install
Couchbase Server works out-of-the-box with most OS configurations. However, the procedures on this page assume the following:
-
You must have administrator privileges to install Couchbase Server on Windows. Once installed, Couchbase Server runs as a Windows Service using the Local System user account. To start or stop the Windows Service, your windows account must either have administrator privileges or be granted sufficient privileges to start the service. For more information, see Microsoft’s How to grant users rights to manage services.
-
Your system meets the minimum requirements and that your operating system version is supported.
Windows Server is fully supported for production use-cases, while Windows Desktop is only supported for development use-cases.
-
You’re working from a clean system and that you’ve uninstalled any previous versions of Couchbase Server.
If you’re upgrading an existing installation of Couchbase Server, refer to Upgrade.
-
You’re not running any third-party anti-virus software during the installation process.
-
The Windows 10 Universal CRT is installed.
The Windows 10 Universal CRT is required to run Couchbase Server on Windows. This component is not included by default in versions of Windows earlier than Windows 10. Make sure to download and install the Update for Universal C Runtime in Windows if you are using one of these earlier versions of Windows.
For production deployments, make sure to follow the Deployment Guidelines so that your systems and environment are properly sized and configured before installation.
Basic Installation
Couchbase Server uses an interactive wizard, for basic installations on Windows systems. You must be logged into a local user account that has administrator privileges, in order to perform the installation. Proceed as follows:
-
Download the appropriate package from the Couchbase downloads page. Note that Couchbase Server for Windows is packaged in a standard MSI file.
-
In the Type here to search field, which is to the immediate right of the Start button, at the lower left of the screen, type
cmd:
-
When the Command Prompt icon appears in the search results, right-click on it, to display the pull-down menu; then, select Run as administrator:
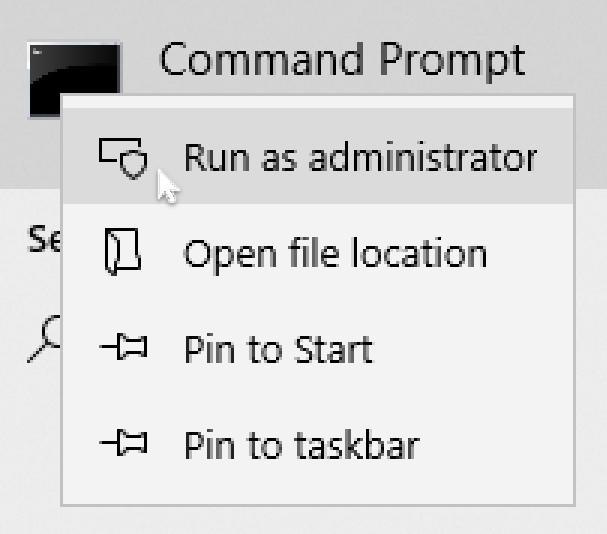
Next, a dialog appears, asking whether you wish to allow the Windows Command Processor to make changes to your system. Click Yes, on the dialog.
-
The Command Prompt now appears. Against the prompt, change directory to Downloads, by entering the following command.
cd C:\Users\customer\Downloads -
Start the Couchbase-Server install wizard; by using the
callcommand, and specifying the.msifile that you have downloaded:call couchbase-server-enterprise_<version_number>-<build_number>-windows_amd64.msiThe following is only an example:
call couchbase-server-enterprise_8.0.0-3777-windows_amd64.msiThe install wizard now appears:
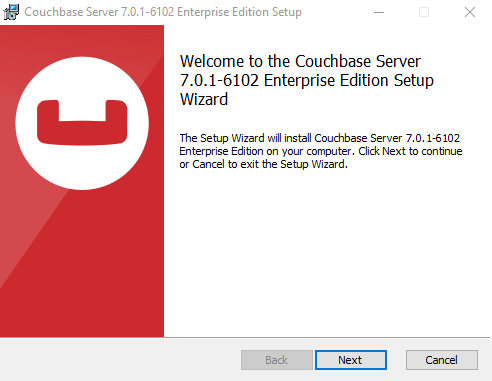
-
On the initial, Welcome screen of the install wizard, click Next; to start configuring the installation.
-
On the License Agreement screen, make sure to read the entire End-User License Agreement.
If you accept the license agreement, check the box next to I accept the terms in the License Agreement.
Click Next to continue.
-
On the Destination Folder screen, choose the folder where you want the Couchbase Server application to be installed.
You can change the folder by clicking the Change… button, or click Next to use the default folder.
The destination folder will only contain the Couchbase Server application. Couchbase Server stores database files and other persistent data in C:\Program Files\Couchbase. -
Enterprise Edition: On the IP Version Selection screen, you can choose to configure Couchbase Server to use IPv6.
Unless you’re sure that you need to use IPv6, you should keep the default configuration (IPv4). Refer to the IPv6 documentation for more information.
Click Next to continue.
-
Once you’re ready, click Install to begin the installation.
Some parts of the installation may cause Windows User Account Control to prompt for your explicit permission to install certain components. These are required components, so you must click Yes in order to successfully complete the installation.
-
Once the installation completes, a web browser and access the Couchbase Web Console to verify that the installation was successful and that the node is available.
Unattended Installation
If you need to install Couchbase Server using the command line, you can perform an unattended installation (also known as a silent or headless installation). For a completely unattended installation, you must run each command from an Administrator command prompt.
-
Download the appropriate package from the Couchbase downloads page.
Couchbase Server for Windows is packaged in a standard MSI file.
-
Install Couchbase Server.
To install Couchbase Server in the default directory:
start /wait msiexec /i package-name.msi /qnTo install Couchbase Server to a non-standard directory:
start /wait msiexec /i package-name.msi /qn INSTALLDIR=C:\ my-install-dirIf you don’t prepend start /waitto the command,msiexecimmediately returns control to the command prompt and doesn’t wait for the installation to complete or report any errors. In this case, you may have to wait a minute or two for the actual installation to complete. -
Once the installation completes, a web browser and access the Couchbase Web Console to verify that the installation was successful and that the node is available.
Next Steps
Following installation and start-up of Couchbase Server, a node must be initialized and provisioned.
-
If it is the first node in a deployment, initialization and provisioning happens all at once when you create a cluster of one.
Refer to Create a Cluster
-
If you already have an existing cluster, the node is initialized and provisioned when you add it to the cluster.
Refer to Add a Node and Rebalance
-
Optionally, initialization can be performed explicitly and independently of provisioning, as a prior process, in order to establish certain configurations, such as custom disk-paths.
Refer to Initialize a Node